
| Page Created |
| March 28th, 2026 |
| Last Updated |
| April 15th, 2026 |
| France |
 |
| Related Pages |
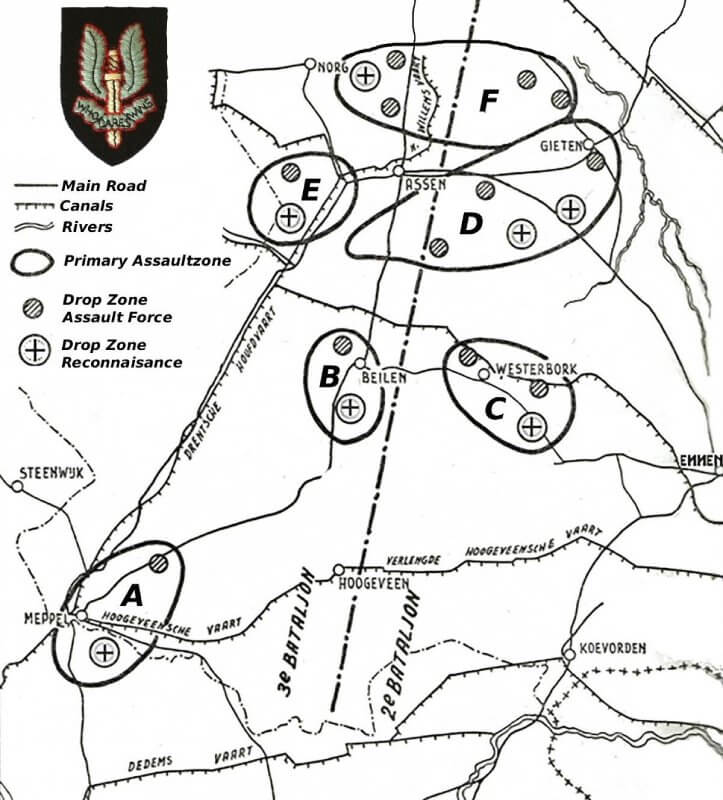
| Special Air Service Operation Jedburgh Operation Amherst Operation Amherst, Zone A Operation Amherst, Zone B Operation Amherst, Zone C Operation Amherst, Zone D Operation Amherst, Zone E Operation Amherst, Zone F |
| April 7th, 1945 – April 15th, 1945 |
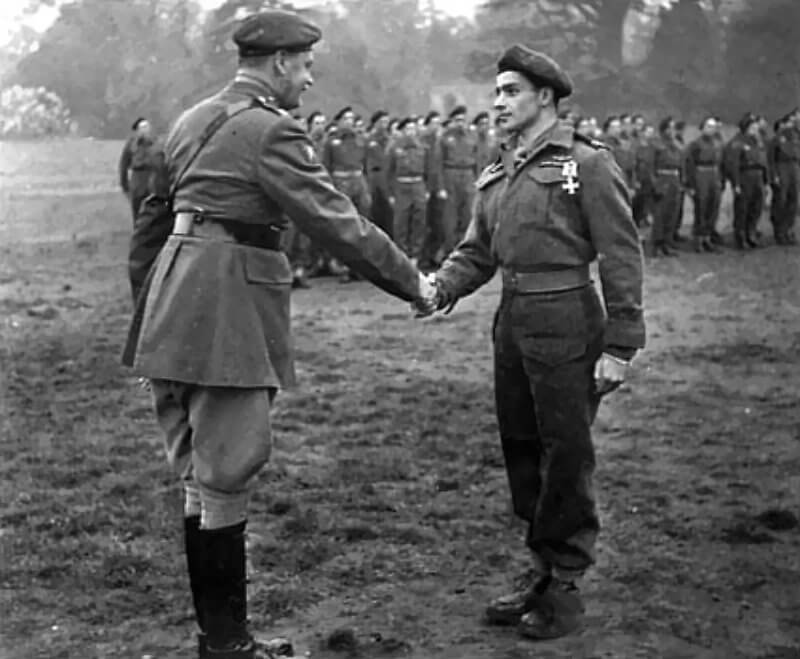
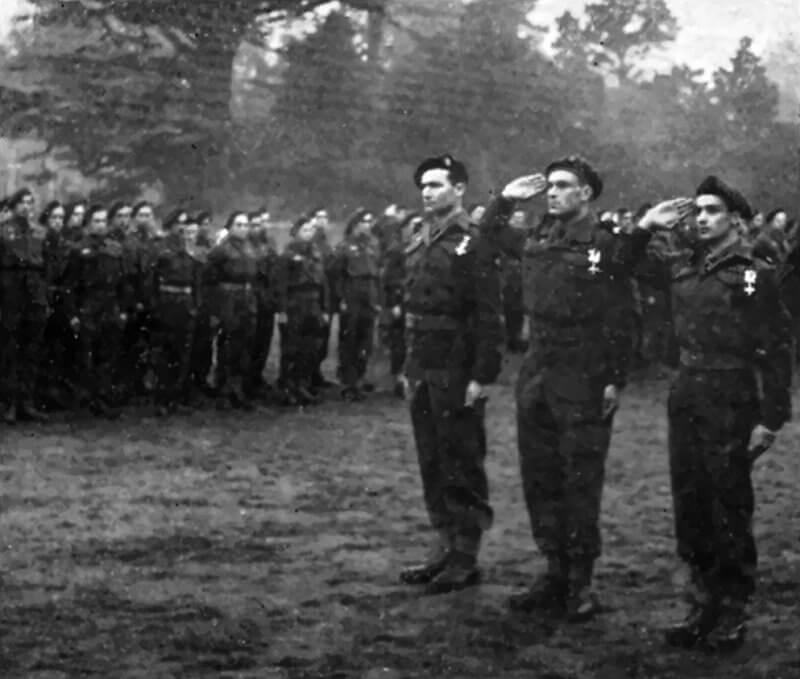
| Operation Amherst, Zone E |
| Objectives |
- To secure crossings over the Drentsche Hoofdvaart canal and its western branch, the Appelschaster Vaart.
- To interdict traffic on the main road running along the waterway.
| Operational Area |
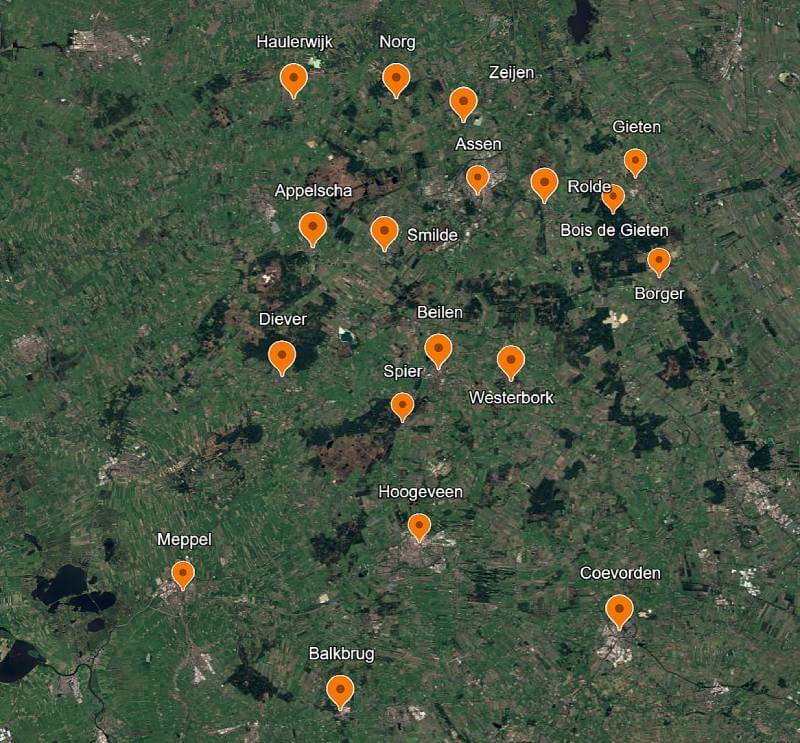
| Zone E, Smilde, Appelscha, Diever and Haulerwijk |
Zone E covers the western sector of the Operatie Amherst area, stretching across the region of Smilde, Appelscha, Diever, and Haulerwijk. Drop Zone 15 is assigned to the sticks of Thomé with chalk number 49, Hubler with chalk number 50, and Vidoni with chalk number 51, all belonging to the 2e Compagnie of the 3e Régiment de Chasseurs Parachutistes. Drop Zone 16 is assigned to the sticks of Collery with chalk number 52, Duno with chalk number 53, and Sicaud with chalk number 54. The mission is to secure crossings over the Drentsche Hoofdvaart canal and its western branch, the Appelschaster Vaart, and to interdict traffic on the main road running along the waterway. Two additional sticks land in Zone E by error. The stick of Boiteux with chalk number 44, belonging to the 1e Compagnie of the 3e Régiment de Chasseurs Parachutistes, 3 Special Air Service, drops on the east side of the Drentsche Hoofdvaart rather than its intended zone. The Lagèze jeep group with chalk number 7, belonging to the 2e Régiment de Chasseurs Parachutistes, 4 Special Air Service, is the only stick that fails to take off on the night of April 7th to 8th due to engine trouble and drops on the second night of the operation, April 8th to 9th, landing near Smilde.
The aircraft carrying the Zone E sticks depart from two airfields. The Stirlings with chalk numbers 49 and 50 fly from Dunmow and drop their sticks between 22:30 and 23:00 on April 7th, 1945. Chalk number 51 flies from Shepherds Grove and drops between 23:00 and 23:30. Each of these aircraft carries eight paradummies in addition to its stick and four supply containers. The Stirlings with chalk numbers 52, 53, and 54 fly from Shepherds Grove and drop between 23:00 and 23:30. Chalk number 44, carrying the Boiteux stick, flies from Dunmow and drops between 22:30 and 23:00.
The landings in Zone E are scattered. The sticks come down well wide of their intended drop zones and take considerable time to regroup. One man drowns after landing in a canal. Others become separated from their units and lose their supply containers. The Dutch resistance in this area proves exceptionally valuable throughout the operation. The resistance leader working alongside the French appears to be a former Dutch regular army officer and is one of the most capable resistance contacts encountered during the entire Amherst operation. The resistance provides intelligence, guards prisoners, and supplies the French with additional weapons throughout the Zone E operations.
Two sticks land on the east side of the Drentsche Hoofdvaart rather than their intended drop zones. These are the Boiteux stick and the Lagèze jeep group, and their experiences illustrate the extreme consequences of navigational error during the drop.The Boiteux stick lands far from its intended Drop Zone 13 near Norg, coming down in an area known as the Oosterveld. The terrain immediately tells the men they are in the wrong place. The landscape is bare and flat, crossed by canals and partly bordered by a dike, with scattered farmhouses and a large factory building visible to the north. Supply containers are not found until first light after an extended search. Dutch civilians locate some of them and signal with the coloured parachutes, guiding the French toward them. One food container has burst open on landing. The weapons in the others are still heavily greased and must be cleaned before they can be used.
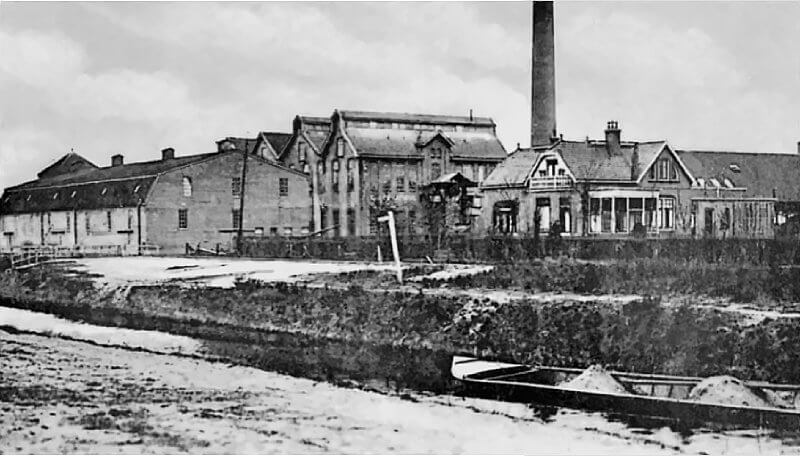
The area is bounded to the south by the Beilervaart, a barge canal connecting Hoogersmilde with Beilen, running west to east. To the north, roughly parallel to the Beilervaart, runs the Oranjekanaal. On the northern bank of the Oranjekanaal stands a large cooperative potato flour factory, with workers’ houses arranged in single file along both sides of the canal. The factory and houses together form the small settlement of Oranje. A drawbridge near the factory entrance connects the two halves of the village.
Lieutenant Boiteux initially assembles his men near a farm but moves the group to an open field in a slight depression in the Vorrelveen to avoid putting the farm residents at risk. He sends three-man patrols to reconnoitre the bridges across the Beilervaart at Tol and Nijenstate. Both crossings are found intact and undefended. The bridge across the Oranjekanaal at Oranje is a different matter. Local residents warn the French that a strong German detachment is stationed at the factory. Boiteux commits half a stick to test the bridge defences and remove any demolition charges.
At approximately midday on April 8th, 1945, two groups move up to the south bank of the Oranjekanaal. A three-man group under Philippe Paris takes position on the left to provide flanking cover. A five-man group under 1st Sergeant Julliard moves directly toward the bridge. Before reaching it, they are detected and a firefight breaks out. Armed men emerge from buildings on the far bank and engage the French. Unseen by either group, a party of German soldiers crosses the canal further to the west by boat and strikes the French from the flank. Five paratroopers, some of them wounded, are cut off and captured. The remainder flee back toward the bivouac with the Germans in pursuit. The position is completely compromised. The bivouac is abandoned. The surviving paratroopers are concealed in the hayloft of the Van der Kooi family farmstead at Vorrelveen 12.
Sergeant Julliard does not go with them. He runs northward, drawing enemy fire and attention away from his comrades, continuing to fire at his pursuers until he is wounded and captured at the Heijenk farm at Vorrelveen 18. His action allows the others to hide without being found. The Germans search the Van der Kooi farm, firing through doors and floors and throwing grenades, without finding the concealed paratroopers. The French remain hidden throughout the night. The following morning the farm family tells them the Germans have called off the search. The paratroopers are moved to a secret hiding place constructed inside a haystack in a barn, where they remain concealed until Canadian armoured cars reach the area a week later.
The wounded Julliard is taken by the Germans but left in the care of the Van het Hof family at Hijken after examination by the local doctor, who deliberately misdiagnoses him as mortally wounded to prevent his removal. Julliard survives and is evacuated by Canadian forces when they reach the village a few days later.
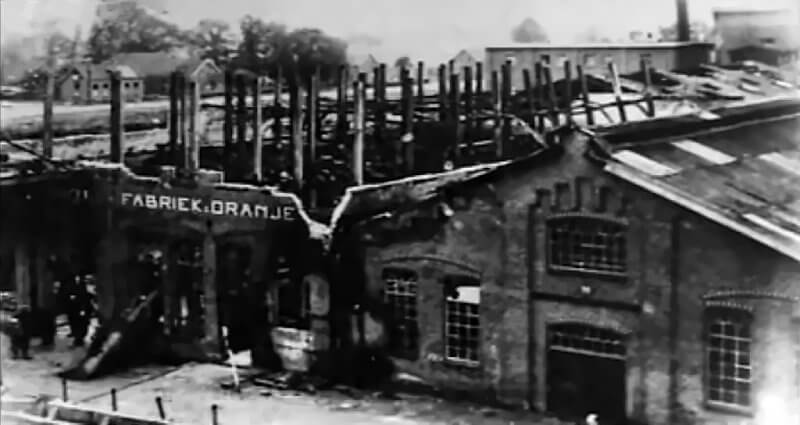
No information survives about what further actions the Boiteux stick undertakes from its concealment in the Van der Kooi barn. Whether the paratroopers succeed in removing the demolition charges from the Oranje bridge is not recorded. The Germans blow the bridge the following day, April 9th, 1945, suggesting the charges remain in place. The potato flour factory at Oranje is subsequently destroyed on April 12th, 1945, when Canadian tanks take it under fire during the battle for Beilen.
| Multimedia |
| Zone E, Jeep Group 23 |
The stick of Aspirant Pierre Henri Lagèze is Jeep Group 23 of fifteen men equipped with three armoured Special Air Service jeeps. Lagèze is initially assigned to Drop Zone 3, northwest of Beilen and west of Elp on the north side of the Oranjekanaal, the same drop zone intended for the Nicol and Leblond sticks.
The operation begins badly for Lagèze. The Stirling carrying his stick fails to take off on the evening of April 7th, 1945, due to engine trouble. Repairs cannot be completed in time. The men are transferred to a reserve aircraft but it is already well past midnight, too late to make the drop that night. The stick spends the remainder of the night on the floor of a hangar at Dunmow airfield, using their parachute packs as pillows, waiting for the following night. For a paratrooper, climbing back down from a loaded aircraft knowing the operation has been postponed is a deeply dispiriting experience.
On the night of April 8th to 9th, 1945, the stick is flown to Holland with a revised destination, Drop Zone 26 near Donderen, one of the northernmost drop zones of the entire Amherst operation, coinciding with the drop zones of the Valay and Poli-Marchetti sticks. Luck does not improve. Lagèze is dropped in the wrong place again, this time near Smilde, a small village along the Drentsche Hoofdvaart just south of Assen, far from the assigned drop zone.
Two men are lost in the drop. Private Raymond Guyon breaks his leg on landing. Sergeant Jean Marie Ravenel is killed. His parachute becomes entangled with a supply container and he falls to his death. The cause is almost certainly an error by the air dispatcher, who should have held the ninth man in the stick for a single second to allow the containers to clear the aircraft before he jumps. Ravenel’s body is wrapped in his parachute by his comrades and concealed under bushes near the drop zone. He now rests in the local cemetery at Smilde.
The night is dark and foggy with visibility of less than twenty metres, making orientation impossible. Compass and maps are useless under these conditions. The men wait for dawn. In the early morning, the badly wounded Guyon, who has been given two morphine injections for the pain, is handed over to Dutch civilians who transport him by handcart to a nearby farmstead, where the local doctor tends to his injuries. From these civilians Lagèze learns that he has been dropped approximately fifteen kilometres south-southwest of his assigned drop zone.
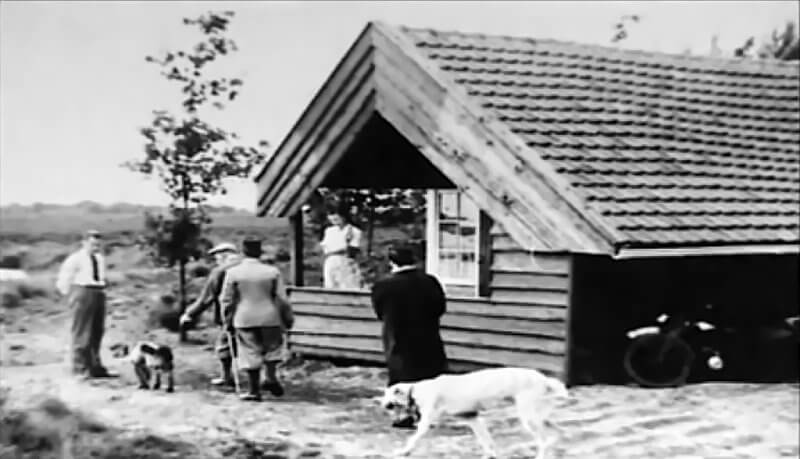
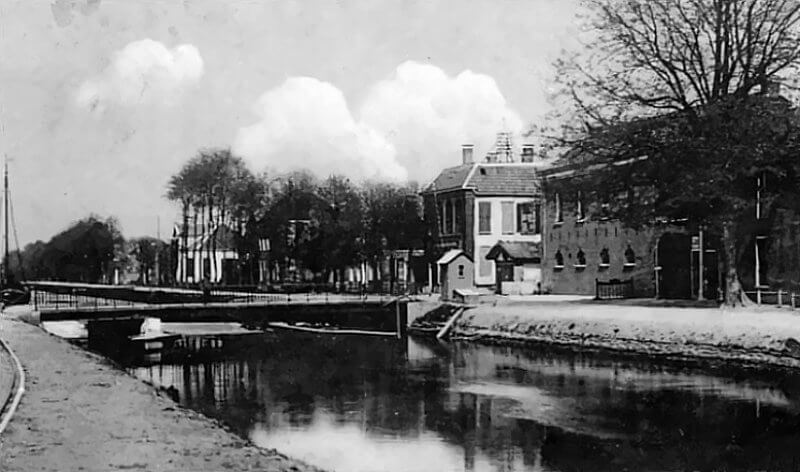
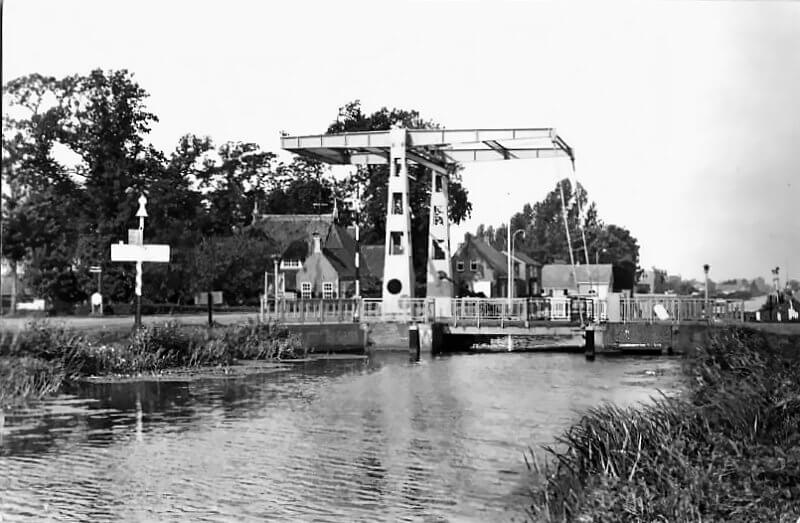
Despite the losses and disorientation of the first night, the Lagèze stick moves immediately into action. After the evacuation of the wounded Guyon, Lagèze establishes a bivouac in a small wooden holiday cabin at the Kievitsven, a small forest pool east of Smilde. A local farmer’s son, Jan Voortman, whose family lives in a farmhouse on the canal opposite a swing bridge over the Drentsche Hoofdvaart known as the Veenhoopsbridge, alerts the French to the existence of this intact crossing. The bridge carries the main road between Assen and Meppel, an important German withdrawal route, and has been prepared for demolition. Voortman assures Lagèze that the guard detachment numbers only six men. Lagèze decides to move against the bridge the following day.
On the afternoon of April 9th, 1945, before moving on the bridge, Lagèze leads four men through the drainage ditches toward the main road along the canal. They reach the canal bank and ambush a German column of infantry and horse-drawn carts moving along the quieter road on the opposite bank, striking from a distance of less than twenty metres. The attack inflicts casualties among the enemy soldiers and shoots up several horse-drawn vehicles before the French withdraw to their hiding place. A patrol under Aspirant Paul-André Albert Metz toward the Beilen to Assen road is less successful, encountering the enemy and being forced to disengage.
On the morning of April 10th, 1945, during a reconnaissance of the route to Smilde, Lagèze personally intercepts one of the bridge sentries, a non-commissioned officer travelling by bicycle to Hooghalen to fetch reinforcements, most likely alarmed by the previous afternoon’s attack. When challenged, the German reaches for his weapon and is shot. The bridge detachment now numbers five men. That afternoon the stick moves from the Kievitsven toward the bridge. Jan Voortman and his father meet the French in the village and guide them to the bridge unseen. The sentries are quickly dealt with. One soldier is killed and the others are taken prisoner.
The demolition charges are then removed from the bridge. Jan Voortman plays a central role in this operation, using a wooden beam placed across the bridge’s side supports to access the charges beneath the deck. The accounts differ on the precise division of labour. Voortman’s own account places him as the primary actor, assisted by Special Air Service paratrooper Jacques Buchart. Buchart’s post-war account describes the charge removal as primarily his own task, initially assisted by Jacques Santino, with two Dutch civilians joining later and helping complete the work quickly. Both accounts agree that 24 charges are removed and thrown into the water. The bridge is saved. The French withdraw to the bivouac with the four prisoners.
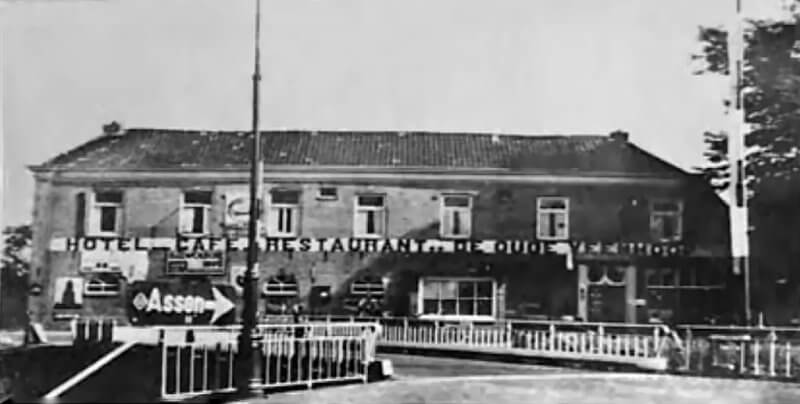
On April 11th, 1945, a German detachment of approximately forty to fifty men, including pioneers, arrives at the Oude Veenhoop café opposite the bridge and discovers that the demolition charges have been removed. Lagèze reports their strength to main Special Air Service Headquarters at 14:30. The Germans do not suspect the local population and attribute the removal of the charges to the French or, as Voortman overhears them say, to Engländer. While the infantry establishes sentries, the pioneers wire new charges onto the bridge.
Jan Voortman again makes his way unobtrusively to the Kievitsven and informs Lagèze. Lagèze requests a Typhoon air strike against the Post Office building beside the café, where the Germans have established themselves. Later that afternoon, four Typhoons of No. 198 Squadron, Royal Air Force, fly to Smilde. One aircraft turns back ten minutes after take-off. The remaining three make multiple attacks on the village, one pass with rockets and two with cannon fire. The surrounding woodland is also strafed. The strike fails to destroy the Post Office building but prompts a rapid German withdrawal, leaving only a guard detachment at the bridge. Two houses in the village catch fire and several other buildings are damaged.
That evening Lagèze moves against the bridge for a second time. Two men must remain at the bivouac to guard the prisoners, reducing the attacking force to eleven. The French approach in two groups, one from the right under Lagèze and one from the left under Lance Corporal Metz. The Germans are alert and open fire immediately with machine guns and rifles. Despite being outnumbered, the French engage. A two-hour firefight follows. The French destroy a machine-gun position established on the first floor of the Oude Veenhoop café using a bazooka, most likely supplied by the local resistance. Three prisoners are taken, described by Buchart as very young recruits. The number of German casualties is unknown but several men are wounded. The French withdraw without losses, taking the prisoners with them.
On the morning of April 12th, 1945, German pioneers return to re-wire the bridge charges. Jan Voortman watches the scene from the front window of his parents’ house, knowing that the explosion will severely damage the building. The pioneers struggle with the firing leads and quarrel continuously. Without warning they abandon the work, gather their tools, load their truck, and drive toward Assen. The other German soldiers at the café have already left. The bridge is unguarded. Voortman goes out immediately, and with his father repeating the procedure of April 10th, removes all the charges and throws them into the water. The Veenhoopsbridge is saved a second time. It passes into local memory as Voortman’s bridge.
That afternoon Lagèze returns to the bridge and finds it unoccupied. The French take up defensive positions in the German trenches. Two enemy patrols approach along both banks of the canal later in the afternoon. Lagèze allows them to close to approximately fifty metres before opening fire with every weapon available. The patrols, estimated at approximately two sections of thirty men, scatter immediately, apparently believing the French force to be far stronger than it is. German casualties are unknown. That evening the Germans return in strength, supported according to Buchart by a light armoured car, and retake the Oude Veenhoop café in the ensuing firefight. The French disengage, regroup, and return to their bivouac unharmed.
On April 13th, 1945, Lagèze returns to the bridge to find the Germans gone entirely. The French occupy the position and hold it. During the day contact is established with Canadian ground forces, who liberate Assen on the same date. All prisoners are handed over to the Canadians. Private Clément, listed as missing in the French after-action report, is not accounted for.
The Lagèze stick’s confirmed losses inflicted on the enemy amount to eight soldiers killed and nine captured. A further twelve or more are killed or wounded in unconfirmed engagements throughout the operation.
| Multimedia |
| Zone E, Diever & Dieverbrug |
The Thomé stick lands in the wooded area known as Hezer Esch, northeast of Diever, approximately ten kilometres south of its intended Drop Zone 15 near Appelscha. Most of the men come down inside the forest, which consists largely of young fir plantations. The dense young trees obscure visibility and nearly triple the time needed to assemble the stick. By the time all men are gathered it is already getting light. Corporal André Coppy is injured on landing but remains able to take part in the subsequent actions.
Lieutenant Edgard Thomé, whose real name is Edgard Alphonse Tupet, establishes his position only at daybreak, when civilians encountered in the forest tell him he is near Diever. A daylight move to Appelscha is too risky. Thomé decides to remain in the forest and establishes a bivouac opposite the Armen-Werkhuis, a former workhouse on the northeastern edge of the village along the Groningerweg, a sandy track connecting Diever to the main road along the Drentsche Hoofdvaart. Through the night the sound of motorised columns moving along a nearby road is clearly audible.
The drop itself is experienced vividly by the men. The jump altitude of approximately 500 metres, far higher than the standard 150 to 200 metres, means a long, slow descent through total darkness. Some men land in trees. The young plantation provides a cushioned if disorienting landing for those who come down in the forest. The paradummies dropped alongside the stick, which activate on hitting the ground and simulate small arms fire for several minutes, initially cause confusion among the men as they wonder whether other sticks have already made contact with the enemy.
April 8th, 1945, passes without operational activity. Thomé holds his men in the forest, cautious and without communication with other sticks. His instinct is to confirm that the Canadians are approaching before committing to his objective, a bridge over the Drentsche Hoofdvaart near Appelscha. News of the French presence spreads quickly among local civilians. The resistance makes contact and provides food. Among those who come forward is Geesje Schoemaker, a young post office employee from Diever who attaches herself to the stick and serves as guide for the remainder of the operation.
On April 9th, 1945, reassured by intelligence from the resistance, Thomé moves into action. He decides on daylight ambushes along the main road following the Drentsche Hoofdvaart, intending the aggressive daytime posture to give the enemy an impression of superior strength. He divides the stick into two groups of five men, one under himself and one under 2nd Lieutenant Gilles Anspach. Both groups successfully establish blocking positions along the main road near the Haarsluis sluice gate, not far from a German truck destroyed in an earlier air raid and still smouldering at the roadside.
During the day the French intercept several enemy vehicles. A motorcycle with sidecar approaches the position. Lucien Klein, the German-speaking Alsatian member of the stick, shoots the driver from more than one hundred metres with a single aimed shot. The machine loses control, flies off the road, and rolls into the ditch, killing the co-driver. The motorcycle yields classified documents from the Gestapo headquarters at Groningen. Later that day two vessels moving along the canal, a cargo boat carrying machinery and ammunition and a smaller tug, are attacked and sunk with Gammon bombs, blocking the waterway. Eight crew members are killed and three taken prisoner. One prisoner, who identifies himself as an SS man and refuses a body search while insulting the French soldier conducting it, is shot by Klein on the spot, an act that dismays Thomé.
Meanwhile, Anspach’s group, positioned several hundred metres further south, stops seven men on bicycles wearing civilian clothing. When challenged, the men identify themselves as Reichspolizei, members of the Sicherheitsdienst. They show their identity papers as confirmation. Four of them abruptly attempt to run. One jumps into the canal and tries to swim across. None escape. All four are shot. The decision is then taken to kill the remaining three men of the Sicherheits Dienst, who have not attempted to flee. They are also shot. Among them is a Dutch policeman, who survives. He is convinced he has been shot by German Fallschirmjäger, having heard his captors speaking fluent German, not realising he has been speaking with an Alsatian. Shortly afterwards a large black staff car flying a pennant slows as it encounters the bodies of the Sicherheits Dienst men in the road. The French destroy it with a Gammon bomb, killing the driver and two passengers.
After these engagements all traffic on the main road along the canal ceases entirely. The road remains silent from this point on.
In the afternoon of April 9th, 1945, the resistance leader of Diever, a man named Wiglema, brings urgent news to Thomé at the bivouac. Wiglema has been monitoring the telephone exchange at the local post office and has intercepted a call from the Nationaal Socialistische Beweging’s mayor of Diever, Posthumus, to the Wehrmachtskommandant at Assen, informing the German commander of the presence of French paratroopers and requesting military assistance. The German commander replies that he cannot spare any troops and that the mayor must deal with the situation himself. Posthumus and his close associate Balsma, the local Landwacht commander, both represent a serious security threat. The two men have previously facilitated the activities of a group of fifteen Landwachters who terrorise the surrounding area from October 1944 onwards, becoming known locally as Blood-group Norg for their brutality. Wiglema asks Thomé to arrest them both. Thomé sends a small group into Diever. The mayor and two other collaborators are arrested and brought back to the bivouac, where they are tied to trees with parachute cord. Balsma has disappeared but is later captured at Appelscha by paratroopers of the Duno stick.
On April 10th, 1945, tension rises in Diever as residents, feeling the German grip loosening, begin to act more boldly against remaining collaborators. A scuffle breaks out between villagers and Nationaal Socialistische Beweging’s members in the early afternoon. One of the NSB men sends for help from a German unit at Steenwijk. At approximately 16:00 five German soldiers arrive in the village, clearly assessing the situation rather than retreating. Wiglema immediately sends word to the French bivouac.
Thomé and Anspach go out to look for supply containers, having received word that an air resupply drop has taken place, though the drop cannot be located and it is uncertain whether it has actually occurred or whether Thomé is searching for containers from the original drop that have not yet been recovered. While searching, they are warned by a Dutch policeman, nearly mistaken for an enemy soldier because of his black uniform, that the Germans have occupied Diever in force with tanks, artillery, and SS infantry.
Thomé and Anspach return toward the bivouac to find that 2nd Lieutenant Puydupin has already led most of the men toward Diever, having heard gunfire and mistaken it for the approaching Canadians. The small group has moved unseen along ditches to the eastern edge of the village, where they encounter German soldiers dismounting from a truck and taking up positions in a small grove. Puydupin engages them with Gammon bombs, killing and wounding several. Two substantial German detachments have entered Diever from the directions of Wapse to the west and Wittelte to the south.
Thomé rushes forward to extract his men. He orders an immediate withdrawal. The French use a shallow terrain fold to gain a ditch unseen and begin crawling through it in single file, with Thomé leading and cutting through dense brambles with his dagger. When German infantry closes to the far edge of the ditch, Thomé signals his men to prepare Gammon bombs. At his signal the entire group erupts from the ditch shouting, throws the grenades simultaneously, and charges at the pursuing Germans, who scatter in confusion, having expected to be chasing a retreating enemy rather than facing a sudden assault. The French drive them back with short volleys before disengaging sharply, reversing direction, and wading waist-deep through muddy water back to the bivouac. Approximately ten to fifteen Germans are killed or wounded in the engagement, including the troop leader. Two resistance fighters who have left Diever to warn the French are caught in the firefight. One of them, Jan Koning, is mortally wounded.
The position at the Armen-Werkhuis is now compromised. Thomé moves the stick deeper into the forest, first to the Witte Bergen, taking the prisoners with him, six German soldiers and three collaborators including the Nationaal Socialistische Beweging’s mayor. Some of his men suggest shooting the prisoners. Thomé refuses, unwilling to provoke further German reprisals. That evening the German forces in Diever, unwilling to pursue the French into the forest, shell the area around the Armen-Werkhuis with what appears to be a mortar. Several houses and sheds in the vicinity catch fire. The following day Thomé moves the stick again, crossing the road to Wateren and concealing himself in the forest of Berkenheuvel northwest of Diever. Here the stick remains until April 12th, 1945, when contact is made with Canadian ground forces. The French move into Diever and place their prisoners in a room beneath the church tower.
The German reprisal against Diever is swift and merciless. Enraged by their losses in the firefight, German forces round up eleven men from the village at random and line them up beside the local cemetery. An Sicherheits Dienst officer named Habener arrives by staff car from Steenwijk, reportedly having learned that a close friend is among those killed in the fighting. Habener personally takes part in the execution that follows that evening, firing on the defenceless men with a submachine gun. The Germans leave the village afterwards, threatening to return. One man, 28-year-old Koos Westerhof, survives. Hit by seven bullets, he falls sideways as the firing begins and feigns death throughout the execution, including a final shot administered to each victim to confirm death. The man beside him falls across him. When the Germans fire a single shot for both, Westerhof’s position beneath his neighbour saves him. He lies still until the Germans leave.
| Multimedia |
| Zone E, Appelscha |
The operations near Appelscha bring together three sticks that land widely scattered across the forests and heathland south and east of the village. Of the three sticks assigned to Drop Zone 16 northwest of Appelscha, only the Duno stick lands near its intended zone. The Collery stick comes down to the east of the township of Wateren, near a forest pool called the Ganzenpoel. The Sicaud stick lands in a plantation of young firs far to the south of Appelscha, near a place called the Groote Veen. The sticks assigned to Drop Zone 15 east of Appelscha are even more widely scattered. The Thomé stick, as already described, fights its own separate battle near Diever. The Vidoni stick lands far to the north near Haulerwijk. Only the Hubler stick comes down close to its intended drop zone.
The Hubler stick lands at the Tilgrupsweg, not far from Drop Zone 15, and is the first to reach the planned rendezvous point near the Friesch Volkssanatorium, a tuberculosis hospital surrounded by forest on the edge of Appelscha. Lieutenant Hubler assembles twelve men and conceals the group in forest close to the Nysingh farm to await first light and establish his position. In the early morning local resistance members, alerted by the farmer, guide the French to the sanatorium, where Hubler establishes a base camp.
Lieutenant Collery’s stick comes down near the Ganzenpoel, southwest of Wateren. Collery is injured on landing when he strikes a concrete wall, suffering a back injury. One of his men breaks an ankle. Collery decides to wait for dawn before moving toward Appelscha.
Captain Sicaud, commanding officer of the 2e Compagnie, lands in difficulty from the first moment. The drop zone, which aerial photographs show as open ground, is in reality a dense plantation of young fir trees. Before jumping, Sicaud asks the dispatcher for the azimuth of the aircraft’s flight and passes it to his men so that each knows which direction to search once on the ground. He exits the aircraft first. Landing softly in the flexible branches of young firs, he removes his equipment and begins moving by compass on the aircraft’s azimuth. Some fifty metres behind him he hears branches breaking and a muffled voice. Alarmed, since there should be nobody behind him in the direction of flight, he draws his knife and continues cautiously, glancing back repeatedly. On one of these backward glances a branch he has pushed aside with his shoulder springs back and strikes him full in the face. A pine needle punctures the cornea of his left eye. He sees a flash of stars but continues. Hearing no further sound from behind, he whistles a popular tune. The same tune echoes back from the darkness, accompanied by the dim glow of the phosphorescent pellet on a helmet net. The man responding is Sergeant Ourinowski. The two continue on the azimuth, gathering the rest of the stick. One man, Sergeant Beylier, is missing. He has jumped too late, landed too far away, found no trace of his comrades, and conceals himself on a farm until Canadian forces arrive. Sicaud decides to wait for dawn before taking any further action.
At first light, a remarkable coincidence brings the French and the local resistance together. The Knokploeg Noord-Drenthe, a resistance group led by Kees Veldman and hiding in the Appelscha forests following a spectacular action against the Assen prison on December 11th, 1944 in which more than thirty political prisoners are freed, stumbles upon the French paratroopers during an early morning weapons exercise. The accounts of what follows differ. The resistance account states that the French are asleep when found. Sicaud’s own post-war version insists that the French are fully alert with weapons ready, having heard the approaching group. What is agreed is that the encounter is sudden and surprising for both parties, and that it quickly leads to cooperation. The resistance men take the French to their concealed dugout in the forest, a substantial underground structure the resistance calls the Prins Bernhard Kazerne and the French immediately name La cabane du Maquis. From there the combined group sets out to find the other scattered sticks. The Collery stick is located and brought to the dugout. Sicaud makes contact with Hubler at the sanatorium.
Also present at the resistance hideout is Sergent Wim van der Veer, No. 2 Dutch Troop, No. 10 (Inter-Allied) Commando. Van der Veer has been parachuted into the area from England in October 1944 with the mission to organise and train local resistance fighters, and is suffering from malaria during the operation. He departs on his bicycle that morning for Westerbork, approximately forty kilometres to the east, where he makes contact with Major Puech-Samson and later guides Captain Betbèze’s force in the attack on Generalmajor Böttger’s headquarters, as already described in this account.
The local physician of Appelscha, Doctor W. Gerlach, is summoned to the hideout on the morning of April 8th and treats the wounded French paratroopers. He examines Sicaud’s eye, which is seriously inflamed and constantly weeping fluid. The injury eventually causes both eyes to become inflamed, leaving Sicaud effectively blind for two days, unable to move without a hand on a comrade’s shoulder. The eye is saved, though the recovery is painful. The bandaged Sicaud, wearing a woollen cap over his dressings, makes a striking impression on the resistance members. On April 8th, 1945, Sicaud transmits two wireless messages to main Special Air Service Headquarters in London, reporting that the landings have gone badly with troops scattered far south of their drop zones, but that he has established contact with the Collery and Hubler sticks.
A first plan for a combined attack on two bridges is drawn up on the morning of April 8th, 1945, by Sicaud and the resistance leaders. The objectives are the Veenhoopsbridge across the Drentsche Hoofdvaart and the nearby Wittewijksbrug across a side channel, the Opsterlandse Compagnonsvaart. The action is planned for the evening of April 8th. Coordination with the resistance group at Smilde proves impossible to achieve. A Dutch cyclist dispatched with a message toward Smilde and a companion he picks up en route at the Veenstra farm are intercepted by Landwacht members along the way. Both men are shot while attempting to flee. One is killed. The other escapes, seriously wounded. The attack proceeds without Smilde coordination and meets enemy resistance. A brief skirmish kills one German sentry before the French are forced to break off the attempt. Sicaud, incapacitated by his eye injury, temporarily hands command to his adjutant René Merlin and remains in the forest hideout.
The interception of the courier has serious consequences the following day. On April 9th, 1945, a combat patrol of approximately twenty Feldgendarmerie, sent from Oosterwolde, arrives at the Veenstra farm after Landwacht members attempting their own investigation are driven off in a skirmish by resistance fighters early that morning. By the time the Feldgendarmerie arrives, the farm occupants and resistance fighters have already fled. The building is set on fire.
On April 10th, 1945, the Hubler stick captures two Dutch Landwacht members and a Dutch SS member accompanied by a woman on a road through the forest near the village. The two Landwacht men are transporting rifles on a horse-drawn cart. All three men are subsequently shot. The woman is left in the care of civilians.
| Multimedia |
| Zone E, Stick Duno |
On the morning of April 10th, 1945, at 06:00, Lieutenant Duno moves against the Stokersverlaat bridge, a small drawbridge crossing the Opsterlandse Compagnonsvaart at the northern end of Appelscha. He finds it intact and immediately occupies it. Defensive positions are established around the bridge. Concrete rings and large flour sacks from the nearby Mulder flour mill are used to build a Bren gun post on the north side. Several paratroopers climb onto the roof of the mill building, from where they can observe the road running east to west along the canal from the direction of Oosterwolde, the next village to the west, which the enemy is using regularly. Approximately twelve armed Dutch resistance fighters reinforce the French position. A telephone link is established with the resistance in Oosterwolde. Whenever an enemy vehicle moves from Oosterwolde eastward toward Appelscha, the French receive a warning call.
Shortly after the position is established, a German car approaches from the direction of the village. It is hit by small arms fire. Two occupants are killed and one is captured. Among the dead is a German officer who is travelling to Assen to assume command of the city’s defence, the same action already noted in Calvert’s Zone E summary. The car is destroyed with a hand grenade. In the afternoon a small party of approximately six German soldiers approaching the bridge through the Bruggelaan is captured. The prisoners are transferred to the nearby Vondeling family farm and locked in the pigsty, to the considerable amusement of local residents, guarded by two paratroopers.
By the end of the day Duno withdraws from the bridge and returns with his men and prisoners to the Rooks farm for the night. The prisoners are locked in the barn. That evening the Landwacht leader Balsma, whose arrest at Diever several days earlier has been frustrated when he escapes on a bicycle, is caught as he passes through the Bruggelaan in Appelscha. The Stokersverlaat bridge is left unguarded that night. Around midnight a column of retreating German troops from Oosterwolde passes the bridge unhindered.
Captain Sicaud, still recovering from his eye injury at the Friesch Volkssanatorium, is given a lift by bicycle to the sanatorium and then proceeds on foot to the Rooks farm, joining Duno on the evening of April 10th, 1945. He has been absent from the bridge operations, occupied with interdicting the main Assen to Smilde to Meppel road in conjunction with the local resistance. A message he transmits to main Special Air Service Headquarters that evening reports twenty-one prisoners taken at Appelscha and states that he will join Duno that night to organise the defence. A second message transmitted at the same time reports intelligence from reliable sources that the enemy is organising a defensive line along the canal between Smilde and Halerbrug, suggesting Sicaud is in close contact with resistance groups near Smilde. By the night of April 9th to 10th, 1945, the attacks on the Assen to Meppel road have taken effect. The enemy no longer uses the road after dark.
On the morning of April 11th, 1945, the French reoccupy the bridge. Sicaud establishes his command post in the Café Hulst beside the bridge. The stick also holds the small Smidsdraai footbridge a short distance to the east. Sicaud notifies main Special Air Service Headquarters that his men hold two bridges, one with a twelve-tonne capacity and one with a four-tonne capacity, and requests Royal Air Force air patrols over the area south and east of Appelscha.
April 11th is a day of heavy activity. A German staff car approaches the bridge at speed from the direction of the Boerestreek with approximately five occupants. It is caught in enfilading fire from two Bren guns, one manned by Sergeant Ourinowski concealed in a grove to the left of the road and one positioned at the Café Hulst. The driver is killed. The other occupants are wounded. Among them is a senior Gestapo officer in civilian clothing, previously posted at Paris before transfer to Rotterdam. A bullet has passed through both his cheeks and cut his tongue in the process, making interrogation effectively impossible. His documents are secured by the French.
Throughout the day further skirmishes occur at the bridge. A bus and an ammunition truck, the latter believed to be carrying German pioneers tasked with demolishing bridges between Oosterwolde and Smilde, are ambushed and destroyed. Several Germans are killed and many more captured. In the early afternoon a German combat patrol probes from the north toward the bridge and is driven off by French fire, the survivors scattering in the direction of Fochteloo. Those unable to escape are taken prisoner. At dusk the French again withdraw to the Rooks farm, taking their growing prisoner count with them. The barn now holds forty-seven prisoners. Doctor Gerlach, the local physician of Appelscha, treats the wounded among them.
Four days into the operation, no contact has yet been made with Canadian ground forces. Ammunition is running low while the prisoner count continues to grow. Sicaud urgently requests an air resupply. He also asks main Special Air Service Headquarters for information on the location of the Canadians. The reply arrives at 16:30 on April 11th: ground forces are making progress but relief is unlikely within 48 hours. Sicaud is instructed to abandon the bridges if the situation becomes untenable.
In the early morning of April 12th, 1945, Typhoon fighter-bombers deliver the requested supply containers, filled with ammunition and landmines. The mines are used to block the access roads to the bridge. The day passes quietly. The enemy no longer appears. Sicaud transmits a situation report at 10:00, noting that his men are exhausted after five days of continuous action and that he is seriously considering withdrawing and lying low if relief does not arrive that day. Calvert agrees, even suggesting Sicaud might move south to meet the approaching Canadians. The mood improves in the course of the day. Resistance couriers bring word that Canadian forces have reached the nearby village of Frederiksoord, south of Appelscha. The Royal Canadian Dragoons have crossed the Drentsche Hoofdvaart that morning at Dieverbrug. Reassured by the resupply and the news of the Canadian approach, Sicaud decides to keep the Stokersverlaat bridge occupied through the night.
On the morning of April 13th, 1945, at 10:00, armoured cars of B Squadron, Royal Canadian Dragoons, arrive in Appelscha, not from the south as might be expected but from the west, from the direction of Oosterwolde. After six days of continuous operations, Sicaud and his men are relieved. The final account of the Zone E operations at Appelscha is remarkable. The French take fifty prisoners, kill ten enemy soldiers, and wound five. Among the dead is the German officer who was travelling to assume command of the defence of Assen. Throughout the entire operation, from the night of the drop on April 7th to 8th to the arrival of the Canadians on April 13th, the French suffer not a single man killed.
| Multimedia |
| Zone E, Haulerwijk |
The aircraft carrying the Vidoni stick overshoots its intended drop zone and deposits its load far to the north, scattering the men into two separate groups.
The first group of seven men, the demi-stick under Lieutenant Brunet, most likely the first to jump, comes down in the Weperpolder, an area northeast of Oosterwolde. On the morning of April 8th, 1945, completely disoriented, the men knock on the door of the Jellema farm on the main road from Oosterwolde to Veenhuizen and ask for help. To protect the family, the seven men conceal themselves in a small forest pool opposite the farmhouse while the family seeks assistance. On April 9th, 1945, a local farmer collects them and guides them through the swampy Fochtelooër Veen to Appelscha, where they join the Duno stick. Their arrival is confirmed in Sicaud’s wireless message to main Special Air Service Headquarters that afternoon.
The second group, including Lieutenant Albert Jean Vidoni himself, lands further north still, most likely having jumped after the supply containers are released from the aircraft. They come down in meadows southeast of the village of Haulerwijk, between the Rendijk and the Slinke road, in open terrain dotted with small patches of forest, isolated farmsteads, and occasional tree walls. No one witnesses the drop.
In the middle of the night, the paratroopers wake the farmer Van der Leij and ask him to open his barn to conceal their equipment. When they ask about shelter, Van der Leij directs them to the neighbouring Tamminga farm, situated next to the drawbridge over the Kromme Elleboogsvaart at a site locally known as the White House after a white-painted farmhouse beside the bridge. Van der Leij, half-asleep and confused by the German-speaking French paratroopers, assumes they are German soldiers and mentions that some of their colleagues are already at the Tamminga farm. The French, hoping to find the other members of their stick, move to the farm in the dark and knock.
Farmer Tamminga, also roused from sleep and equally unable to identify the German-speaking visitors as anything other than retreating German troops, grumbles that he already has guests. That evening, four German soldiers have arrived and demanded quarters and are sleeping in the hayloft. The French ask to speak with their comrades. Tamminga lets them in. The French go up to the hayloft and wake the German soldiers. Tamminga watches in horror as the Germans are led outside to an adjoining meadow and shot without mercy on the edge of a ditch. The bodies remain where they fall until the following morning, when the shaken Tamminga loads them onto a cart and takes them to the cemetery at Haulerwijk. News of the killings spreads rapidly through the village, causing immediate anxiety about German reprisals.
The paratroopers take up defensive positions in fields near the Eelze Boskje, west of the Kromme Elleboogsvaart. They are discovered quickly. A local National Socialistische Beweging’s member and Landwacht collaborator, Pieter van der Heide of the Meidoornlaan, known to local residents by the derisive nickname Piet Bacil, alerts the nearby German military commander. The commander is initially reluctant to act, apparently preferring to continue his retreat. Only when Van der Heide threatens to contact the Sicherheitsdienst at Norg does the commander change his mind. A German unit of approximately 200 men retreating eastward through the area is available. In the afternoon, a strong German fighting patrol moves down from Haulerwijk along the Meidoornlaan and Scheidingsreed and attacks the French position. In the firefight that follows, Private Henri Pintaud is killed near the Boer farm while attempting to escape through the fields. Four others are captured, three of them wounded: Francis Recollon, René Berthier, Christian Ferrandi, and Pierre Pauli. A fifth man, Jules Garcia, who has become separated from the stick immediately on landing and conceals himself near the Veenstra farm, is discovered and also taken prisoner.
Only two members of the stick evade capture. Lieutenant Vidoni, slightly wounded in the hand, hides in the forest known as the Blauwe Bos, the Blue Forest, behind the Tonckenshoeve south of Haulerwijk. There he finds two other French paratroopers already in hiding. These are most likely Corporal Raymond Hauser and Henri Courcier of the Picard stick, who have become separated from their own unit. A second man, Private Henri Fouquer, is pursued closely by the Germans and concealed by the farmer at the Bijker farm in the hayloft. German soldiers search the farmyard and threaten to shoot the farmer’s son if he does not reveal the hiding place. The son says nothing. The Germans do not carry out the threat. Fouquer is subsequently smuggled away by bicycle to a hiding place near Zuidvelde in civilian clothing, his French moustache shaved off, where he joins other concealed paratroopers of the Picard stick and waits until Canadian ground forces arrive.
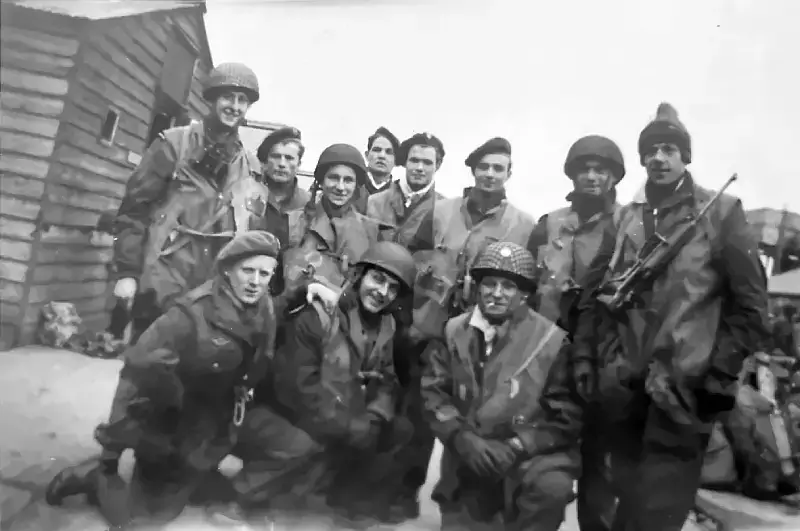
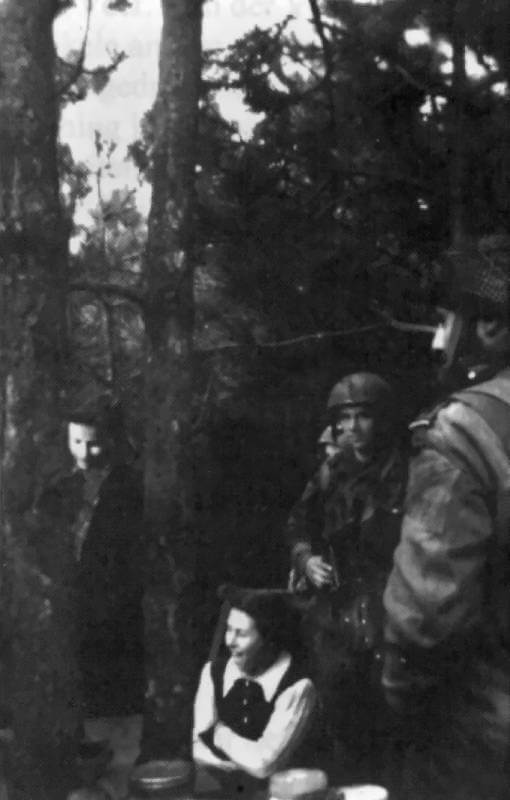
The local doctor of Haulerwijk, Doctor Beumer, treats Vidoni’s wounded hand and bandages it. The Dutch resistance moves Vidoni and his two companions from the Blauwe Bos to the Van Weperen farm near Haule, where they remain concealed until Canadian forces reach Oosterwolde. On April 13th, 1945, the three men cycle to Oosterwolde and make contact with the Royal Canadian Dragoons. A photograph taken at Oosterwolde that day shows Vidoni with his bandaged hand in a sling, Corporal Hauser, and Henri Courcier, all with their yellow airborne recognition scarves wrapped around their left arms, accompanied by a resistance fighter from Haule named Roel Voortman, who has been carrying Vidoni’s carbine.
The fate of the four prisoners is more fortunate than might be expected given the pattern of German behaviour seen elsewhere during the operation. The wounded men are taken by horse-drawn cart by a local farmer to Doctor Beumer’s house in the centre of Haulerwijk for medical care. They are eventually evacuated to a hospital at Heerenveen, where they are liberated by Canadian ground forces. Garcia, the only unwounded prisoner, is transferred to the prison at Leeuwarden, where Canadian forces liberate him on April 15th, 1945. No German reprisals are carried out against the civilian population of Haulerwijk despite the killing of the four German soldiers at the Tamminga farm.
| Multimedia |
| The 1st Canadian Armoured Car Regiment, the Royal Canadian Dragoons dash to the North Sea |
The ground force that relieves the French Special Air Service paratroopers across the northern and western sectors of the Amherst area is the 1st Canadian Armoured Car Regiment, the Royal Canadian Dragoons.
On April 4th, 1945, the regiment has come under command of the 2nd Canadian Corps. It crosses the Rhine on a pontoon Bailey bridge at Emmerich, and assembles near Doetinchem. A Squadron is immediately detached to the 3rd Canadian Infantry Division to screen that division’s extended left flank along the IJssel River, taking up position northeast of Arnhem near the German bridgehead at Doesburg. The remaining squadrons prepare for operations in support of the 2nd Canadian Infantry Division. After several days of planning, the Royal Canadian Dragoons cross their start line at 08:00 on April 9th, 1945, with B and C Squadrons leading and D Squadron in reserve. The regiment’s war diary records the mood as one of considerable eagerness, describing the coming role as exactly the kind of operation the regiment has trained for but never yet undertaken.
The Dragoons’ initial task is to exploit along the axis Raalte to Zwolle, screening the left flank of the 2nd Canadian Infantry Division and maintaining contact with the 3rd Canadian Infantry Division advancing on a parallel axis toward the IJssel cities of Zutphen and Deventer. On April 9th the Dragoons move toward Raalte. On April 10th they probe further in the direction of Zwolle. B Squadron advances so far in that direction that it takes a full twenty-four hours to disengage and return when the axis of advance changes.
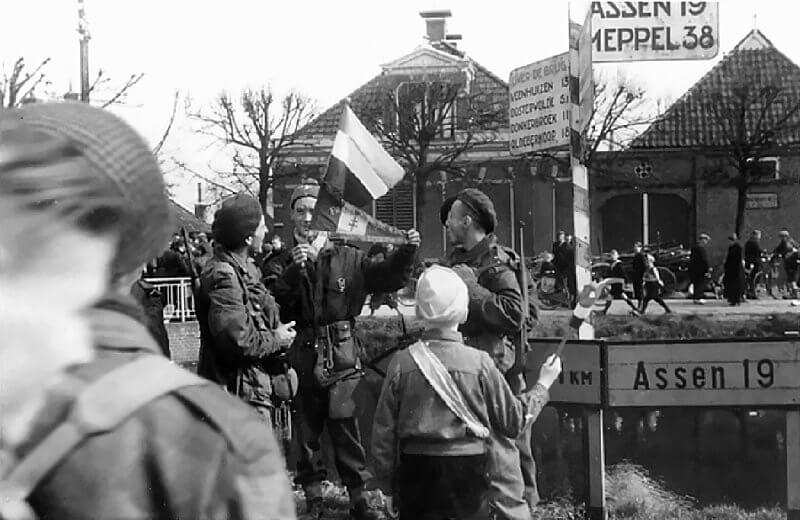
The change comes on April 11th, 1945, when word reaches the regiment that Canadian engineers are about to complete a bridge over the River Vecht at Ommen. By 11:00 the bridge is ready. The Royal Canadian Dragoons are pulled in from the far left and redirected up the centre of the divisional axis, with D Squadron and Regimental Headquarters leading, closely followed by C Squadron. At Hoogeveen, already reached by leading Canadian elements that day, Lieutenant Colonel Landell, commanding the Royal Canadian Dragoons, meets Lieutenant Alway, commanding the 8th Canadian Reconnaissance Regiment, and the two officers agree a plan. The 8th Reconnaissance Regiment will push up the 2nd Canadian Infantry Division’s main axis with the dual objectives of making contact with the 1st Polish Armoured Division and reporting on enemy strength along the Hoogeveen to Assen to Groningen road. The Royal Canadian Dragoons will cut across country through the province of Friesland in a northwesterly direction toward Leeuwarden, the provincial capital, tasking themselves with cutting all communication routes fanning out from Leeuwarden to the east and if possible seizing the town itself. The operation that follows becomes known as the Armoured Car Sweep, carrying the regiment all the way to the North Sea within a matter of days.
It is the Royal Canadian Dragoons who relieve the French Special Air Service forces in the western sector of the Amherst area. Their B Squadron, advancing from Hoogeveen, crosses the Drentsche Hoofdvaart at Dieverbrug on the morning of April 12th, 1945, the crossing point that reassures Captain Sicaud at Appelscha that relief is imminent. On April 13th, 1945, armoured cars of B Squadron arrive in Appelscha from the west, from the direction of Oosterwolde, ending the six-day operation of the Sicaud force at the Stokersverlaat bridge. Elements of the regiment also make contact with Lieutenant Vidoni and his two companions cycling into Oosterwolde from Haule on the same day.
At last light on April 11th, 1945, Regimental Headquarters of the Royal Canadian Dragoons and C Squadron arrive at Dwingeloo without incident. En route they have linked up with fifteen French paratroopers at Ruinen, most likely the Gayard stick, which as already described in this account has been operating in the Zone A area since the opening night of Amherst. D Squadron also concentrates at Dwingeloo. At 17:00 elements of D Squadron are sent north to reconnoitre the Beilervaart and find a crossing. Using light bridging equipment, the squadron crosses the canal at a place called De Strank. The squadron commander, in a scout car supported by the assault troop, advances as far as Hijken without incident. The squadron firms up for the night at De Strank.
The challenge facing the Dragoons is the Drentsche Hoofdvaart, the main canal running southwest to northeast through the province of Drenthe, connecting Meppel with Assen. Most of the bridges across it have been destroyed. Some have been disassembled by the Germans and some have been blown in the final hours. Whether the Dragoons are aware that the Lagèze stick has secured the Veenhoopsbridge at Smilde is not established, but even if they know, the Oranjekanaal still lies between Smilde and any approach route from Dwingeloo. The Boiteux stick’s failure to secure the bridge at Oranje means there is no confirmed crossing north of Smilde. That night, however, an unexpected solution presents itself at Dieverbrug, immediately west of Dwingeloo.
The small bridge at Dieverbrug has been demolished by the Germans on April 7th, 1945. A supervisor of the Rijkswaterstaat, the Dutch Department of Infrastructure, named Koers, who lives on the western bank at the lock, approaches the Royal Canadian Dragoon commander with critical information. He has found the bridge components of the disassembled Wittelterbrug stored on a box barge moored nearby at a quiet point on the canal. Koers persuades the Canadian commander that with this material he can build a working emergency bridge overnight on the remains of the demolished Dieverbrug. The commander agrees, on condition that the bridge is ready by 06:30 the following morning. If not, he will seek a crossing further north.
The plea of the Diever resistance also weighs on the decision. As already described in this account, eleven civilian residents of Diever are executed on the night of April 10th, 1945, on the orders of Sicherheitsdienst officer Habener, who threatens to return and complete the killing. The local resistance sends a messenger to the Canadian commander at Dwingeloo urging immediate intervention. The commander acknowledges the appeal but states that without a proper bridge he cannot send units forward. Canadian engineers are overwhelmed with bridging work across the entire front and bridging material is scarce. He estimates at least three days before a conventional bridge can be built. If the situation becomes dangerous, Diever civilians should come to Dwingeloo, where the Canadians will protect them.
A group of civilian volunteer craftsmen from Diever and Dwingeloo works through the entire night. The structure they build is improvised from timber and planking, carried on the back of an old scow. It is a precarious affair by any standard. In the early morning of April 12th, 1945, at approximately 06:15, the crossing is finished. The first Staghound armoured car of C Squadron edges onto the structure. The bridge creaks and groans under the weight but holds. After adjustments, a second Staghound crosses. Further work with steel beams discovered at the last moment gives the structure sufficient stability for the remainder of the squadron to cross. In the early morning of April 12th, 1945, Diever is liberated.
The liberation is received with profound relief and equally profound grief. The executions of April 10th are not yet two days old. The village mourns its dead even as it welcomes the Canadians. The mixture of liberation and loss is felt by every resident who witnesses the armoured cars cross the bridge.
After establishing the Dieverbrug bridgehead, the Royal Canadian Dragoons fan out in three directions. C Squadron moves southwest toward Steenwijk, passing through Diever and Vledder and reaching the town at approximately 11:00 on April 12th. There it finds a German military hospital containing 800 patients, among them twenty-one Allied prisoners of war, who are immediately transferred to Allied medical facilities. C Squadron clears the town and sends a reconnaissance group toward the German military airfield at Havelte, the same facility reconnoitred earlier by both the Gayard stick in Zone A and Zone E patrols, and found completely destroyed by Allied bombing.
D Squadron moves northwest toward Leeuwarden, quickly paralleling C Squadron’s advance, bypassing and overrunning isolated groups of German soldiers unable to respond to the speed of the armoured car advance. By the afternoon of April 12th, 1945, D Squadron reaches the Tjonger Kanaal, a barge canal running at right angles to the axis of advance, approximately halfway to Leeuwarden. Regimental Headquarters moves to Frederiksoord. B Squadron joins Regimental Headquarters there and that evening is sent forward to reinforce D Squadron, which has found a crossing over the Tjonger Kanaal at Mildam but is counter-attacked by the enemy. The situation at Mildam is quickly resolved and B Squadron withdraws for the night to Noordwolde.
The consequences of the Dieverbrug crossing extend well beyond the immediate advance. The German command has converted Meppel into a defensive stronghold intended to block the Canadian advance. The breakthrough at Dieverbrug outflanks the Meppel position entirely. The German garrison, now at risk of being cut off, is forced to withdraw rather than defend the town. The improvised bridge built by Dutch civilians in a single night has done what the German demolition teams spent weeks preparing to prevent.
On April 13th, 1945, B Squadron of the Royal Canadian Dragoons advances at first light toward Oosterwolde via Oldeberkoop and Makkinga, where Squadron Headquarters is established. From there, No. 1 and No. 4 Troops reconnoitre southeast toward Appelscha and make contact with Captain Sicaud’s force at the Stokersverlaat bridge. The French report all is well. The bridge position, held for six days against repeated enemy pressure, is intact.
The encounter between the Canadian armoured car crews and the French paratroopers makes a strong impression on the Dragoons. The regimental history records the moment vividly, describing gaunt, bearded men emerging from concealed positions after days without sleep as the Canadian vehicles appear. What the Canadians find is a force that has dominated an area far larger than its numbers could reasonably control, through aggression, mobility, and the close support of the Dutch resistance.
The entire village of Appelscha turns out to welcome the armoured cars. French paratroopers and civilians crowd around the Staghounds together. At the Stokersverlaat bridge, the Bren gun post constructed from concrete blocks and flour sacks taken from the Mulder mill still stands. Lieutenant Duno is among the men at the position. The high building of the mill rises in the background behind the celebrating crowd. That evening B Squadron firms up at Oosterwolde.
The arrival at Appelscha is one of the final acts of the Royal Canadian Dragoons’ involvement in the Amherst area. From the Dieverbrug bridgehead, the regiment has conducted what becomes known as the Armoured Car Sweep, a rapid northwestward advance through Friesland toward the North Sea coast. Assisted by approximately 3,000 organised Dutch resistance fighters who secure road junctions, bridges, and entire villages alongside the Canadians, the advance moves at extraordinary speed. By April 14th, 1945, the armoured reconnaissance squadrons reach the North Sea, effectively severing the land connection between western Holland, where the bulk of the German 25. Armee remains in Festung Holland, and the rest of Germany. Leeuwarden, the provincial capital of Friesland, falls to the Royal Canadian Dragoons on April 15th, 1945.
| Multimedia |
| Sources |