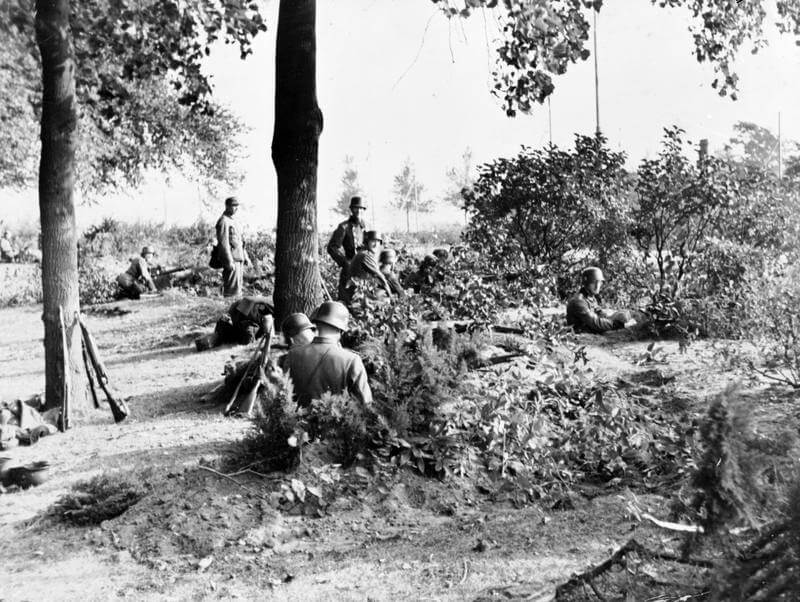
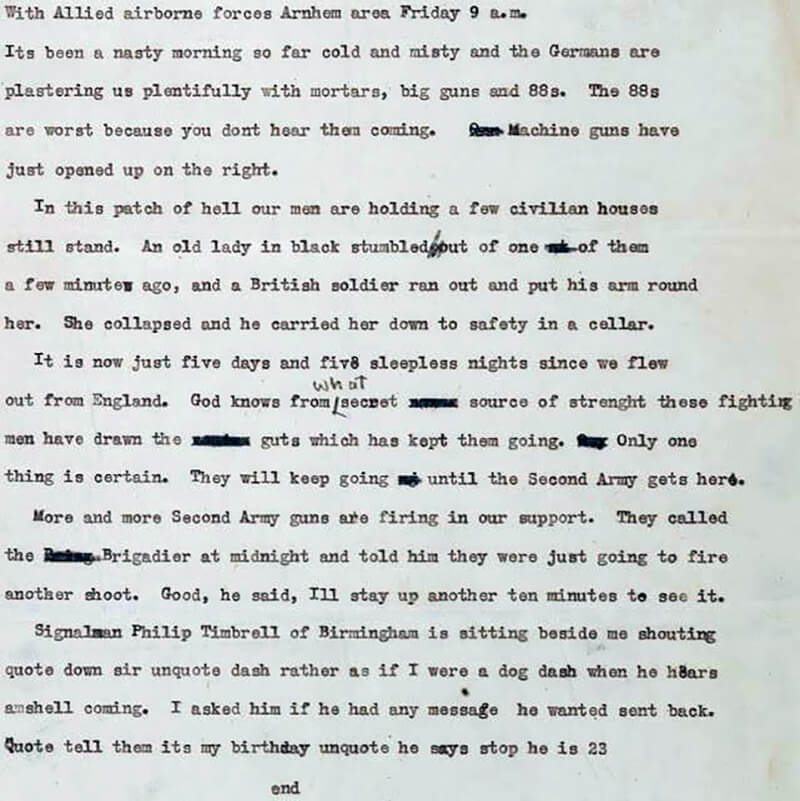
| September 17th, 1944 – September 26th, 1944 |
| Operation Market Garden |
| Objectives |
- Land at Landing- and Drop Zones at Wolfheze, Oosterbeek, and Ede.
- Capture the road bridge in Arnhem and hold it for a minimum of 48 hours
- Link up with the advancing ground forces of the 30th Corps.
| Operational Area |
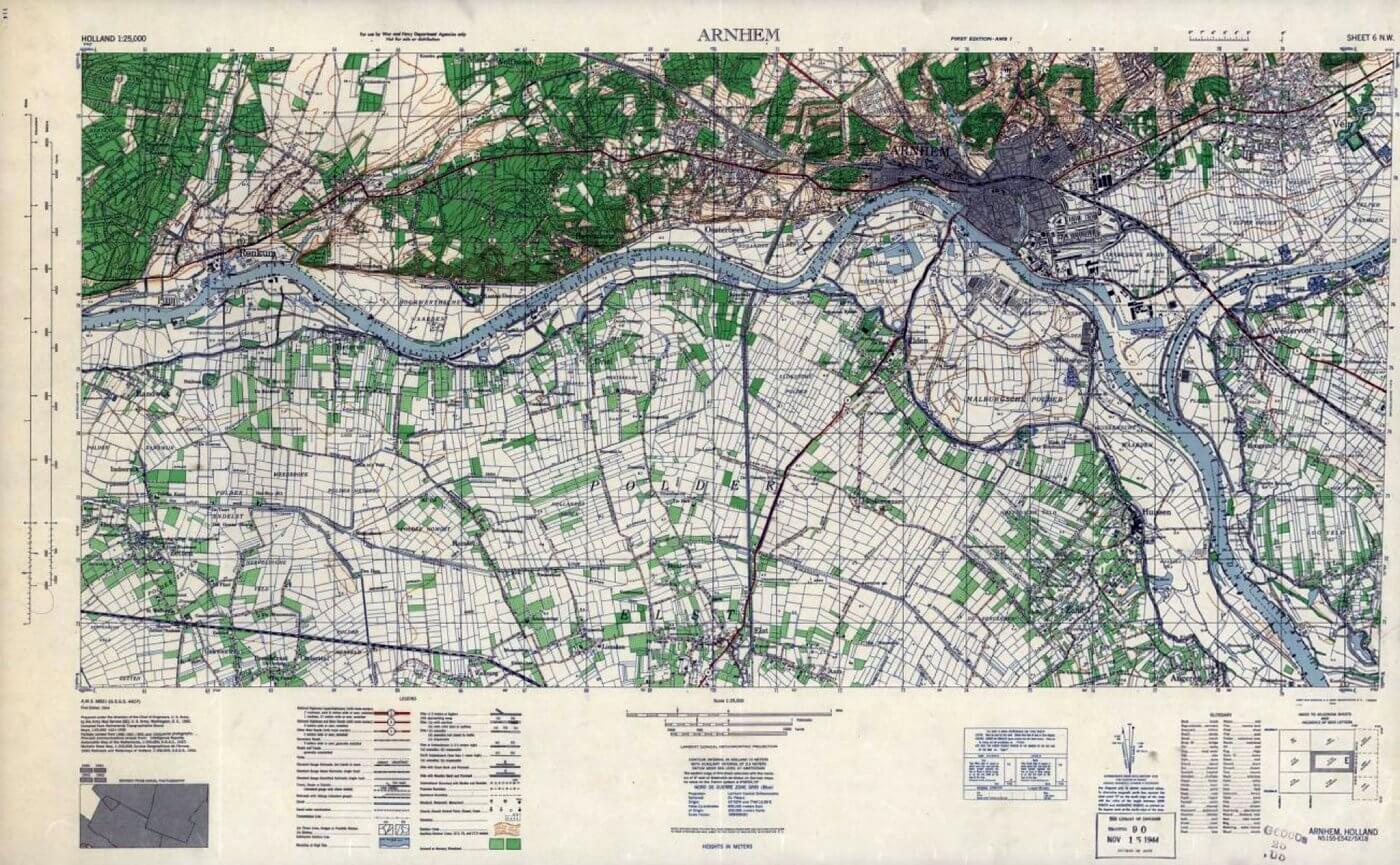
Arnhem Area
| Allied Forces |
- 1st Airborne Division
- 1st Polish Independent Parachute Brigade
- 52nd, (Lowland) Airlanding Division
| Axis Forces |
- II SS-Panzer-Corps
- 9. SS-Panzerdivision “Hohenstaufen”
- 10. SS-Panzerdivision “Frundsberg”
- Kampfgruppe von Tettau
- Feldkommandantur 642
- SS-Unterführerschule Arnheim
- Bataillon I
- Bataillon II
- Bataillon III
- SS-Polizei Schule
- SS-Ausbildungs und Ersatz Bataillon 4
- Bataillon I
- Bataillon II
- SS-Wach Battalion 3
- Schiffsturm Abteilung 10
- Schiffsturm Abteilung 6/14
- Fliegerhorst Battalion 2
- Fliegerhorst Battalion 3
- Artillerie Regiment 184
- Sicherheit Regiment 42
- Kampfgruppe Knoche
- Sicherheit Regiment 26
- Bataillon I
- Bataillon II
- MG Bataillon 30
- FlaK Abteilung 688
- Bataillon I
- Bataillon II
- Hermann Göering Schule Regiment
- Hermann Göering Schule Regiment
- Bataillon I
- Panzer Abteilung 224
- SS Ersatz Abteilung 4
- Deelen Airfield FlaK Kompanie
- Wach Kompanie
- Reichs AD
- Hermann Göering Schule Regiment
- Sicherheit Regiment 26
- Kampfgruppe Kraft
- SS-Panzer Grenadier Ausbildungs und Ersatz Bataillon 16
- Schwerepanzer Abteilung 506
- Schwerepanzer Kompanie Hummel
- StuG Abteilung 280
- Artillerie Regiment 191
- Bataillon I
- Bataillon II
- Bataillon III
- SS-Werfer Abteilung 102, Hauptsturmfürer Nickmann
- Kampfgruppe Brinkmann
- Kampfgruppe Bruhn
- Kampfgruppe Harder
- Sperrverband Harzer
- MG Bataillon 47
- Marine Kampfgruppe 642
- Kampfgruppe Schörken
- Kampfgruppe Kauer
- SS-Abteilung “Landstrum Nederland”
- Kampfgruppe Knaust
- Ersatz Abteilung Bocholt
- Panzer Kompanie Mielke
- Kampfgruppe Spindler
- FlaK Abteilung Swoboda
- Kampfgruppe von Allworden
- Kampfgruppe Weber
- Nachrichten Abteilung 213
- Sösterberg Fliegerhorst Battalion
- Kampfgruppe Henke
| Operational Planning |
In September 1944, Major General Roy Urquhart faces complex tactical and logistical challenges during Operation Market Garden due to the staggered arrival of his 1st British Airborne Division. The division’s Landing and Drop Zones must be secured and defended for three days until all units are fully deployed in Arnhem. This task consumes valuable infantry resources that would be better used capturing and holding the strategic bridges in Arnhem, crucial objectives of the operation.
A significant planning conference on September 11th, 1944, addresses the issue of landing zone selection. Urquhart and his staff push for Landing Zones closer to the Arnhem bridges and suggest reviving the concept of coup de main landings, swift, surprise assaults directly on the objectives. However, this idea is quickly dismissed by Air Vice-Marshal Hollinghurst, who prioritises the safety of transport aircraft from German anti-aircraft artillery (flak) positioned in and around Arnhem and the Deelen airfield. Intelligence assessments indicate a formidable array of 44 heavy anti-aircraft guns and 112 lighter-caliber weapons, bolstered by reports of mobile flak units and anti-aircraft barges capable of moving along the local waterways.
The Royal Air Force’s reluctance to risk aircraft near these high-threat zones dictates the selection of landing areas. Photographic reconnaissance identifies potential Landing Zones near the Arnhem bridges as unsuitable, classifying them as polder land, reclaimed terrain characterized by boggy conditions, ditches, and a high risk of flooding. Such ground is deemed inappropriate for glider or parachute landings. Although later proved to be inaccurate, these assessments prevent closer landings that could have significantly improved the operation’s chances of success. Compounding the controversy, elements of the Polish Brigade are scheduled to land on this same ground during the third lift, further questioning the initial exclusion of closer landing zones.
Colonel George Chatterton, Commander of the Glider Pilots, strongly advocates for a coup de main landing on the main highway bridge at Arnhem. He proposes that gliders could be released remotely, allowing the tug aircraft to turn back before reaching the flak-heavy areas. Despite Chatterton’s insistence that glider landings near the bridge, though risky, would be more effective than landing miles away, his proposals are rejected by General Browning, who defers to Royal Air Force priorities. The Royal Air Force’s decisions are shaped by fears of heavy casualties among transport crews due to intense anti-aircraft fire, a risk deemed unacceptable despite the strategic value of landing closer to the objectives.
The flawed assessment of the terrain near the Arnhem bridges, combined with misleading intelligence reports from the Dutch resistance regarding marshy conditions, supports the dismissal of direct glider assaults. The potential threat posed by German defenders occupying high ground overlooking the landing zones is also a concern, as any glider-borne force attempting to secure the bridge would be exposed to concentrated machine-gun and artillery fire. This cautious approach forces Urquhart to look elsewhere for suitable landing areas, further complicating his mission.
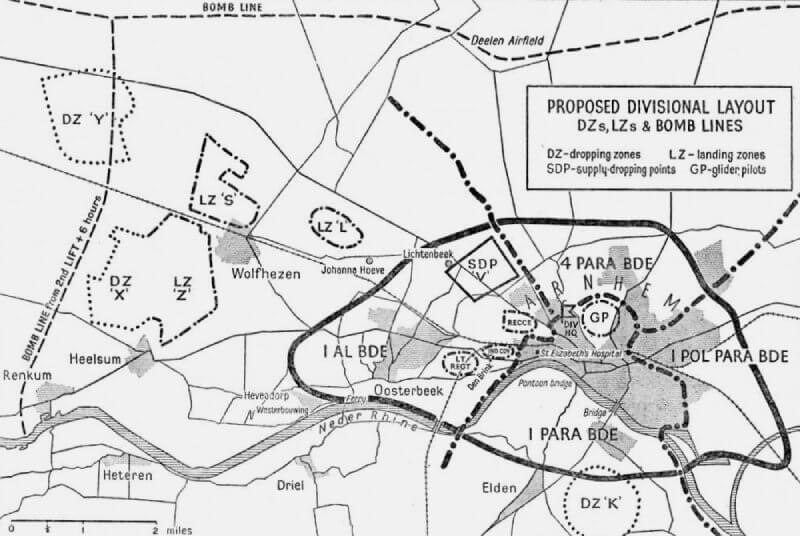
Urquhart ultimately selects five Landing Zones and Drop Zones, all positioned between 10 and 13 kilometers from Arnhem’s key highway bridge. These areas, comprising open heathlands and extensive farmland, are chosen for their suitability to accommodate large numbers of parachute and glider troops with minimal immediate casualties. However, the significant distance from the objectives and the time required for troops to traverse unfamiliar terrain heavily encumber the division’s effectiveness. As British paratroopers land on Dutch soil, German forces in and around Arnhem are already alerted and moving to reinforce their defensive positions.
The positioning of the Landing Zones complicates Urquhart’s efforts to rapidly assemble his division into coherent battalion groups capable of concentrated attacks. The chosen zones are intersected by the railway line from Arnhem to Utrecht, with several key Landing and Drop Zones, designated Love (L), Sugar (S), and Yoke (Y), located both north and south of the line. Additional zones, including X-Ray (X) and Zebra (Z), are similarly divided, forcing airborne units to navigate complex terrain features before reaching their targets. A further Drop Zone, King (K), is planned for use by the 1st Independent Polish Parachute Brigade on the operation’s third day, when it is assumed that German anti-aircraft threats will have been neutralized.
Logistical arrangements include a designated Supply Dropping Point (SDP) named Victor (V) on the north-west outskirts of Arnhem, designed to support continuous parachute resupply within the intended divisional perimeter.
Initial planning foresaw the potential use of glider pilots to defend the landing zones, a role for which they were trained. However, glider pilots were considered too valuable to risk in direct combat; they were seen as a critical reserve force and were intended to be swiftly repatriated to England for future operations. This decision reflects a broader strategy of conserving elite assets, even when immediate battlefield needs are pressing.
Returning to his headquarters at Moor Park Golf Club in Hertfordshire on the evening of September 11th, 1944, Major General Roy Urquhart, commanding officer of the 1st Airborne Division, spends hours in his command caravan scrutinising maps and aerial photographs of Arnhem. Faced with limited options due to air command restrictions, Urquhart settles on the only feasible strategy: using landing zones located 10 to 21 kilometres from the Arnhem bridges.
Despite frustrations with the refusal of air commanders to approve a direct landing near the target, Urquhart sees some benefits in a daytime landing on the open heathlands and fields outside Arnhem. The combination of good weather, daylight, and well-suited landing zones minimises the risk of his division being scattered, allowing his troops to rally quickly and mount their assault. Once his plan is clear, Urquhart briefs his divisional staff, who immediately start drafting the detailed operation orders needed for the next day. The work continues through the night and into the morning of September 12th, 1944, with the completed Operation Order finalised and distributed just in time for Urquhart’s Orders Group meeting at 17:00 hours. Here the Brigade commanders and key staff officers gather at Moor Park to receive their orders.
| The Air Routes |
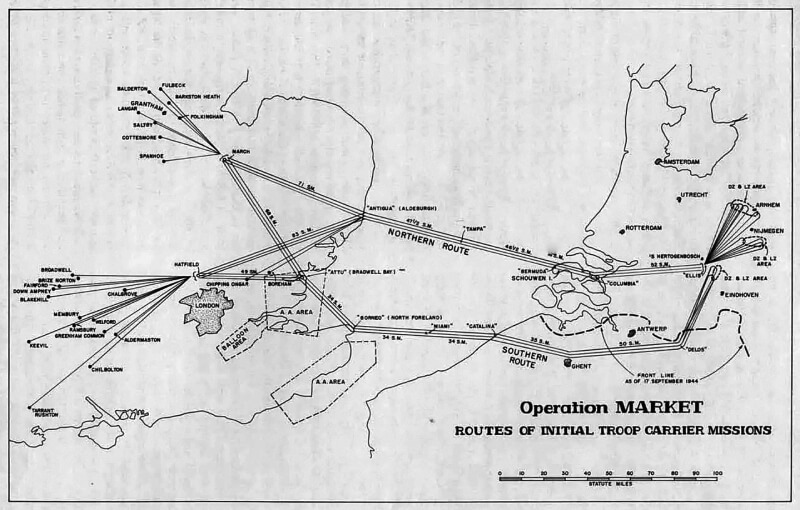
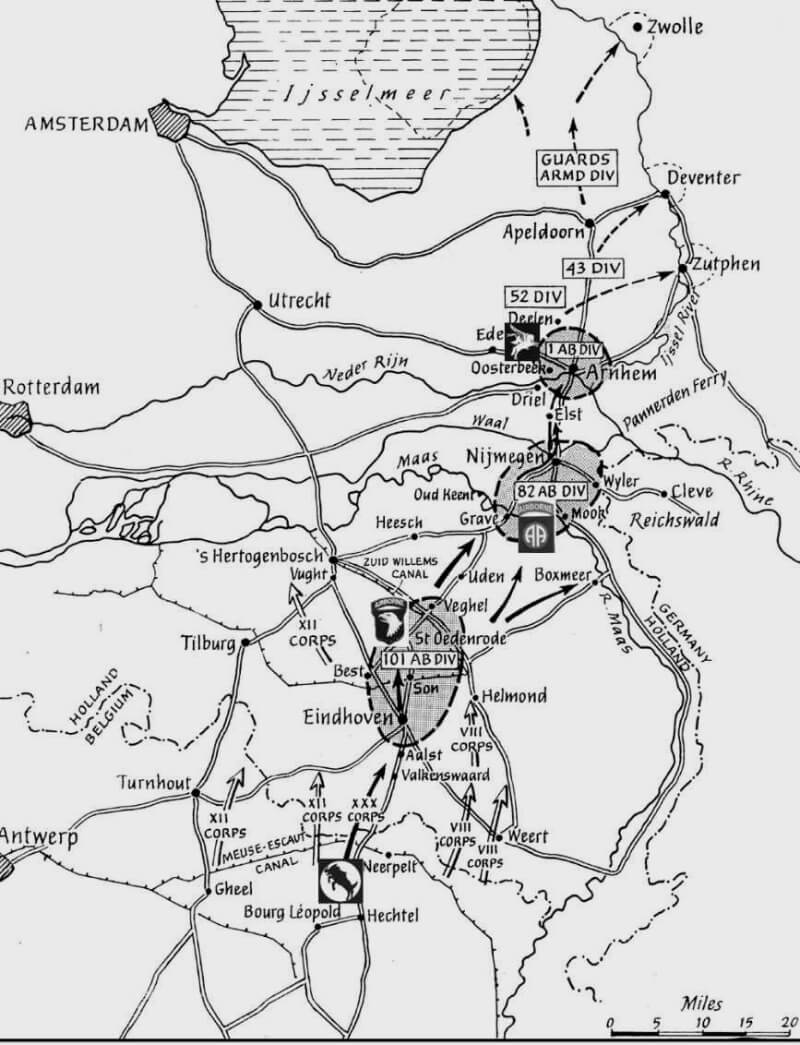
By September 12th, 1944, also a broader agreement on air delivery plans is reached, allowing detailed planning to commence. Two primary air routes, the Northern and Southern Routes, are established for transporting Allied forces into the operation. The Northern Route is designated primarily for the airborne operations to Arnhem and Nijmegen. This route is favoured for its simplicity, as aircraft can fly in a nearly straight line, reducing navigational challenges. However, this direct path also involves flying over 130 kilometres of German-occupied territory. Avoiding this by diverting over the sea would lead to navigation issues due to the absence of visual markers, posing significant risks for less experienced tug crews. Therefore, maintaining a direct line over the sea remains essential for the planned routes.
Aircraft on the Northern Route depart from Aldeburgh on the Suffolk coast, flying straight over the North Sea for 150 kilometres before reaching the island of Schouwen off the Dutch coast. The aircraft then follow the 30-kilometre length of the island to its southeastern tip, before turning inland for 84 kilometres over enemy-held territory. Upon completing this overland leg, aircrews confirm their position near key road junctions south of ’s-Hertogenbosch, then proceed north for 40 kilometres to Nijmegen or 55 kilometres to Arnhem.
Intelligence reports suggest the route is relatively safe, with only sporadic concentrations of flak which can be managed by ground-attack aircraft. The lack of heavy anti-aircraft fire along this path makes it particularly appealing to Air Transport Command, who prioritise the safety of aircraft and crews.
The Southern Route operates concurrently, transporting the 101st Airborne Division to Eindhoven from airfields in southern England. This shorter route starts from Royal Air Force Bradwell Bay in Essex, crosses the Thames estuary to North Foreland, avoiding the London Air Defence Zone. From North Foreland, the aircraft fly eastward for 240 kilometres over the sea before making landfall on the Belgian coast. The route then follows the Albert Canal, turning northeast for 50 kilometres to reach the designated landing zones near Eindhoven.
With these routes established, priority for transport aircraft allocation is set based on a “bottom to top” strategy, focusing first on the divisions closest to the front line, Eindhoven, then Nijmegen, and finally Arnhem. The rationale is that success in securing bridges and maintaining the corridor must start at the beginning; failure in the initial sectors would render the Arnhem crossings irrelevant. As a result, despite being the ultimate goal of the operation, Arnhem receives the lowest priority for air transport on the first day of the assault.
Major General Urquhart and his American counterparts push hard for additional aircraft from Air Marshal Brereton and General Williams, hoping to secure more lift capacity for their divisions. However, despite their determined efforts, none of the commanders succeed in gaining a significant increase in their aircraft allocations. The strict prioritisation policy leaves Urquhart’s division under-resourced, complicating their mission to capture the Arnhem bridges during the critical early stages of Operation Market Garden. The inadequate lift capacity prevents a single, unified landing on D-Day, complicating Urquhart’s ability to seize his goals promptly.
Despite urgent demands from Urquhart and his American counterparts for more aircraft, the allocation of transport resources is strictly prioritised. The decision is made to favour divisions closest to the advancing ground forces of XXX Corps, meaning that initial lifts are concentrated on securing Eindhoven and Nijmegen, with Arnhem receiving lower priority. Although the ultimate objective is the Arnhem bridges, on D-Day, Urquhart’s division is allotted the fewest transport aircraft.
Compounding these issues is Lieutenant General Browning’s contentious decision to deploy his headquarters into the operation, a move that consumes critical lift capacity. The headquarters, never intended as a field-deployable unit, is hastily adapted with additional radios, staff, and logistical support to function in a combat environment. This reconfiguration diverts 32 Horsa gliders and six Hadrian gliders from Urquhart’s division, further limiting his already constrained resources.
On D-Day, the 1st British Airborne Division starts with 480 aircraft, including 320 glider-tug combinations, leaving Urquhart with significantly fewer assets compared to his American counterparts. This disparity in lift capacity, combined with the logistical and tactical constraints imposed by distant landing zones, sets the stage for the complex and ultimately precarious battle that unfolds in Arnhem, as Urquhart’s forces struggle to overcome the operational limitations imposed by planning decisions and external constraints.
| Planning First Lift on D-Day (Sunday, September 17th, 1944) |
Operation Market Garden is set to begin on Sunday, September 17th, 1944, with the drop of the 21st Independent Parachute Company, also known as the Pathfinders, led by Major “Boy” Wilson. The company includes twenty-five Jewish refugees from Germany and Austria, highly motivated and skilled, adding valuable linguistic capabilities to the pathfinder ranks.
21st Independent Parachute Company consists of three strong platoons, totalling 180 men, and is tasked with marking Drop Zone X and Landing Zones S and Z using advanced techniques, including Eureka homing beacons, coloured panels, and smoke markers. These visual aids help guide transport aircraft and gliders across England, over the Channel, and through liberated Belgium to their designated drop and landing zones.
The pathfinders will begin their drop at 12:40 hours, landing approximately twenty minutes before the first gliders carrying Brigadier Philip “Pip” Hicks and his 1st Airlanding Brigade.
The main body of the first lift of Operation Market Garden comprises 358 glider-tug combinations, all headed towards Arnhem, except for a subset allocated for different tasks. Specifically, thirty-two Horsa gliders from A Squadron and six Hadrian gliders from Lieutenant Peter “Peggy” Clark’s “X” Flight are designated to carry the headquarters of Lieutenant General Frederick Browning’s Corps, which will land near Nijmegen on Landing Zone N in the U.S. 82nd Airborne Division zone near Nijmegen. Lieutenant General Frederick Browning’s decision to deploy his headquarters during Operation Market Garden significantly hampers the mission’s effectiveness and lifting capacity. The First Allied Airborne Army Headquarters is not designed or equipped for field operations; they lack the necessary tactical equipment, radios, and trained staff required for command and control in a combat environment.
The glider lift bound for Arnhem is divided into two main groups, each assigned to different landing zones to facilitate the spread of forces and reduce congestion upon arrival. These landing Zones are designated as Landing Zone S and Landing Zone Z. Landing Zone S is primarily allocated for gliders transporting Brigadier Philip Hicks and the tactical headquarters of the 1st Airlanding Brigade. This includes not only command elements but also critical units that provide coordination and operational support for the brigade. The bulk of the 173 Horsa gliders assigned to land on Landing Zone S are filled with the airlanding infantry battalions of Hicks’s brigade. These gliders carry:
- 1st Battalion, The Border Regiment
- Objective: Secure Landing Zone S and protect the northern approaches to the landing zone. Establish defensive positions to support subsequent landings and secure the area against counterattacks.
- 2nd Battalion, The South Staffordshire Regiment
- Objective: Defend Landing Zone Z and secure key roads and tracks leading to Arnhem. Prevent German forces from disrupting the landing operations and maintain control of the area to facilitate reinforcement.
- 7th (Galloway) Battalion, The King’s Own Scottish Borderers
- Objective: Establish strongpoints around Landing Zone Z, providing depth to the defence. Engage any German forces approaching the landing zones and prepare to support the advance into Arnhem.
These battalions are larger and better armed than parachute battalions, featuring extensive support companies equipped with 81 millimetre mortars, Vickers medium machine guns, and 6-pounder (57-millimetres) anti-tank guns. Their structure makes them ideal for securing and defending the landing zones.
Landing Zone Z is designated as the destination for a further 154 Horsa and thirteen Hamilcar gliders, bringing in significant elements of Major General Roy Urquhart’s divisional troops and other crucial units that are key to the overall operational plan for Arnhem. This strategic allocation ensures that vital forces are positioned to support the division’s objectives from the outset.
The glider lift to Landing Zone Z includes a range of units that provide crucial firepower, mobility, and engineering support necessary for the success of the airborne operation:
- 1st Airborne Reconnaissance Squadron, commanded by Major Freddie Gough:
- Twenty-two Horsa gliders from C Squadron, The Glider Regiment transport the 1st Airborne Reconnaissance Squadron, including their thirty-nine modified Jeeps, motorcycles, trailers, and two 20-millimetre Polsten anti-aircraft guns. These Jeeps are vital to Gough’s fast-moving, light-armoured force, designed to strike quickly and secure the Arnhem bridgein a Coup de Main attempt. The Polsten guns add a critical anti-aircraft capability, helping defend against low-level attacks and supporting the squadron’s ground operations.
- 9th (Airborne) Field Company, Royal Engineers:
- Sixteen Horsa gliders from D Squadron, The Glider Regiment, launching from Keevil, deliver the Sappers of the 9th (Airborne) Field Company. This unit includes an additional four Jeeps that bolster Gough’s strike force. The engineers’ primary tasks are obstacle clearance, demolition of enemy fortifications, and constructing defensive positions, directly supporting the reconnaissance squadron’s operations and enhancing the division’s overall mobility.
- 1st Airlanding Light Regiment, Royal Artillery:
- A significant artillery component, the 1st Airlanding Light Regiment, is tasked with providing the division’s only integral artillery support until the arrival of XXX Corps. The regiment includes twenty-four 75-millimetre pack howitzers, essential for providing direct fire support against enemy positions. Fifty-seven Horsa gliders are required to transport these howitzers, along with their ammunition and towing Jeeps. The artillery’s rapid deployment is crucial for establishing a defensive perimeter and delivering sustained firepower during the initial phase of the operation.
- 1st Airlanding Anti-Tank Battery, Royal Artillery:
- General Urquhart’s strategic planning places heavy emphasis on countering the potential threat of German armour. Recognising the limitations of the lightly armed parachute battalions, the deployment of anti-tank assets is critical to ensuring the division can defend against armoured counterattacks. On D-Day, the battery is flown in with sixteen 6-pounder (57-millimetre) anti-tank guns and eight 17-pounder (76-millimetre) anti-tank guns. The combination of these weapons provides the division with robust anti-armour capabilities that are immediately available upon landing.
- 6-Pounder Anti-Tank Guns: Each 6-pounder is paired with a towing Jeep and transported in a Horsa glider. This setup ensures the gun and its transport vehicle are not separated during flight, allowing for rapid deployment upon landing. The 6-pounder is effective against medium armoured vehicles and provides flexible firepower that can be positioned quickly in defensive roles.
- 17-Pounder Anti-Tank Guns: The 17-pounders, known for their ability to penetrate the armour of heavy German tanks like the Panther and Tiger, are much larger and heavier, requiring Hamilcar gliders from ‘C’ Squadron for transport. Each Hamilcar carries a 17-pounder gun along with its Morris C8 tractor unit, which is necessary for moving the gun into position. These guns provide the division with a potent counter to even the most formidable German armoured threats.
Additional Units attached to the 1st Airlanding Brigade that land on Landing Zone Z are
- 1st Airborne Divisional Signals
- 9th (Airborne) Field Company, Royal Engineers
- 250th (Airborne) Light Composite Company, Royal Army Service Corps
- 181st Airlanding Field Ambulance, Royal Army Medical Corps
- 1st Airlanding Brigade Ordnance Field Park
Following Hicks’ brigade, 143 American C-47 Dakotas from IX Troop Carrier Command transport Brigadier Gerald “Legs” Lathbury’s 1st Parachute Brigade to Drop Zone X. Each of the parachute battalions, consisting of the 1st, 2nd, and 3rd Parachute Battalions of the Parachute Regiment, requires thirty-four C-47 Dakota aircraft to transport their rifle companies. These aircraft, flown from American airfields in Great Britain at Barkston Heath and Saltby, are tasked with dropping the main body of the battalions onto their designated drop zones.
Each parachute battalion is allocated a single Hamilcar glider from C Squadron, The Glider Pilot Regiment, to transport two Universal ‘Bren’ carriers. These versatile tracked vehicles are crucial for providing direct fire support, ammunition resupply, and transport of personnel under combat conditions. The Bren carriers enhance the battalions’ ability to sustain offensive operations and reinforce defensive positions.
The Brigade Headquarters and the headquarters of the three parachute battalions are flown in using twenty Horsa gliders from D Squadron, The Glider Pilot Regiment. These gliders, taking off from Keevil, carry thirty-eight Jeeps, which are essential for command and control mobility, along with staff officers, signallers, and medics. This deployment ensures that command elements can effectively coordinate their forces and maintain communications throughout the operation.
In addition to the personnel dropped by parachute, the battalions’ heavy equipment, including Jeeps and essential ammunition, are transported via gliders. This method allows the parachute battalions to have immediate access to their vehicles and support weapons upon landing, enhancing their operational mobility and firepower.
The brigade’s mission is to capture key structures in Arnhem, including the railway bridge, pontoon bridge, and main road bridge. Lathbury’s 1st Parachute Brigade Battalions have the following missions:
- 1st Parachute Battalion, The Parachute Regiment
- Objective: Move along Route Leopard, securing high ground north of Arnhem. Establish a defensive line to protect the northern approaches to the city and prevent German forces from reinforcing the bridge.
- 2nd Parachute Battalion, The Parachute Regiment
- Objective: Advance along Route Lion, secure the railway bridge (code-named Charing Cross), and the northern bank of the Rhine. Capture the main road bridge (code-named Waterloo) by attacking from both ends.
- 3rd Parachute Battalion, The Parachute Regiment
- Objective: Follow Route Tiger through Heelsum and Oosterbeek into Arnhem. Support the 2nd Battalion in the assault on the main road bridge, reinforcing the bridgehead.
Urquhart’s objective is for Lathbury’s battalions to capture the bridges and secure key positions in Arnhem by nightfall on D-Day. Meanwhile, Hicks and his glider-borne battalions will fortify the landing zones to ensure the safe arrival of the second lift, scheduled for September 18th, 1944.
| Planning Second lift on D+1 (Monday, September 18th, 1944) |
The scheduling and execution for the Second Lift are fraught with challenges that surpassed those faced during the initial D-Day operation. Ideally, the second lift plans to reach the Arnhem landing zones early on the morning of September 18th, 1944. However, the exact timing is contingent upon first light and weather conditions, which are critical factors that can not be controlled or predicted with precision. Unlike the D-Day lift, which could be delayed for better conditions, the second lift has to proceed regardless of weather once the first wave of troops are on the ground in Holland. Failure to deliver these reinforcements will leave the airborne forces vulnerable to isolation and destruction by the increasingly alert German forces.
Brigadier Roy Urquhart understood that the staggered delivery of his division’s forces needed to be urgently compensated for by reinforcing the newly established bridgehead with the second lift. This reinforcement are crucial to maintaining momentum, securing key positions, and bolstering the division’s defences against mounting German counterattacks.
The second lift is designed to deliver the balance of Brigadier Philip ‘Pip’ Hicks’s 1st Airlanding Brigade and Brigadier John ‘Shan’ Hackett’s 4th Parachute Brigade in their entirety. The glider component includes 274 glider-tug combinations, tasked with transporting units that are overspilled from the first lift and additional crucial reinforcements.
The key components of the second lift are:
- 2nd (Oban) Airlanding Anti-Tank Battery, Royal Artillery:
- The second lift also included the 2nd (Oban) Airlanding Anti-Tank Battery, Royal Artillery, equipped with two troops of 6-pounder guns and two troops of the heavier 17-pounders. These anti-tank assets significantly enhanced the division’s ability to counter German armoured threats, providing a vital line of defence against potential counterattacks.
- 1st Airlanding Light Regiment, Royal Artillery
- The remaining pack howitzer battery of the unit
- 1st Airlanding Anti-Tank Battery, Royal Artillery
- Remaining troop of 6-pounder anti-tank guns pof the unit.
- Detachment Airborne Anti-Tank Battery, 1st Polish Independent Parachute Brigade
- Support elements of the 4th Parachute Brigade:
- These units are assigned to Landing Zone X, previously designated as Drop Zone X during the first day. A total of 229 gliders, including fifteen Hamilcar gliders, are tasked with delivering this critical equipment. The Hamilcars are loaded with eight 17-pounder anti-tank guns and their Morris tractor units, two Bren carriers for each battalion of the 4th Parachute Brigade, and additional carriers for the 2nd Battalion, The South Staffordshire Regiment.
- Bulk Supplies and Heavy Equipment:
- Three of the Hamilcar gliders were specially allocated to transport ‘bulk stores,’ which included essential ammunition, engineer stores, and other heavy supplies. These supplies were necessary to sustain combat operations, enabling the airborne forces to maintain pressure on German defences and continue their advance.
- Completion of the Airlanding Brigade Lift on Landing Zone S:
- The remainder of the lift plan utilised sixty-eight gliders from the total second lift, which were assigned to Landing Zone S. This component included the remaining elements of Brigadier Hicks’s 1st Airlanding Brigade, to restore the the Brigade to full strength, the second lift brings in additional infantry units. This includes two companies of 2nd Battalion, The South Staffordshire Regiment that were displaced from the first lift to provide towing aircraft for General Browning’s Corps Headquarters are also included in this lift. Their arrival is vital for reinforcing Brigadier Hicks’s brigade. A small increment of troops from the 1st Battalion, The Border Regiment, and the 7th Battalion, The King’s Own Scottish Borderers. These units, along with elements of the 181th Airlanding Field Ambulance, Royal Army Medical Corps, and other support troops, are essential to maintaining the brigade’s operational capability and resilience.
The parachute element of the second lift involves the entirety of the earlier mentioned 4th Parachute Brigade of Brigadier John “Shan” Hackett, is also scheduled to jump on D+1 onto Drop Zone Y. Hackett’s brigade mirrors the organisation of its sister formation, the 1st Parachute Brigade, but with key differences. The brigade deploys more of its troops directly by parachute, including its ‘Q’ elements, which are responsible for logistics and supply. Instead of integrating its support weapons under the Headquarter Company as seen in the 1st Parachute Brigade, Hackett’s battalions group their support weapons in a separate company with its own dedicated headquarters. The brigade’s support elements also jump as part of the second lift. This includes engineers from the 4th Parachute Squadron, Royal Engineers, who are critical for tasks such as clearing obstacles, demolition, and constructing defensive positions. Medics from the 133rd Parachute Field Ambulance, Royal Army Medical Corps provide essential medical support, ensuring immediate care for any injured personnel upon landing.
The three Parachute Battalions of the brigade are:
- 10th Parachute Battalion, The Parachute Regiment
- Objective: Land on Drop Zone Y and advance east toward Arnhem. Establish positions to support 1st Parachute Brigade and secure the northern approaches.
- 11th Parachute Battalion, The Parachute Regiment
- Objective: Secure the area around Drop Zone Y and advance to reinforce 1st Parachute Brigade in Arnhem. Establish a defensive line to protect against counterattacks.
- 156th Parachute Battalion, The Parachute Regiment
- Objective: March from Drop Zone Y into Arnhem, securing key roads and maintaining contact with 1st and 4th Parachute Brigades. Provide depth to the northern perimeter.
Their target Drop Zone Y is located north of the railway embankment on Ginkel Heath, 1,500 metres east of Landing Zone S and the furthest of the drop zones from Arnhem. Despite its distance, Ginkel Heath is ideal for parachuting due to its open terrain, providing a clear landing area for Hackett’s forces.
The safe arrival of the 4th Parachute Brigade on Drop Zone Y and their subsequent movement away from the drop zone is pivotal in allowing Brigadier Philip ‘Pip’ Hicks to adjust his forces. With Hackett’s troops now securing part of the perimeter, Hicks is able to release two of his airlanding battalions from guarding the landing zones. These battalions then redeploy towards the village of Oosterbeek, establishing a defensive line that forms the western side of the division’s new perimeter around Arnhem.
The third airlanding battalion, meanwhile, maintains a defensive perimeter around Landing Zone L for an additional twenty-four hours to secure the area for the landing of the Polish Gliders on D+2.
Overall Hackett’s brigade is assigned to land on Drop Zone Y and march into Arnhem, supporting the 1st Parachute Brigade by establishing defensive positions north and northwest of the city. Their arrival enables Hicks to redeploy his airlanding battalions to bolster the western perimeter.
| Planning D+2 (Tuesday, 19 September 1944) |
On D+2, the 1st Polish Independent Parachute Brigade, lands onto Drop Zone K south of the river and near Arnhem Bridge. This Polish unit, commanded by Major General Stanisław Sosabowski, is crucial for reinforcing the airborne forces at a critical juncture in the battle. The unit consists of:
- 1st Polish Parachute Battalion
- Objective: Secure Drop Zone K south of Arnhem Bridge, establish defensive positions, and prevent German forces from reinforcing the bridge.
- 2nd Polish Parachute Battalion
- Objective: Support 1st Battalion in holding the southern perimeter, linking up with British forces to consolidate the bridgehead.
- 3rd Polish Parachute Battalion
- Objective: Establish strongpoints on the eastern approaches to the bridge, providing a defensive layer against counterattacks.
With the three Parachute Battalions land support troops from the Brigade’s Airborne Engineers Company, the Airborne Signals Company, the Airborne Medical Company and the Headquarters Company.
The Polish Airborne Light Artillery Battery is left in in Great Britain due to the lack of lifting capacity.
The Polish Brigade’s main role is to defend the eastern approaches to Arnhem Bridge, providing a critical layer of protection as the main British force consolidates its positions. After their landing, the Polish troops are tasked with bolstering the overall defensive perimeter, crucial to holding Arnhem until XXX Corps can break through.
Alongside the parachute drop, thirty-five gliders carrying Polish heavy equipment, vehicles, and the remaining anti-tank guns of the Airborne Anti-Tank Battery land on Landing Zone L to the north of the river, further strengthening the division’s defensive and offensive capabilities.
Major General Stanisław Sosabowski, is notably dissatisfied with the planned separation of his brigade’s elements on D+2. His forces are divided between landings north and south of the Rhine, a tactical decision driven by the operational constraints and the immediate needs of the airborne forces fighting in Arnhem. Sosabowski understands that this separation poses significant risks, particularly in terms of coordination and mutual support, which are crucial for his brigade’s effectiveness.
Despite his reservations, Sosabowski accepts that in the tight timeline and chaotic conditions of the operation, there is no feasible alternative. The tactical necessity of securing both flanks of the river near Arnhem Bridge dictates the deployment pattern, and his brigade’s role is essential to reinforcing the airborne forces already under pressure from German counterattacks.
| Tasks for the Glider Pilot Regiment after landing |
The Glider Pilot Regiment plays a critical role in delivering troops, equipment, and heavy weapons into the landing zones. The regiment’s pilots are not only responsible for safely flying the gliders into their designated areas but are also expected to fight as infantry once on the ground. The regiment’s tasks include:
- 1st Wing Glider Pilot Regiment, commanded by Lieutenant Colonel Iain Murray:
- Objective: Land gliders carrying the infantry of 1st Airlanding Brigade and crucial equipment such as anti-tank guns and artillery. Once on the ground, the pilots regroup into their squadrons and form a defensive unit to protect divisional headquarters, acting as a tactical reserve.
- 2nd Wing Glider Pilot Regiment, commanded by Lieutenant Colonel John Place:
- Objective: Support the 1st Airlanding Brigade upon landing. The pilots will provide local security around landing zones S and Z and assist in establishing the defensive perimeter. They will fight as infantry if required to protect key positions.
Specific Tasks for Glider Pilot Squadrons:
- Glider Pilots carrying the anti-tank guns of the Royal Artillery are to stay with their loads and assist in deploying the weapons. They provide security for the anti-tank crews and defend these key assets until relieved by regular infantry units.
- Glider Pilots responsible for landing the light artillery of the 1st Airlanding Light Regiment are tasked with protecting the howitzers and their crews immediately after landing, ensuring the guns are operational as quickly as possible.
- B Squadron pilots who carry the 6-pounder anti-tank guns detached to the parachute battalions will accompany the guns, providing local defence and assisting in their tactical deployment against enemy armoured threats.
- Specific Mission for Captain Angus Low and 20 Flight of B Squadron:
- Captain Low’s flight is to detach from 2nd Wing after landing near Arnhem and move 35 kilometres south by any means available to reinforce A Squadron at Nijmegen, where they will support the defence of General Browning’s Corps Headquarters.
| Waiting for XXX Corps |
After the complete Division has landed Urquhart’s vision is to establish a 29-kilometres defensive perimeter around Arnhem by D+2, with XXX Corps expected to link up rapidly with the airborne units. The Polish Brigade secures the eastern sector, the 4th Parachute Brigade fortifies the northern and northwest approaches, and the Airlanding Brigade holds the western side. The 1st Parachute Brigade, acting as a divisional reserve, is poised to respond to any breaches in the line.
Throughout the planning stages, Urquhart and his officers remain vigilant, aware of the significant risks posed by enemy forces. Intelligence reports suggest that German resistance might be stronger than expected, raising concerns about the ability of XXX Corps to break through. The success of Operation Market Garden depends heavily on the precise coordination of airborne and ground forces, making it one of the most complex and daring airborne operations of the Second World War.
| Passwords |
The passwords for the initial days at Arnhem, as specified in the operational orders, are as follows:
- H Hour to September 17th, 1944: Challenge, “Red,” Reply, “Beret.”
- September 18th, 1944, D+1: Challenge, “Uncle,” Reply, “Sam.”
- September 19th, 1944, D+2: Challenge, “Carrier,” Reply, “Pigeon.”
- September 20th, 1944, D+3: Challenge, “Air,” Reply, “Borne.”
- September 21st, 1944, D+4: Challenge, “Robert,” Reply, “Burns.”
- September 22nd, 1944, D+5: Challenge, “Troop,” Reply, “Carrier.”
Only five days’ worth of passwords were originally planned, and once these were exhausted, New passwords had to be created. There are indications that Challenge “Mae”, Reply, “West” was used on September 24th, 1944. Passwords for Saturday and Monday might be missing. Most likely passwords were arranged locally by Headquarters.
The initial stages of Operation Market Garden see the Allied forces launching intense bombardments on key German positions, particularly around Arnhem. This heavy bombing, conducted by the Royal Air Force and United States Air Forces, achieves its military objectives but also results in tragic civilian casualties, most notably at a psychiatric asylum in Wolfheze.
The following morning, over 3,500 Allied aircraft take off from England, carrying the 1st Airborne Division and other units to the Netherlands. The first wave of landings proceeds with minimal resistance, despite some challenges, such as glider crashes and minor losses. The operation begins smoothly overall, with most troops landing safely.
The 1st Parachute Brigade quickly moves towards Arnhem Bridge, following different routes. However, their advance is hindered by delays, miscommunications, and unexpected German resistance. Lieutenant-Colonel John Frost’s 2nd Parachute Battalion successfully reaches Arnhem Bridge and secures key positions, but the other battalions face significant obstacles. The 3rd Parachute Battalion, encountering enemy forces, is forced to halt overnight. Meanwhile, the 1st Battalion struggles with strong resistance along the “Leopard” Route, resulting in casualties and slower progress.
Major Gough’s Reconnaissance Squadron attempts an early seizure of Arnhem Bridge but is delayed by logistical issues after the landing and enemy encounters, ultimately failing to secure the bridge early. However, Major Frost’s 2nd Parachute Battalion is able to reach, capture and secure the northern end of the bridge. The situation becomes increasingly challenging, with the 1st Airborne Division’s leadership temporarily cut off from its units and the Germans forming a blocking line that prevents the 2nd Parachute Battalion from being reinforced. Despite these setbacks, some progress is made, but the overall advance is slower than anticipated, allowing German forces to reinforce their defences around Arnhem.
Throughout the night, A Company of the 2nd Parachute Battalion makes two attempts to capture the southern end of Arnhem Bridge, but both efforts are thwarted by strong German defences, including machine-gun fire and an armoured car. A mishap with a flamethrower sets off explosions, engulfing the bridge in flames and making further assaults impossible. Lieutenant-Colonel Frost, recognizing the unexpected strength of German resistance, radios for reinforcements.
Meanwhile, the 1st Parachute Battalion, led by Lieutenant-Colonel Dobie, abandons its original mission, and cautiously advances toward Arnhem Bridge under cover of darkness. Despite taking every precaution, the Battalion faces increasing resistance, leading to fragmentation and significant casualties. By morning, half of the 548 men are out of contact.
As the 2nd Parachute Battalion secures the northern end of Arnhem Bridge, the Germans are caught off guard, with the 10. SS-Panzerdivision unable to execute its planned defense. Forced to reroute their forces via a ferry, the Germans order an immediate counterattack to clear the British from the bridge. Kampfgruppe Brinkmann, reinforced by tanks and infantry, is tasked with this mission.
At the drop zones, Divisional Headquarters grows increasingly concerned due to the lack of communication with the 1st Parachute Brigade and the absence of Major-General Urquhart, with rumors of his death circulating. Brigadier Hicks takes temporary command and sends reinforcements to Arnhem, despite the risk of leaving the drop zones exposed. The 1st Airlanding Brigade fends off several enemy attacks but faces challenges, including German strafing runs and skirmishes that result in casualties and equipment losses.
The delayed arrival of the Second Lift due to fog gives the Germans time to reinforce their positions. When the lift finally arrives, the 7th Battalion, King’s Own Scottish Borderers come under heavy attack at Drop Zone Y, and the 4th Parachute Brigade descends into an active battlefield. Despite facing fierce resistance and suffering losses, the Brigade manages to land and assemble, but the situation remains dire.
The 4th Parachute Brigade, initially confused about its objectives due to poor communication, presses on with its mission to secure high ground near Arnhem. However, they encounter strong German defences, leading to heavy casualties and the need to reassess their strategy. Brigadier Hackett, frustrated with the lack of coordination, works with Brigadier Hicks to clarify objectives, ultimately focusing on securing the high ground at Koepel.
The 1st and 3rd Parachute Battalions continue their push toward Arnhem Bridge, facing relentless German resistance. The 1st Parachute Battalion reaches the railway bridge but suffers heavy casualties, leaving only a fraction of the men combat-ready. Despite reinforcements from the South Staffordshire Regiment and the 11th Parachute Battalion, the situation remains bleak as the Germans fortify their positions.
Lieutenant-Colonel Dobie takes command of the advance towards Arnhem Bridge but is delayed by a misleading report that German resistance has collapsed. This delay allows the Germans to strengthen their defences further, leading to a costly and fragmented British attack that ultimately fails to secure the bridge.
In the early hours of Tuesday, 19th September, Lieutenant-Colonel Dobie of the 1st Parachute Battalion realizes that Arnhem Bridge is still under British control, a revelation that comes too late as valuable time and the cover of darkness have been lost due to erroneous information. This miscommunication hampers the Brigade’s assault and allows German forces to strengthen their positions near the bridge.
Unaware that Lieutenant-Colonel Fitch and the remnants of the 3rd Parachute Battalion had already attempted a similar attack, Dobie’s battalion moves forward, initially making progress under the cover of darkness. However, as dawn breaks, they come under intense fire from well-entrenched German positions. Despite desperate bayonet charges, the 1st Parachute Battalion is decimated, with most of the men either killed, wounded, or captured, including Lieutenant-Colonel Dobie.
The 3rd Parachute Battalion fares no better, encountering heavy fire and forced to retreat. Lieutenant-Colonel Fitch is killed during the withdrawal. The 2nd Battalion, South Staffordshire Regiment also suffers heavy losses, eventually becoming trapped by German forces. Despite fierce resistance, most of the Battalion is captured, though their efforts temporarily liberate Major-General Urquhart, allowing him to return to Divisional Headquarters.
As the 4th Parachute Brigade advances towards Arnhem, the 156th Parachute Battalion encounters heavy resistance along the Dreijenseweg, suffering significant casualties. Despite their efforts, they are forced to withdraw after losing half of their strength. The 10th Parachute Battalion also faces fierce opposition but manages to withdraw with fewer losses.
Simultaneously, the 7th Battalion, King’s Own Scottish Borderers holds Landing Zone L in anticipation of the 1st Polish Independent Parachute Brigade Group’s arrival. Despite minimal interference earlier, the situation becomes critical as the delayed Third Lift approaches. German forces begin to close in, forcing the Brigade to retreat south of the railway line.
In the confusion, part of the 156th Parachute Battalion marches towards Wolfheze instead of regrouping with the rest of the Division, leaving them isolated. The remaining forces manage to secure a small tunnel for their vehicles and prepare defenses. Captain Queripel of the 10th Parachute Battalion leads a valiant rearguard action, holding off the Germans until he is fatally wounded, an act that earns him a posthumous Victoria Cross.
The 4th Parachute Brigade’s efforts to advance towards Arnhem are thwarted by well-prepared German defenses, resulting in heavy losses and a forced withdrawal.
Major-General Urquhart, realising the severity of the situation, decides to change tactics as losses make it clear that reaching Arnhem is no longer possible. Lieutenant-Colonel Frost’s men at Arnhem Road Bridge are ordered to hold their position until XXX Corps arrives. If the bridge falls, success may depend on securing a bridgehead on the northern bank of the Rhine and building a Bailey Bridge for reinforcements.
Urquhart orders his division to regroup in Oosterbeek and establish a defensive perimeter extending to the riverbank. The 1st Battalion, Border Regiment holds the western flank, but the eastern side is poorly defended, forcing scattered units to converge under intense enemy pressure. The Lonsdale Force, under Major Cain and Major Lonsdale, holds the eastern sector, facing repeated attacks from Kampfgruppe Spindler. Despite heavy losses, they manage to prevent a German breakthrough.
In the western sector, the 4th Parachute Brigade fights its way into the Oosterbeek perimeter, but only a fraction of the original force survives the journey. By evening, the division consolidates a perimeter, with the 1st Battalion, Border Regiment and 7th Battalion, King’s Own Scottish Borderers securing key positions. The men, exhausted and low on supplies, dig in, prepared to defend until XXX Corps can break through.
At Arnhem Road Bridge, Frost’s men continue a fierce defence despite being cut off and heavily outnumbered. They hold the bridge for several days, delaying German forces long enough to allow British armour to advance towards Nijmegen. Eventually, with no reinforcements and under heavy fire, the defence collapses, and most of the British troops are captured. However, their stand plays a crucial role in delaying the German advance, providing critical time for XXX Corps to push forward.
At 08:00, the Germans launch a coordinated assault on the 1st Airborne Division’s perimeter, delivering a critical blow at Westerbouwing Restaurant, which is held by B Company of the 1st Battalion, Border Regiment. Caught by surprise, the British suffer heavy losses and lose the strategic high ground. This allows the Germans to gain control of the Driel-Heveadorp ferry crossing and shrink the perimeter along the Rhine to just 640 metres. Despite multiple attempts to retake the position, the British are unsuccessful, but Major Charles Breese quickly forms “Breeseforce” to create a defensive line that the Germans are unable to penetrate for the remainder of the battle.
Later in the morning, General Urquhart holds a press conference at Hotel Hartenstein, outlining the division’s precarious position and their isolation on the northern bank of the Rhine. He stresses the importance of waiting for XXX Corps to relieve them, though the situation grows more urgent as larger German forces close in from the west.
Throughout the day, the 1st Battalion, Border Regiment faces relentless attacks. A Company repels multiple assaults with limited ammunition, C Company fends off flanking maneuvers with a bayonet counterattack, and D Company destroys a German tank after enduring mortar fire. Despite these victories, the battalion’s exposed position leaves them vulnerable to enemy observation and continued assaults.
In the eastern perimeter, Lonsdale Force repels fierce German attacks, with Major Cain’s leadership earning him a Victoria Cross for his bravery. The 10th Parachute Battalion, however, faces a devastating assault, losing most of its men and officers, though pockets of resistance hold out until reinforcements arrive.
A major engagement also occurs at the Dreyeroord Hotel, defended by the 7th Battalion, King’s Own Scottish Borderers. After a costly surprise attack on German positions, the Borderers repel a determined infantry assault with bayonet charges, suffering heavy casualties but maintaining control. Eventually, the position is evacuated due to heavy losses.
Meanwhile, Polish forces attempt to cross the Rhine to reinforce the division but are unable to do so due to the loss of the ferry and heavy German resistance. Despite successful drops, many Polish paratroopers are delayed or misdropped, limiting their effectiveness in reinforcing the beleaguered division.
Throughout the day, intense German artillery fire, including misdirected friendly fire, causes further losses within the perimeter. The increasing effectiveness of artillery support from XXX Corps signals that help is drawing closer, but the division’s situation remains dire, with heavy casualties on both sides and limited supplies.
Despite the loss of Westerbouwing and heavy fighting across the perimeter, the 1st Airborne Division holds firm, though at great cost. Urquhart sends his chief of staff across the Rhine to communicate the urgency of their situation to XXX Corps, as time is running out for the beleaguered British forces.
As the Germans face heavy casualties and little success from their direct assaults on the 1st Airborne Division at Oosterbeek, they change tactics. Instead of launching more attacks, they focus on containing the British forces within their defensive perimeter, relying on relentless artillery bombardment. By the battle’s end, 110 German artillery pieces are shelling the British, creating a devastating and constant barrage. The British, lacking the ability to counter this heavy firepower, are forced to dig deeper into their trenches to avoid the worst of the explosions. However, the continuous bombardment causes severe psychological strain on the troops, many of whom suffer from shell shock due to lack of sleep and the constant threat of death.
In addition to artillery, German snipers infiltrate British lines, using the wooded areas in the south as cover. The Glider Pilot Regiment, acting as a reserve, takes on the dangerous task of hunting these snipers and becomes highly effective in neutralizing this threat during nighttime patrols.
While infantry attacks continue, the Germans now focus on capturing specific buildings rather than attempting to overwhelm the entire perimeter. Tanks still operate on the front lines but face increased resistance, as British anti-tank gunners ambush vehicles with handheld PIAT weapons. However, a shortage of PIAT ammunition hampers their efforts.
Meanwhile, the Royal Air Force halts resupply missions, mistakenly believing that XXX Corps will link up with the 1st Airborne Division soon. To address the worsening situation, Lieutenant Colonel Mackenzie and Lieutenant Colonel Myers cross the River Rhine under enemy fire to make contact with XXX Corps and deliver an urgent message: without immediate reinforcements, the division’s position will soon collapse. In response, XXX Corps commits to sending reinforcements, but enemy forces block the route, further delaying help.
At the same time, the 1st Polish Independent Parachute Brigade, led by General Sosabowski, is ordered to cross the Rhine to reinforce the British forces. Originally planned to land after the Arnhem bridge was secured, the Polish troops must now ferry across the river using small rubber dinghies, as the DUKW’s become bogged down in the muddy terrain.
The river crossing is perilous, with intense German artillery fire and a strong current slowing progress. British officer Lieutenant David Storrs makes twenty-three trips across the Rhine in the dinghies, ferrying soldiers one by one. By the early hours of the morning, the operation is called off, as exhaustion and heavy enemy fire make further crossings impossible. Despite the best efforts of the British and Polish troops, only 60 of the 1,500 Polish soldiers manage to make it across the dangerous river, far fewer than needed to make a meaningful impact.
The 1st Battalion, Border Regiment finds itself in a precarious situation during the battle. A Company, reinforced with sappers and paratroopers, faces intense assaults from German infantry supported by self-propelled guns and tanks equipped with flamethrowers. Despite their dire circumstances, A and C Companies hold their ground, cutting down German infantry with small-arms fire. However, A Company is critically low on ammunition and resorts to using weapons stripped from German casualties. By this point in the battle, nearly half of the Border Regiment’s weapons are German in origin. Meanwhile, D Company is nearly surrounded, isolated from the rest of the division, but continues to resist despite its vulnerable position.
In the midst of these attacks, the situation with the Polish troops becomes increasingly urgent. At the signals office of the 1st Airborne Divisional Headquarters, communication issues plague efforts to coordinate with both the 1st Polish Independent Parachute Brigade and XXX Corps. With damaged telephone lines and enemy interference, establishing a connection is difficult. Repeated attempts are made to contact the Polish “Cuba” and British “Roger” callsigns of the 1st Polish Independent Parachute Brigade, with little success. The tension in the office grows as explosions shake the building, but the atmosphere shifts when a weak but significant connection is finally made with the Polish Brigade. General Urquhart steps in and makes contact with “Roger,” maintaining communication despite German efforts to disrupt the signal. This breakthrough allows the Allies to make critical decisions about the next phase of operations.
As the 1st Airborne Division still hasn’t been relieved by XXX Corps by September 22nd, 1944, the Royal Air Force resumes its resupply efforts. Seventy-three Short Stirlings and fifty Dakota C-47’s, escorted by fighters, head to Arnhem, though flak continues to cause losses. Six Stirlings and two Dakotas are shot down, and half of the remaining aircraft are damaged. Over the following days, additional sorties are flown, but the majority of supplies fail to reach the intended recipients.
The failure of the initial river crossing attempts using rubber dinghies leads to the realisation that these craft are impractical for reinforcing the division. In response, Major-General Sosabowski sends Major Malaszkiewicz to request proper assault boats. He secures a promise for eighteen boats, capable of carrying twenty-four men each, with Canadian sappers assigned to assist. However, when the boats arrive at nearly midnight, they lack crews, forcing the Polish Engineer Company to operate the boats themselves under heavy fire.
The second crossing begins at 03:00, but numerous complications arise. The boats, intended to hold twenty-four men, only accommodate twelve due to the difficult conditions. Despite these challenges, the Polish troops manage to ferry 153 soldiers across the Rhine by dawn, including 95 from the 3rd Parachute Battalion, 44 anti-tank gunners, and 14 from Brigade Headquarters. This is far fewer than hoped, and Major General Sosabowski himself returns to Driel after crossing the river. Despite the bravery of the Polish troops, the operation falls short of providing the much-needed reinforcements for the 1st Airborne Division.
As the battle for Oosterbeek intensifies, the 1st Airborne Division is overwhelmed with wounded soldiers, both British and German. By morning, the medical staff is caring for around 1,200 men, but the Division has lost most of its medical facilities. Only five out of fourteen Regimental Aid Posts remain operational, and two of the three Main Dressing Stations are still functioning, despite many medical staff being captured. Medical supplies are critically low, and bandages are improvised from available cloth. Surgeons and stretcher-bearers work tirelessly, risking their lives under fire to care for the injured.
With all available shelters filled, many wounded men are left in the open, exposed to further shelling. In some areas, civilians, like Kate ter Horst, open their homes to care for the wounded. Amidst these dire conditions, Colonel Graeme Warrack negotiates a temporary truce with the Germans, allowing approximately 250 stretcher-bound men and 200 walking wounded to be evacuated into German care. Though they become prisoners of war, they are promised proper medical treatment.
Meanwhile, Dakotas C-47’s of No. 575 Squadron fly limited resupply sorties, though their success remains minimal.
As the battle worsens, Lieutenant-General Horrocks meets Major-General Sosabowski to decide the next steps. Sosabowski offers two options: launch a reinforcement or withdraw the airborne troops. Horrocks chooses the reinforcement plan, leading to a major river crossing operation involving British and Polish forces. At a tense conference, Sosabowski’s battalion is reassigned under British command, frustrating him. He criticizes the plan and predicts German resistance, but the British generals proceed with their original strategy.
Shortages of boats delay the operation, and the Polish crossing is canceled. The 4th Battalion, Dorset Regiment begins their crossing at 01:00, but, as Sosabowski feared, German forces are prepared. After 300 men cross, intense enemy fire forces the operation to halt by 02:15, with over 200 of the 315 men captured and little impact made on the battle.
As the situation at Oosterbeek deteriorates, Major-General Urquhart receives word from Major-General Thomas of the 43rd (Wessex) Infantry Division at 06:00, informing him that XXX Corps can no longer reinforce the 1st Airborne Division. Urquhart is advised to begin withdrawing his troops across the Rhine. With the perimeter showing signs of collapse, Urquhart confirms the decision after two hours of deliberation, setting the withdrawal for that night.
However, the battle continues. Intercepted German radio transmissions reveal an imminent attack on the Lonsdale Force in the southeastern corner of the British perimeter. Throughout the day, elite SS battlegroups launch assaults, with heavy fighting near Oosterbeek Church and the 2nd Battalion, South Staffordshire Regiment. In one instance, close-quarters combat ensues with German troops who take control of a building, only to be repelled when the Light Regiment fires directly at the structure.
Despite intense attacks, the British hold their lines. Royal Air Force Dakotas attempt their final supply drops, but once again, the much-needed supplies fail to reach the division.
Urquhart’s withdrawal plan, codenamed Operation Berlin, is meticulously designed to deceive the Germans into believing the British intend to continue their defense. Using a “collapsing bag” strategy, the northernmost troops are the first to withdraw, while artillery from XXX Corps provides cover to mask the movement. To maintain the illusion, non-walking wounded soldiers and medical staff are left behind to continue manning the defenses, and radio operators transmit misleading messages.
Stealth is critical: troops blacken their faces, silence their movements by wrapping their boots in rags, and destroy any equipment that cannot be carried to prevent capture. The withdrawal begins late at night, with carefully coordinated routes leading to two crossing points near the church in southern Oosterbeek. Canadian and British engineers operate storm boats and assault crafts to ferry troops across the Rhine under continuous enemy fire.
Major M.L. Tucker of the 23rd Canadian Field Company receives orders at 10:00 to prepare for the evacuation. Along with Lieutenant R.J. Kennedy, Tucker scouts for suitable launch sites and coordinates the movement of stormboats to the operational area near Valburg. Despite challenges with terrain and roads, the convoy reaches its destination by 16:30, and preparations are completed by nightfall.
At 21:40, the stormboats are launched as planned, with a heavy artillery barrage masking their movements. However, difficult conditions, including muddy terrain and enemy fire, cause setbacks. Several boats are damaged or destroyed, but despite these obstacles, the operation is carried out with precision, ferrying hundreds of soldiers across the river.
The British evacuation unfolds on a rainy, dark night, with soldiers struggling to navigate the treacherous terrain under the constant threat of German machine-gun fire. The journey to the assembly point at the Oude Kerk in Oosterbeek is long and perilous, with some troops taking more than three hours to cover the distance. Many lose their lives along the way. Despite the cover of darkness, the challenging terrain and enemy fire make the retreat extremely dangerous. Upon arrival at the church, soldiers wait for their turn to cross the Rhine River.
The Allies prepare 21 wooden storm boats and several canvas assault boats for the evacuation, but progress is slow due to waterlogged outboard motors. As anxiety grows, some soldiers, fearing they won’t be rescued before dawn, attempt to swim across the Rhine, but many drown in the strong currents, weakened by exhaustion. Nevertheless, Operation Berlin proceeds relatively smoothly for several hours.
As dawn approaches, the Germans realise the British are evacuating rather than reinforcing their troops. They respond by firing on the boats and shelling the southern bank of the Rhine. The increasing pressure, combined with mechanical failures, reduces the number of operational boats. Record-keeping becomes impossible as paper disintegrates in the rain, and visibility is limited. Despite these challenges, the evacuation continues until 04:15, when the operation is officially halted to avoid further endangering the boat crews.
Some soldiers, like Lieutenant Russell Kennedy, defy the order and make additional crossings despite the growing danger. His efforts lead to heavy casualties, and by 05:45, daylight makes further crossings impossible. The Polish troops and rear guard units hold the perimeter to cover the retreat, but many soldiers, including Polish forces, are left behind. Some attempt to swim across but are either captured by the Germans or swept away by the strong currents. Approximately 95 airborne soldiers die during the evacuation, and around 300 are captured.
Lieutenant Cronyn of the Royal Engineers remains at the off-loading site, waiting for any stragglers. However, none arrive after the main evacuation. Meanwhile, the wounded soldiers are treated at field posts, where over 100 walking wounded and 69 stretcher cases are cared for, putting a significant strain on the medical teams.
During the evacuation, German Field Marshal Walter Model and General Wilhelm Bittrich remain unaware of the British retreat. A motorcycle courier informs them of the evacuation, and the Germans are relieved that the battle is nearing its end. As German forces enter Oosterbeek, they find hundreds of British soldiers who had been left behind, either injured or asleep during the evacuation. The captured troops are escorted away, some making “V for Victory” signs and singing defiantly, even in defeat.
Oosterbeek is left in ruins, with wrecked vehicles, debris, and the bodies of soldiers scattered across the battlefield. Around 130 soldiers manage to escape a month later in Operation Pegasus, a daring mission aided by the local resistance. However, many remain trapped behind enemy lines.
During the morning, a ceasefire allows German ambulances to evacuate hundreds of wounded British soldiers from emergency hospitals. The Germans, following orders from General Bittrich, treat the wounded with respect. Dr. Alexander Lipmann-Kessel and his medical team continue to care for the wounded until they manage to escape to Allied lines in mid-October.
After the evacuation, the exhausted British and Polish troops reach Driel, where they are given food, blankets, and clothing, some donated by locals. Due to a shortage of transport, many soldiers march on foot to Nijmegen, where they finally have the chance to rest. Some sleep for days, utterly exhausted after the grueling operation.
As the soldiers regroup in Nijmegen, the full scale of their losses becomes clear. The 1st Airborne Division, severely depleted, is no longer capable of combat and does not see action for the remainder of the war. General Roy Urquhart, the division’s commander, expresses regret to General Boy Browning for not achieving their objective.
The official tally of men who cross the river is 2,398, including 2,163 from the 1st Airborne Division (along some 422 glider pilots, 160 Polish troops, and 75 from the 4th Battalion, Dorsetshire Regiment. However, when individual unit reports are combined, the total is closer to 2,500.
| Multimedia |
| Photographs |
