

| Widerstandsnest 70 |
 |
| Garrison |
| 20–30 men |
| Unit |
| 10. Kompanie, Grenadier-Regiment 726, 716. Infanterie-Division (bodenständig) under command of 352. Infanterie-Division |
| Armament |
| * Two 7.5-centimetre Field Guns * 2-centimetre FlaK 30 * Two Granatwerfer 36 * Maschinengewehr 34 * Maschinengewehr 42 |
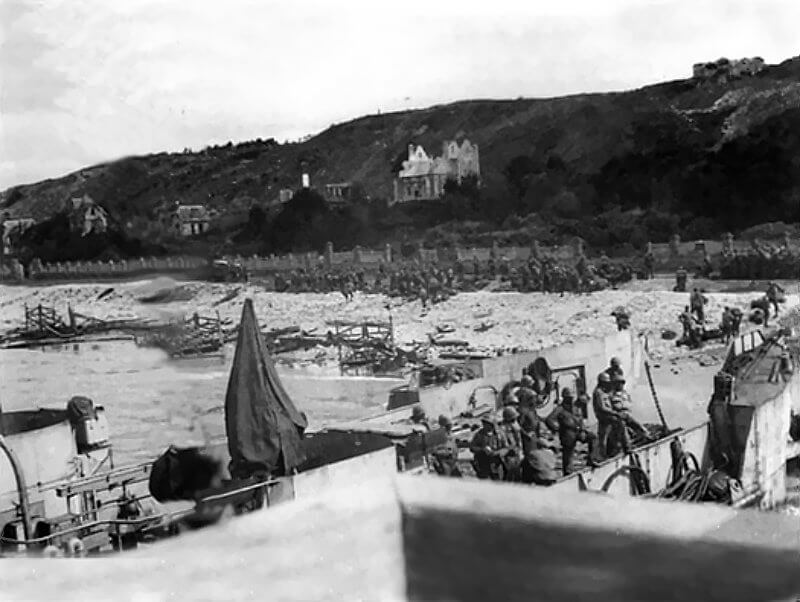
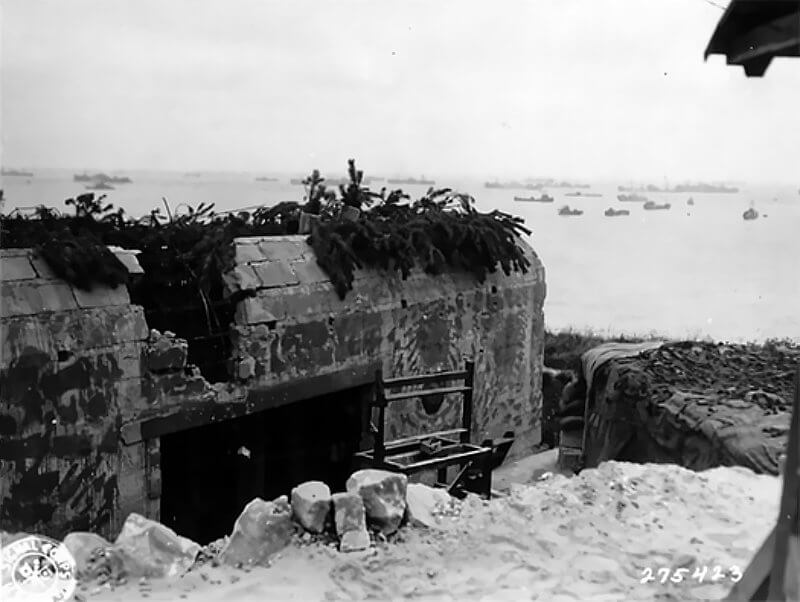
Widerstandsnest 70 occupies a commanding position on the plateau between Vierville-sur-Mer and Saint-Laurent-sur-Mer. From this height it overlooks both the Dog Green and Dog White sectors of Omaha Beach. Its location allows it to fire laterally across the sand, covering the open ground between the Vierville draw to the west and the Les Moulins draw to the east. This makes it an important link in the German Atlantic Wall chain of strongpoints.
The position is still under construction in early June 1944. Some of its bunkers are incomplete, and parts of the trench network are newly dug. Despite this, the site already combines permanent concrete structures with temporary fieldworks. The concrete elements include small shelters, open gun emplacements, and Tobruk pits. The fieldworks consist of zigzag trenches, firing bays, and foxholes, reinforced with timber and sandbags.
Its tactical role is to deny attackers the use of the flat ground between the two draws, to enfilade any troops advancing up the beach, and to add depth to the fire plan of the neighbouring Widerstandsnester. From its height, Widerstandsnest 70 can also observe Allied movements offshore and direct artillery fire from batteries further inland.
| Construction and Layout of Widerstandsnest 70 |
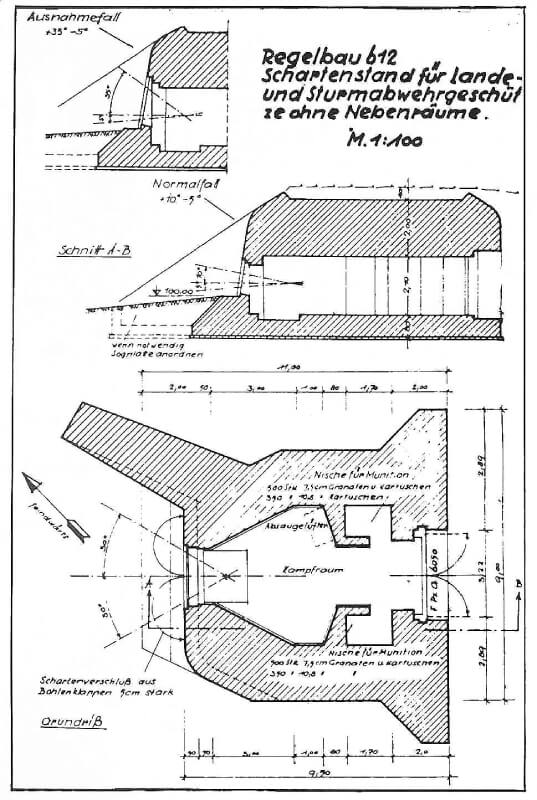
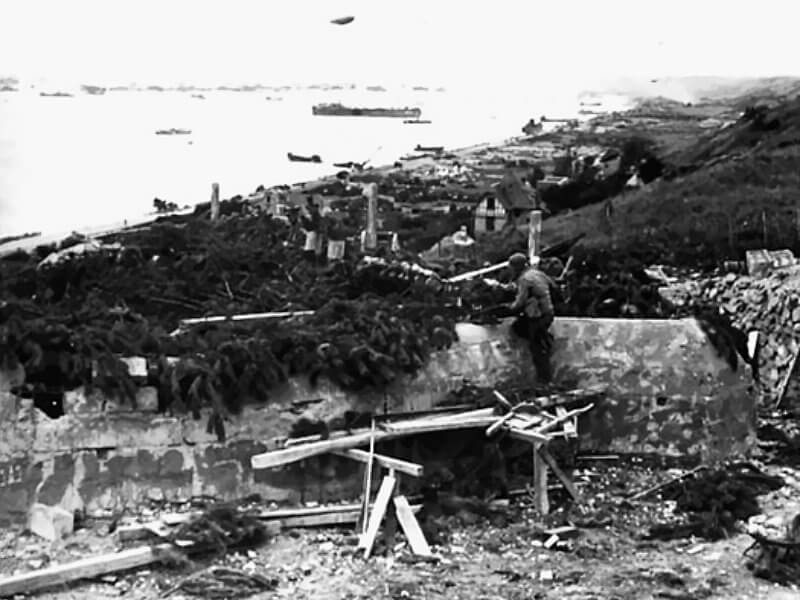
Widerstandsnest 70 remains under active construction until early June 1944. The site contains both incomplete bunkers and improvised fieldworks. A Regelbau R612 casemate is in progress, intended for a 7.5 cm gun, but it is not finished by the start of June. Several smaller shelters and fighting positions are already in place. These are built from concrete and salvaged materials. The garrison even demolishes nearby villas to recover stone and brick, improving both construction speed and fields of fire.
An extensive trench network runs along the cliff edge, linking the main positions. This network almost connects with neighbouring Widerstandsnest 68, creating a near-continuous defensive line. The layout contains several covered weapon pits and earthworks positioned to engage both seaward and landward approaches.
The R612 casemate faces east along the beach to allow enfilade fire once a gun is fitted. Its reinforced walls and overhead protection are designed to resist naval bombardment and provide a stable firing platform for an anti-tank or field gun. Nearby, an open emplacement is prepared for a second 7.5 cm gun. This position is unprotected, possibly sandbagged or revetted. It suggests an intention to mount two medium-calibre guns, one protected by concrete, the other in open support. Whether this second gun is installed by June 6th, 1944, remains uncertain.
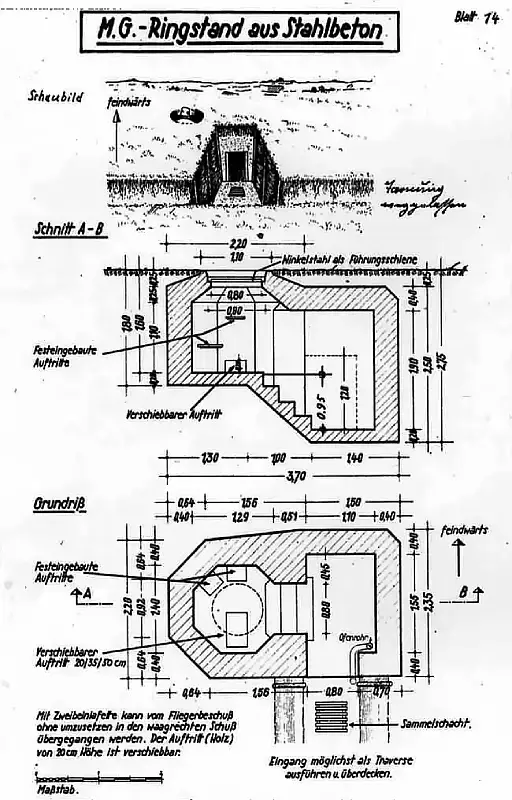
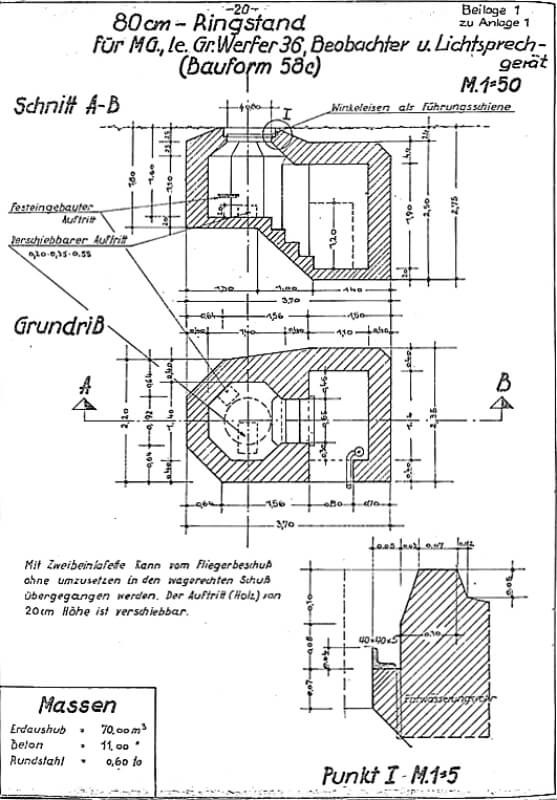
At least four Tobruk pits are built for infantry weapons. Two serve 5-centimetre Granatwerfer 36 mortars, allowing indirect fire into dead ground. Another contains a machine gun positioned to guard the inland approach and cover possible flanking attacks. The remaining pit or pits can mount further machine guns or act as observation posts. Each Tobruk is a small concrete structure with an open top and a firing pedestal. A narrow underground entrance gives access. Their low profile and 360-degree field of fire make them difficult targets.
Zig-zag trenches link all major positions, including the casemate, gun pit, Tobruks, and shelters. These trenches are dug into the earth, revetted, and provide cover for troop movement. Rifle pits and firing steps along the trench lines cover approaches up the slope. The trench system extends towards Widerstandsnest 68, reflecting the German practice of closing gaps between strongpoints. Telephone lines are probably buried along these routes to maintain communication with headquarters and adjacent defences.
Several small shelters provide cover for the garrison. These may be simple dugouts reinforced with concrete or timber. They serve as troop quarters, ammunition stores, or a local command post. German plans of Widerstandsnest 70 show at least one protected command bunker for coordination and communication. This post is likely equipped with maps, a field telephone, and basic command facilities.
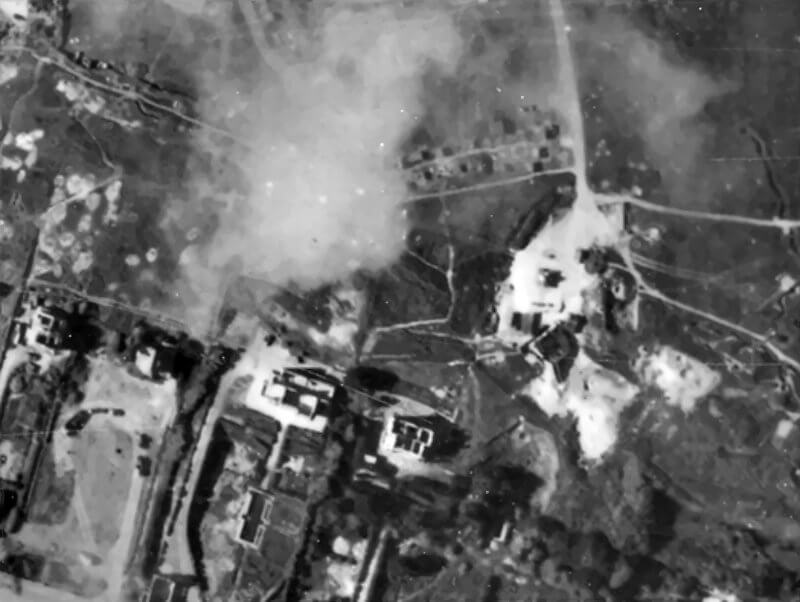
A reconstructed plan based on aerial photographs shows trenches marked in blue and barbed wire in green. The numbered features identify the incomplete R612 casemate, the prepared open gun emplacement, two mortar Tobruks, a 2-centimetre Flak 30 position, several machine-gun posts, a probable command shelter, and another Machine Gun or Flak position on the western flank.
Overall, Widerstandsnest 70 is compact but carefully organised. The central gun position is supported by infantry weapons on the forward slope of the bluff. Trenches and wire obstacles create a defended perimeter. Camouflage includes earth, vegetation, and netting to conceal positions from Allied reconnaissance. Despite its unfinished state, Widerstandsnest 70 follows the principles of the Atlantic Wall. Reinforced concrete works integrate with field defences and natural terrain to create a layered and mutually supporting position.
| Multimedia |
| Defensive Systems and Infrastructure of Widerstandsnest 70 |
Beyond its bunkers and trenches, Widerstandsnest 70 is protected by layered obstacles and supporting infrastructure. These measures aim to slow, channel, and destroy attacking forces. They form part of the wider Omaha Beach fortification programme implemented under Field Marshal Erwin Rommel’s directives in late 1943. By June 1944, Omaha’s defenders have emplaced extensive obstacles both on the shoreline and around the strongpoints.
Minefields cover the approaches to Widerstandsnest 70. Anti-personnel and anti-tank mines are laid in depth to inflict casualties and block movement. Likely routes up the bluff or across the open plateau between Vierville and Saint Laurent-sur-Mer are seeded with belts of mines. Some fields extend onto the tidal flats to threaten landing craft as the tide recedes. The density of this mining ensures that any assault faces a continuous and dangerous network from the high-water line inland.
Barbed wire entanglements surround the position. Double-apron fencing and concertina coils form outer rings beyond the trench line. These barriers are positioned to funnel attackers into pre-sighted killing zones. Draws and gullies in the bluffs are blocked or mined to deny the use of natural approaches. Wire obstacles also close off routes inland, forcing troops into areas swept by machine guns and mortars.
Anti-tank obstacles support this perimeter. Widerstandsnest 70 sits on a plateau without a direct road up the cliff, but it benefits from barriers at nearby draws. West at the Vierville D-1 exit, a concrete anti-tank wall blocks the coastal road. East between Widerstandsnest 66 and Widerstandsnest 68, an anti-tank ditch stretches for roughly 800 metres. These features halt armoured vehicles and force them into zones covered by German guns, including those of Widerstandsnest 70. Dragon’s teeth and other fixed obstacles add further difficulty for an armoured advance.
Communications infrastructure links Widerstandsnest 70 to higher command. A buried field telephone cable likely runs from its command shelter to the 10. Kompanie headquarters at Widerstandsnest 69 near Saint Laurent-sur-Mer, or into the regimental network. This enables requests for artillery, reinforcement, or coordination with neighbouring strongpoints such as Widerstandsnest 71 and Widerstandsnest 72 at Vierville. Redundant lines or limited radio sets may provide backup, but the primary system is buried cable, less vulnerable to bombardment than exposed masts.
The natural terrain itself strengthens the position. Widerstandsnest 70 occupies the crest of bluffs 25 to 30 metres high. These slopes are steep and broken, with few narrow paths, all under direct observation. Any assault from Dog Green or Dog White must climb this exposed ground under fire. The plateau beyond offers little cover, consisting of open fields. German engineers have demolished nearby buildings and cleared vegetation to deny concealment. The concave shape of the coast at Vierville allows Widerstandsnest 70’s elevated weapons to sweep across beaches in front of neighbouring sectors, creating overlapping arcs of fire.
Some Omaha Beach strongpoints also contain hidden flame fougasse devices. These are remotely triggered flamethrowers buried to protect dead ground. When fired, they spray burning fuel into gullies or blind spots that direct weapons cannot reach. It is uncertain whether Widerstandsnest 70 has such devices, but their use elsewhere reflects Rommel’s defensive doctrine.
Widerstandsnest 70 is therefore more than a collection of bunkers. It is part of an integrated killing ground. Barbed wire drives infantry into mined lanes. Mines force attackers into open ground under machine-gun and mortar fire. Anti-tank obstacles stall vehicles beneath the guns of Widerstandsnest 70 and its neighbours. Communications ensure support from artillery and adjacent nests. The design follows the Atlantic Wall’s defence-in-depth principle, combining natural obstacles and man-made fortifications to destroy an assault before it can break inland.
| Multimedia |
| Armament and Weapons Emplacements of Widerstandsnest 70 |
Widerstandsnest 70 is not heavily armed by coastal battery standards, yet its weapons make it a formidable company-level strongpoint. Its firepower is focused on anti-personnel and anti-tank defence, covering both the beach and the plateau above.
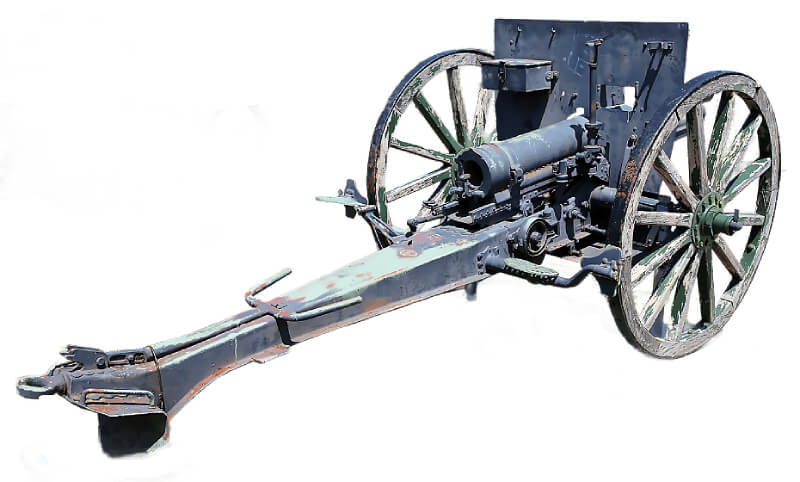
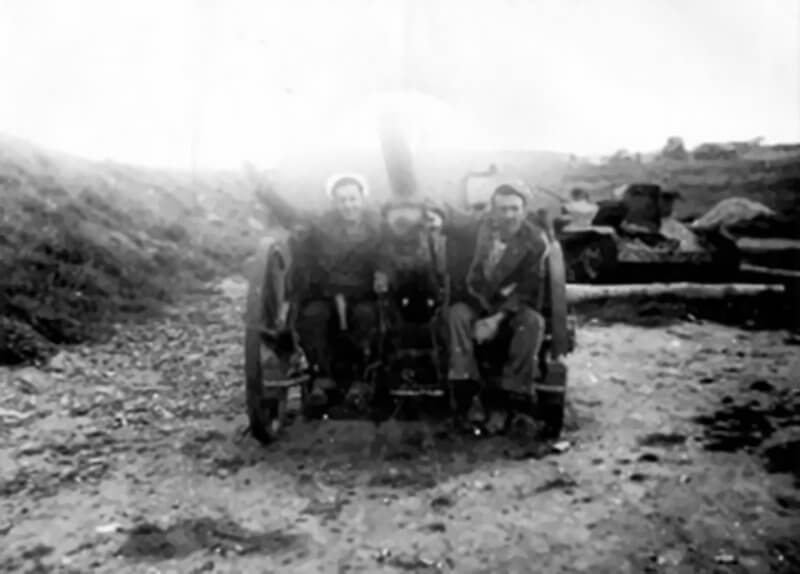
The position is planned to mount two 7.5-centimetre guns. These are likely field guns or anti-tank pieces adapted to engage landing craft, tanks, and infantry. One is intended for the R612 casemate, the other for an open field emplacement. Some reports suggest the casemate weapon could be a captured Czech 8-centimetre FK 17(t) or another repurposed foreign gun. From its height, a 7.5-centimetre weapon can deliver enfilade fire along the beach or strike vehicles emerging from the draws. By June 1944, it is uncertain if either gun is installed. Widerstandsnest 70 is incomplete, and no confirmed photographs show a gun in the casemate on D-Day. If present, the weapon may be hastily mounted and without full protection, but even a single operational 7.5-centimetre gun poses a major threat to landing craft or tanks.
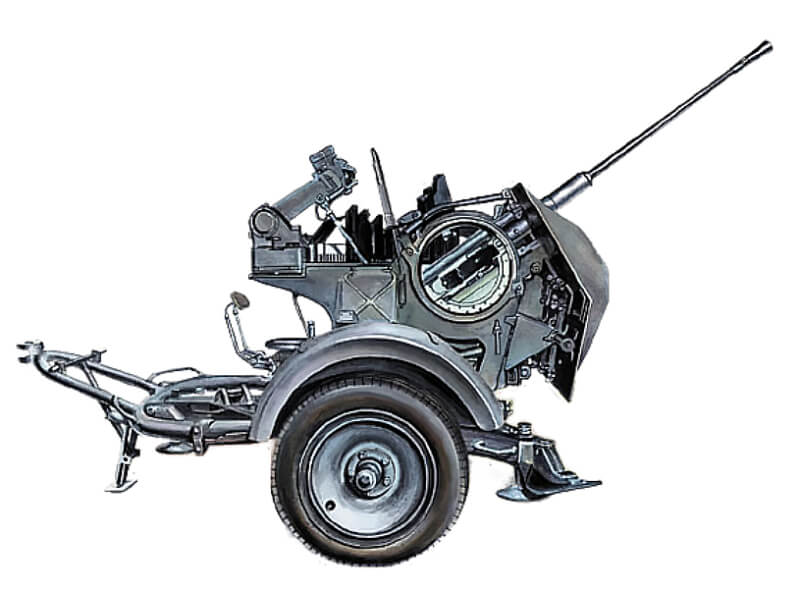
A 2-centimetre FlaK 30 automatic cannon is emplaced within the strongpoint. Mounted in a concrete encuvement, it has full traverse and a high rate of fire. Designed for low-flying aircraft, it is equally effective against infantry or light vehicles. From the cliff edge it can sweep the beach with explosive shells, engage targets on the bluff, or turn inland against approaching troops.
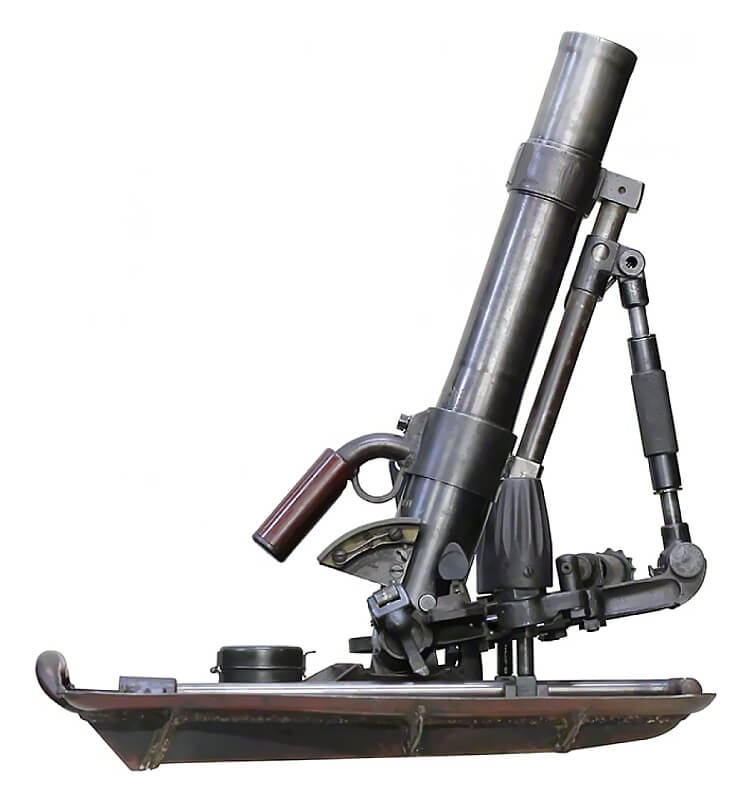
Two 5-centimetre Granatwerfer 36 mortars are sited in Tobruk pits. With a range of up to 600 metres, they can drop shells into dead ground unreachable by direct fire. Likely targets include the shingle bank, the cliff base, and the flanks of nearby draws. Their high-explosive rounds are highly effective against concentrated infantry.
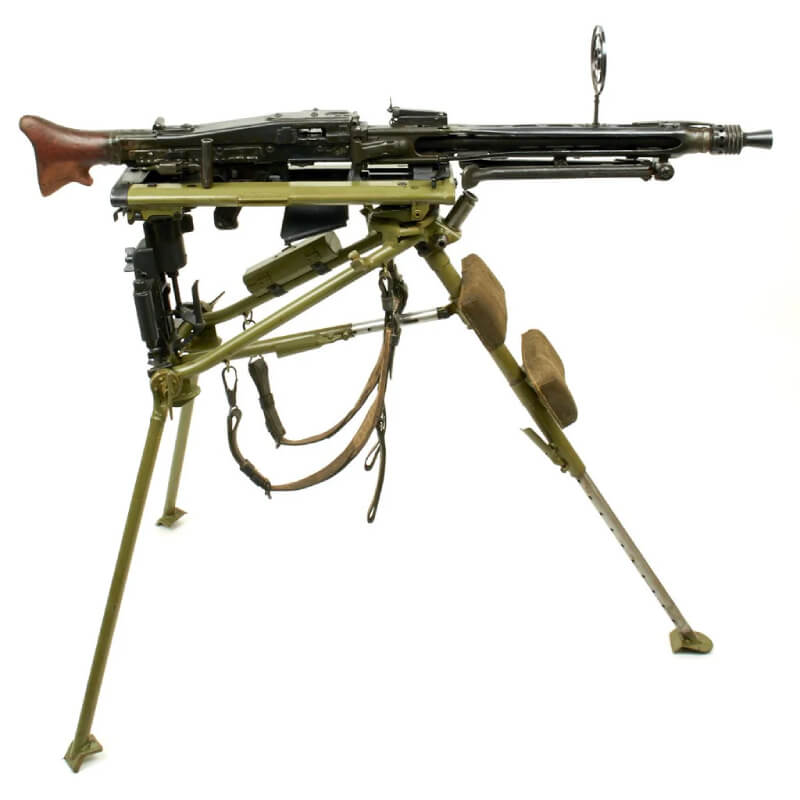
Machine-gun positions form the backbone of the infantry defence. The garrison uses MG 34 and MG 42 guns to deliver sustained fire across multiple sectors. At least one Tobruk covers the rear approach, while others face the beach and flanks. Overlapping arcs from Widerstandsnest 70 and neighbouring strongpoints create interlocking bands of grazing fire across the sand and exit routes. Even in its incomplete state, these weapons can catch attackers in crossfire. For close-quarters fighting, the defenders also have MP 40 submachine guns, rifles, and grenades.
The garrison is likely equipped with handheld anti-tank weapons, including Panzerfaust or Panzerschreck launchers, to destroy any armoured vehicle breaching the perimeter. These are supported by hand grenades for trench and close-in defence.
The siting of these weapons maximises mutual support. If both 7.5-centimetre guns are operational, one would likely fire eastward towards Saint Laurent, overlapping with Widerstandsnest 68, while the other could cover Vierville or inland approaches. The 2-centimetre Flak can be rapidly redirected to any threat, from strafing aircraft to infantry clusters. Mortars are pre-sighted on key approach routes and likely cover positions. Machine-gun arcs overlap with those of Widerstandsnest 71 and Widerstandsnest 72, ensuring continuous fire coverage.
The concave curve of the coastline allows Widerstandsnest 70 to fire not only on its own sector but also to enfilade neighbouring beaches. Troops advancing through the Vierville draw can be struck from the front by Widerstandsnest 72 and simultaneously from the flank by Widerstandsnest 70’s weapons. Any attempt to bypass the position inland meets fire from its rear-facing machine guns and mortars. This integration of fields of fire reflects the German doctrine of overlapping defence, a key feature of the Atlantic Wall’s tactical design.
| Multimedia |

| Garrison and Organisation of Widerstandsnest 70 |
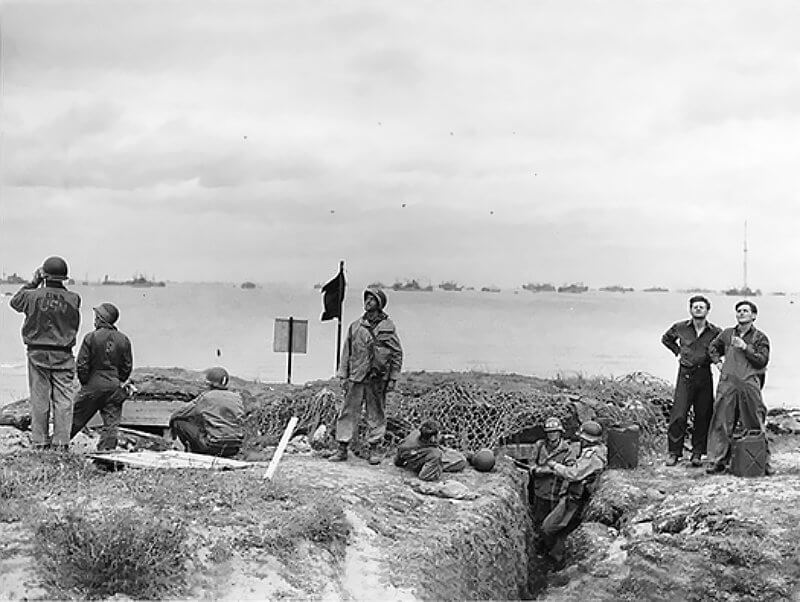
The garrison of Widerstandsnest 70 is small, roughly the size of a reinforced platoon with about thirty to thirty-one men. It consists of weapons crews, infantrymen, and support personnel organised for the specific needs of the strongpoint. These troops are elements of the 10. Kompanie, Grenadier-Regiment 726, part of the 352. Infanterie-Division in June 1944. The regiment was originally under the 716. Infanterie-Division (bodenständig) but was transferred to the more experienced 352. Infanterie-Division in March to strengthen the Omaha Beach sector. The Kompanie-Gefechtsstand is based in Saint-Laurent-sur-Mer, with Widerstandsnest 70 operating as one of its forward Küstenverteidigungsstellungen.
Widerstandsnest 70’s detachment forms part of a Schützenkompanie assigned to the coastal defence. The company is divided into small detachments to man several Widerstandsnester. The garrison here likely includes a Zugführer, either a Leutnant or Oberfeldwebel, a deputy Unteroffizier, and several Gruppenführer for the weapon teams. Each major weapon has a dedicated crew: five to seven men for each 7,5-centimetre gun, three to four for the 2-centimetre Flak, and two to three for each 5-centimetre Granatwerfer. Maschinengewehr-Stände are served by three- to four-man crews, supported by Schützen acting as sentries, ammunition carriers, and Melder. A designated Liason officer maintains contact with the Kompanie-Gefechtsstand and neighbouring Stützpunkte, relaying reports and requests for fire support.
Specialist roles are clearly defined. Maschinengewehr-Schützen and their assistants maintain MG 34 or MG 42 positions, often drawn from the company’s schwere Zug. Granatwerfer crews operate the 5-centimetre weapons, providing close-support fire. Panzerabwehr- and Feldgeschütz crews, possibly with artillery backgrounds, handle the 7,5-centimetre pieces. Flak-Schützen crews, sometimes seconded from Luftwaffe-Flak units, man the 2-centimetre Flak 30. Munitions-träger keeps all positions supplied during combat, moving ammunition from teh ammunition bunker to each weapon. A Medic may be attached from the rear but is unlikely to be permanently stationed in Widerstandsnest 70.
The quality of the garrison reflects the mixed composition of the 352. Infanterie-Division. Many officers and Non-Commissioned Officers are veterans of the Ostfront, while younger conscripts and Volksdeutsche from Alsace form part of the ranks. A significant number of Osttruppen, volunteers or pressed men from former Soviet territories, are also present within the division, and it is possible that some serve in Widerstandsnest 70. These men are commanded by experienced German cadre, with Befehle kept simple to ensure clarity. Key weapons and positions remain in the hands of trained Wehrmacht soldiers.
Command of Widerstandsnest 70 falls under the III. Bataillon, Grenadier-Regiment 726, which is operationally subordinated to Grenadier-Regiment 916 for the Omaha coastal sector. Orders flow from Bataillons-Gefechtsstand to the Kompanie-Gefechtsstand at Saint-Laurent-sur-Mer, and then to the Zug in Widerstandsnest 70. The Zugführer is responsible for readiness, Feuerleitung with neighbouring Widerstandsnester, and maintaining defensive discipline. Once battle begins, Waffenbedienungen operate semi-independently under their Gruppenführer, while the Zugführer focuses on requesting artillery support and adjusting the defensive plan.
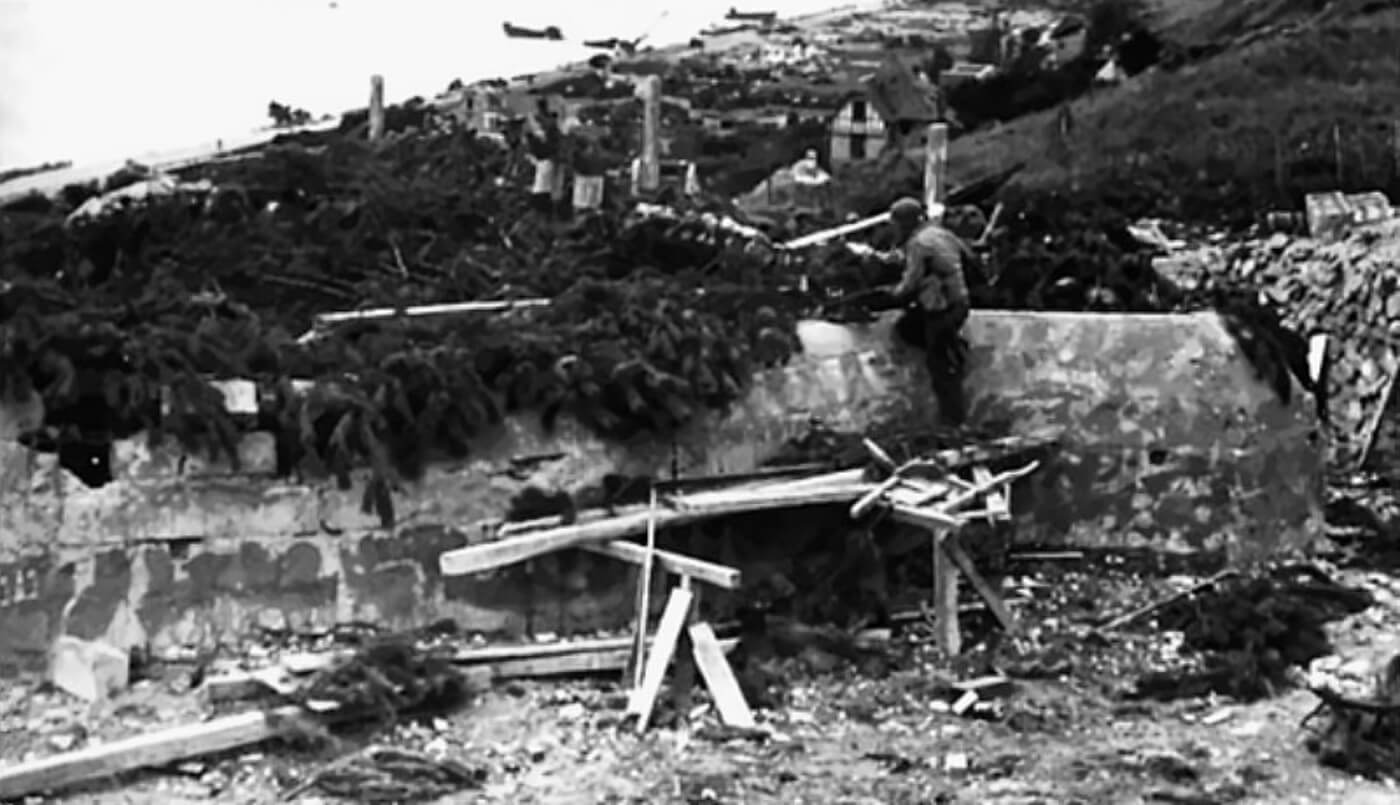
By early June 1944 the garrison is on ständige Gefechtsbereitschaft. The men stand to at their posts before dawn each day, aware that the invasion could begin at any moment. They have prepared Schußtafeln for every weapon and rehearsed firing schedules. Training includes Zielübungen and coordination drills with neighbouring Stützpunkte. A photograph from spring 1944 shows German troops training at Widerstandsnest 70, demonstrating their operational readiness. Doctrine dictates that the Stellung is to be held at all costs. Although Widerstandsnest 70 is smaller and less developed than some neighbouring positions, its defenders are expected to inflict schwere Verluste on any attackers before surrendering or withdrawing.
| Widerstandsnest 70’s Role in the Omaha Beach Defence Strategy |
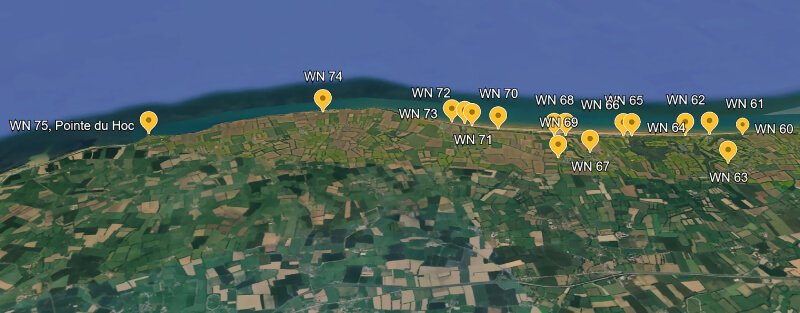
Widerstandsnest 70 plays a strategic role in the German defence of Omaha Beach as part of the Atlantikwall system of interlocking Widerstandsnester. German planners recognise Omaha as a likely invasion site and construct numerous positions along its 10-kilometre length, concentrating on draws where attackers will try to push inland. Widerstandsnest 70 is one of four defensive positions guarding the Vierville-sur-Mer sector at Omaha’s western end. It sits between the Vierville draw (D-1) to the west and the Les Moulins draw (D-3) to the east. From its plateau position in this gap, it prevents any unguarded ground between the major strongpoints at those exits. In effect, Widerstandsnest 70 seals the high ground between Vierville and Saint-Laurent, denying the Allies a lateral or unopposed inland advance in this area.
Integration with neighbouring positions is deliberate. Widerstandsnest 70 is coordinated with Widerstandsnest 71 and Widerstandsnest 72 defending the Vierville exit, and with Widerstandsnest 68 defending the Les Moulins exit. A trench system almost links Widerstandsnest 70 to Widerstandsnest 68 along the cliff, forming a near-continuous resistance line. On the western side, Widerstandsnest 70 lies within close support distance of Widerstandsnest 72 and Widerstandsnest 71 across the D-1 draw. Widerstandsnest 70’s guns and machine guns can fire across the draw into the flank of any enemy forcing that exit, supporting Widerstandsnest 72 from the opposite side. Conversely, Widerstandsnest 71’s heavier weapons can sweep the beach in front of Widerstandsnest 70, creating crossfire into Dog Green sector. This mutual support is enhanced by the concave coastline, which gives Widerstandsnest 70–Widerstandsnest 73 excellent fields of fire over large stretches of the beach. WN70 also protects the rear of Widerstandsnest 72 and Widerstandsnest 71; any Allied troops attempting to outflank those nests from inland would encounter resistance from Widerstandsnest 70’s rear-facing weapons.
The primary role of Widerstandsnest 70 is to deny Allied use of the Vierville–Saint-Laurent plateau. This high ground dominates western Omaha and, if captured, would allow the enemy to outflank other defences. Widerstandsnest 70’s weapons cover the plateau, the Dog Green and Dog White sectors below, and the open fields to the east and south. Dog Green, directly at the Vierville draw, is intended by German defence plans to be a killing zone, with Widerstandsnest 70 contributing flanking fire from the east. The position also protects the left flank of Widerstandsnest 72, preventing any advance from Dog White towards Vierville’s rear. In this way, Widerstandsnest 70 guards the open ground behind Vierville and the hamlet of Hamel-au-Prêtre, making it hazardous for Allied units to manoeuvre inland before it is neutralised.
The incomplete R612 casemate of Widerstandsnest 70, positioned just behind the cliff crest, is designed to house a 7,5-centimetre gun facing east along the shoreline for enfilade fire. This reverse-slope siting gives some protection from naval bombardment and allows the weapon to re-engage once shelling lifts. Widerstandsnest 70’s location and fields of fire exemplify its purpose: to dominate open ground between Vierville and Saint-Laurent, and to provide flanking fire on any force attempting to land or move through the D-1 sector.
Within the wider Atlantikwall system, Widerstandsnest 70 is part of a layered defence. The first line is the beach itself, covered by mines, obstacles, and interlocking fields of fire from Widerstandsnest 60 to Widerstandsnest 73. The main fortresses at the draws, such as Widerstandsnest 72 with its 8,8-centimetre gun at Vierville and Widerstandsnest 66/65 at Saint-Laurent, are designed to block armour that makes it ashore. Widerstandsnest 70, less heavily armed but well placed, serves as an intermediate strongpoint to reinforce these fortresses and to trap infantry moving inland between them. Behind Widerstandsnest 70, further inland positions such as Widerstandsnest 69 with its Nebelwerfer battery, and Widerstandsnest 67 and Widerstandsnest 63 behind the beach exits, form the second line of resistance.
Widerstandsnest 70 is linked into this network by communications and coordination plans. If the Allies are slowed on the beach, German doctrine calls for Widerstandsnest 70 and its neighbours to pin them down until mobile reserves, such as II. Battailon, Grenadier-Regiment 915 or armour from 21. Panzer-Division, can counterattack. Its task is to delay, disrupt, and inflict maximum casualties, buying time for higher-level responses. Its placement ensures that the D-1 Vierville exit remains closed; the road is blocked by an anti-tank wall and covered by Widerstandsnest 70 from the cliff and by Widerstandsnest 71’s guns and mortars above the draw. Together with Widerstandsnest 72 at the foot of the draw, these positions make Vierville one of Omaha’s most heavily defended sectors.
Although modest in size, Widerstandsnest 70 is treated under German doctrine as a nid de résistance, a thorny defensive nest that must be eliminated individually. Its well-sited weapons, overlapping fire plans, integration with neighbouring positions, and use of natural high ground embody the principles of the Atlantikwall. Before and during June 1944, it stands as a key link in the chain of defences protecting the western end of Omaha Beach, a position designed to hold up any advance until the full weight of the German counterattack can be brought to bear.
| Multimedia |
| Sources |