

| Fort d’Ében-Émael |
| Podcast |
| Location |
| Garrison |
Régiment de Forteresse de Liège
| Unit |
- Groupe de Commandement et des Services
- 1re Batterie (Batterie d’attaque)
- 2e Batterie (Batterie de défense)
| Armament |
- 2 120-millimetre guns
- 16 75-millimetre guns
- 12 60-millimetre guns
- 25 twin machine guns
- 6 anti-aircraft machine guns
- Approximately twelve light machine guns.
| Summary |
Fort d’Ében-Émael, also known as Fort Eben-Emael, is a large Belgian fortress. Belgium builds it between 1932 and 1935. It stands on the eastern frontier near the Dutch border.
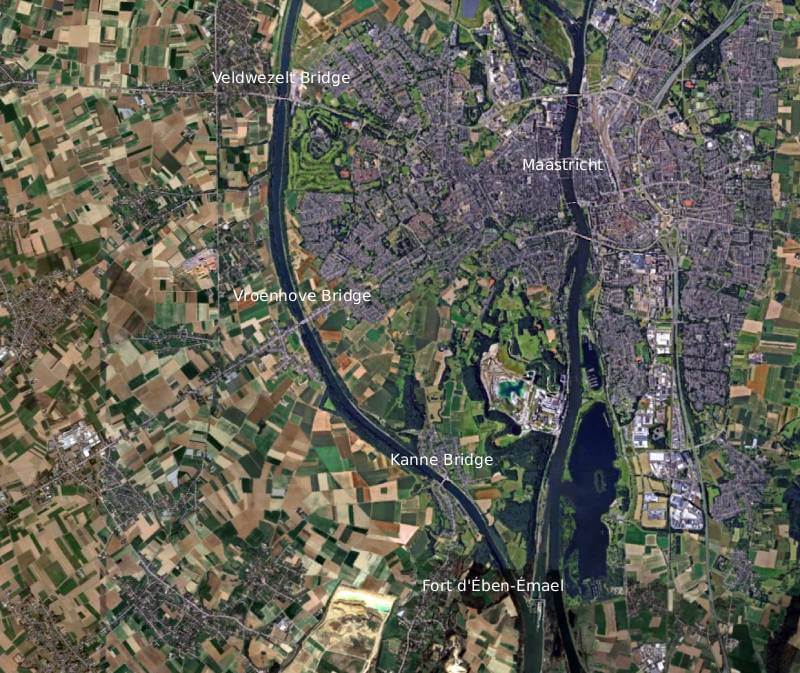
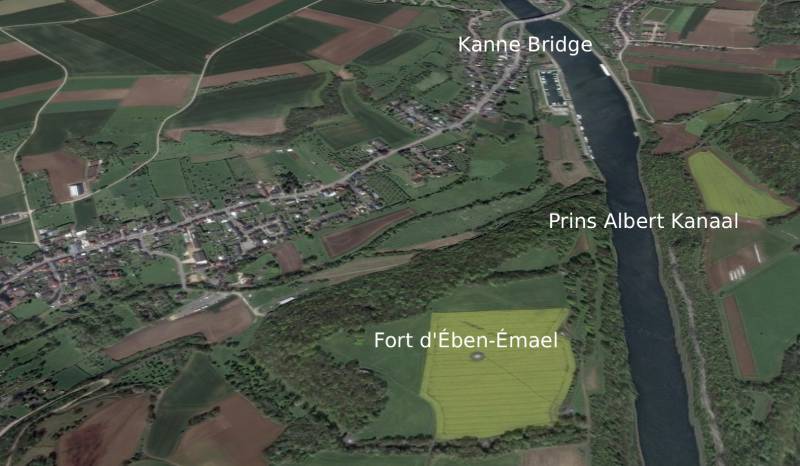
The fort lies about 20 kilometres north-east of Liège, Belgium and about 10 kilometres, south of Maastricht, The Netherlands. It occupies a commanding position beside the Albert Canal. It sits close to the junction of Belgium, the Netherlands, and Germany.
Belgium conceives the fortress after the First World War. Its purpose is to support Belgian neutrality. It guards the narrow Visé–Maastricht gap. German forces use this route during the invasion of 1914.
Eben-Emael’s primary task is to defend key bridges. These include bridges over the Meuse River and the Albert Canal. These crossings are essential for any invading force. The fort is intended to delay or deter a German advance into central Belgium.
When construction ends, Fort Eben-Emael is the largest fortress in the world. It is regarded as impregnable at the time. It contains extensive underground works. It has heavily armed positions.
In May 1940, during the Second World War, a small force of German paratroopers mounts an assault. They conduct the first glider-borne assault in history. They neutralise the fort within half an hour.
This action removes the major obstacle covering Belgium’s border in this sector. It allows German troops to pass through without effective interruption. It marks a decisive turning point in the Battle of Belgium.
| Construction and Layout of Fort Eben-Emael |
World War 1 exposes a serious weakness in the 1914 Belgian defences. On that site Fort d’Ében-Émael or Fort Eben-Emael is designed to exploit natural defensive advantages. The position lies on a hill between Liège and Maastricht. It dominates the River Meuse. It also anchors the new strategic barrier created by the Albert Canal.
The broad plateaux of Saint Peter’s Hill, known as the Caestert Heights, overlook the River Meuse east of Eben and Emael. The ground offers unrivalled views into southern Holland and Germany. The hill serves defensive purposes since the fourth century under Roman control. Many tribes and armies occupy it over time. Forces based there observe movement across many kilometres. They also control the east–west route across the Meuse at Maastricht. Invading armies repeatedly use this crossing.
The requirement is for a fortress to complete the modernised Position Fortifiée de Liège I. This system aims to delay any invasion from the east. Belgian authorities decide in 1931 to build the fortress at Eben-Emael. It becomes the centrepiece of national defended neutrality. Construction costs reach fifty million Belgian francs by 1936. This figure excludes further work completed between 1936 and 1940.
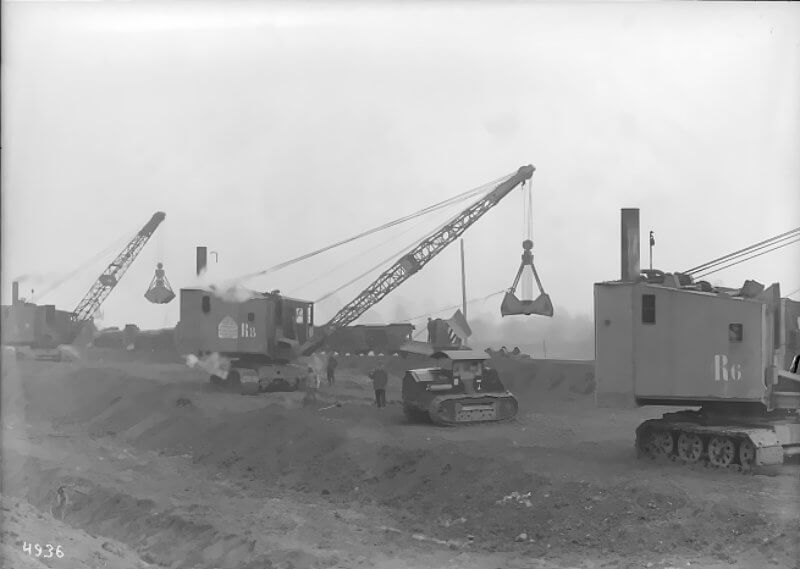
This is a limestone and marlstone hill overlooking the Meuse and Albert Canal junction. Engineers excavate deep into the rock. They remove spoil by barge through the canal. This method keeps most construction out of view. The creation of the Albert Canal allows Belgium to construct a powerful modern defensive position at Eben Emael. The canal is planned in 1919. It represents a major national engineering effort.
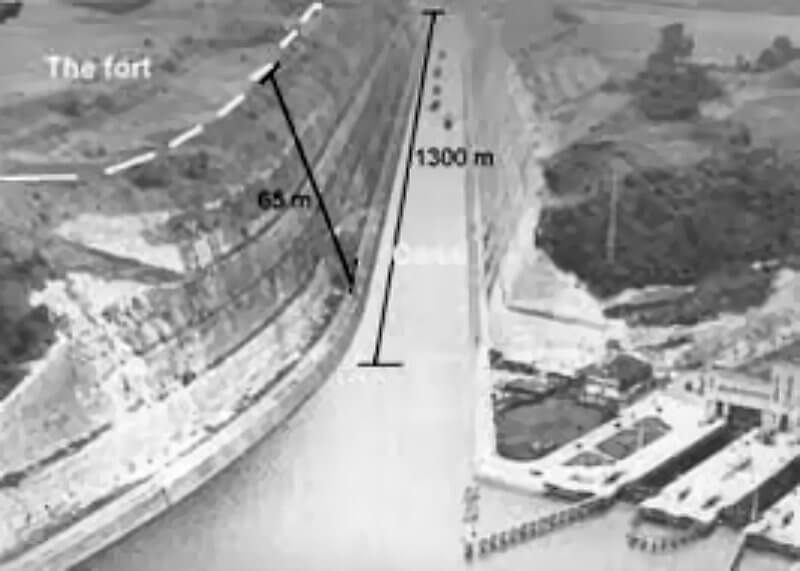
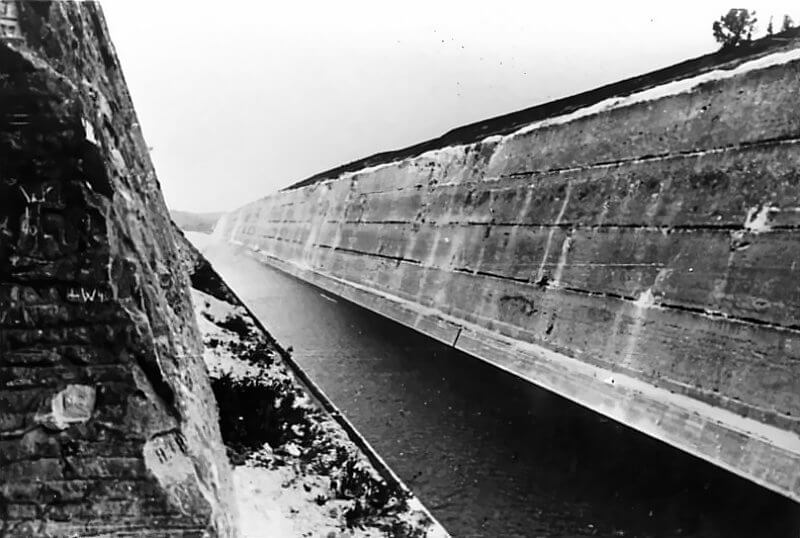
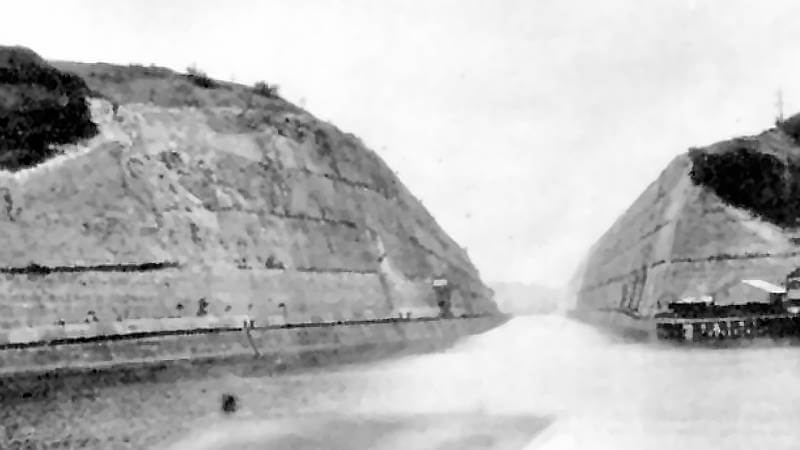
The most demanding work occurs at Saint Peter’s Hill. Engineers cut directly through the marl rock. This section becomes known as the Tranchée de Caster. The cutting links the Albert Canal with the Zuid-Willemsvaart Canal. The excavation splits the hill completely. It forms a near-vertical trench. The cutting reaches a depth of approximately 59 metres. It measures about 46 metres in width. Its total length extends to roughly 1,190 metres. The scale of the work transforms the landscape. The new water barrier strengthens the defensive potential of Eben Emael.
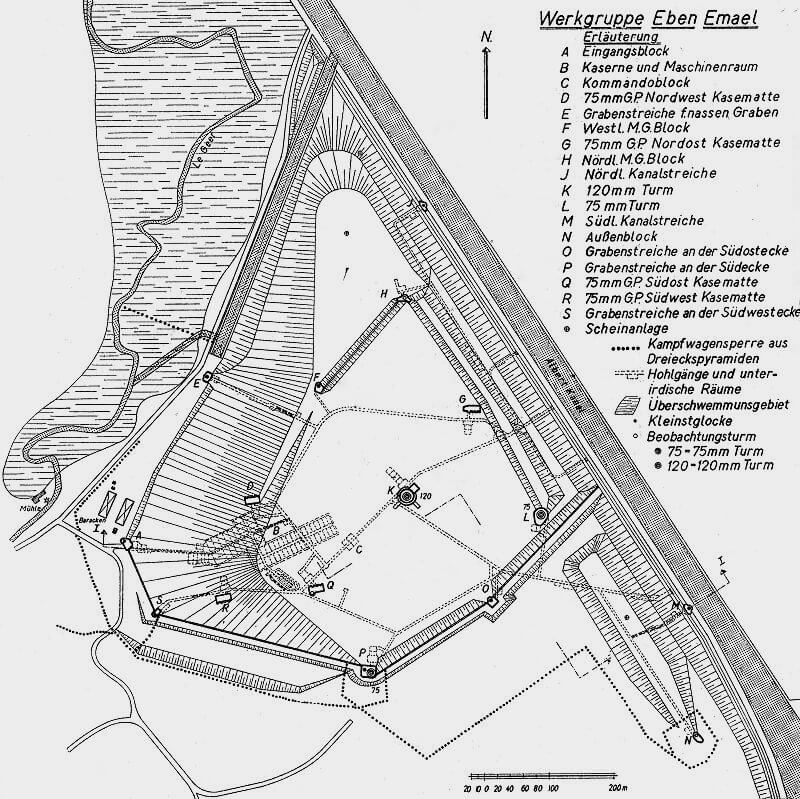
The fort is taken into service in 1935. The completed complex has an irregular, arrowhead-shaped footprint. It measures roughly 600 to 750 metres across in each direction. Its overall dimensions are about 0.75 by 1 kilometre. It covers an area of 75 hectares. Reinforced concrete walls and roofs cover the galleries and combat blocks. The concrete reaches thicknesses of up to 1.5 metres. A layer of earth lies above for camouflage and added protection. In total, the fort includes 17 surface combat blocks. These include gun turrets, casemates, and pillboxes across a flat plateau.
This grouping is more compact than France’s contemporary Maginot forts. The design still incorporates important lessons from First World War sieges. Belgian engineers use high-quality reinforced concrete. They pour it carefully to avoid weak joints. They also space gun turrets further apart. This reduces the risk of one shell disabling multiple batteries.
The fort receives robust ventilation and filtration systems. This responds to the threat of gas warfare experienced in the First World War. The engineers also improve drainage. The fort’s elevation and engineering make it notably drier and more habitable than earlier forts. Beneath the surface, Fort Eben-Emael functions as a self-contained underground complex on three levels. Engineers carve about 4 to 5 kilometres of tunnels into the bedrock. Some galleries reach depths of up to 45 metres.
Level zero lies about 45 metres below the top of the fort. It contains the underground barracks and main facilities. Sleeping quarters accommodate up to 1,200 men. The level also includes a kitchen and mess halls. It includes a hospital with an operating theatre. Workshops stand beside a fresh-water well and pumping station. A power plant with diesel generators supplies electricity.
Above this, Level one lies about 25 metres below the surface. It contains ammunition magazines and support utilities. These include air filtration rooms and ventilators. It also includes the command post. Entrances lead upward into each combat block. Long inclined galleries connect these areas to the surface fighting positions. The main entrance is heavily protected. A thick iron gate and drawbridge span a 4 metre pit. This approach leads into Block One, the entry bunker. This block is fitted with anti-tank guns and machine guns. It also has gas-tight doors and a decontamination chamber.
The overall design aims to maximise resilience and self-sufficiency. The project is extremely expensive and costs about 50 million Belgian francs. The layout combines a fortified perimeter of ditches and walls with internal robustness. It also provides modern comforts to sustain a prolonged defence.
| Multimedia |

| Defensive Systems and Infrastructure of the Albert Canal |
Belgian defensive planning focuses on the Albert Canal north of Fort Eben-Emael. The intention is to delay a German advance for five days. During this period, Allied armies move into central Belgium. They establish a defensive line along the River Dyle.
The Albert Canal measures 129.6 kilometres in length and is constructed between 1930 and 1939. It stands as a major achievement of Belgian civil engineering. The canal creates a direct inland waterway between Liège and Antwerp. At the same time, it forms a substantial military obstacle against an invasion from the east. It deliberately blocks manoeuvre from the east. On average, the canal measures approximately 46 metres in width. Its depth averages around 4.5 metres.
Excavated spoil is piled along the western bank. This creates elevated firing positions for the defenders. From these positions, Belgian troops dominate the open ground to the east. North of Eben-Emael, the canal forms a serious obstacle. Its banks are steep and high. Any German crossing requires careful planning and preparation.
Belgian defensive planning remains heavily influenced by experience from the Great War. National strategy relies on static defensive obstacles. These range from the Albert Canal to bunkers and major forts such as Eben Emael. Belgian planners assume that these works, combined with border troops, will form an impenetrable barrier. This concept depends entirely on a repeat of the German strategy used in 1914. No serious alternative is anticipated. Despite immense investment of time, labour, and funding, the defensive concept proves flawed. German Blitzkrieg operations overrun the Albert Canal before Belgian forces can respond.
Even before construction of the canal begins, the Belgian Army fortifies the western bank. This bank is intended as the primary forward defensive line. The defensive frontage stretches from Antwerp in the north to Liège in the south. The Albert Canal is viewed as the decisive obstacle to block German entry. It is also expected to delay any invasion long enough for British and French forces to arrive. These Allied reinforcements are intended to strengthen the forward line.
Fort Eben Emael occupies a key position on the right flank of the defensive system. It stands on the Loën heights. Its elevated and dominating location assigns it a central role in operational planning. Belgian doctrine regards the fort as virtually unassailable. It becomes the cornerstone of the fortified ring protecting Liège.
After mobilisation in September 1939, the Belgian General Staff recognises a strategic shift. It becomes clear that French forces will not advance to the Albert Canal. This results from the new Anglo-French strategy known as the Dyle Plan. This plan introduces major organisational changes.
Between Antwerp and Leuven, Belgian units withdraw behind the Antwerp Fortified Area. They also fall back to the Dyle Line, also called the KW Line. This line runs from Antwerp through Brussels to Namur. Construction of its extension begins during the winter of 1939. British forces deploy between Leuven and Wavre. French forces secure the sector between Wavre and Namur.
As a result, the Albert Canal no longer serves as the primary defensive wall by May 1940. Despite this, the canal sector near Maastricht retains critical importance. Numerous bunkers protect bridges and flanking approaches. These are regarded as essential to prevent a German crossing from Dutch Limburg. The terrain near Maastricht offers a favourable bridgehead for an attacker. This makes fortification of the canal and bridges unavoidable.
The first bunkers are installed during canal construction. As bridges and locks are completed, defensive works follow immediately. One of the earliest bridges, at Lanaye near Eben Emael, receives a bunker in November 1931. This bunker is built into the left support column. The concrete thickness measures 30 centimetres.
In 1933, Belgian engineers conduct a detailed analysis of the Maastricht enclave. Special emphasis is placed on bunker and casemate placement. Planning proceeds so construction can begin once the canal stretch between Kanne and Briegden is completed. Defensive bunkers are planned for the bridges at Kanne, Vroenhoven, and Veldwezelt. Large flanking casemates are also planned along the western bank. These are designated A, B, B’, C, and D.
These flanking casemates are multi-storey structures. They include lateral firing ports covering the canal plain. Machine-gun embrasures are installed. Steel observation cupolas crown the roofs. In 1934, SA des Entreprises Réunies begins construction of the major works. German labourers and engineers participate extensively in this phase. Information gathered during construction later proves valuable to German intelligence.
German workers from the Pieux Frankignol Company participate in building bunkers A, B, B’, C, and D. This is known to Belgian defence authorities. Restrictions are imposed requiring Belgian supervision of all work. The gendarmerie enforces security. Foreigners, especially Germans, are barred within a 500-metre radius of the sites.
Bunkers A, B, B’, C, and D are completed and occupied between February 18th and February 20th, 1935. Cyclistes Frontières from Lanaken man the positions. Each bunker, except C, is staffed by an officer or NCO commander. Two sergeants supervise upper and lower levels. One senior private operates a light machine gun with two ammunition bearers. Observation and liaison duties fall to one senior private and four soldiers. Bunker C follows the same structure but with reduced observation staff.
These casemates support the main bridge-defence bunkers M and N at Vroenhoven and Veldwezelt. These are completed on February 8th, 1935. They stand directly on the western road approaches. In March 1935, plans are approved for twenty-seven additional structures. Bunker O is intended to cover the Kanne bridge and serve as an observation post for Fort Eben Emael.
In 1935, the firm Moens constructs flanking bunkers E and F at Kanne. Each contains a single firing chamber. Weapons are mounted on a Chardome chassis. The gunner operates while seated. Bunker E has ground-level access. Bunker F is entered by stairs leading to an elevated entrance.
The canal section between Lanaye and Briegden is completed in 1936. This places the canal directly opposite Maastricht. Additional defensive works are planned. Three bunkers protect the bridges at Kanne, Vroenhoven, and Veldwezelt. Six flanking casemates for automatic weapons are installed at canal level. Two are assigned to each bridge.
Further bunkers are integrated into the western support of the Lanaye bridge. Others are built into the Lanaye locks and at Veldwezelt. A dedicated anti-tank casemate with field gun mount is constructed at Lanaye and designated L1.
Construction of canal-side fortifications concludes in 1939. During that year, bunkers O, M, and N receive electrical power. Earlier installations rely on acetylene searchlights of the Magondeaux type. These are replaced by Willocq Bottin electric searchlights with accumulators. Connection to the national grid is completed by December 7th, 1939.
Additional bunkers are planned for the Lixhe bridge. These include bunkers D and E with Chardome-mounted weapons. The project is never completed. Further plans call for four water-level bunkers between Veldwezelt and Kanne. These would be linked by a 75-metre underground gallery. This concept remains on paper and is never built.
The Maastricht enclave casemates differ from those in Flemish Limburg. The four major casemates at Vroenhoven and Veldwezelt are designed for lateral fire. Each has two floors and an observation cupola. Rear entrances are protected by a metal door and a roller gate. Upper floors contain four firing chambers. Two mount Chardome weapons. Two house searchlights. One chamber includes an emergency exit.
A forward light machine-gun chamber provides access to the observation dome. Concrete stairways connect both floors. Lower levels contain two automatic weapon chambers, storage space, and latrines. Additional firing ports support light machine guns and mortars. Diamond-shaped trenches protect the lower embrasures from earth collapse. Minor design differences reflect local terrain, but overall structure remains consistent.
To protect the bridge at Kanne, the Defence Ministry orders construction of a bunker on the central hill at Opkanne. This position commands a direct field of fire over the bridge. The bunker is designated O. Access is provided by a stairway of sixteen steps. Two metal doors lead into the interior. Beyond them lies a Bocholt-type ventilation chamber. Fresh air is drawn in from the right side of the bunker. Exhaust air is expelled through the gun chamber. After completion, the bunker is connected to the electric power supply. The garrison consists of one sergeant, two senior privates, and nine gunners. All personnel are detached from Fort Eben Emael.
Two additional concrete positions defend the Kanne bridge. These are flanking casemates E and F. Each contains a single gun. Casemate E has a ground-level entrance. Casemate F is entered by a staircase leading upward. Both positions fall under the command of 2e Luitenant Massin of 5e Compagnie, 2e Grenadiers.
Bunker M at Vroenhoven is intended to block any attempt to cross the Vroenhoven bridge. The structure has two storeys. The upper level contains three chambers. One houses a 47 mm anti-tank gun. One mounts a Maxim machine gun. The third contains an acetylene searchlight. From this level, a corridor with two doors leads to the observation cupola. The lower storey contains two latrines, a rest room, and an ammunition store.
Two border cyclists of the Limburg battalion are assigned a dual role. They are to stop enemy motor vehicles using the anti-tank gun. If required, they are also to demolish the bridge. As at Veldwezelt, the fuses for the demolition charges are placed between the inner and outer entrance doors of the bunker.
Bunker N at Veldwezelt is the twin of bunker M at Vroenhoven. Its sole task is to prevent motorised enemy forces from crossing the bridge. It is equipped with a 47-millimetre anti-tank gun and a Maxim machine gun. A searchlight supports night fighting. An additional machine gun is mounted in the observation cupola on the concrete roof. This weapon secures the immediate surroundings of the bunker. The basement level contains latrines, a rest room, and the ammunition store. The fuses for the demolition charges are stored between the two entrance doors. The detonator consists of a metal box containing a TNT cartridge. When fired, it triggers the explosive charges placed in three chambers within the northern bridge support.
Bunker C at Veldwezelt is integrated into the bridge support column. It closely resembles the bunker beneath the bridge at Lanaye. During bridge construction, the waiting period is used to incorporate the bunker into the structure. It consists of two levels and four Maxim machine-gun firing rooms. One firing port is located on the lower level. Two are positioned on the upper basement level. Both entrances are located on the upper floor and secured by roller doors. Access to the lower section is gained through two floor openings. Metal rungs set into the concrete wall provide descent. The roof is formed by a metal plate. As with other Albert Canal positions, two diamond-shaped trenches flank the bunker. These prevent earth from blocking the machine-gun embrasures.
The bridge at Kanne and its infantry demolition guard do not fall under the direct command of Belgian Army Major Jean Jottrand. He commands the fortress garrison of Fort d’Ében-Émael. However, he maintains direct telephone communication with the firing point in Bloc 0. This position overlooks the bridge. It also serves as an artillery observation post.
Major Jottrand, however, has direct responsibility for the destruction of the Lanaye lock gates and the adjacent bridge. This task forms part of the wider canal denial plan.
| Multimedia |
| Defensive Systems and Infrastructure of Fort Eben-Emael |
As said, the Fort Eben-Emael complex itself forms an irregular, arrowhead-shaped layout. It extends approximately 600 to 750 metres in each direction, giving overall dimensions of roughly 0.75 by 1 kilometre. The site occupies an area of about 75 hectares.
The galleries and combat blocks are enclosed in reinforced concrete walls and roofs, with thicknesses reaching up to 1.5 metres. These structures are further concealed and protected by a covering layer of earth. In total, the fort comprises 17 surface combat blocks, including gun turrets, casemates, and pillboxes, spread across a broad, flat plateau.
Bloc PL.19 lies to the south of the fort. It is technically part of the Eben-Emael defensive system. The blockhouse remains under fort command. It is connected by telephone to the Visé Battery artillery command post. This standard concrete position covers the canal bridges in the Visé sector.
Within the barbed-wire perimeter, just outside the entrance to Fort Eben-Emael, stand two barrack and administrative buildings. These structures remain from the construction phase. Commanders quickly recognise that permanent subterranean living is unpleasant. It also proves unsuitable for effective daily command and administrative work.
In the event of hostilities, Belgian Army planners intend a clear procedure. The crews of the upper-level machine-gun casemates Mi Nord and Mi Sud move all documents into the fort. They then demolish the surface buildings. This action denies cover to an attacker.
The demolition ensures uninterrupted fire from Blockhouses Bloc I and Bloc II. It also allows overlapping arcs of fire across the flat ground near the entrance. This area lies at the south-west corner of the fort.
The physical protection of the approach is limited. Defence relies only on barbed-wire fences and triangular steel dragon’s-teeth anti-tank obstacles. The need for a clear and unobstructed field of fire is therefore critical.
Approximately 55 metres below the grass-covered upper surface, the lower galleries are accessed at the level of Eben-Emael village. These installations fall into two broad categories. They include the seven defensive blockhouses of the 2nd Battery. They also include the internal administrative and support facilities of Fort Eben-Emael.
Bloc I, known to the German attackers as Objective 3, is a massive reinforced concrete structure. Like the other six defensive blockhouses, it is set into the steep slopes of Saint Peter’s Hill. As the main entrance to the fort, it receives especially heavy armament. A Belgian Army garrison of two lieutenants, three corporals, and twenty-three soldiers mans the position.
The blockhouse contains a small headquarters. It includes searchlights behind bullet-resistant glass. It mounts two machine guns. It also mounts two 60-millimetre anti-tank guns. One gun covers northern arcs. The other covers western approaches. For the 1930’s, 60-millimetre weapons are unusually powerful. Their heavy barrels, breeches, and recoil systems provide extended range. At Eben-Emael, these guns are claimed effective against contemporary tanks at 3,000 metres. Like all defensive blockhouses, Bloc I carries a small cast-steel observation bell on its roof.
Bloc II, known as Objective 4, stands about 251 metres north of Bloc I. Its fire covers the Canal Nord, known as the wet moat. In the opposite direction, its arcs overlap with Bloc I. Together they cover the open approaches from the village. Bloc II mounts two 60-millimetre anti-tank guns. It also has searchlights for night fighting and two machine guns.
Bloc II contains one of the three sally ports. From this exit, the Belgian Army garrison can launch counter-attacks. In this case, it covers the entrance sector of the fort.
Bloc Canal Nord, German Objective 17, is located on the eastern face of the fort within the Tranchée de Caster. Together with its southern counterpart, it covers the Albert Canal. The canal here measures approximately 46 metres in width. Bloc Canal Nord mounts one anti-tank gun and one machine gun. These primarily fire north towards Kanne and the towpath on the opposite bank. A second machine gun fires south along the trench. This provides mutual support with Bloc Canal Sud.
Bloc Canal Nord, Bloc Canal Sud, and Blocs I, IV, V, and VI each include small armoured escape hatches. These allow the gun crews to withdraw if required.
Bloc Canal Sud, German Objective 35, is also sited within the Tranchée de Caster. It lies near the southern end of the cutting. Its field of fire covers the junction of the Albert Canal and the Zuid-Willemsvaart. It also covers the Lanaye Locks. A single 60-millimetre gun dominates this sector. Two machine guns cover northern and southern arcs. This blockhouse no longer exists. Belgian engineers demolish it during post-war widening of the Albert Canal.
Bloc 01, German Objective 34, lies about 274 metres beyond the southern edge of the fort. It stands immediately above the Lanaye Locks. A stairway and tunnel from the Intermediate Level connect it to the main fort. This access can be demolished to prevent enemy entry. The crew requires approximately twenty minutes to reach their post from the lower-level barracks.
Once in position, the Belgian Army detachment mans one anti-tank gun and two machine guns. Their primary task is the defence of the locks area. The most important feature of Bloc 01 is the large artillery observation post known as Eben 1. From its roof, the observation officer overlooks the River Meuse and its valley. He can observe the vital Visé Gap.
Bloc IV, German Objective 30, occupies the southern edge of the fort. There is no Bloc III. Bloc IV is set within the deep anti-tank ditch. It mounts two anti-tank guns, searchlights, and machine guns. The southern farmland approaches are obstructed by barbed wire. They are also blocked by heavy steel tetrahedral anti-tank obstacles. Many similar obstacles later appear on the beaches of Normandy and along the Atlantic Wall.
Bloc V, German Objective 22, is located at the southern extremity of the main fort. It also covers the anti-tank ditch. Its Belgian Army crew consists of one non-commissioned officer and sixteen soldiers. They man one 60-millimetre anti-tank gun and two machine guns. Their fire covers the southern and south-eastern approaches.
Bloc VI, German Objective 6, completes the defensive ring around the lower level. It supports neighbouring blockhouses with overlapping fire. The position mounts two-60 millimetre guns, one machine gun, and a searchlight. It covers the vulnerable approaches leading towards the fort entrance.
Entering Fort Eben-Emael at the Lower Level, approximately 55 metres below the upper surface, access leads directly into the living and administrative areas of the garrison. The entrance passage is wide. It is designed to admit all ammunition, equipment, supplies, and stores after construction is completed.
Bloc I, internal section, controls access to the fort. Two iron-railed gates, each approximately 4.3 metres high, open into the entrance chamber. These gates regulate daily movement into the fortress. Internal defences begin immediately beyond them. A sliding wooden drawbridge spans a pit approximately 3 metres deep. When closed, it blocks entry into the interior tunnels.
The fort is designed to operate under chemical warfare conditions. A decontamination room opens off the entrance chamber. Soldiers exposed to persistent agents, such as mustard gas, clean equipment and clothing here. Heavily contaminated items are abandoned. Opposite the decontamination room stands a heavy armoured steel door. This door leads to the Bloc I defensive positions and the guardroom.
Another armoured steel doorway seals the main tunnel network. It resists explosive charges and direct fire. It also seals the fort against gas attack. The entrance tunnel lacks a protective bend or blast wall. This exposes the door to direct external fire. This feature attracts criticism as a design weakness common to Brialmont-style fortifications. A machine gun in an embrasure to the left covers the entrance hall.
Within the protected interior, armourers’ workshops support the fort’s armament. Belgian Army armourers maintain artillery pieces and small arms. Repairs occur during both peace and wartime. These specialists operate entirely within the fortified interior.
Ablution facilities branch off the main corridor. These include lavatories, washrooms, and shower cubicles for the garrison. These facilities remain operational for staff and visitors today.
Beyond a bend in the corridor lie the detention cells. Like most permanent military installations, the fort maintains its own cell block. With a garrison approaching 1,200 Belgian Army soldiers, disciplinary confinement is unavoidable. During hostilities, the cells can also hold a limited number of prisoners of war.
Electrical power generation ensures independence from external utilities. Six diesel engines, each producing approximately 175 horsepower or 140 kilovolt-amperes, generate electricity. They power lighting systems, mechanical equipment, and ammunition-handling mechanisms. Transformers and switching systems distribute power from an adjoining chamber. Cooling water from the engines is recycled. It raises barrack temperatures from the natural constant of 11 degrees Celsius to a more habitable level. Despite this system, several areas remain persistently cold. Heated water also supplies the shower facilities.
Large fuel tanks are cut into the surrounding rock. They provide sufficient diesel reserves for extended operations in peace and war. Exhaust gases vent through a large chimney. This chimney exits via a concrete casemate on the upper surface. Only one original engine remains operational today. The Belgian garrison damages the others before surrender. German forces remove five engines for repair and reuse in the Atlantic Wall. Four are later returned. Volunteers now work to restore them and supply power within the fort.
Nearby are the kitchen and food storage areas. These facilities are essential for sustained operations. Soldiers collect meals from the kitchen. They serve food and drink in their barrack rooms.
The stores section supports daily operations. As a static unit, the range of stored items is limited. Nevertheless, the quartermaster holds uniforms, consumables such as oil, and spare parts for weapons and equipment.
The Fort Commander’s office suite is also located at this level. Before the German attack, Belgian Army Major Jean Jottrand conducts most administrative duties from the surface buildings. Once the assault begins, he directs operations primarily from these offices rather than the Intermediate Level battery command posts.
Approximately 183 metres from the entrance lies the main tunnel intersection. This junction forms the internal crossroads of the Lower Level. Turning right leads into the barrack accommodation area.
Along the right-hand wall, doors cut into the rock open into twenty-four soldiers’ barrack rooms. Each room contains beds for up to twenty Belgian Army soldiers. Furnishings are minimal. They consist only of tables, chairs, and individual lockers for personal equipment.
On the opposite side of the corridor are the officers’ rooms. Senior officers occupy single rooms. Junior officers, including lieutenants, share accommodation. Nearby are the officers’ mess rooms. Here, officers of the duty watch eat together and spend off-duty time.
Small-arms magazines and reserve ammunition stores are also located within the barrack area.
At the far end of the barrack spur, beyond heavy steel doors, stand the Grand Staircase and the lifts. These provide access to the Intermediate Level of Fort Eben-Emael.
Part of the fort’s air filtration system is located in this section. It is essential for maintaining air quality. At times, more than five hundred men occupy the barrack area simultaneously.
A spur on the opposite side of the main tunnel intersection leads to the infirmary. This medical facility reflects the fort’s role as a frontline combat unit. It includes a pre-operative room. It also contains an operating theatre, a dental surgery, and a ward with seven beds.
The fort maintains an independent water supplyknown as the purple room. Water is drawn from a borehole near the centre of the fortress. Electric pumps move the water to storage tanks positioned above this chamber.
The Lower Level and Intermediate Level can be sealed off if required. A double airlock system of heavy doors provides isolation during gas attack or enemy penetration. These doors originally incorporate rubber seals. From this point, the staircase rises approximately 18 metres to the Intermediate Level.
Surrounding the lower-level chambers are narrow marl galleries. These tunnels are unlined and roughly cut from the rock. Their purpose is ventilation. They channel foul air away from the barrack areas of the fortress.
The Intermediate Level consists of a complex labyrinth of approximately five kilometres of tunnels. The layout is so intricate that even the Belgian Army garrison relies on directional signs at key junctions. These signs guide movement between positions throughout the fort.
Access to all fighting blocs, artillery casemates, gun cupolas, external observation posts, and Bloc I is provided from this level. Stairways lead downward from the tunnels to the 2nd Battery defensive blockhouses. Spiral staircases rise approximately 30 metres to the surface. These stairways lead to the 1st Battery offensive casemates and cupolas.
Since December 1939, Fort Eben-Emael operates under the operational command of the Belgian Army I Army Corps. Despite this command relationship, the fort’s artillery fires across several formation boundaries. The command post complex forms the operational and administrative centre of the fortress. Its layout reflects the command relationships with neighbouring forts of the Position Fortifiée de Liège and with field formations operating within range.
Internal communication relies primarily on a telephone network. A secondary intercom system links battery command posts to their respective casemates. This intercom system remains incomplete. External communication is mainly conducted through landlines. The fort also possesses three radio sets for redundancy.
Four separate command posts operate within the complex. The principal command post serves as the operational headquarters of Belgian Army Major Jean Jottrand. A second command post controls the three gun cupolas of the 1st Battery. A third command post directs the Visé and Maastricht casemates of the same battery. A fourth command post controls the 2nd Battery defensive blockhouses. Each command post maintains radio and telephone links appropriate to its specific role.
The four artillery casemates are allocated to specific Belgian Army regiments. Visé 1 supports the 2nd Grenadier Regiment. Visé 2 supports the 2nd Rifle Regiment. Maastricht 1 and Maastricht 2 support the 18th Infantry Regiment.
Each artillery group is primarily tasked to support nearby formations, most of which belong to I Army Corps. Belgian Army III Army Corps, operating further south, can also request fire support. These requests pass through the Régiment de Forteresse de Liège. This procedure is slow and administratively cumbersome.
Operational control of the twin 120-millimetre gun cupola rests with the artillery commander of I Army Corps. The twin 75 millimetre cupolas, Cu Nord and Cu Sud, receive fire orders from the Belgian Army 7th Infantry Division. The Visé and Maastricht casemates respond directly to infantry regiments defending the canal and river line. These arrangements reflect the fort’s position at the northern edge of the Liège defences. The location creates complex defensive problems due to the proximity of the Belgian, Dutch, and German borders.
The manual telephone exchange is also located on this level. The system functions poorly. Its effectiveness is further reduced because several telephones assigned to the fort are in use at a Belgian Army rifle range located elsewhere.
Seven separate ammunition magazine complexes are located within the Intermediate Level. Each complex serves a single artillery casemate or cupola. The magazines store shells and cartridge cases. They are positioned approximately 37 metres below the surface. Several armoured steel doors protect each chamber. This dispersed layout makes the magazines far less vulnerable than the single central magazine that destroyed Fort Loncin in 1914.
Ammunition is loaded into flash-proof metal trolleys within the magazines. These trolleys are pushed to the hoist shafts. Two trolley types are used. One carries forty-two rounds of 75-millimetre ammunition. The other carries fourteen rounds of 120-millimetre ammunition.
Opposite each magazine are vertical shafts rising between 30 and 37 metres to the casemates and cupolas. At the centre of each shaft are paired ammunition hoists. These lift loaded trolleys to the gun positions above. Staircases run around the hoists. These provide the only routine access to the casemates.
The stair landings can be removed when required. This allows large or heavy equipment, including gun barrels, to be raised or lowered. At the base of each shaft are airlock chambers between two sets of doors. Slots within these doors accept steel beams and sandbags. These measures allow a casemate to be sealed off if enemy forces break into the chamber above.
Two large air intakes are cut into the near-vertical eastern face of the fort in the Tranchée de Caster. Fresh air enters through these intakes. It passes through gas filtration systems before being distributed throughout the fortress. The ventilation system is inefficient. Belgian engineers are in the process of upgrading it in May 1940.
| Armament and Weapons Emplacements |
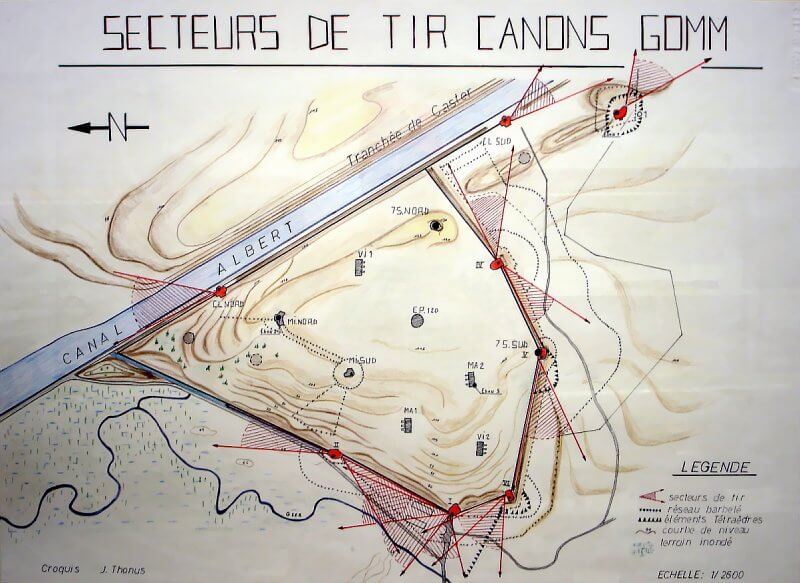
Fort Eben-Emael possesses an exceptional concentration of firepower for its period. Its design combines retractable gun turrets with fixed casemate batteries. This arrangement allows the garrison to engage targets in multiple directions.
The vast majority of the armament lies on the upper level of the plateau of Saint Peter’s Hill, approximately 55 metres above the fort’s entrance level. This surface carries the offensive casemates and gun cupolas of the Belgian Army 1st Battery. It also contains several defensive installations. These include two machine-gun casemates and four anti-aircraft machine-gun positions.
On the upper surface stand four identical reinforced concrete artillery casemates. Each mounts three 75-millimetre guns. Their maximum range reaches approximately 9,100 metres. Two casemates face north towards Maastricht and the Albert Canal bridges. These are designated Maastricht 1 and Maastricht 2. German assault plans assign them Objective 12 and Objective 18.
Two further casemates face south towards Visé. These are designated Visé 1 and Visé 2. German planners identify them as Objectives 26 and 9. Each casemate is commanded by a Belgian Army sous-officier holding the rank of sergeant-major. Each is manned by four corporals and twenty-eight soldiers.
The guns are mounted in fixed steel ball mounts. Each weapon has a firing arc of only seventy degrees. This limitation restricts their tactical flexibility. Mounted above Maastricht 2 is Eben 3. This is one of three armoured artillery observation cupolas on the upper surface. From this position, an artillery observer of the Visé group observes widely to the south-east. The Lanaye Locks remain outside his field of view.
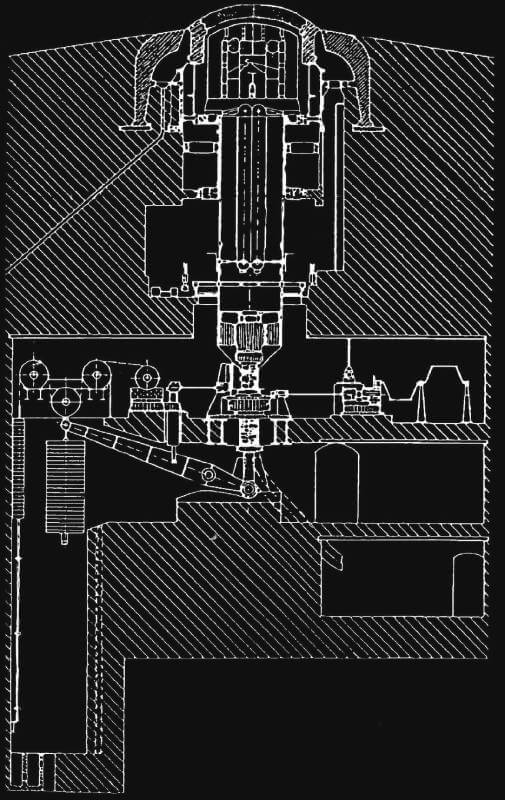
Two retractable armoured cupolas, Cupola Nord and Cupola Sud, are also positioned on the plateau. German plans identify them as Objectives 31 and 23. Each cupola mounts two quick-firing 75-millimetre guns. Their effective range is approximately 730 metres. They possess full 360-degree traverse. Electric motors and counterbalance weights raise them into the firing position.
For reloading, the cupolas are lowered into concrete recesses. Only the steel dome remains visible above ground. As with all artillery positions in Fort Eben-Emael, the ventilation system maintains internal overpressure. When gun breeches open, propellant gases are forced outward through the barrels.
Unlike the Visé and Maastricht casemates, each cupola contains three internal levels. The lowest level includes ready-use ammunition storage and crew bunks. German intelligence marks Cupola Sud as located above Bloc V. It appears the attackers do not fully identify it as part of the fort’s offensive strength. No German Fallschirmjäger detachment is assigned to neutralise this position.
Cupola Nord provides one of only two access points to the upper surface. This sally port allows movement between the interior and the plateau. The raising mechanism for both cupolas is located below.
A single heavy armoured cupola mounts the fort’s largest guns. This is the 120 millimetre cupola, designated Objective 24 by the Germans. Its steel armour reaches 300 millimetres in thickness. It mounts two 120 millimetre guns. These can engage targets at distances approaching 15,500 metres.
Operational control of these guns lies deep within the Intermediate Level command system. Target data is collected and prioritised by the Belgian Army I Corps artillery headquarters. Fire orders are then passed to the 1st Battery command post.
Two machine-gun casemates, Mi Nord and Mi Sud, are positioned on the upper surface. German plans assign them Objectives 19 and 13. Designers expect that an enemy might attempt a ground assault by climbing the fort’s outer defences. An airborne assault is not anticipated.
These casemates cover approaches into the centre of the fort from the south. This area is considered the most vulnerable sector of the upper surface. By coincidence, they also overlook the open ground later used as a glider landing area.
Mounted on Mi Nord is the armoured steel dome of the Eben 2 artillery observation post. This position is manned by an observer team from the Maastricht group. Mi Nord also contains the second armoured sally port on the upper surface.
Four open anti-aircraft machine-gun pits are grouped on the southern part of the plateau. German planners identify them as Objective 29. These positions form part of the general air defence of the area. They are not designed specifically to counter airborne landings. Belgian planners expect that any ground assault may be supported by air attack. They also expect bombing attempts while German ground forces force the Maastricht or Visé corridors.
Three false cupolas are installed on the upper surface. German intelligence designates them as Objectives 14, 16, and 32. These structures resemble the real 120 millimetre cupola in size and appearance. Two are placed in the northern sector. One stands south of the main defences. Their purpose is deception. German attacks against these positions later demonstrate incomplete intelligence assessment.
At the centre of the open area stands a large workshop building. This structure is built of timber and corrugated iron. It serves the Belgian Army maintenance and repair detachment. It also provides shelter for personnel working on the upper surface.
| Multimedia |
| Garrison and Organisation |
The garrison of Fort Eben-Emael belongs to the Belgian Army Régiment de Forteresse de Liège.
This regiment is responsible for manning the permanent fortifications of the Position Fortifiée de Liège. It provides the personnel for Fort Eben-Emael, including artillery crews, infantry for the defensive blockhouses, and command, technical, and administrative staff. Operational command of the fort rests with Belgian Army I Corps, but day-to-day manning and discipline remain the responsibility of the Régiment de Forteresse de Liège.
In 1940, Fort Eben-Emael is manned by a large garrison. Command rests with Major Jean Jottrand. The full wartime complement numbers about 1,200 troops. Most belong to the Belgian fortress artillery.
The garrison is organised into three groups. One group numbers about 200 men. Known as the Groupe de Commandement et des Services. These are technical and support personnel. They include engineers, mechanics, communications specialists, medical staff, cooks, and administrators. They remain permanently stationed inside the fort to maintain its systems.
The remaining two groups each number roughly 500 artillerymen. These are the 1re Batterie also known as the Batterie d’attaque and the 2e Batterie, also designated as the Batterie de défense. These men serve as gun crews and combat personnel. In peacetime, the two artillery groups rotate weekly. One group occupies the fort for one week. The other remains in reserve at the village of Wonck, about 5 kilometres away. They then exchange roles.
This system is intended to prevent overcrowding. The underground barracks cannot house all 1,200 men comfortably for long periods. The rotation also allows many soldiers to remain with families or train elsewhere. Belgium is not formally at war until May 1940.
Mobilisation begins in late 1939 after the outbreak of war in Poland. The fort is then brought up to full strength. Many of the men are reservists recalled to service. A large proportion are young conscripts or older reservists. Most officers and some non-commissioned officers are career professionals.
Training focuses on artillery duties and technical operation of the fort. The garrison receives little infantry combat instruction. Belgian planning assumes the walls, ditches, and obstacles prevent close assault. The men are therefore not trained for internal infantry fighting.
Living conditions inside the fort are comparatively good. The garrison has access to showers and a field kitchen. Ventilation and filtration systems maintain air quality when the fort is sealed. An independent power plant and groundwater pump allow sustained operation under siege.
Before May 1940, morale within the garrison is confident. The men believe they serve in an unbreachable fortress. Belgian command expects the fort to resist attack for several days. Training does not prepare the garrison for sudden shock assault.
Major Jottrand commands from headquarters inside the fort. The installation is divided into sectors. Each sector corresponds to groups of combat blocks. Junior officers command these sectors. Artillery fire is directed from internal observation posts. External observation points also feed reports into the fort’s network.
Plans exist for cooperation with nearby field forces. The 7de Infantrie Divisie is assigned to secure the surrounding area. This division is intended to reinforce the fort if required.
| Officers | Commisioned Officers | Enlisted Men | Total | |
| Staff | 12 | 40 | 157 | 209 |
| 1st Battery: Artillery | 8 | 28 | 434 | 470 |
| 2nd Battery: Infantry Weapons | 4 | 34 | 468 | 506 |
| 24 | 102 | 1059 | 1185 |
| Multimedia |
| Role in the Belgian Defence System |
Fort Eben-Emael stands at the centre of Belgium’s interwar defensive strategy. It plays a decisive role in plans to resist a German invasion in 1940. Together with older and newer forts around Liège, it forms part of the Position Fortifiée de Liège. This fortified zone is designed to guard the main gateways into Belgium.
Eben-Emael covers the north-eastern frontier. Its sector includes the Visé Gap. This corridor lies between the Ardennes to the south and Dutch Limburg to the north. It has long served as a traditional invasion route into Belgium.
The fort also anchors the defence of the Albert Canal line. This line combines fortifications with water obstacles along the eastern border. During the late 1930s, Belgium formally maintains neutrality. At the same time, it quietly strengthens this defensive system. France extends the Maginot Line northward to the Belgian frontier.
Belgian planning assumes that, in the event of war, the enemy will be delayed along the Albert Canal and the Meuse. This delay is intended to gain time. French and British forces are expected to advance into Belgium. They are to establish a main defensive front further west along the Dyle Line.
Fort Eben-Emael is positioned directly on the canal. It is expected to secure the left flank of the Allied defensive concept. The fort guards the sector where German forces are most likely to cross near Maastricht. From there, an advance into central Belgium would follow.
Three major steel bridges span the Albert Canal just north of the fort. These crossings lie at Veldwezelt, Vroenhoven, and Kanne. Any German force advancing through the Netherlands requires these bridges intact. Eben-Emael’s artillery is positioned to cover all three crossings.
The fort can shell or machine-gun enemy units attempting to seize or repair the bridges. Each bridge is also prepared for demolition. Charges are wired and controlled from nearby bunkers. Belgian infantry detachments from the Seventh Infantry Division are assigned to defend the bridges on the ground.
Within Belgian and Allied planning, Eben-Emael functions as a linchpin. As long as its guns dominate the canal crossings, rapid German advance is considered impossible. If attacked, the fort is expected to hold for several days. A prolonged defence is assumed to force the enemy into a costly siege.
This delay is intended to allow Allied reinforcements to arrive. It also gives the Belgian field army time to occupy stronger positions deeper inside the country. Eben-Emael is therefore regarded as the shield at Belgium’s eastern gateway. Its presence is believed to compel any German assault to halt at the border.
| Multimedia |
| Sources |