
| Page Created |
| April 13th, 2025 |
| Last Updated |
| April 14th, 2025 |
| Great Britain |
 |
| Related Pages |
| 6th Airborne Division 17th Airborne Division Office of Strategic Services Teams |
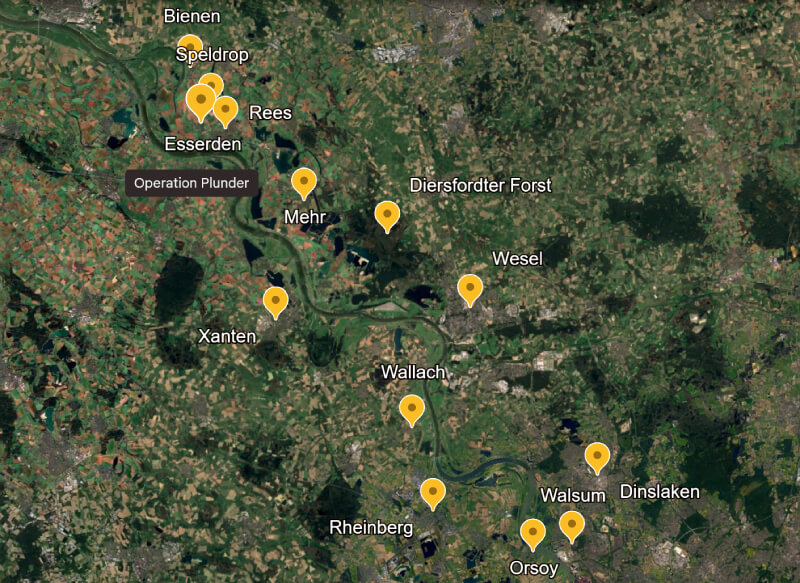
| Operation Plunder |
| Operation Turnscrew Operation Torchlight Operation Widgeon Operation Flashpoint Operation Varsity |
| March 23rd, 1945 – March 24th, 1945 |
| Operation Torchlight |
| Objectives |
- Secure a crossing of the River Rhine and to establish a firm lodgement on its eastern bank, directly opposite the town of Xanten.
| Operational Area |
| Allied Forces |
- 21st Army Group
- British Second Army
- XII Corps
- 15th (Scottish) Infantry Division
- 52nd (Lowland) Airlanding Infantry Division
- 8th Army Group Royal Artillery (AGRA)
- XXX Corps
- 51st (Highland) Infantry Division
- 1st Commando Brigade
- 79th Armoured Division (specialized armoured vehicles)
- 8th Armoured Brigade
- II Canadian Corps
- 9th Canadian Infantry Brigade
- XII Corps
- U.S. Ninth Army
- XVI Corps
- 30th Infantry Division
- 79th Infantry Division
- 8th Armored Division (in reserve)
- XIII and XIX Corps (in reserve)
- XVIII Airborne Corps
- 6th Airborne Divison (British)
- 17th Airborne Division (U.S.)
- Office of Strategic Services Teams
- XVI Corps
| Axis Forces |
- Heeresgruppe H
- 1. Fallschirm-Armee
- II. Fallschirm-Korps
- 6. Fallschirmjäger-Division
- 7. Fallschirmjäger-Division
- 8. Fallschirmjäger-Division
- LXXXVI. Armeekorps:
- 180. Infanterie-Division
- 190. Infanterie-Division
- XLVII. Panzerkorps:
- 116. Panzer-Division “Widhund”
- 15. Panzergrenadier-Division
- II. Fallschirm-Korps
- 1. Fallschirm-Armee
| Operation |
The principal objective of Operation Torchlight perfomed by the 15th (Scottish) Infantry Division is to secure a crossing of the River Rhine and to establish a firm lodgement on its eastern bank, directly opposite the town of Xanten. Under the command of Lieutenant-General Neil Ritchie, XII Corps is tasked with seizing key terrain and infrastructure necessary for a rapid and sustainable build-up of Allied forces across the river.
The initial aims include the clearance of riverside defences and flood dykes, the capture of Bislich, Haffen, and nearby villages just beyond the shoreline, and the establishment of crossings over the Issel River, further inland. Of particular significance is the bridge over the old Rhine loop at Bergerfurth, code-named “Bridge A”. The old river channel, if left in enemy hands, could serve as a secondary defensive barrier. Its seizure is therefore essential to deny the Germans any fallback position.
Control of these bridges would eliminate additional water obstacles beyond the Rhine and facilitate the passage of follow-on forces. Once a bridgehead is secured, XII Corps is directed to establish ferry operations and then construct a heavy bridge to carry armoured formations. A specific operational goal is the rapid construction of a Class 40 Bailey bridge at the Torchlight crossing site, enabling swift deployment of exploitation forces.
As soon as the far bank is sufficiently secured by the Scottish assault troops, engineers are to commence bridge construction. Upon completion, the British 11th “Black Bull” Armoured Division stands ready to cross and push into the German interior. In summary, Torchlight’s objectives are twofold: to execute a surprise night crossing that breaks through the Rhine’s primary defensive line and to physically enable the mass deployment of armoured and mechanised forces eastwards. Achieving these goals would breach the last major natural barrier shielding northern Germany and pave the way for a rapid Allied advance towards final victory.
Operation Torchlight is carried out by the 15th (Scottish) Infantry Division, under the command of Major-General C. M. ‘Tiny’ Barber. A veteran formation within the British Army, the 15th (Scottish) Infantry Division leads XII Corps’ assault across the Rhine. The two designated assault brigades are the 44th (Lowland) Infantry Brigade and the 46th (Highland) Infantry Brigade. These brigades include battalions such as the Royal Scots Fusiliers, the King’s Own Scottish Borderers, and the Highland Light Infantry. The 227th (Highland) Infantry Brigade is held in immediate reserve to reinforce and exploit the initial bridgehead.
All assault troops are issued life jackets and specialist assault equipment for the crossing. Supporting the infantry is a wide array of armour and engineering units, many drawn from Major-General Percy Hobart’s 79th Armoured Division, renowned for its unique specialist vehicles known as “Hobart’s Funnies”.
Among the principal supporting units:
- The 11th Battalion, Royal Tank Regiment operates Landing Vehicle Tracked “Buffalo” amphibious carriers, which are used to ferry the assaulting infantry across the Rhine. Formerly trained for the Canal Defence Light role (searchlight tanks), the regiment has recently been retrained in amphibious operations specifically for this mission.
- The 1st Battalion, East Riding Yeomanry is also equipped with Landing Vehicle Tracked (4) Buffalo vehicles, designated to carry follow-up troops and light equipment. In preparation for the assault, this unit relinquished its tanks and fully re-equipped for the amphibious role.
- The 44th Battalion, Royal Tank Regiment fields Sherman V Duplex Drive tanks, equipped with collapsible flotation screens and propellers to ‘swim’ across the river in the later waves, providing immediate armoured fire support upon landing.
Engineer support is provided by the British 11th Army Group Royal Engineers (AGRE), which includes hundreds of Royal Engineers assigned to ferry operations, obstacle clearance, and bridge construction. These are reinforced by Canadian engineers and U.S. Navy boat teams. Their equipment includes storm boats, assault craft, and materials to construct pontoon and treadway bridges under combat conditions.
Artillery support for the operation is immense. No fewer than six field artillery regiments and four medium regiments, alongside heavy anti-aircraft guns in a ground role and several super-heavy pieces, support each of the two assault brigades. In total, thousands of artillery pieces across the 21st Army Group are coordinated to saturate the eastern bank with fire.
Royal Air Force bombers and fighter-bombers stand ready to strike fortified positions, while smoke screen units are positioned to obscure the river as needed. On Torchlight’s right flank, U.S. XVI Corps, with the U.S. 30th Infantry Division and 79th Infantry Division, launches its own Rhine crossing near Rheinberg. Although not formally part of Torchlight, this simultaneous attack dilutes German defensive efforts. To the left of the 15th (Scottish) Infantry Division, the British 51st (Highland) Infantry Division and Canadian forces engage in Operation Turnscrew, further securing Torchlight’s flank.
This multinational alignment ensures that British, Canadian, and American forces are operating in concert along a broad front, preventing German forces from concentrating their response on any one crossing site.
| Planning and Preparation |
Operation Torchlight is meticulously planned, shaped by hard-earned lessons from earlier river crossings and reflecting Field Marshal Montgomery’s emphasis on thorough preparation. The 15th (Scottish) Infantry Division and XII Corps conduct an extensive training regimen in the weeks prior to the operation.
Notably, in mid-March 1945, the division carries out two full-scale rehearsals, Exercise Buffalo, on the River Maas. These drills, held in daylight on March 14th, 1945 and at night on March 15th, 1945, simulate the conditions of the Rhine crossing as closely as possible. Troops train with the same Buffalo amphibious vehicles, storm boats, and armoured support units that will be used in the real assault. Soldiers rehearse embarkation and disembarkation under combat simulation, the breaching of flood dykes, and rapid consolidation of bridgeheads.
To manage the complexity of the crossing, a specially organised “Bank Group” is formed. This unit, akin to a beach control group, is composed of signals, medical, traffic control, and recovery personnel, principally based around the 5th Battalion, Royal Berkshire Regiment. Its role is to regulate the flow of personnel and materiel to and from the riverbanks, coordinate casualty evacuation, and maintain order throughout the operation. Additional officers and military police ensure that every movement occurs in the correct sequence.
Detailed aerial reconnaissance and intelligence gathering precede the operation, identifying enemy fortifications and likely strongpoints on the far bank. Artillery fire plans are carefully drawn up to engage these positions methodically.
In the final days before March 23rd, 1945, extensive deception efforts and aggressive patrolling are used to conceal the true location and timing of the crossing. Movement across the western bank is tightly controlled, with camouflaged concentration areas and strict regulations imposed to avoid alerting the enemy. Enormous logistical preparations are also made: over 22,000 tonnes of bridging materials, pontoons, assault boats, wire, and rafts, are stockpiled along the front.
Across the 21st Army Group sector, 5,500 artillery pieces of various calibres are assembled to support the crossings, an even greater concentration of firepower than was used during the Normandy landings. At 17:00 on March 23rd, 1945, these guns unleash a colossal barrage across a 35-kilometre front, pulverising enemy positions on the east bank. Simultaneously, Royal Air Force heavy bombers devastate the town of Wesel, further isolating German forces.
This bombardment transitions into a rolling barrage that advances ahead of the infantry as they cross, suppressing German resistance. Fire support is synchronised with the movement of troops and armoured vehicles to maximise effectiveness.
Integration between infantry, engineers, and armour is emphasised in the final orders. The 15th (Scottish) Infantry Division’s reconnaissance regiment, for instance, assigns half-tracks to tow storm boats and bridging equipment. Armoured personnel carriers, “Kangaroos” and flail tanks “Crabs” (equipped for mine-clearing) are on hand to support the infantry post-landing.
Specialised equipment is issued to the troops: inflatable life belts, blackened faces for concealment, and night-fighting gear. The Canal Defence Light tanks, Grant or Matilda models fitted with powerful carbon-arc searchlights, are available in the sector. Although it is unclear whether they are actively employed during the assault, their presence reflects the operation’s readiness to illuminate the battlefield if necessary. The codename “Torchlight” itself alludes to this capability.
In essence, the comprehensive preparations, from full rehearsals to artillery coordination and engineer support, set the conditions for one of the most ambitious and well-executed river crossings of the war.
| March 23rd, 1945 |
Operation Plunder begins with a thunderous artillery bombardment. At 18:00, thousands of Allied guns open fire simultaneously, unleashing a devastating barrage on German positions across the Rhine. For several hours, waves of artillery fire strike enemy batteries, bunkers, and assembly areas.
At approximately 21:00, on the left flank of Operation Torchlight, XXX Corps initiates Operation Turnscrew. The British 51st (Highland) Division crosses near Rees in amphibious vehicles, advancing under cover of the ongoing bombardment. An hour later, farther south, British Commandos launch a surprise assault near Wesel under Operation Widgeon. Following a heavy Royal Air Force bombing raid, they seize the shattered city, further diverting German attention and initiating the process of securing multiple bridgeheads along the river.
By nightfall, all assault elements of the 15th (Scottish) Infantry Division are in position on the west bank of the Rhine, poised to launch Operation Torchlight.
| 24 March 1945 |
H-Hour for Operation Torchlight is set for 02:00. In the darkness of early morning, the 15th (Scottish) Division commences its crossing precisely on schedule. On the western bank opposite Xanten, assault teams board Buffalo amphibious carriers and storm boats. Two brigade groups lead the assault: the 44th (Lowland) infantry Brigade on the left and the 46th (Highland) Infantry Brigade on the right. Each launches from pre-designated sectors along the flooded Rhine shore. Royal Engineers, travelling in storm boats, accompany them to cut through obstacles on the far bank.
Despite the confusion of night combat, the crossing proceeds with remarkable coordination. The Buffaloes churn through the 365 to 460-metre-wide river, carrying platoons of Scottish infantry through turbulent waters. As they near the eastern bank, German flares shoot into the sky, and machine-guns open fire, though initially with poor accuracy. Moments later, the first wave reaches the shore.
Near the village of Bislich, troops from the 6th Battalion, Royal Scots Fusiliers and 8th Royal Scots (of the 44th (Lowland) Infantry Brigade) disembark and storm the flood dyke (Bund) that lines the riverbank. To the south, the 7th Battalion, Seaforth Highlanders and 9th Battalion, Cameronians of 46th (Highland) Infantry Brigade do the same in their sector. The timing of the assault achieves a degree of surprise; many German defenders, still sheltering from the bombardment, are caught off guard by the sudden appearance of the amphibious craft.
While some German machine-gun positions on the dyke survive the initial shelling and mount determined resistance, most frontline positions are quickly overrun or abandoned. In brutal close-quarters fighting using bayonets and grenades, the Scottish infantry clears the trench-lines atop the embankment. By approximately 03:30, the assault battalions secure their initial objectives: the western edge of Bislich and a stretch of riverbank approximately 900 metres deep.
According to one regimental history, “soon all the rifle companies were on their objectives,” rounding up surrendering Germans and isolated stragglers. Follow-up waves are already en route. Additional Buffaloes and storm boats ferry the second battalions of each brigade shortly after H-Hour. Tanks of the 44th Battalion, Royal Tank Regimen, with Sherman Duplex Drive (DD) tanks, begin swimming across as well. A troop of these tanks provides immediate fire support with their 75-millimetre guns, knocking out concrete bunkers that continue to resist. Engineers simultaneously work to clear lanes inland from the bank.
A notable innovation sees Buffaloes towing assault boats filled with infantry, releasing them mid-river to increase the first wave’s lift capacity and expedite the build-up on the far bank. This technique proves effective in accelerating the landing of troops.
Later waves face stiffer resistance as the enemy begins to recover. A Company of the 10th Battalion, Highland Light Infantry of the 227th (Highland) Infantry Brigade, crossing slightly later, lands off-course in the darkness and encounters a group of German defenders not neutralised in the bombardment. This results in intense house-to-house fighting and some casualties. However, such incidents are isolated. Overall, the crossing proceeds as planned and remains on schedule.
By dawn, between 06:00 and 07:00, the 15th (Scottish) Infantry Division firmly holds a bridgehead on the east bank of the Rhine. Brigadier Cumming-Bruce of 46th (Highland) Infantry Brigade meets his battalion commanders at first light and reports to General Barber that “progress was satisfactory everywhere.” Orders follow to push further inland from the initial lodgement.
The assault brigades begin advancing on secondary objectives. The 6th Battalion, King’s Own Scottish Borderers press eastward through Bislich, securing the remainder of the village. The 8th Battalion, Royal Scots move towards the hamlets of Vissel and Jockern, skirmishing with remnants of the German 84. Infantrie-Division. On the right, 46th (Highland) Infantry Brigade engages German forces in Mehr and Haffen, overcoming sporadic resistance.
German troops, though disorganised, attempt counter-action. Elements of the 7. Fallschirmjäger-Division launch piecemeal counterattacks and infiltration attempts against the bridgehead’s periphery. These are repelled by the 8th Battalion, Royal Scots, aided by artillery fire from the west bank. One significant counterattack by German paratroopers at dawn, near Speldrop just outside the Torchlight sector, is repelled with difficulty by the adjacent 51st (Highland) Infantry Division, securing the operation’s northern flank.
As the day progresses, Allied engineering efforts shift into high gear to expand and reinforce the bridgehead. Rafts and ferries are assembled to bring over heavy equipment. Motorised assault boats and prefabricated rafts carry anti-tank guns, jeeps, and additional troops across. By mid-morning, the first Bailey pontoon bridge sections are being floated into position under the direction of XII Corps engineers.
Despite intermittent German artillery fire, the bridge-building proceeds steadily. On the western bank, bulldozers prepare access roads to the water; on the far bank, bulldozers brought across in Landing Vehicles Tracked begin constructing exit ramps. By nightfall, a light pontoon or Treadway bridge is operational in the Torchlight sector, allowing limited vehicular crossings. Within 24 hours, a Class 9 bridge and a heavier Class 40 Bailey bridge are completed at the Xanten–Bislich crossing, meeting the objective of establishing a robust crossing point.
Once a secure bridge is in place, tanks and armoured carriers from the 11th “Black Bull” Armoured Division begin crossing the Rhine into the 15th (Scottish) Infantry Division’s bridgehead, commencing exploitation operations.
| March 25th, 1944 |
The arrival of the 11th “Black Bull” Armoured Division, during the night, significantly enhances Allied offensive capability on the eastern bank. Operation Torchlight continues as the 15th (Scottish) Infantry Division, now supported by the 11th “Black Bull” Armoured Division, expands the bridgehead. By the evening, British forces link up with American airborne units from Operation Varsity, who had landed in the Diersfordter Forest northeast of Wesel. Patrols from the 15th (Scottish) Infantry Division make contact with troops of the U.S. 17th Airborne Division near the southern edge of the bridgehead.
Simultaneously, the 15th (Scottish) Infantry Division establishes contact with the 51st (Highland) Infantry Division to the north, forming a unified Allied front east of the Rhine.
| March 26th, 1944 – March 27th, 1944 |
XII Corps’ Mobile Striking Force is fully across the river. This includes armoured formations, mechanised infantry in Kangaroo armoured personnel carriers, and self-propelled artillery. Allied forces capture towns further inland, including Haldern and Brünen, as the bridgehead continues to expand.
Engineers continue constructing additional bridges. Within a matter of days, twelve bridges span the Rhine in the Wesel–Rees sector, some built by the British Second Army, others by the U.S. Ninth Army, enabling an unimpeded flow of men and materiel into Germany.
| March 28th, 1944 |
The success of Operation Torchlight and its supporting operations is beyond doubt. The 21st Army Group now holds a bridgehead approximately 56 kilometres wide and nearly 20 kilometres deep east of the Rhine. The last significant natural barrier in western Germany has been breached. Montgomery’s forces, in concert with the Americans, advance rapidly to the east and north. Operation Torchlight, executed on schedule and achieving all key objectives, proves to be a decisive tactical success.
| Aftermath |
Casualty figures specific to Operation Torchlight, the 15th (Scottish) Infantry Division’s assault crossing of the Rhine on March 24th, 1945 and March 25th, 1945 are not typically listed in isolation within official British Army summaries. Instead, they are usually subsumed under the broader totals for Operation Plunder, which encompasses all British, Canadian, and American crossings in the Lower Rhine sector during this phase of the campaign.
However, analysis of divisional war diaries, after-action reports, and secondary historical sources allows for a credible estimate of losses sustained by the 15th (Scottish) Infantry Division during the initial crossing and the first 48 hours of engagement east of the Rhine.
- Killed: Approximately 100 to 120 personnel
- Wounded: Estimated 250 to 300
- Missing or Captured: Negligible (recorded in low single digits, if any)
- Total Estimated Casualties: Between 350 and 400 personnel
These losses, while significant, are remarkably low for an opposed river crossing against prepared defences. The reduced casualty figures are attributed to the overwhelming artillery preparation, meticulous planning, and the general disorganisation of German defensive units, many of which are still reeling from sustained bombardment and air attack at the time of the assault.
One notable incident occurs during the advance of the 6th Battalion, Royal Scots Fusiliers, when short-falling British artillery causes a friendly fire event on the far bank. D Company suffers particularly heavy losses in this misfire. Other battalions, including the 10th Battalion, Highland Light Infantry, 8th Battalion, Royal Scots, and 6th Battalion, King’s Own Scottish Borderers, record casualties due to machine-gun fire, mines, and sporadic counterattacks by isolated German forces.
Across the broader theatre, the British Second Army sustains approximately 3,968 casualties (killed, wounded, and missing) during the initial phase of Operation Plunder, which includes multiple divisions and crossing sectors. By comparison, American formations involved in Operation Flashlight (U.S. Ninth Army) and Operation Varsity (XVIII Airborne Corps) experience similar or in some cases heavier losses, particularly among airborne elements landed behind enemy lines.
Precise figures for German casualties sustained during Operation Torchlight are not recorded in a single unified source. However, British after-action reports, prisoner counts, and known deployments of enemy formations provide a reliable basis for estimation.
- Killed: Approximately 500 to 800
- Wounded: Estimated in excess of 1,000
- Prisoners of War: Between 2,000 and 3,000, potentially higher
- Total Estimated Casualties: Approximately 3,500 to 5,000 in the immediate area of the British assault
These estimates pertain specifically to the sector contested by the British 15th (Scottish) Infantry Division during the initial phases of Operation Torchlight. Enemy casualties are particularly high due to the combination of overwhelming preparatory bombardment, swift infantry assault, and the disintegration of German command and control following the breach of the Rhine defences.
The German 84. Infantrie-Division and elements of the 7. Fallschirmjäger-Division are responsible for defending the sector between Rees and Wesel. Both formations are severely depleted and include hastily formed or underprepared units. Among these are second-line battalions comprised of untrained or medically unfit personnel, such as the so-called “Ohr-Bataillon”, composed of partially disabled troops.
The pre-assault artillery and aerial bombardments inflict heavy casualties even before the British infantry reaches the eastern bank. Dozens of German machine-gun emplacements and concrete bunkers are either destroyed or quickly overrun in the early hours of the crossing. Some posts offer brief, determined resistance, but most are overwhelmed by the speed and weight of the British assault.
Field reports from units such as the 9th Battalion, Cameronians detail the capture of between 40 and 80 prisoners during individual company-level engagements, with entire platoons surrendering once isolated. While resistance stiffens in some inland villages, it remains largely fragmented and uncoordinated.
In the 48 to 72 hours following the crossing, the German defensive position in the area collapses further. Disrupted communications and leadership failures contribute to widespread surrenders. British intelligence assessments compiled post-operation consistently estimate German casualties in the several-thousand range across the 15th (Scottish) Infantry Division’s front.
In the broader framework of Operation Plunder, the number of German prisoners captured—including those taken by American and Canadian forces in adjacent sectors, exceeds 30,000 by early April 1945. Although accurate tallies of German killed and wounded remain elusive due to the destruction of unit records and the disordered retreat, available evidence confirms that losses in the Torchlight sector alone are considerable.
In summary, German forces defending the Xanten–Bislich area suffer severe attrition during Operation Torchlight, with many formations effectively rendered combat-ineffective. The scale of these losses contributes directly to the rapid Allied advance into northern Germany in the ensuing weeks.
| Multimedia |