| Page Created |
| January 25th, 2025 |
| Last Updated |
| January 30th, 2025 |
| Italy |
 |
| Related Pages |
| December 1941 Xa Flottiglia MAS Adua-Class Submarine Siluro a Lenta Corsa Underwater Transport Containers |
| December 2nd, 1941 – December 29th, 1941 |
| Operazione Golfo di Alessandria 3 |
| Objectives |
- Attack British warships in the Harbour of Alexandria, Egypt.
| Operational Area |
| Allied Forces |
- Alexandria Harbour, Egypt
| Axis Forces |
- Adua-Class Submarine Scirè
- Sirena-Class Submarine Zaffiro
- Xa Flottiglia MAS
- Tenente di Vascello Luigi Durand de La Penne (SLC 221)
- Capo di 3a Classe Emilio Bianchi (SLC 221)
- Capitano del Genio Navale Antonio Marceglia (SLC 221)
- Capo di 2a Classe Spartaco Schergat (SLC 222)
- Capo di 1a Classe Vincenzo Martellotta (SLC 223)
- Sottocapo Mario Marino, (SLC 223)
- Sototenente di Vascello, Dottore Medico, Giorgio Spaccarelli
- Sototenente di Vascello Luigi Feltrinelli (Reserve)
- Sergente Armando Memoli (Reserve)
- Sottocapo Luciano Favale (Reserve)
- Three Siluro a Lenta Corsa’s
| Operation |
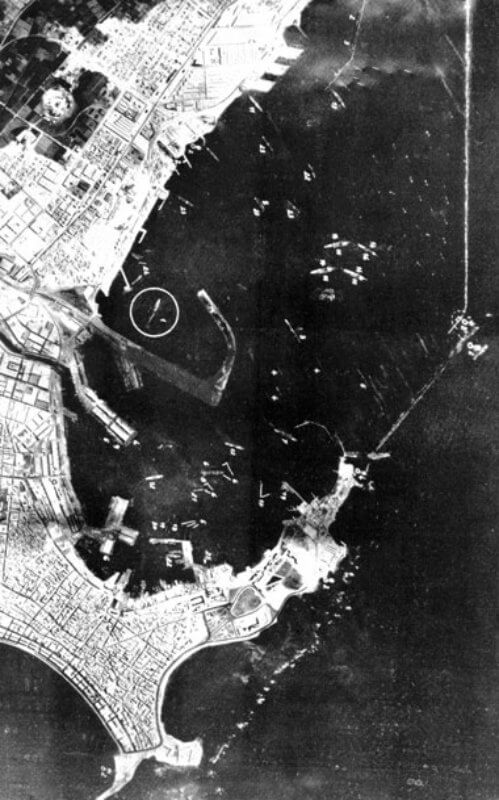
During October and November 1941, the activities of the Italian Navy’s Assault Vessels unit experienced a period of operational stagnation. By early December, plans for a daring operation to infiltrate the heavily defended port of Alexandria àre revived. Alexandria Harbour, located in Alexandria, Egypt, is one of the most significant ports in the Mediterranean. It serves as a critical maritime and military hub due to its location on the southern coast of the Mediterranean Sea, near the strategically vital Suez Canal, which connects the Mediterranean to the Red Sea and Indian Ocean. Alexandria Harbour consists of the Inner Harbour: The protected part of the port, used for docking warships, supply vessels, and commercial ships. It is shielded by breakwaters and is equipped with multiple berths for naval and civilian operations and the Outer Harbour: The larger, less protected area used for anchoring larger vessels awaiting entry into the inner harbour. The harbour is accessed through narrow channels, which are well-defended during wartime, including anti-submarine nets, minefields, and patrols.
During World War II, Alexandria Harbour is a major base for the Royal Navy’s Mediterranean Fleet. Its proximity to key conflict zones, including North Africa, Malta, and the Eastern Mediterranean, makes it a central hub for Allied operations. Alexandria serves as the headquarters for the British Mediterranean Fleet, coordinating naval engagements, convoy protection, and anti-submarine warfare in the region. The harbour facilitates the movement of troops, fuel, ammunition, and other vital supplies for campaigns in North Africa, particularly the Western Desert Campaign.
This mission, aims at crippling the British Mediterranean Fleet, is not a new concept, it has been attempted twice in 1940 during Operazione Golfo di Alessandria 1 and Operazione Golfo di Alessandria 2, both of which ended in failure due to the sinking of the approaching submarines Iride and Gondar even before they could deploy their assault teams.
In November 1941, the planning for Operazione Golfo di Alessandria 3 resumes with renewed determination, though significant challenges have to be addressed to ensure its success. These difficulties primarily stemmed from the nature of the mission and the fortified British harbour:
- The submarine, Scirè, would need to approach the enemy coastline during daylight hours to make use of the minimal navigational landmarks offered by the flat and featureless terrain. This approach carried a substantial risk of detection by British forces. The shallow coastal waters meant that, if spotted, the submarine would have limited options for evasion or escape.
- To avoid compromising the mission, Scirè was required to remain outside the main defensive barriers of Alexandria harbour. This decision, while prudent, meant that the three Siluro a Lenta Corsa’s, would have to traverse a significant distance, approximately 9 kilometres, to reach the harbour entrance. This journey alone was estimated to take about 2.5 hours, leaving the operators exposed to potential detection for an extended period.
- Accurate information regarding the underwater obstructions and defensive measures within Alexandria’s harbour was scarce. While it was assumed that the enemy would not have been able to install complete and impenetrable barriers due to the shallow depth of the harbour (only 17 metres), this lack of certainty added an element of unpredictability to the mission. Operators would need to adapt to unforeseen obstacles in real-time.
- Perhaps the most daunting aspect of the mission was the recognition that recovering the operatives after the attack would be nearly impossible. Once the charges were deployed, the operators would have to fend for themselves within enemy territory, with little hope of rescue. This meant the mission was essentially a one-way operation, demanding exceptional courage and acceptance of potential capture or death.
The plan for the attack on Alexandria’s military harbour is carefully coordinated and divided into multiple phases.
The Adua-Class submarine Scirè will leave La Specia, Italy under the cover of an exercise. Once at sea, it will take on the Siluro a Lenta Corsa from another vessel and from there travel to Porto Lago, Leros in the Aegean Sea. The Siluro a Lenta Corsa are transported in the submarine’s onboard transport containers. Here the crews for the Siluro a Lenta Corsa’s are taken onboard who are flown in from La Specia, Italy. Once the complete assault group is complete the Scirè will leave from Alexandria. At the day the operation, the Scirè will surface under the cover of the night to launch the Siluro a Lenta Corsa’s and their crew.
The operation begins with the Siluro a Lenta Corsa’s travelling together on the surface for nearly 12 kilometres along the Ras el Tin Peninsula. From there, they proceed along a breakwater, navigating stealthily to reach the entrance of the military harbour. This approach is carefully timed to avoid detection and to position the Siluro a Lenta Corsa’s at their targets before 06:00 hours.
Upon arrival, the Siluro a Lenta Corsa’s are tasked with deploying explosive charges. Each operator will attach a charge to the hull of their designated target ship within the harbour. The fuses are set to detonate simultaneously at 06:00 hours. In addition to the primary charges, incendiary devices are distributed throughout the harbour. These devices are timed to ignite one hour after the main explosions, with the intention of setting fire to oil spills in the water. The hope is that the resulting conflagration will cause widespread damage to additional ships in the port and to nearby shore facilities. This aspect of the plan is based on experiments with Italian fuel oil, although previous attempts, such as at Gibraltar, have shown that the higher-quality British fuel oil is less likely to ignite.
Once the charges have been set, the operators will scuttle their Siluro a Lenta Corsa’s to prevent their recovery by enemy forces. They will then swim to shore, abandoning their craft. In the days following the attack, the Sirena-Class submarine Zaffiro will be positioned off Rosetta, waiting to extract the operators. The plan requires the operators to locate and steal a small boat, which they will use to reach Zaffiro.
While the plan is meticulously organised, it faces significant risks. The heavily defended harbour and breakwater pose a constant threat of detection. The potential failure of the incendiary devices to ignite British fuel oil could limit the operation’s impact. Additionally, the escape and recovery phase depends on the operators successfully navigating hostile territory and securing a boat to reach their extraction point.
The operation employs highly specialised tools, including the Siluro a Lenta Corsa’s, explosive charges, incendiary devices, and the Sirena-Class Submarine Zaffiro, all carefully coordinated to achieve maximum destruction. However, the ultimate success of the mission hinges on precise execution, favourable conditions, and the resilience of the operators in overcoming challenges.
| December 2nd, 1941 |
The submarine Scirè, under the command of Junio Valerio Borghese, departs La Spezia, Italy at 10:10 for a series of exercises, returning to the same port by 14:30.
| December 3rd, 1941 |
At 18:00, the Italian submarine Scirè, sets sail from La Spezia on what appeared to be a routine training cruise. However, this mission concealed a far more critical purpose. Under cover of night and away from the coastline, Scirè rendezvous with a support vessel carrying three Siluro a Lenta Corsa’s. The submarine is specially outfitted to carry these manned submersibles, which are stowed within sealed canisters affixed to its deck.
Once the Siluro a Lenta Corsa’s are secured and the necessary adjustments made, Scirè continued its journey, heading towards the Italian-held base at Leros in the Aegean Sea. Leros, located in the Dodecanese archipelago, serves as a key staging point for operations in the Eastern Mediterranean.
| December 5th, 1941 |
While off the coast of Taormina, Sicily, at 21:10, an unidentified submarine is spotted ten kilometres away. Signals exchanged with the unknown vessel confirm no immediate threat, and it takes a parallel course to Scirè at a distance of 5,000 metres. British submarines H.M.S. P 34 (later renamed Ultimatum), H.M.S. Upright, and H.M.S. Unique are known to be in the area, although there is no evidence they interact with Scirè.
| December 8th, 1941 |
At 10:50, a three-engine aircraft is sighted, the Italian crew confidently waves at the approaching aircraft and uses the correct Aldis-lamp recognition signal for the day, successfully convincing the Royal Air Force aircrew that the submarine is friendly.
Unbeknownst to the Royal Air Force, Scirè has this critical information because Italian naval intelligence has cracked the Royal Navy’s tactical code, designated QBC, which conveys operational details like daily recognition signals.
The Royal Air Force aircraft reports: “A U-boat bearing ‘GONDAR2’ features is spotted south of Crete. This particular U-boat is challenged by the aircraft and answers with a green light signal, which is the correct signal for the day; she is therefore not molested.”
Admiral Cunningham’s records later identify the plane as a reconnaissance Blenheim bomber from No. 203 Squadron.
| December 9th, 1941 |
Scirè docks at Porto Lago on the island of Leros to load its operatives.
| December 11th, 1941 |
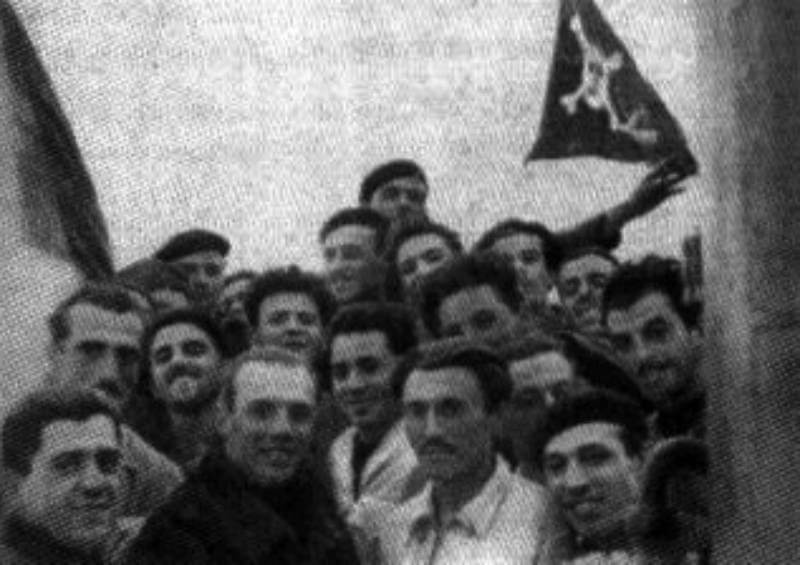
The assault teams travel by air from La Specia, Italy to Rhodes The group consists of ten men from the Xa Flottiglia MAS, including three reserves and a medical officer. Their journey is intentionally separate from the submarine’s, as previous operations have demonstrated that prolonged voyages aboard submarines negatively affect the physical fitness of special craft crews. The stale, recycled air within the submarine and the lack of opportunities for physical movement significantly reduce their lung capacity, which is essential for the physically demanding missions they are trained to execute.
This carefully planned arrangement ensures that the Siluro a Lenta Corsa operators arrive in peak condition, avoiding the detrimental effects of the confined submarine environment.
| December 12th, 1941 |
The operators of the Siluro a Lenta Corsa’s travel by air from Rhodes to the Italian naval base at Leros, where they join Scirè.
| December 13th, 1941 |
Borghese boards the Asmara steamship with the operatives to review the latest reconnaissance and plans.
| December 14th, 1941 |
Orders are issued for Scirè to begin the mission. Submarine Scirè departs Leros at 07:00, bound for Alexandria as part of Operazione Golfo di Alessandria 3, a mission to launch Siluri a Lenta Corsa against the Allied fleet.
| December 17th, 1941 |
Borghese receives final confirmation: “Two battleships confirmed in port, likely accompanied by an aircraft carrier. Attack immediately.”
| December 18th, 1941 |
By mid-December 1941, Allied intelligence, relying heavily on the ULTRA programme, provides little indication of an imminent Italian naval operation. This is largely because the primary Italian naval ciphers and codes remain uncompromised. However, the decryption of a German report concerning a reconnaissance flight over Alexandria prompts the Admiralty to issue a general warning of a possible attack to Admiral Sir Andrew Cunningham during the afternoon.
That evening, aboard H.M.S. Queen Elizabeth, the crew is assembled on the quarterdeck and instructed to remain alert for any unusual activity. Despite the warning, the atmosphere aboard the ship reflects a general sense of complacency. The harbour at Alexandria is considered well-defended, protected by a robust entrance boom and other security measures, leading many to dismiss the likelihood of an Italian infiltration. This overconfidence is further reinforced by prevailing stereotypes about Italian inefficiency. By nightfall, the warning is largely disregarded, and normal routines resume. The crew further dismissed the possibility by leaning on the stereotype of Italian inefficiency. By 22:00, the warning had been largely forgotten, the sense of complacency taking hold once more.
Meanwhile, the Scirè reaches its final position 3.7 kilometres north of Alexandria’s harbour entrance after 16 hours of stealth navigation. At 18:40, the submarine Scirè bottoms in shallow waters 2 kilometres north of Ras El Tin Light at a depth of 17 metres. By 20:47, Scirè surfaces, and the six crew members of the Siluro a Lenta Corsa, along with one reserves, Tenente di Vascello Feltrinelli and Medical Officer Sottotenente di Vascello, exit the submarine to begin their mission.
The final orders are given. Tenente di Vascello Luigi Durand de La Penne and Capo di 3a Classe Emilio Bianchi, operating SLC 221, will target the battleship H.M.S. Valiant. Capitano G.N. Antonio Marceglia and Capo di 2a Classe Spartaco Schergat, with SLC 222, will set their sights on the battleship H.M.S. Queen Elizabeth. Capo di 1a Classe Vincenzo Martellotta and Sottocapo Mario Marino, piloting SLC 223, are tasked with targeting an aircraft carrier or a large tanker.
During that same period of time, the Sirena-Class Submarine Zaffiro, under the command of Giovanni Lombardi, departs Leros at 21:10 hours. Her mission is to patrol off Rosetta, near Alexandria, to retrieve Siluro a Lenta Corsa operators following their planned attack on the harbour.
Meanwhile at Alexandria Harbour, the sea conditions are calm. After moving in, Scirè bottoms again at 15 metres. At 21:28, the submarine surfaces to recover the two reserve divers, Tenente di Vascello Feltrinelli and Sototenente di Vascello, Dottore Medico, Giorgio Spaccarelli. Feltrinelli and Spaccarelli, who are responsible for securing the cylinder hatches. However, Spaccarelli, suffering from illness, does not return aboard as planned. Recognising the issue, Borghese sends Sergente Armando Memoli and Sottocapo Luciano Favale out with orders to locate Spaccarelli and ensure that the hatches are properly closed.
The two operators eventually find Spaccarelli between the transport cylinders, assess his condition, and promptly bring him back inside the submarine. Spaccarelli is brought aboard unconscious, suffering from severe asphyxia. Borghese then attempts to submerge the vessel but is forced to surface again when it becomes apparent that a hatch at the aft remains open.
Memoli is instructed to exit the submarine once more and make another effort to secure the problematic hatch. Despite his attempts, he is unable to close it. In response, he decides to open the port-side hatch as well, aiming to balance the pressure and thrust. At 21:33, Scirè submerges and departs for Leros. Inside the submarine, vigorous attempts at artificial respiration revive Spaccarelli by 01:00.
The Siluri a Lenta Corsa travel together on the surface for nearly 12 kilometres, following the coastline of the Ras el Tin Peninsula before continuing along a breakwater leading to the entrance of Alexandria’s military harbour.
| December 19th, 1941 |
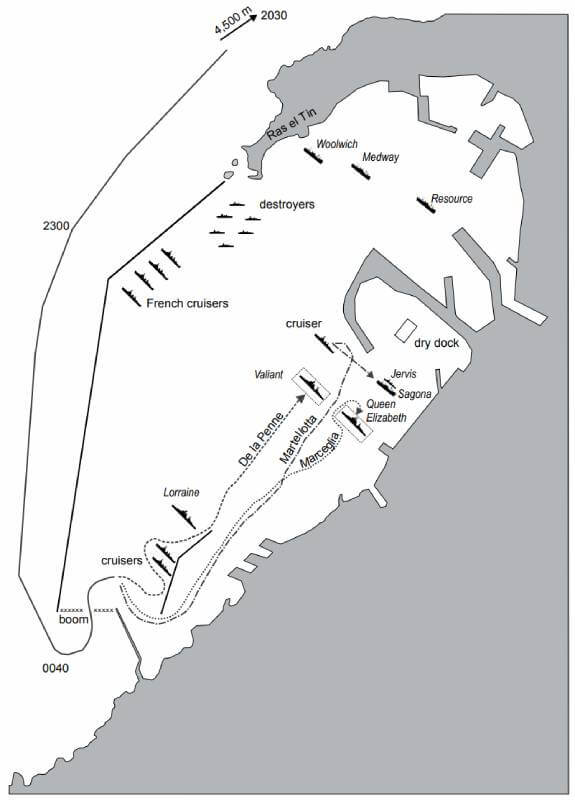
Shortly after midnight, at 00:24, the boom is reopened for the returning 15th Cruiser Squadron, which includes the light cruisers H.M.S. Naiad and H.M.S. Euryalus, as well as the destroyers H.M.S. Sikh, H.M.S. Legion, H.M.S. Maori, and H.M.S. Isaac Sweers. These ships are returning after an unsuccessful attempt to intercept an Italian convoy.
The three Siluro a Lenta Corsa’s, carrying their operators, reach the entrance boom shortly after midnight. The area is patrolled by a large motorboat periodically deploying small explosive charges, which creates a challenging environment for the approaching Italian craft.
While assessing the defences, navigational lights suddenly illuminate the area, revealing three destroyers entering the harbour at a speed of ten knots. Despite the danger, Durand de la Penne decides to exploit the open boom and proceeds to enter on the surface. The decision proves hazardous as he is thrown about by the bow waves of two destroyers. Similarly, the second Siluro a Lenta Corsa, piloted by Antonio Marceglia, also navigates around a destroyer. The third Siluro a Lenta Corsa, piloted by Vincenzo Martellotta, passes within 20 metres of the patrolling motorboat. All three pilots experience discomfort from the shocks of the small explosive charges being dropped, but their craft manage to enter the harbour without damage or detection.
Once inside the harbour, the three Siluro a Lenta Corsa’s separate to locate their respective targets. The operators proceed with their mission, navigating through the heavily patrolled and defended harbour in a bid to achieve their objectives.
| Luigi Durand de La Penne and Emilio Bianchi (SLC 221) |
The team of Tenente di Vascello Luigi Durand de La Penne and Capo di 3a Classe Emilio Bianchi, operating SLC 221, targets the British battleship H.M.S. Valiant (30,600 tonnes), which is moored in a heavily defended position within a torpedo net enclosure. After successfully following British destroyers through the harbour defences, they navigate carefully toward their target.
As de la Penne manoeuvres his Siluro a Lenta Corsa within 50 metres of the battleship, he encounters an unfamiliar obstruction. This consists of spherical floats approximately 30 centimetres in diameter, supporting a steel cable from which hangs a rope net 4–5 millimetres in diameter. Navigating past this barrier proves difficult, as the Siluro a Lenta Corsa becomes entangled with the net and cable, creating considerable noise. After a tense struggle, the craft breaks free, allowing de la Penne to remount and continue towards the H.M.S. Valiant’s hull.
By this time, it is around 02:00, an time is the team is under pressure. A tear in his rubber suit allows water to seep in, draining his body heat. Determined to complete the mission, he submerges and accidentally bumps into the H.M.S. Valiant’s hull. However, he loses control of the Siluro a Lenta Corsa, which sinks into the soft, muddy seabed at a depth of 17 metres.
Realising the situation, Durand de la Penne checks his position relative to the battleship and attempts to restart the craft’s motor, but his efforts prove unsuccessful. He instructs his copilot, Emilio Bianchi, to inspect the propeller for any obstructions. It is then that de la Penne discovers Bianchi has fainted, likely due to prolonged exposure to the pure oxygen provided by their rebreathers. The operators lose contact with one another, leaving Durand de La Penne to handle the malfunctioning craft alone.
Undeterred, Durand de La Penne begins the arduous process of pushing the 300-kilogram craft by hand along the seabed. Relying on the sound of the ship’s pumps to guide him, he painstakingly manoeuvres the explosive device into position beneath the hull of the H.M.S. Valiant. This effort takes approximately 40 minutes and requires immense physical and mental endurance, exacerbated by the effects of oxygen toxicity at such a depth and his growing exhaustion. Recognising the futility of his efforts, he swims to the surface, where he finds Bianchi clinging to a mooring buoy, having inadvertently surfaced. Moments later, the two are spotted and captured by British personnel. Despite their capture, de la Penne’s mission achieves partial success. His Siluro a Lenta Corsa, which he had abandoned less than 10 metres from H.M.S. Valiant’s hull, remains in place, effectively serving as a bottom mine near the target. This close proximity ensures that the explosive device still poses a significant threat to the battleship.
Tenente di Vascello Luigi Durand de La Penne and Capo di 3a Classe Emilio Bianchi are apprehended and brought aboard H.M.S. Valiant. Dripping wet, they are marched between two lines of amused British sailors, who laugh and point at the bedraggled Italians, assuming their mission has been a failure. An Italian-speaking officer, Sublieutenant S.T. Nowson, is summoned from H.M.S. Queen Elizabeth to assist in the interrogation. Upon his arrival, Nowson questions the prisoners about their origin and, with a tone of irony, expresses feigned sympathy for their apparent misfortune.
The captives are subsequently escorted ashore to the intelligence offices at Ras el Tin. Accompanying them are Nowson and H.M.S. Valiant’s commanding officer, Captain Charles Morgan. At Ras el Tin, the prisoners are questioned individually by Major Humphrey Quill, Royal Marines, who serves as the Staff Officer for Intelligence (Levant). According to later accounts by de la Penne, Major Quill conducts the interrogation in fluent Italian while holding a pistol, though the captives remain steadfast and disclose no information about their mission.
Despite Quill’s efforts, no conclusive evidence of the operation’s success is uncovered during the questioning. The Italians maintain their silence, and the British remain unaware of the impending detonation of the charges set beneath H.M.S. Valiant and other targets in Alexandria Harbour.
At 03:32, a general signal is issued throughout Alexandria Harbour, indicating that the presence of “human torpedoes” is suspected. This alert, reiterates prior instructions for patrol boats to deploy explosive charges if deemed necessary. Tugs are ordered to raise steam, and all ships are instructed to pass lines along their hulls to detect any explosive devices that may be attached beneath them.
By 04:00, Admiral Sir Andrew Cunningham is awakened with news of the capture of the Italian operatives. In response, he orders that the prisoners be immediately returned to H.M.S. Valiant and confined in a secure location deep within the ship. Cunningham hopes that if the vessel is in imminent danger, the prisoners will divulge information to save themselves. Meanwhile, aboard H.M.S. Queen Elizabeth, alarm stations are activated at 04:00, rousing the crew with rattling alarms and the bugler’s call. Cunningham is observed on deck, having hastily left his cabin wearing a raincoat over his pyjamas.
As the alarm spreads, measures are implemented to safeguard the ships. H.M.S. Valiant passes a line along its hull to detect any suspended charges, but it finds nothing, as the explosive device is resting on the seabed. However, H.M.S. Queen Elizabeth’s line successfully snags on a charge, confirming the presence of explosives.
While these defensive actions are underway, the Italian prisoners are returned to H.M.S. Valiant after a second round of questioning. Despite the heightened security, the British fail to confiscate Durand de la Penne’s luminous, watertight wristwatch, which he had used to time the fuses. With only ten minutes remaining before detonation, Durand de la Penne requests to speak with H.M.S. Valiant’s captain, Charles Morgan. During their brief meeting, de la Penne warns Morgan that the ship will soon be sinking but refuses to provide further details. He is then sent back to his confinement in the lower decks.
As Durand de la Penne is escorted to his holding area, he hears an announcement over the ship’s loudspeakers instructing the crew to abandon ship. The tension escalates as the countdown to the explosions continues, marking the final moments before the attack’s devastating impact on Alexandria Harbour.
At precisely 06:06, the explosive charge beneath H.M.S. Valiant detonates. Durand de La Penne, confined but able to sense the events unfolding, later describes the scene as “apocalyptic, like the thunder of a volcano.” He recalls the intense vibration that shakes the ship, lasting for several moments, followed by an eerie silence. The stillness is soon replaced by a cacophony of shouting voices and the frantic movement of the ship’s crew as they react to the damage and chaos caused by the blast. The explosion under its “A” turret, created a breach in the hull, leading to severe flooding and forcing the H.M.S. Valiant to list 4–5 degrees to port.
From the deck of H.M.S. Valiant, before being transferred ashore as a prisoner of war, the officer witnesses the culmination of the operation. At 06:10, just minutes after the first explosion, HMS Queen Elizabeth, anchored approximately 500 metres away, is struck by the charge placed beneath it by Marceglia and Schergat.
| Antonio Marceglia and Spartaco Schergat (SLC 222) |
The second team, Antonio Marceglia and Spartaco Schergat, enter the port of Alexandria by stealth, skillfully following enemy destroyers to avoid detection. Following the other two teams through the harbour defences, they locate their target with relative ease.
Captain Antonio Marceglia begins his mission to target H.M.S. Queen Elizabeth by navigating a distance of 2,200 metres through Alexandria Harbour. He carefully steers his Siluro a Lenta Corsa between a line of cruisers and the shore, using prominent landmarks such as the French battleship Lorraine to guide his approach. Their target, the battleship H.M.S. Queen Elizabeth, soon comes into view. The battleship H.M.S. Queen Elizabeth (30,600 tonnes), which is moored astern of the H.M.S. Valiant and similarly protected by torpedo nets. Upon reaching the protective net surrounding H.M.S. Queen Elizabeth, he inspects the perimeter and discovers a gap, allowing him to proceed with his attack.
At 0300, Marceglia dons his ARO (oxygen rebreather) and submerges his Siluro a Lenta Corsa into the dark waters. He later describes the descent as challenging, with the apparatus difficult to balance and its rate of descent increasing uncontrollably. Despite his attempts to stabilise it using the rudders, the lack of forward thrust proves problematic. During the descent, he experiences sharp pain in his ear due to the pressure, and the craft eventually touches down on the seabed at a depth of 13 metres, raising a cloud of mud.
Working alongside his copilot, Marceglia begins the task of detaching the explosive charge and securing it to the hull of H.M.S. Queen Elizabeth. The operation is fraught with difficulties. When air is introduced to the Siluro a Lenta Corsa to lift it towards the attachment point, it rises uncontrollably and collides violently with the battleship’s hull. This abrupt impact disrupts the process and leaves the copilot feeling unwell, as the rear-seat operators, submerged longer, are forced to rely more heavily on their ARO’s. Despite these setbacks, Marceglia completes the task, suspending the explosive charge from the hull by attaching it to a cable clamped to the battleship’s bilge keels. At 0325, he sets the fuse for 06:00.
After completing the placement, the two men guide their Siluro a Lenta Corsa along the harbour floor to escape. However, due to concerns over the copilot’s deteriorating condition, Marceglia decides to surface. Before abandoning their craft, they also deploy a series of incendiary bombs intended to ignite any diesel fuel leaking from the tanks of the damaged ships, hoping to exacerbate the destruction.
After completing their task, Marceglia and Schergat abandon the Siluro a Lenta Corsa and scuttle it to prevent its capture. The two men then swim towards shore, eventually reaching land at 0430 after spending eight hours in the water. Once ashore, they evade immediate capture and fool the port sentries by posing as French sailors. Moving through the streets of Alexandria, aiming to reach a prearranged rendezvous point near Rosetta.
Their plan is to board the submarine Zaffiro, which has been ordered to wait for them off the coast for three consecutive nights. However, despite their ingenuity and endurance, their escape ultimately fails. After reaching the vicinity of Rosetta, Marceglia and Schergat are discovered and apprehended by Egyptian police, ending their daring mission.
| Vincenzo Martellotta and Mario Marino (SLC 223) |
Capo di 1a Classe Vincenzo Martellotta and Sottocapo Mario Marino on SLC 223, stealthily enter the port of Alexandria, closely trailing enemy ships as they search for a significant target to sabotage, preferably an aircraft carrier or a large oil tanker. Martellotta’s Siluro a Lenta Corsa follows a route along the shoreline similar to that of Marceglia. After navigating between H.M.S. Valiant and H.M.S. Queen Elizabeth, Martellotta inspects the berth designated for an aircraft carrier, only to find it empty. During the search, he identifies what appears to be a third battleship. Based on its size and silhouette against the dark background, the warship initially seems distinct from the other two battleships targeted in the operation. Acting on instinct and recognising the opportunity, they prepare to attack. However, upon closer inspection, they identify the vessel as H.M.S. Carlisle, a cruiser rather than a battleship.
Upon closer assessment, it becomes apparent that the vessel is a cruiser rather than a battleship. As the cruiser is deemed an insufficiently valuable target, Martellotta resumes the search for a more suitable objective, maintaining discipline and adhering to operational orders. The duo then redirects their efforts towards an oil tanker moored nearby.
Ultimately, Martellotta selects the large Norwegian oiler Sagona (7,554 GRT) as the target. Due to issues with the oxygen rebreather (ARO), the Siluro a Lenta Corsa cannot fully submerge.Martellotta begins to experience severe symptoms of oxygen poisoning, manifesting as violent vomiting. Recognising the danger, he surfaces to recover, leaving Marino to carry out the critical task. While Martellotta stabilises the craft near the stern of the oiler, his copilot attaches the explosive charge beneath the vessel. The fuse is set at 02:55. Following this, additional explosive charges are scattered as part of the mission plan. A large destroyer, H.M.S. Jervis, is moored alongside the tanker, prompting the two operatives to exchange a whispered hope: “If it stays there for another three hours, it’s doomed too.”
To maximise the damage, they also place four small incendiary bombs approximately 100 metres from the tanker, intending to ignite any escaping fuel. After completing their sabotage, the operatives scuttle their Siluro a Lenta Corsa, initiating its self-destruction mechanism, and swim towards a nearby dock. Once ashore, they remove and sink their diving suits along with their breathing apparatus, hoping to evade capture. However, their luck runs out, and they are apprehended shortly after by the port’s internal security.
| The Explosions |
At 05:47, the explosive charge placed beneath the Norwegian oiler Sagona detonates, followed by the charge beneath H.M.S. Valiant at 06:06 and H.M.S. Queen Elizabeth at 06:10. The sequence of explosions causes widespread destruction across Alexandria Harbour.
The explosion causes H.M.S. Valiant to list to port, and de la Penne is thrown off his feet, injuring his knee. Despite his injuries, he climbs a ladder and escapes through an open hatchway abandoned by its sentry, reaching the weather deck. His copilot, Emilio Bianchi, confined in a separate compartment, survives the blast unharmed. From the deck of H.M.S. Valiant, de la Penne witnesses the explosion beneath H.M.S. Queen Elizabeth, moored approximately 500 metres away. The officer provides a vivid and concise description of the event:
“I turned my gaze towards H.M.S. Queen Elizabeth, positioned about 500 metres off our stern. Her crew had gathered on the bow. Moments later, the ship seemed to leap slightly from the water, and then debris, shards of metal, various objects, and diesel fuel, erupted from the funnel. The detritus reached our deck, coating the stern crew in grime.”
Admiral Cunningham later recalls his experience aboard H.M.S. Queen Elizabeth during the explosion. Standing near the ensign staff at the stern, he feels a “dull thud” and is thrown nearly 1.5 metres into the air due to the violent flexing of the ship’s hull. The quarterdeck is displaced upwards by at least 15 centimetres, followed by thick smoke and flame erupting from the ship’s funnel. The ship then begins to settle rapidly.
The explosion beneath H.M.S. Queen Elizabeth causes catastrophic damage. The keel plates under Boiler Room B are ripped apart, creating a hole measuring approximately 58 metres by 18 metres. Boiler Rooms A, B, and X, along with the 45-inch magazine, flood rapidly, while Boiler Room Y and adjacent compartments slowly flood to the main deck level. The ship assumes a 45-degree starboard list and settles 2.4 metres lower at the bow.
H.M.S. Valiant suffers significant damage as well. The port-side protective lower hull bulge is breached over an area of 18 metres by 9 metres, with the inner bottom, shell room A, its magazine, and nearby compartments flooding immediately. The ship settles 1.5 metres lower at the bow.
The tanker Sagona sustains severe damage to its aft section, with its propeller shafts and rudder destroyed. The oiler remains unrepaired until 1946. The destroyer H.M.S. Jervis, moored alongside Sagona, experiences structural damage to its bow, with plates in the communications mess deck and other compartments buckling. A fire ignites in the paint stores, and H.M.S. Jervis requires a month in dry dock for repairs.
H.M.S. Valiant occupies Alexandria’s floating dry dock until April 1942, after which it sails to Durban, South Africa, for further repairs and refitting. The battleship re-enters service with the Eastern Fleet in August 1942. H.M.S. Queen Elizabeth, following extensive temporary repairs, leaves dock on June 27th, 1942 and is sent to Norfolk, Virginia, for permanent restoration. The battleship returns to fleet operations in January 1944.
| Submarines |
The Scirè surfaces after 39 hour and starts reloading it’s batteries. Meanwhile, the pick up submarine Zuffiro Zaffiro navigates through coordinates 35°40’N, 28°20’E and 33°30’N, 30°16’E, covering a distance of 985.6 kilometres before arriving in her designated patrol area at 31°40’N, 30°20’E.
| December 20th, 1941 |
By 21:15, submarine Scirè receives confirmation from Supermarina that reconnaissance has identified oil leaks around the battleships, verifying their damage.
| December 22nd, 1941 |
Submarine Scirè arives at Poro Lagos, Leros in the Aegean Sea.
At 19:35 hours, the pick-up submarine Zafirro spots a vessel approximately 6,000 metres away. Initially the ship is identified as a fishing boat, it is later confirmed to be a British Motor Torpedo Boat. As the MTB approaches, closing to within 1,500 metres, Zaffiro dives at 21:25 hours to avoid detection.
| December 23rd, 1941 |
Submarine Scirè departs Poro Lagos, Leros in the Aegean Sea at 08:00 for the return trip to La Spezia, Italy.
By 00:04 the pick-up subamrine Zaffiro reaches the rendezvous point at 31°41’N, 30°22’E, where she is scheduled to collect the six Xa Flottiglia MAS divers who had infiltrated Alexandria. However, a British destroyer appears in the vicinity, forcing the submarine to dive to the seabed at a depth of 45 metres. After the destroyer moves on, Zaffiro surfaces at 02:30 hours and resumes the search for the fishing vessel that was to be commandeered by the divers. She continues searching until 04:00 hours, but there is no sign of the operators.
| December 24th, 1941 |
The Zaffiro returns to the rendezvous area, conducting a search from 02:26 to 05:00 hours. Despite her efforts, there is no trace of the operators.
| December 25th, 1941 |
At 12:45, a three-engine bomber, identified as Blenheim P from No. 203 Squadron, attacks submarine Scirè from astern. The submarine responds with anti-aircraft fire at a range of 800 metres, but the bomber remains undamaged. The aircraft drops four 113-kilogram depth charges, the closest of which falls approximately 80 metres astern of the submarine, before departing.
The Zaffiro repeats the recovery operation once more between midnight and 04:00 hoursWith no sign of the operators, who are later confirmed to have been captured, the Zaffiro begins her return journey to Leros.
| December 29th, 1941 |
Submarine Scirè arrives at La Spezia, Italy at 11:00, successfully completing its mission.
The submarine Zaffiro arrives back at her base in Porto Lago, Leros at 15:25 hours.
| Aftermath |
Commander Junio Valerio Borghese receives the Cavaliere dell’Ordine Militare di Savoia and returns safely from the operation. Lieutenant Luigi Durand de la Penne, Sub-Lieutenant Emilio Bianchi, Captain Antonio Marceglia, Chief Petty Officer Spartaco Schergat, Captain Vincenzo Martellotta, and Sergeant Mario Marino receive the Medaglia d’Oro al Valor Militare along with a promotion, but are captured during the mission. Sub-Lieutenant Giorgio Spaccarelli and Sub-Lieutenant Luigi Feltrinelli earn the Medaglia d’Argento al Valor Militare and return successfully. Sub-Lieutenant Armando Memoli and Sub-Lieutenant Luciano Favale are awarded the Medaglia di Bronzo al Valor Militare and also return safely.
Following Operazione Golfo di Alessandria 3 on December 19th, 1941, the British immediately prioritise concealing the extent of the damage to their fleet from enemy reconnaissance. Since H.M.S. Queen Elizabeth settles on the harbour bed in an upright position, Admiral Sir Andrew Cunningham remains aboard, and the crew continues their daily routines, including the ceremonial hoisting of the colours each morning. This effort is designed to give the impression that the battleship remains operational. However, as Admiral Philip Vian later recalls, a reconnaissance aircraft manages to evade the harbour’s defences the morning after the attack. The aircraft observes H.M.S. Queen Elizabeth and H.M.S. Valiant, both resting on the seabed with submarines moored alongside to provide electrical power. A reconnaissance photograph taken during this overflight could have exposed the true extent of the damage, much like similar images following the British air attack on Taranto in November 1940.
Initial Italian assessments based on reconnaissance photographs conclude that both British battleships have been damaged. Aerial reconnaissance on January 6th, 1942 confirms this, prompting Italy to issue a public bulletin on January 8th, 1942, claiming success. The German naval staff, however, is sceptical. Believing the Mediterranean Fleet still has three operational battleships, they delay officially recognising the attack’s impact until January 9th, 1942, when it is finally described as a “considerable success.” Even as late as 27 January, German intelligence doubts reports that H.M.S. Queen Elizabeth has been rendered inoperable, citing conflicting information that the battleship had supposedly been at sea since the attack, while H.M.S. Valiant remained in dock for repairs.
The attack on Alexandria marks a critical turning point for Italian naval strategy in the Mediterranean. Prior to this operation, the Regia Marina had begun taking more aggressive actions to regain control of the central Mediterranean. This effort included escorting supply convoys to North Africa with battleship support, which proved effective in deterring British attacks. One such engagement, later known as the First Battle of Sirte, occurs on December 17th, 1941. During this brief skirmish, British cruisers and destroyers withdraw after coming under fire from Italian battleships, reinforcing the effectiveness of Italy’s “big gun” deterrent, despite British reliance on advanced radar technology, referred to by Italian sailors as occhio elettrico (“electric eye”).
On the same day as the Alexandria attack, British Force K, consisting of cruisers and destroyers based in Malta, strikes an Italian minefield off Tripoli. The force suffers heavy losses, including one cruiser and one destroyer sunk, and two additional cruisers damaged. Together, these three Italian victories between December 17th, 1941 and December 19th, 1941, the successful convoy escort, the minefield action off Tripoli, and the attack on Alexandria, dramatically shift the naval balance in the Mediterranean.
Admiral Cunningham later describes the disabling of H.M.S. Queen Elizabeth and H.M.S. Valiant as a disaster, writing to Admiral Dudley Pound, the First Sea Lord, on December 28th, 1941, expressing his frustration over the situation. With their capital ships out of action, the British are unable to effectively counter Italian battleship-escorted convoys, allowing Italy to secure its supply lines to North Africa. This success is reflected in the figures: in December 1941, 39,092 tonnes of supplies, 82 percent of all Italian shipments, reach their destinations in North Africa. In January 1942, this figure rises to nearly 100 percent, with 65,570 tonnes delivered. The Italians also use this newfound dominance to blockade British communications between Alexandria and Malta, sharply reducing the success rate of British convoys. Between August 1940 and December 1941, all 37 merchant ships departing Egyptian ports for Malta had arrived safely. Following the Alexandria attack, only 8 of 25 such ships, 32 percent, make it to Malta up until the Anglo-American invasion of North Africa in late 1942.
Despite these successes, the Axis powers fail to fully exploit the strategic opportunities presented by the British losses. While some German officials suggest an offensive against Alexandria or the Suez Canal, the Italian naval staff rejects these proposals as overly risky and logistically impractical. Instead, discussions turn to a potential invasion of Malta, which had long been viewed as a critical objective for Axis control of the Mediterranean. Although plans for the invasion are finalised by mid-1942, the German high command ultimately cancels the operation, unwilling to commit the necessary resources. In hindsight, this missed opportunity prevents the Axis from fully capitalising on their temporary dominance in the Mediterranean.
| Multimedia |