
| Page Created |
| July 14th, 2025 |
| Last Updated |
| October 25th, 2025 |
| The United States |
 |
| Related Pages |
| Project Scam Dukw Landing Craft, Assault U.S. Army Rangers Operation Overlord Operation Neptune Omaha Beach Omaha Beach, Widerstandsnest 73 Omaha Beach, Widerstandsnest 74 Omaha Beach, Provisional Ranger Group Omaha Beach, PRG, Force A, Pointe du Hoc Omaha Beach, PRG, Force B Omaha Beach, PRG, Force C Provisional Ranger Group, Assault on the Maisy Battery |
| June 6th, 1944 |
| Omaha Beach, Provisional Ranger Group, Force B |
| Podcast |
| Objectives |
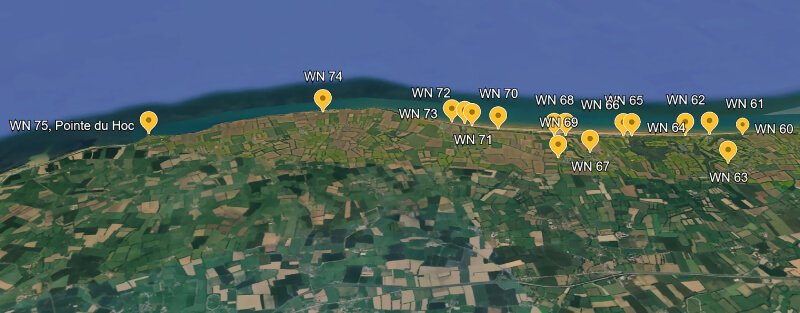
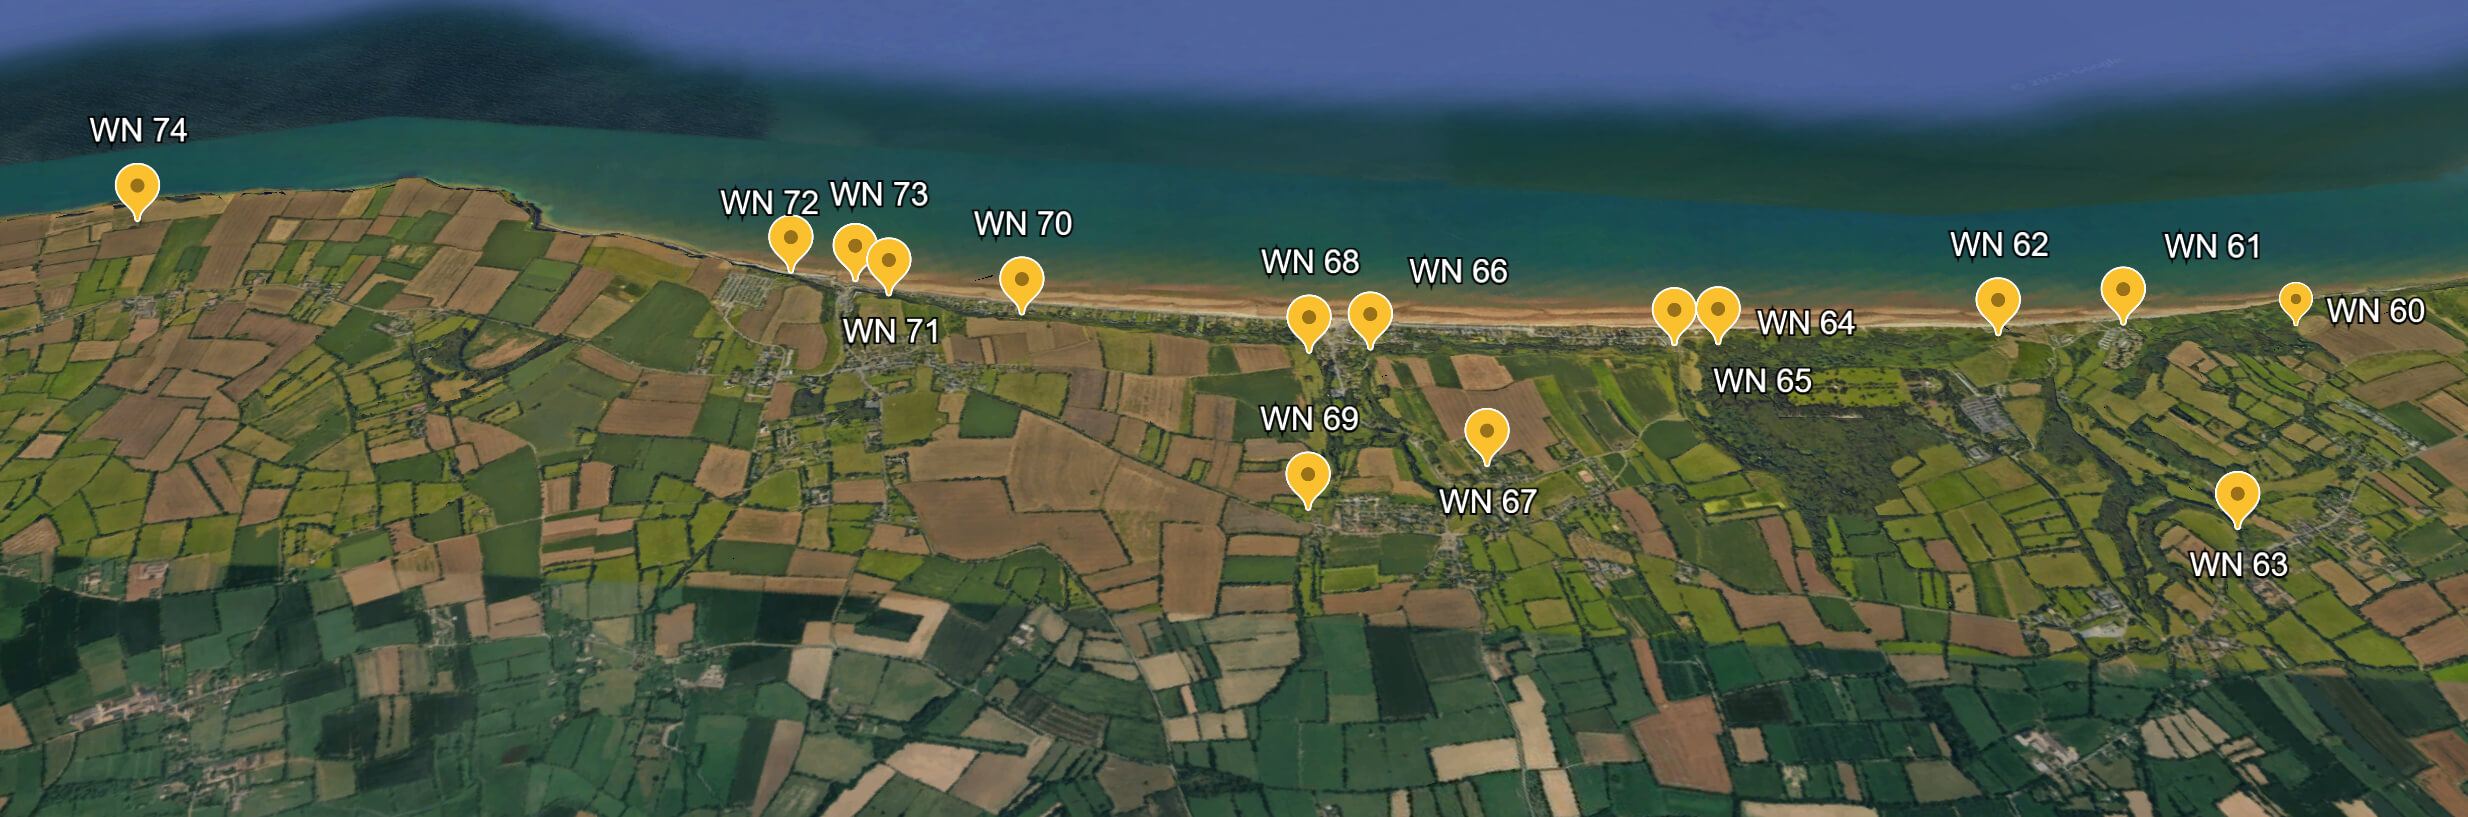
- Attack and neutralise German defensive strongpoints, Widerstandnest 73 and Widerstandnest 74, along Pointe-et-Raz-de-la-Percée, cliffs situated at the western end of Omaha Beach.
- rejoin the main body of the 2nd Ranger Battalion.
- advance west with the battalion clearing the coastal strip as a part of the drive to link up with Utah Beach.
| Operational Area |
| Allied Forces | ||||
 |
- 2nd Raider Battalion
- Company C
| Axis Forces |
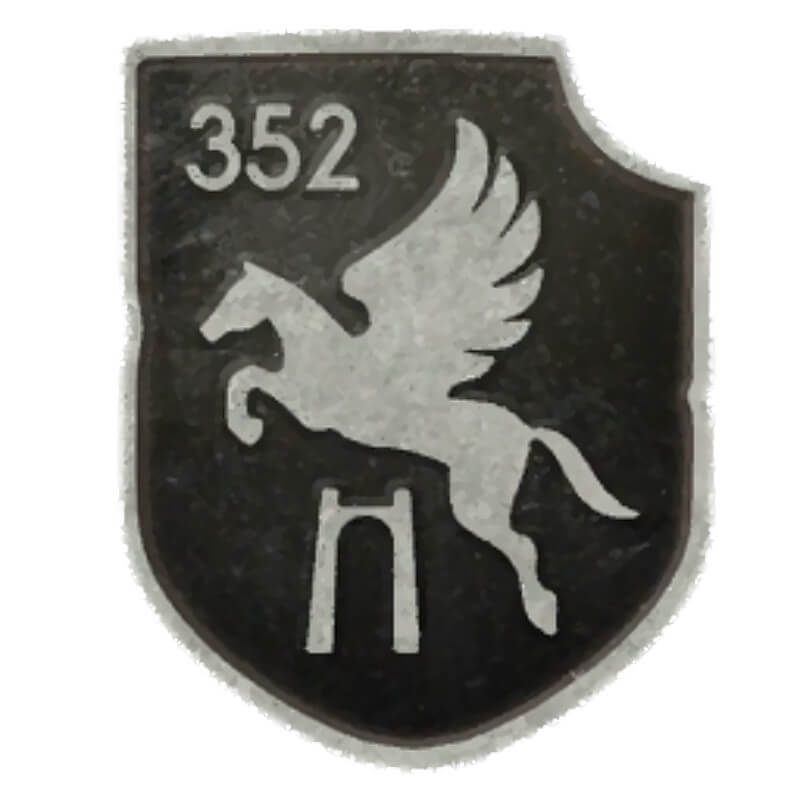
| 352. Infantrie-Division |
 |
- Grenadier-Regiment 914
- I Bataillon (I./914)
- II Bataillon (II./914)
- Grenadier-Regiment 915
- I Bataillon (I./915)
- II Bataillon (II./915)
- Grenadier-Regiment 916
- I Bataillon (I./916)
- II Bataillon (II./916)
- Artillerie Regiment 352
- I Bataillon (I./352) 3 batteries of 105-millimetre leFH 18/40
- II Bataillon (II./352) 3 batteries of 105-millimetre leFH 18/40
- III Bataillon (III./352) 3 batteries of 105-millimetre leFH 18/40
- IV./352 with batteries of 150-millimetre sFH 18
- Panzerjäger-Abteilung 352
- Kompanie
- Kompanie
- Kompanie
- Pionier-Bataillon 352
- Divisions-Füsilier-Bataillon 352
- Nachrichten-Abteilung 352
- Feld-Ersatz-Bataillon 352
- Heeres-Küsten-Batterie Maisy (H.K.B. 6./1716 and 8./1716)
- Batterie 6: Four 105-millimetre leFH 414(f) French howitzers
- Batterie 8: Four 100-millimetre Czech guns (K.14/19) in open pits
- Heeres-Küsten-Batterie Pointe du Hoc (H.K.B. 2./1261)
- Six 155-millimetre GPF-T (French) naval guns
- Heeres-Küsten-Batterie Trevieres / Formigny
| 716. Infantrie-Division |
 |
- Grenadier-Regiment 726
- I Bataillon (I./726)
- II Bataillon (II./726)
- Grenadier-Regiment 736
- I Bataillon (I./736)
- II Bataillon (II./736)
- III Bataillon (III./736)
- Artillerie-Regiment 1716
- I Bataillon (I./1716): 100-millimetre Czech field guns
- II Bataillon (II./1716): 105-millimetre leFH 18 German howitzers
- III Bataillon (III./1716): 150-millimetre sFH 414(f) French heavy howitzers
- IV Bataillon: Mixed coastal defence guns and anti-tank weapons
- Panzerjäger-Bataillon 716
- Pioneer-Bataillon 716
- Nachrichten Bataillon 716
- Feld-Ersatz-Bataillon 716
- Heeres-Küsten-Batterie Longues-sur-Mer (H.K.B. 2./1260)
- Heeres-Küsten-Batterie Mont-Fleury (H.K.B. 1./1260)
- H.K.B. Wn61 / Wn60 (Colleville-sur-Mer sector)
| Reserve Units |
- Ost-Bataillon 439 (Ukrainian)
- attached to 716. Infantrie-Division
- Ost-Bataillon 642 (Georgian/Russian)
- attached to 352. Infantrie-Division
- Ost-Bataillon 630
- uncertain but possibly attached to 716. Infantrie-Division
| Multimedia |

| June 6th, 1944 |
Company C of the 2nd Ranger Battalion, Force B, is assigned a distinct and independent mission. Unlike the main body landing at Pointe du Hoc, Company C is designated to land on the extreme western end of Omaha Beach, in Charlie Sector. Their scheduled touchdown is at H+3 minutes, just behind the first assault wave of the 116th Regimental Combat Team.
Their primary objective is the destruction of Widerstandsnest 73, the dominant German strongpoint overlooking the western end of Dog Green and Charlie beaches. Its guns and mortars pose a direct threat to all forces landing in this sector, and neutralising it is essential for the success of the Vierville exit.
Widerstandsnest 73 stands as the westernmost of thirteen German strongpoints guarding the Vierville bluffs and valleys. Each Widerstandsnest, or resistance nest, is designed to dominate a specific sector of the coastline. Together, these platoon- or company-sized positions form an interlocking matrix of defences, capable of delivering overlapping fields of fire across beach approaches and inland exits.
Widerstandsnest 73 is ideally positioned. Located on the cliff edge above what becomes Dog Sector on D-Day, it commands a clear line of fire across the entire western half of Omaha Beach. Its elevation and orientation give it lethal visibility over the shingle, tidal flats, and waterline. Any assault force landing at the base of the cliffs would be exposed to direct and flanking fire from above.
By April and May 1944, the German 352. Infantrie-Division assumes responsibility for Coastal Sectors 1 to 3. However, the original static coastal infantry, III Bataillion, Infantry Regiment 726, remain in place. In the Vierville area, responsibility for the strongpoints, including Widerstandsnest 70 through Widerstandsnest 73, passes to Kompanie 11 of Grenadier-Regiment 726. Their task is simple but brutal: deny access to the Dog One draw and prevent any breakout from the beach.
The defences are arranged with stark efficiency. Crossfires from rifles, machine guns, mortars, anti-tank guns, and artillery blanket the approach routes. The design is almost medieval in concept—each position supports the others, covering the gaps with layered weapons in depth. Any frontal assault without neutralising Widerstandsnest 73 risks catastrophic losses.
A German non-commissioned officer, using a specially designed trench periscope, scans the base of the cliff for signs of enemy infiltration. He is part of a garrison that holds an extensive trench network stretching across the upper slope and ridge line.
The strongpoint itself includes several machine-gun positions, three 81-millimetre mortars, and at least one 75-millimetre artillery piece. Protective shelters are dug into the bluff, with minefields and dense barbed wire securing the landward approaches. The entire position revolves around a solidly constructed stone house, the so-called “Fortified House”, set into a natural cleft in the cliff face.
Though its placement affords little useful field of fire, the house is used by the Germans for command and accommodation. It anchors the defensive layout of Widerstandsnest 73 and provides cover and shelter for its garrison. On D-Day, it becomes a focal point of resistance.
To secure the Vierville draw and break into Festung Europa through Dog Green, Allied forces must silence Widerstandsnest 73. Without its removal, any advance inland via the western end of Omaha Beach would be impossible.
Once Widerstandsnest 73 is destroyed, Company C is to advance westward along the cliffs. Their next objective is the radar site and defences at Pointe de la Percée, identified as Widerstandsnest 74. This position, though isolated, is known to be garrisoned and must be cleared to secure the flank.
Widerstandsnest 74 is a small but strategically located German coastal defence position situated at Pointe de la Percée, west of Vierville-sur-Mer and just beyond the western edge of Omaha Beach. It forms the westernmost element of the Omaha beach defensive system and overlooks a sheer drop to the sea. Though more isolated than other strongpoints such as Widerstandsnest 72 or Widerstandsnest 73, it plays a significant role in flank security and coastal observation.
Widerstandsnest 74 is lightly armed compared to the major resistance nests at Vierville or Saint-Laurent but is nonetheless capable of inflicting casualties on advancing troops. Known or probable weapons include:
- Two Czech Škoda 7.65-centimetre field guns
- Four 2-centimetre Flak 30
- Maschinengewehr 34
- Maschinengewehr 42
- Extensive barbed wire, S-mines, and anti-personnel minefields surrounding the landward side of the position.
Widerstandsnest 74 is sited on elevated ground at Pointe de la Percée. It commands a wide field of view across the Channel approaches and offers visual oversight of the western extremities of Dog and Charlie sectors. The position is intended to act as a flank anchor, early warning station, and local strongpoint controlling movement along the coastal track between Vierville and Pointe du Hoc.
The strongpoint is manned by an estimated platoon-sized force, approximately 25 to 35 men. These are believed to belong to the 9. Kompanie, Grenadier-Regiment 726, 716. Infanterie-Division (bodenständig) under operational control of 352. Infanterie-Division. The garrison consists mostly of static troops, older soldiers or those with limited mobility, tasked with holding fixed defensive positions.
The strongpoint also includes a nearby Würzburg-Riese or Freya radar installation, although this a separate Luftwaffe-controlled site rather than under direct control of the infantry garrison. It is possible that elements of the 10. Flugmelde-Leit-Kompanie, Stab III. Abteilung, Luftnachrichten-Regiment 53 and Kriegsmarine Personnel (naval signals personnel) are also present if the radar station nearby is operational.
After completing these tasks, Company C is to move further west, rejoining the main body of the 2nd Ranger Battalion. Their orders are to destroy all enemy positions encountered en route to Pointe du Hoc. One amphibious tank platoon, or two if required, is placed on call for the initial mission. Company C of the 116th Regimental Combat Team is to provide flank protection during the advance towards Pointe du Hoc. Together, they are to continue clearing the coastal strip, advancing in conjunction with V Corps and airborne forces operating near Utah Beach. The mission forms part of the wider effort to secure the Carentan Peninsula and link up the beachheads.
| The Way in, June 6th, 1944 |
Company C, 2nd Ranger Battalion numbers three officers and sixty-five men. They are positioned in three British-crewed Landing Craft, Assault on the extreme left flank of the assault flotilla. Their scheduled landing time is 06:38, just eight minutes after the amphibious Sherman Duplex Drive tanks of B Company, 743rd Tank Battalion, due at H-5 minutes, and three minutes after Company A of the 116th Regimental Combat Team, assigned to land at H-Hour.
This sequencing is critical. The tanks are expected to neutralise German strongpoints, and the infantry is to clear a path inland. The Rangers, landing in support, are tasked with advancing west towards Pointe de la Percée to destroy further enemy positions and reinforce the flank.
At 04:30, they lower away from their transport and move to the rendezvous area. Here they establish contact with Company A, 116th Regimental Combat Team. The run-in is hampered by heavy seas. Many Rangers become seasick during the crossing.
During the approach to the beach, the company suffers a severe setback. German Anti-tank fire strikes one of the Landing Craft Assault. The ramp is smashed, and severe casualties are inflicted.
The craft is overloaded, and several Rangers are thrown into the cold, churning water. Some men drown under the weight of their gear before they can be rescued. Others are pulled from the sea by nearby U.S. Coast Guard vessels and evacuated back to safety, unable to take part in the assault.
The two remaining Landing Craft, Assault face a difficult approach to Omaha Beach in the rough seas before dawn. Despite a modest meal, many Rangers become seasick during the voyage. To reduce discomfort, Captain Goranson has the men take turns standing up in the Landing Craft, Assault. During the approach, Ranger Edwin Sorvisto observes the aerial bombardment on Pointe du Hoc. He recalls hearing bombs impacting to their right, creating a vivid reddish-orange glow in the sky.
Shortly before sunrise, the destroyer U.S.S. Thompson opens fire on German targets along the beach ahead of the Rangers. At 05:50, Thompson’s four 127-millimetre guns begin bombarding Target 74. This target is the Wiederstand Nest 74, the primary objective for Ranger Force B. After half an hour, Thompson shifts its fire to Wiederstand Nest 75. This second target is Widerstandsnest 73, located close to Force B’s planned landing area.
As shells from Thompson scream overhead, the two Ranger Landing Craft, Assault pass a sinking Landing Craft, Vehicle, Personnel from the 1st Battalion, 116th Regimental Combat Team. The craft is part of the Command Group from H.M.S. Princess Maude, carrying the Beachmaster. Severe sea conditions had caused this Landing Craft, Vehicle, Personnel to founder off Dog Green Beach. This group eventually lands around 07:20, after Force B.
It quickly becomes clear that A Company, 116th Regimental Combat Team, faces intense enemy fire at Vierville draw. Observing this heavy resistance, Goranson and the Royal Navy crew agree to switch to their alternate plan and land further west. The two Ranger Landing Craft, Vehicle head towards the boundary of Dog Green and Charlie beaches. They land to the west, on the right flank of the 1st Battalion, 116th Regimental Combat Team. Due to delays, Force B lands approximately twelve minutes late, at about H+15, 06:45, instead of the planned H+3.
At around 06:35, U.S.S. Thompson spots the Ranger Landing Craft, Assault moving towards the beach. Thompson’s commanding officer, Lieutenant Commander Albert Gebelin, orders his gunners to cease fire at 06:46. Dust and smoke obscuring the shoreline have made it difficult to accurately track the landing craft’s positions.
Until Ranger Force B nears the shore, the Germans appear unaware of the approach of the two Ranger landing craft. At approximately 180 metres from the beach, everything seems quiet. Captain Ralph Goranson’s Ranger Force B lands just west of the shattered A Company, 116th Regimental Combat Team. The two Ranger Landing Craft, Assault encounter fewer beach obstacles, as they land beyond the western limit of the Vierville draw where the belts of mines and obstructions thin out. The craft land within 115 metres of one another, near Widerstandsnest 73.
Two mortars positioned within the Widerstandsnest have been preregistered to strike key areas along the shoreline. These weapons contribute heavily to the slaughter of A Company. Although a few mortar bombs are fired toward the approaching Rangers, none find their mark.
Farther west lies Widerstandsnest 74, the final objective of Ranger Force B.
| Crossing the Beach, June 6th, 1944 |
The Rangers’ 1st Platoon in LCA 418 receives direct fire from these guns as it lands. Within moments of grounding, four 76.5-millimetre shells strike the craft. The first shot misses. The second tears away the bow ramp. The third hits the stern. The fourth explodes amidships. Around a dozen Rangers are killed. Captain Goranson and four nearby men are stunned and concussed. Despite their injuries, they escape the wreckage with the remaining survivors.
The 2nd Platoon under Lieutenant Sydney Salomon lands to the left in LCA 1038. The craft grounds on a sandbar, forcing the men to disembark into waist-deep water. German machine-gunners on the cliffs open fire before the ramp is lowered. Salomon exits first, followed by Sergeant Oliver Reed. Reed is struck and collapses beneath the ramp. Salomon pulls him clear and drags him to the beach.
As they run inland, a mortar round lands among Salomon’s group. It kills the head of the mortar section and wounds most of the others. Salomon is hit in the back by shrapnel. At the base of the cliff, the platoon medic removes the larger fragments and applies field dressings to his wounds.
Salomon estimates that half the men from the craft, around fifteen, are killed or wounded by initial enemy fire. Some of the wounded try to crawl forward, but are killed by further bursts from machine guns and mortars. Of the twenty-three Rangers of C Company killed on D-Day, nineteen fall in the opening minutes of the assault.
The two Landing Craft, Assault land approximately 230 to 275 metres from the base of the cliffs. The tide has carved runnels along the shoreline, forcing the Rangers to wade through these shallow trenches. Movement is slowed, but they reach the foot of the cliffs.
The Rangers have been trained to run immediately for cover and not to pause or regroup. The Rangers carry much lighter equipment than the infantrymen of the 116th Regimental Combat Team. Each man bears only about half the standard load, giving them greater speed and agility under fire.
Technician Grade 5 Jesse Runyan, a Browning Automatic Rifle gunner, is wounded in the groin and loses the use of his legs. Despite this, he continues to fire at a German machine-gun nest near the Vierville draw. His suppressing fire reduces losses among the Rangers during their crossing.
Running across the beach proves chaotic and dangerous. Rangers fall under fire, but none stop to assist. Training dictates that fallen men are left behind. The priority is reaching the cliffs with weapons and mission knowledge intact. Each man is instructed to complete the company objective, regardless of casualties. The dash to the cliff takes three to four minutes. In that time, approximately thirty-five of the original sixty-four Rangers are killed or wounded. Charlie Company loses both mortars. Only one bazooka remains. Three of the four BAR gunners reach the cliffs. Squad leader casualties are significant.
Equipment carried by Captain Goranson is later found to be riddled with bullet and shrapnel holes. Rations are destroyed, the canteen and flare projector are penetrated, and the morphine kit is shredded. Despite the damage to his gear, Goranson is unharmed.
Casualties are heavy. Nineteen Rangers are killed in action. Thirteen are seriously wounded. Five are lightly wounded but elect to remain on duty. Thirty Rangers survive the beach crossing. They are spread over a 180-metre stretch at the cliff base. The largest group numbers eight men. Lieutenant Salomon positions BAR gunners to face the Vierville draw. Their fire suppresses German positions and enables five wounded Rangers to crawl to safety.
| Widerstandsnest 73, June 6th, 1944 |
The cliffs provide cover. German infantry on the bluff cannot target the Rangers directly. Mortars are ineffective at such close range and remain focused on A Company, 116th Regimental Combat Team. Hand grenades are thrown over the edge by German troops, but detonate harmlessly due to poor visibility and distance.
A German grenade lands near Captain Goranson’s position. Its fuse burns, but the blast is absorbed by the sand, causing minimal injury. These grenades are considered ineffective by the Rangers and typically result only in superficial wounds.
Wounded men are moved into a shallow depression at the cliff base. Captain Goranson and Lieutenant Moody determine that Plan 1, advancing through the Vierville draw, is no longer viable due to heavy losses among the 116th Regimental Combat Team. They switch to Plan 2: ascending the cliffs.
Lieutenant Moody, with Sergeant Julius Belcher and Private First Class Otto Stephens, searches for a suitable climb. The lower 12 to 15 metres of cliff are vertical. Above that, the gradient softens. Stephens identifies a climbable section 320 metres to the west. Using a bayonet to create handholds, Stephens ascends, followed by Belcher.
Moody follows with toggle ropes. At the top, stakes are found near a marked minefield. The ropes are secured. Rifle fire begins from German trenches near the “fortified house”.
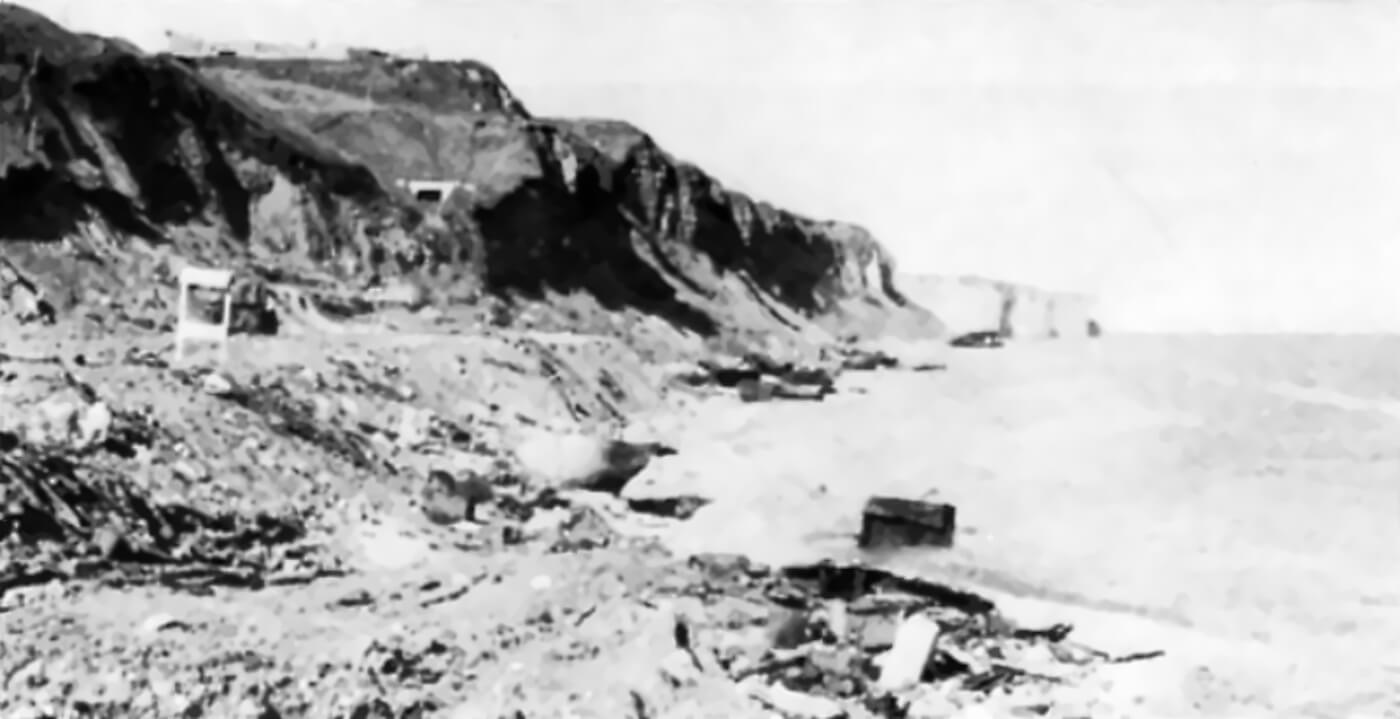
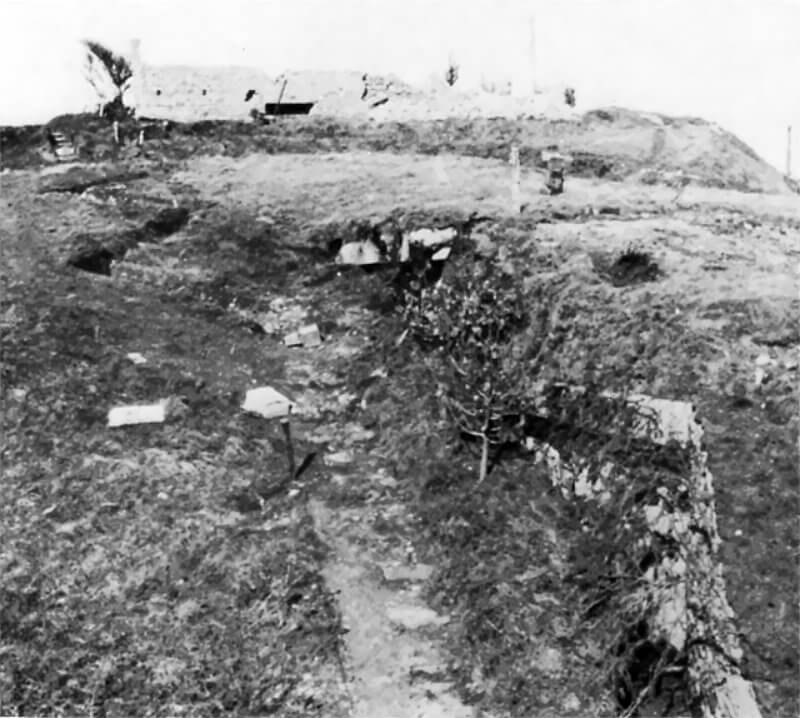
The fortified house, known locally as the “Folie Gambier”, sits in a gully in the cliff face within the hamlet of Vignotière. A stone barn stands above it to the east. The house serves as the primary structure for Widerstandsnest 73. A wooden barracks and field kitchen are located nearby.
By 07:00, the ropes are in place. Moody signals the base. The twenty-four able-bodied Rangers begin climbing. The ascent takes approximately thirty minutes. Lieutenant Moody’s party scouts the area.
From the plateau, Widerstandsnest 74 is observed to lie over 900 metres farther west. With limited manpower and unknown resistance, advancing is deemed too risky. Rangers begin clearing German positions around the fortified house first.
Naval gunfire from U.S.S. McCook has damaged the villa. Patrols report that it is partly collapsed.
Lieutenant Salomon reaches the plateau with nine survivors from his landing craft. Seven are lightly wounded. Moments later, naval gunfire from U.S.S. Harding targets the area. The destroyer crew presumes no survivors have reached the cliff top. A fluorescent identification panel is displayed, prompting the destroyer to cease fire.
Two soldiers from A Company, 116th Regimental Combat Team, Privates Shefer and Lovejoy, join the Rangers and climb the cliff. By 07:30, all Rangers are on the crest. While this is underway, B Company, 116th Regimental Combat Team, starts landing beginning at 06:56. Captain Goranson spots an Landing Craft Vehicle, Personnel landing a section of Company B, 116th Regimental Combat Team, on the beach below. The landing craft, under Lieutenant Leo Pingenot and Staff Sergeant Odell Padgett, approaches in view of the Rangers. The group loses one killed and three wounded before reaching cover. Captain Goranson sends a man back to guide them to the ropes. Pingenot’s twenty-eight men ascend and reinforce the position.
The arrival of B Company doubles Ranger Force B’s strength. Infantrymen are assigned to trenches around the villa. Their .30 calibre Browning light machine gun is placed to cover the southern approach.
Reconnaissance patrols report enemy troops occupying a fortified house and nearby entrenchments to the west. From here, the Germans place enfilade fire on the beach. This area has already been bombarded for forty-five minutes by naval gunfire. The house is damaged but remains partially standing. The enemy has reoccupied the defences.
Captain Goranson then decides to turn left towards the fortified house. His aim is to silence any position that threatens Dog Beach, before pressing on toward Pointe et Raz de la Percée. When the house is reached, the Rangers discover a German strongpoint just beyond. It is a network of dugouts and trenches with machine guns and a mortar position. Goranson places men in an abandoned trench west of the house. He begins probing the enemy defences.
Lieutenant Moody leads a patrol to reconnoitre the German positions. A German patrol is encountered on the slope and two are killed with BAR fire. The rest retreat. Moody is shot and killed after raising his head above a crater. Private Stephens suffers a glancing head wound from rifle fire.
A separate patrol is hit by hand grenades near the barn. Grenades are thrown too early and are returned. Another Ranger, Sergeant Belcher, approaches a trench near the barn and encounters a German rifleman. Both fire. Both weapons misfire. The German flees toward a mortar Tobruk.
Belcher has a reputation for aggression. Officers describe him as fierce and unrelenting, often clearing bunkers with grenades and close-range fire. During the Normandy campaign, he regularly conducts night raids with a fellow officer, returning with stories of destruction and laughter.
Joined by another Ranger, Sergeant Belcher clears a trench near the Tobruk. Three Germans are shot. A white phosphorus grenade is thrown into a dugout. Two more Germans flee and are shot while escaping. Finding the trench system too complex to clear alone, Sergeant Belcher withdraws. Captain Goranson forms two larger patrols to clear the mortar Tobruk.
Lieutenant Salomon follows Lieutenant Moody’s path. Sergeant Charles Flanagan is fired upon by a German machine gunner. He responds with a rifle grenade, killing the gunner. The blast damages his rifle, so he takes an MP 40 from a dead German officer. Farther along the trench, Flanagan encounters four Germans. He kills two. The others retreat.
Sergeant Flanagan and other Rangers approach the Tobruk. A white phosphorus grenade is thrown. A burning soldier emerges. He is a Polish conscript and surrenders. He warns of a large mortar ammunition stockpile inside. No further grenades are thrown to avoid detonation. The Tobruk is cleared later.
A patrol under Sergeant Belcher attempts to move around Widerstandsnest 73 using communication trenches near the cliff. The German trench network proves too large to clear fully. German troops continue infiltrating throughout the early afternoon. A temporary stalemate develops. Only two Rangers are wounded during this phase. When the area is finally secured, burial teams count sixty-nine German dead in and around Widerstandsnest 73.
| Naval Support, June 6th, 1944 |
At 07:16, U.S.S. Thompson identifies one of the 76.5-millimetre guns in Widerstandsnest 74 and opens fire using her 127-millimetre guns. The destroyer ceases fire at 07:55. She expends 106 rounds during the engagement, but succeeds in disabling only one of the two guns. U.S.S. Thompson remains offshore near Dog Green Beach through the morning and into the early afternoon, engaging bunkers and defensive positions within the Vierville draw.
Naval gunfire support in this sector proves problematic. No Shore Fire Control Party establishes contact with offshore warships during the morning. This failure results in several friendly fire incidents. One involves Major Thomas Dallas and the 1st Battalion, 116th Regimental Combat Team command group. They establish a small headquarters in a gully west of the Vierville draw. U.S.S. McCook, mistaking them for German troops, begins shelling the gully. Dallas throws an orange smoke grenade to signal friendly presence. U.S.S. McCook, interpreting the smoke as hostile, intensifies its fire.
Later that afternoon, around 16:35, U.S.S. McCook again targets the Dallas group. As they move position, the destroyer identifies them once more as German troops. Dallas’s men wave white flags and attempt semaphore signalling. U.S.S. McCook interprets the signals as a German surrender attempt.
| Widerstandsnest 74, June 6th, 1944 |
Around 14:00, Captain Goranson and several Rangers move westward along the bluffs to observe Widerstandsnest 74, the second objective of Force B. As they do so, a destroyer closes in and fires on the strongpoint again. A patrol led by Staff Sergeant Elijah Dycus approaches the position and reports it destroyed and abandoned. Goranson decides to terminate the assault on Widerstandsnest 74. U.S.S. Carmick also reports engaging cliff positions on D-Day, though it gives no exact times.
Around 16:00, a Ranger climbs from the beach and reports that he has encountered Major Dallas’s command group below, who possess a working radio. Captain Goranson sends a runner to request that the group contact other Ranger elements. Radio contact still cannot be established due to technical issues. Goranson then sends another runner to Vierville-sur-Mer to find Lieutenant Colonel John Metcalfe, commanding 1st Battalion, 116th Regimental Combat Team. The runner fails to locate him.
Captain Goranson’s Force B remains cut off from the main 116th Regimental Combat Team force for most of the day. Their SCR-300 radios are waterlogged or lost during the morning landing. No radio communication is possible. In the afternoon, Goranson sends a patrol toward Vierville-sur-Mer. The patrol encounters a firefight between American and German troops and wisely withdraws back to the bluffs.
In the early evening, U.S.S. Thompson returns to the Pointe-et-Raz-de-la-Percée area. At 18:36, she re-engages Widerstandnest 74 and ceases fire at 18:48. Her final salvo collapses the strongpoint’s gun aperture.
At 19:00, Captain Goranson climbs down to the beach and meets Major Dallas at the cliff base. By this point, Dallas has finally established radio contact with the 116th Regimental Combat Team. He informs them of the Rangers’ position. Lieutenant Colonel Metcalfe instructs, via Major Dallas, that Goranson’s men should move to the hamlet of Gruchy, located southeast of the Grenier villa. Company C moves down to the beach exit. Here they encounter a patrol from Force C. After receiving instructions, Company C proceeds without incident to Lieutenant Colonel Max Schneider’s Force C bivouac. They arrive here at 22:00.
| Aftermath |
By nightfall, Ranger Force B has fewer than twenty men remaining from the original sixty-four. Twenty-one Rangers are confirmed killed. Eighteen are seriously wounded. Of the three officers and twenty-four non-commissioned officers in the unit, two officers and seventeen Non-Commisioned Officers become casualties during the day and following actions. Some of the walking wounded stay with Captain Goranson and rejoin the Rangers at Gruchy.
| Sources |