
| Page Created |
| November 14th, 2023 |
| Last Updated |
| October 3rd, 2025 |
| United States |
 |
| Related Pages |
| Operation Overlord Operation Neptune Omaha Beach, German Defences Assault Training Center U.S. Assault Teams Omaha Beach, Provisional Ranger Group Omaha Beach, 1st Infantry Division Omaha Beach, 29th Infantry Division |
| Operational Areas |
| Special Air Service 6th Airborne Division Band Beach Sword Beach Gold Beach Juno Beach Omaha Beach Utah Beach 82nd Airborne Division 101st Airborne Division |
| June 6th, 1944 |
| Omaha Beach |
| Podcast |
| Objectives |
- Establish a beachhead between Port-en-Bessin and the Vire River
- push south towards Caumont and Saint-Lô alongside the Second British Army.
| Operational Area |

| Unit Force |
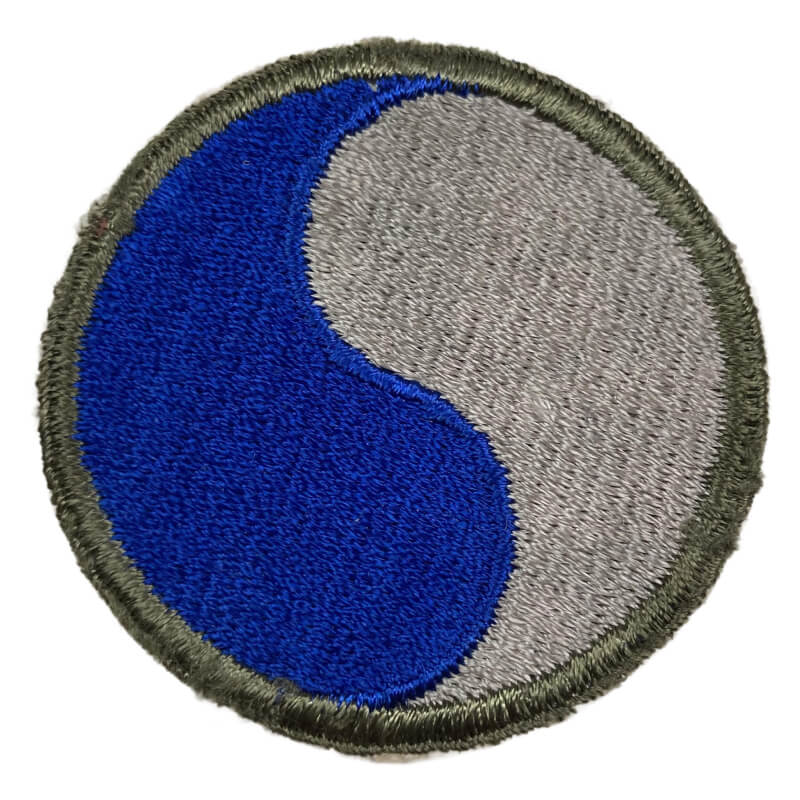
| 1st Infantry Division |
 |
- 16th Regimental Combat Team
- 1st Battalion, 16th Infantry Regiment
- 2nd Battalion, 16th Infantry Regiment
- 3rd Battalion, 16th Infantry Regiment
- 18th Regimental Combat Team
- 1st Battalion, 18th Infantry Regiment
- 2nd Battalion, 18th Infantry Regiment
- 3rd Battalion, 18th Infantry Regiment
- 26th Regimental Combat Team
- 1st Battalion, 26th Infantry Regiment
- 2nd Battalion, 26th Infantry Regiment
- 3rd Battalion, 26th Infantry Regiment
| Divisional Troops |
- 1st Divisional Artillery
- Headquarters
- 7th Field Artillery Battalion
- 33rd Field Artillery Battalion
- 81st Mortar Battalion
- A Company
- D Company
- 1st Combat Engineer Battalion
- 299th Combat Engineer Battalion
- 56th Signal Battalion
- A Company
- 1st Signal Company
- 701st Light Ordnance Company
- 1st Logistic Company
- 1st Military Police Platoon
- 1st Medical Battalion
| Attached Units Assault Phase Command |
- 741st Tank Battalion
- 745th Tank Battalion
- 115th Regimental Combat Team, 29th Infantry Division
- 116th Regimental Combat Team, 29th Infantry Division
- 635th Anti-tank Battalion
- 111th Field Artillery Battalion
- 197th Anti-Aircraft Artillery, Automatic Weapons Battalion
- Medical detachment
- 1st Detachment, 29th Reconnaissance unit
- 1st Detachment, 121st Combat Engineer Battalion
- 37th Engineer Combat Battalion
| Attached Support Units Assault Phase Command |
| 29th Infantry Division |
 |
- 115th Regimental Combat Team
- 1st Battalion, 115th Infantry Regiment
- 2nd Battalion, 115th Infantry Regiment
- 3rd Battalion, 115th Infantry Regiment
- 116th Regimental Combat Team
- 1st Battalion, 116th Infantry Regiment
- 2nd Battalion, 116th Infantry Regiment
- 3rd Battalion, 116th Infantry Regiment
- 175th Regimental Combat Team
- 1st Battalion, 175th Infantry Regiment
- 2nd Battalion, 175th Infantry Regiment
- 3rd Battalion, 175th Infantry Regiment
| Divisional Troops |
- 29th Division Artillery
- 110th Field Artillery Battalion
- 111th Field Artillery Battalion
- 224th Field Artillery Battalion
- 227th Field Artillery Battalion
- 29th Signal Light Company
- 729th Ordnance Light Maintenance
- E Company
- 29th Quartermaster Company
- 29th Military police Platoon
- 104th Medical Battalion
- A Company
- B Company
- C Company
| Attached Units Assault Phase Command |
- 743rd Tank Battalion
- 747th Tank Battalion
- 635th Tank Destroyer Battalion
- 49th Anti Aircraft Artillery Brigade
- 1 Detachment Quartermasters Group & Quatermasters G battery
- Headquarters & headquarters battery
- 18th Anti Aircraft Artillery Group
- 110th Anti Aircraft Artillery Gun Battalion
- 457th Anti Aircraft Artillery Automatic Weapons Battalion
- 413th Anti-Aircraft Artillery Gun Battalion
- 1 Detachment
- 320th Anti-Aircraft Artillery Balloon Battalion (Very Low Altitude)
- 1 Detachment
- 102nd Cavalry Reconnnaissance Squadron
- 5th Engineer Special Brigade
- 6th Engineer Special Brigade
- 992nd Engineer Treadway Brigade Company
- 996th Engineer Treadway Brigade Company
- 502nd Engineer Light Po N company
- 503rd Engineer Light Po N company
- 1st Engineer Combat Battalion, Company C
- 234th Engineer Combat Battalion
- 254th Engineer Combat Battalion QG & Cie QG, 1121st Engineer C Grp
- 147th Engineer Combat Battalion
- 336th Engineer Combat Battalion QG & Cie QG, 1171st Engineer C Grp
- 112th Engineer Combat Battalion
- 146th Engineer Combat Battalion
- 149th Engineer Combat Battalion
- 1340th Engineer Combat Battalion
- 610th Engineer Light Equipment Company
- V Corps Artillery
- Headquarters & Headquarters Battery
- 17th Field Artillery Observation Battalion
- 1 Detachment
- 33rd Field Artillery Battalion
- Headquarters & Headquarters Battery
- 190th Field Artillery Group
- 186th Field Artillery Battalion
- 187th Field Artillery Battalion
- 190th Field Artillery Battalion
- 200th Field Artillery Battalion
- 58th Field Artillery Battalion
- 26th Regimental Company Combat Team
| Provisional Ranger Group |
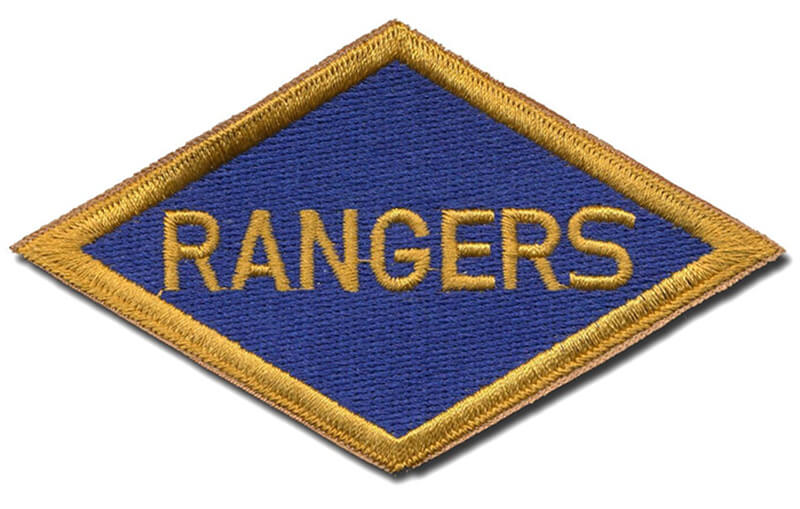 |
- 2nd Ranger Battalion
- 5th Ranger Battalion
| Attached Support Units Assault Phase Command |
| Unit Force |
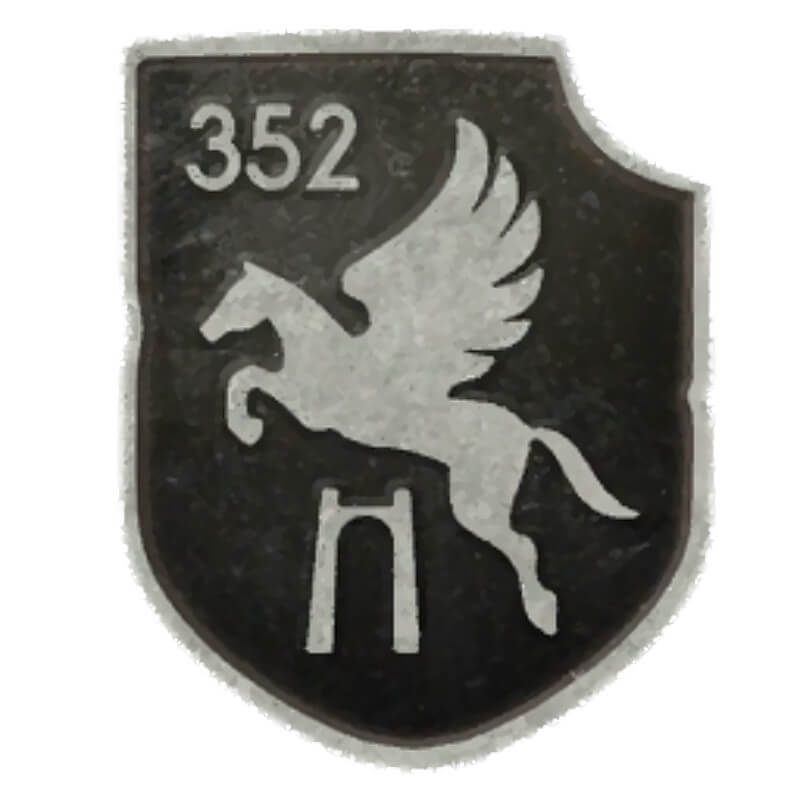
| 352. Infantrie-Division |
 |
- Grenadier-Regiment 914
- I Bataillon (I./914)
- II Bataillon (II./914)
- Grenadier-Regiment 915
- I Bataillon (I./915)
- II Bataillon (II./915)
- Grenadier-Regiment 916
- I Bataillon (I./916)
- II Bataillon (II./916)
- Artillerie Regiment 352
- I Bataillon (I./352) 3 batteries of 105-millimetre leFH 18/40
- II Bataillon (II./352) 3 batteries of 105-millimetre leFH 18/40
- III Bataillon (III./352) 3 batteries of 105-millimetre leFH 18/40
- IV./352 with batteries of 150-millimetre sFH 18
- Panzerjäger-Abteilung 352
- Kompanie
- Kompanie
- Kompanie
- Pionier-Bataillon 352
- Divisions-Füsilier-Bataillon 352
- Nachrichten-Abteilung 352
- Feld-Ersatz-Bataillon 352
- Heeres-Küsten-Batterie Maisy (H.K.B. 6./1716 and 8./1716)
- Batterie 6: Four 105-millimetre leFH 414(f) French howitzers
- Batterie 8: Four 100-millimetre Czech guns (K.14/19) in open pits
- Heeres-Küsten-Batterie Pointe du Hoc (H.K.B. 2./1261)
- Six 155-millimetre GPF-T (French) naval guns
- Heeres-Küsten-Batterie Trevieres / Formigny
| 716. Infantrie-Division |
 |
- Grenadier-Regiment 726
- I Bataillon (I./726)
- II Bataillon (II./726)
- Grenadier-Regiment 736
- I Bataillon (I./736)
- II Bataillon (II./736)
- III Bataillon (III./736)
- Artillerie-Regiment 1716
- I Bataillon (I./1716): 100-millimetre Czech field guns
- II Bataillon (II./1716): 105-millimetre leFH 18 German howitzers
- III Bataillon (III./1716): 150-millimetre sFH 414(f) French heavy howitzers
- IV Bataillon: Mixed coastal defence guns and anti-tank weapons
- Panzerjäger-Bataillon 716
- Pioneer-Bataillon 716
- Nachrichten Bataillon 716
- Feld-Ersatz-Bataillon 716
- Heeres-Küsten-Batterie Longues-sur-Mer (H.K.B. 2./1260)
- Heeres-Küsten-Batterie Mont-Fleury (H.K.B. 1./1260)
- H.K.B. Wn61 / Wn60 (Colleville-sur-Mer sector)
| Reserve Units |
- Ost-Bataillon 439 (Ukrainian)
- attached to 716. Infantrie-Division
- Ost-Bataillon 642 (Georgian/Russian)
- attached to 352. Infantrie-Division
- Ost-Bataillon 630
- uncertain but possibly attached to 716. Infantrie-Division
| Operation |
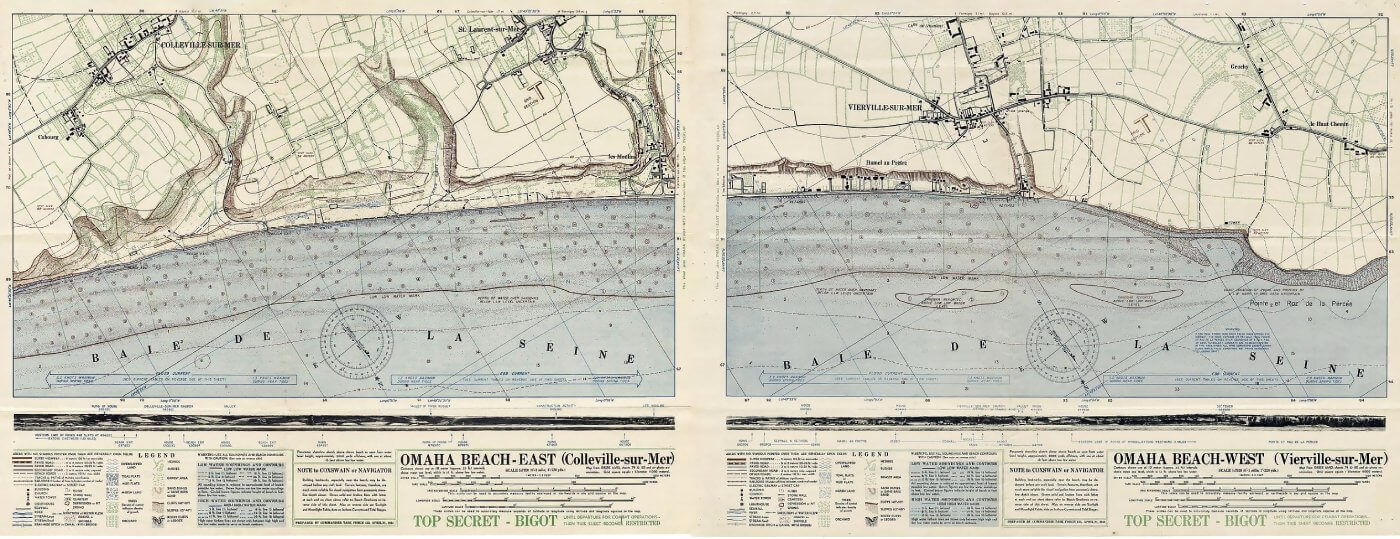
During Operation Neptune, the landing and insertion phase of Operation Overlord, Omaha Beach is assigned to United States V Corps, commanded by Major General Leonard Townsend Gerow. The Corps prepares to land on an eight-kilometre front between the villages of Vierville-sur-Mer and Colleville-sur-Mer. The primary objective is to seize a secure beachhead, open the road network inland, and establish contact with British forces advancing from Gold Beach to the east and American forces landing at Utah Beach to the west.
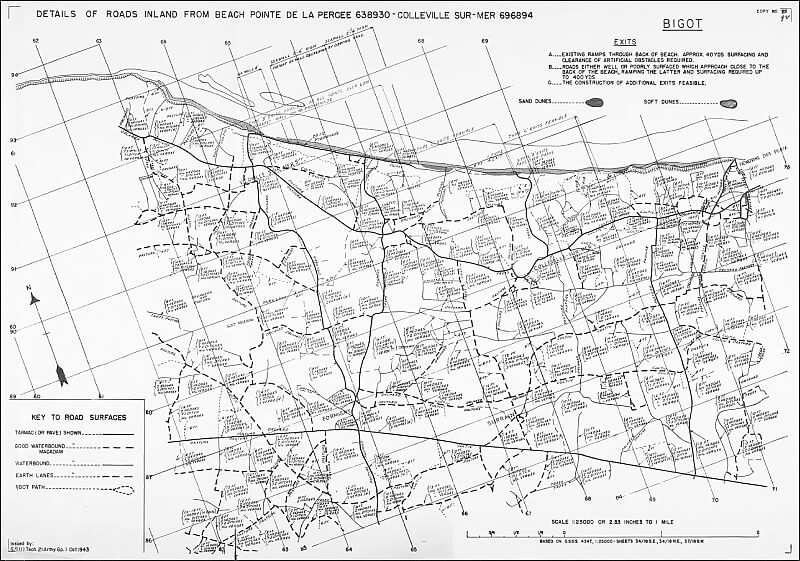
The landing area is divided into ten sub-sectors grouped under five principal sectors: Charlie, Dog, Easy, and Fox. From west to east, these sectors are: Charlie One, Charlie Two, Dog Green, Dog White, Dog Red, Easy Green, Easy Red, Fox Green, and Fox Red. Each sector lies below steep coastal bluffs broken only by narrow draws or gullies. These draws provide the only routes inland for vehicles and heavy weapons. The assault plan concentrates on capturing these exit points.
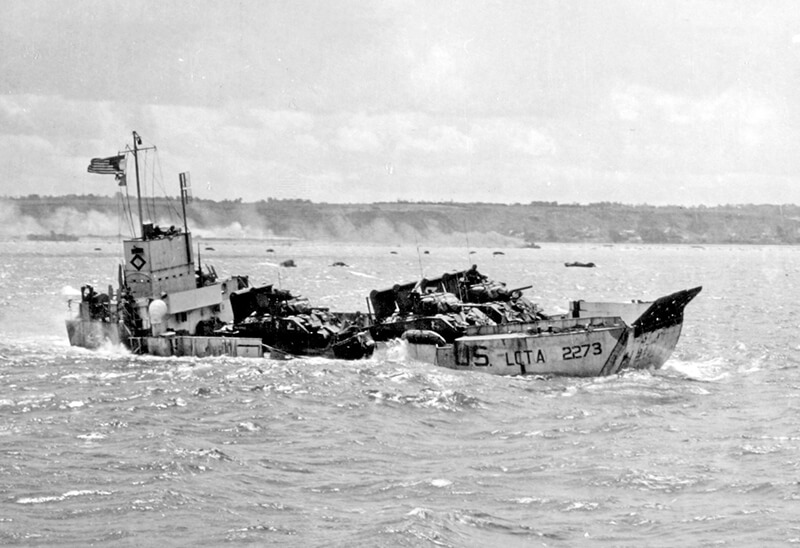
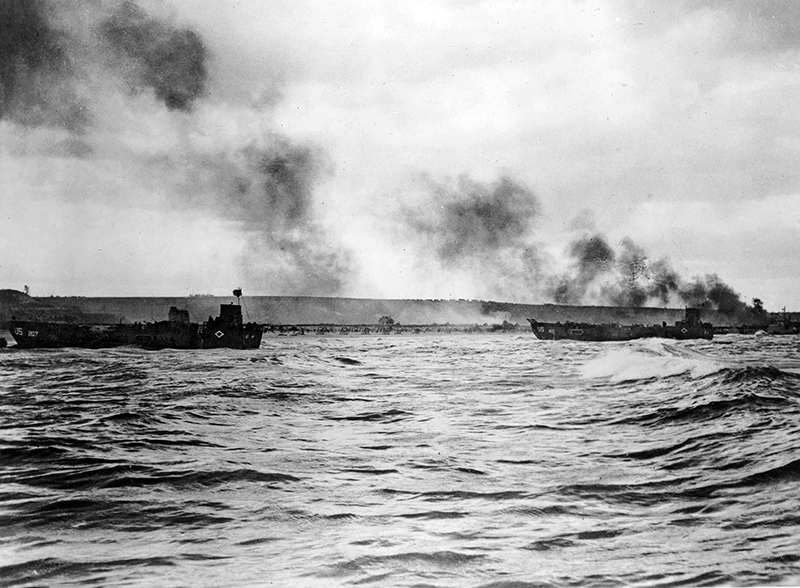
V Corps arrives in Normandy in four phases. The initial force, called Force O, is formed by the the 1st Infantry Division, reinforced to four infantry regiments. The 1st Division contributes the 16th and 18th Regimental Combat Teams. The 29th Infantry Division provides the 115th and 116th Regimental Combat Teams. The 2nd and 5th Ranger Battalions form a provisional force, known as the Provisional Ranger Force. Force O is supported by artillery, armour, engineers, and service units, like the 741st and the 743rd Tank Battalions and the 229th and 146th Engineer Combat Battalion. For the invasion, the Navy Combat Demolition Units are integrated with U.S. Army engineers into “Gap Assault Teams” (GATs), each composed of six Navy Combat Demolition Unit sailors, 27 soldiers, and three additional Navy personnel. Their mission was to blast open 50-metre-wide channels through the German beach obstacles at the waterline, clearing the way for landing craft. On Omaha Beach, sixteen gap assault teams are tasked with opening sixteen such lanes. Force O totals 34,142 men and 3,306 vehicles. The first to land on Omaha beach are the 16th Regimental Combat Team and the 116th Regimental Combat Team.
The follow-up element, Force B, is due on the afternoon of D-Day. It consists of the rest of the 29th Infantry Division, including the 3rd regiment, the 175th Regimental Combat Team. The 26th Regimental Combat Teams, from the 1st Infantry Division, and divisional units arrive that very same day. Force B brings 25,117 men and 4,429 vehicles.
The 2nd Infantry Division arrives on D+1 and D+2. This phase involves 17,500 men and 2,300 vehicles. Between D+2 and D+15, twenty-seven more groups follow. These contribute 32,000 troops and 9,446 vehicles. Some units are attached to V Corps only for transport.
Supporting Force O is the Provisional Ranger Force, commanded by Lieutenant Colonel James E. Rudder. It is composed of the 2nd and 5th Ranger Battalions, organised into three task groups:
Ranger Force A, Companies D, E, and F of the 2nd Ranger Battalion. Their mission is to land west of Omaha Beach, scale the 30-metre cliffs at Pointe du Hoc, and destroy a German gun battery threatening both Omaha and Utah Beaches.
Ranger Force B, Companies A, B, and C of the 2nd Ranger Battalion, landing directly on Dog Green sector alongside the 116th Regimental Combat Team. Their task is to assault and neutralise strongpoints guarding the Vierville draw.
Ranger Force C, the 5th Ranger Battalion, supported by Companies C and D of the 2nd Rangers. They will land on Dog Red and Easy Green sectors, break through beach defences, and push inland to link with the other Ranger forces.
The assault structure allows a transition from one division to two divisions abreast. Unified command is essential during the early phase. Major General Clarence Huebner commands the 1st Infantry Division. He oversees the landings, including elements from the 29th Infantry Division.
Brigadier General Norman Cota lands with the 116th Regimental Combat Team. He assists Huebner until Major General Charles Gerhardt takes command of the 29th Infantry Division once fully ashore.
The 1st Infantry Division is experienced, having fought in North Africa and Sicily. The 29th Infantry Divisios enters combat for the first time in Normandy.
| Terrain of the Assault Area |
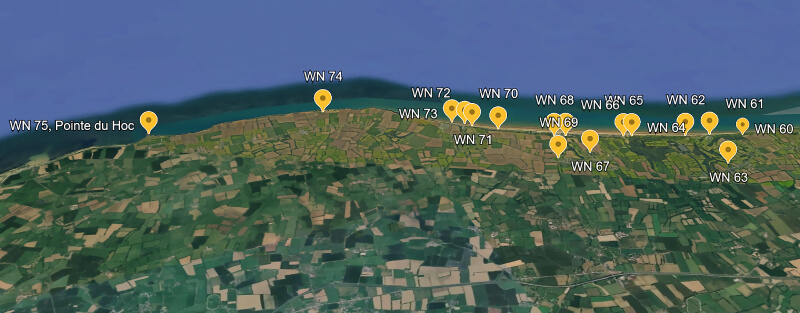
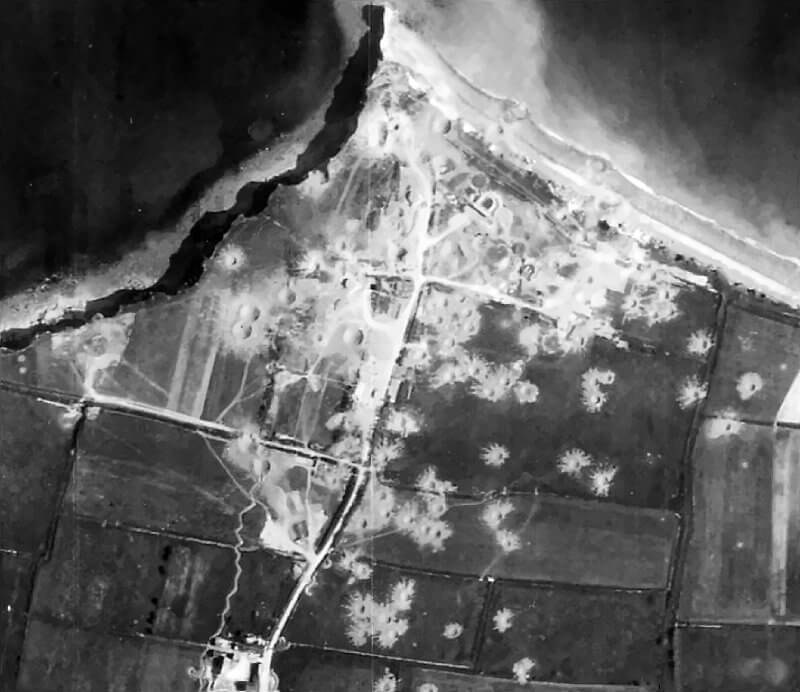
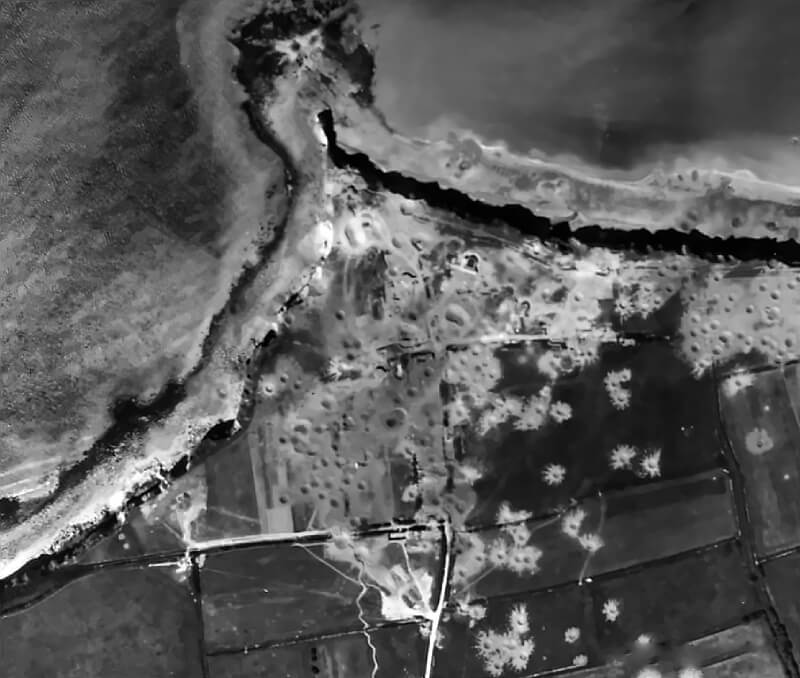
The coastline of Normandy offers few areas suitable for large amphibious landings. The sector allocated to the United States V Corps contains steep cliffs, offshore reefs, and extreme tidal variation. The Vire Estuary lies at the western edge of the American zone. It is shallow and bordered by exposed reefs. West of Grandcamp, the cliffs rise to 30 metres as they approach Pointe de la Percée. At this headland stands Widerstandsnest 74. It guards the westernmost flank of the German defences at Omaha Beach and serves as an artillery observation post.
The German artillery battery position at Pointe du Hoc is designated Stützpunkt 75. It is situated almost 5 kilometers west of Pointe de la Percée. Supporting positions are located 1.6 kilometres west and 3.2 kilometres east of the battery. This sector is under the responsibility of the 716. Infantrie-Division. One company from the III Battalion, 726. Grenadier-Regiment, consisting of approximately 125 men, is assigned to defend the battery and its surrounding defences.
The German artillery battery at Pointe du Hoc is built atop sheer to overhanging cliffs that rise between 26 and 30 metres. Below lies a narrow beach without any cover for assaulting troops. The position is naturally protected from seaward attack. Allied aerial photography reveals that most of the fortifications are constructed facing inland. This assessment is later confirmed by French sources. The entire site forms a self-contained defensive complex. The landward side is heavily mined and wired. The flanks are covered by two satellite positions, each equipped with machine guns and anti-aircraft guns. These positions are sited to fire in enfilade along the beaches beneath the point and to resist attacks from inland. The battery forms part of the coastal defences between the Vire and the Orne rivers.
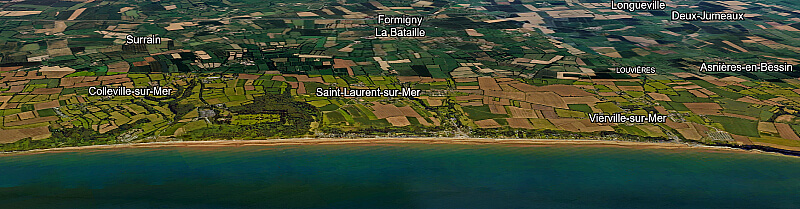
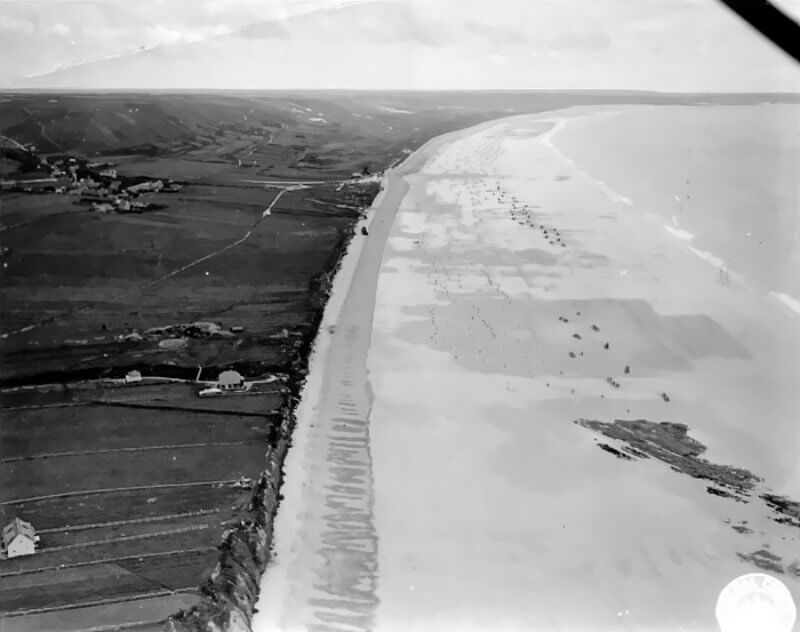
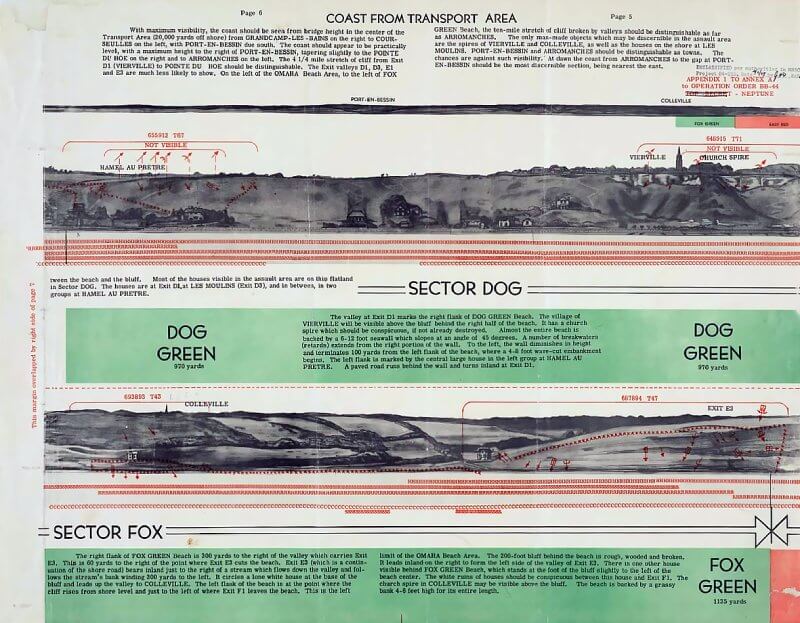
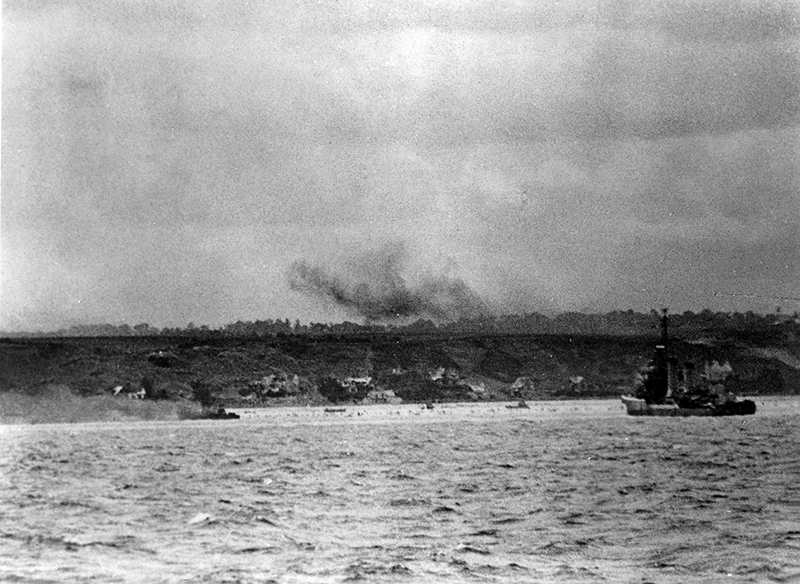
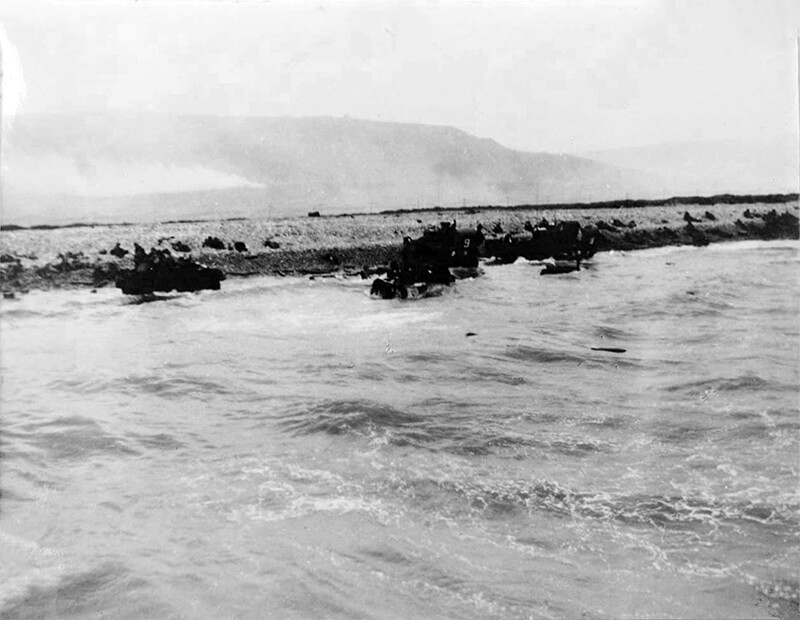
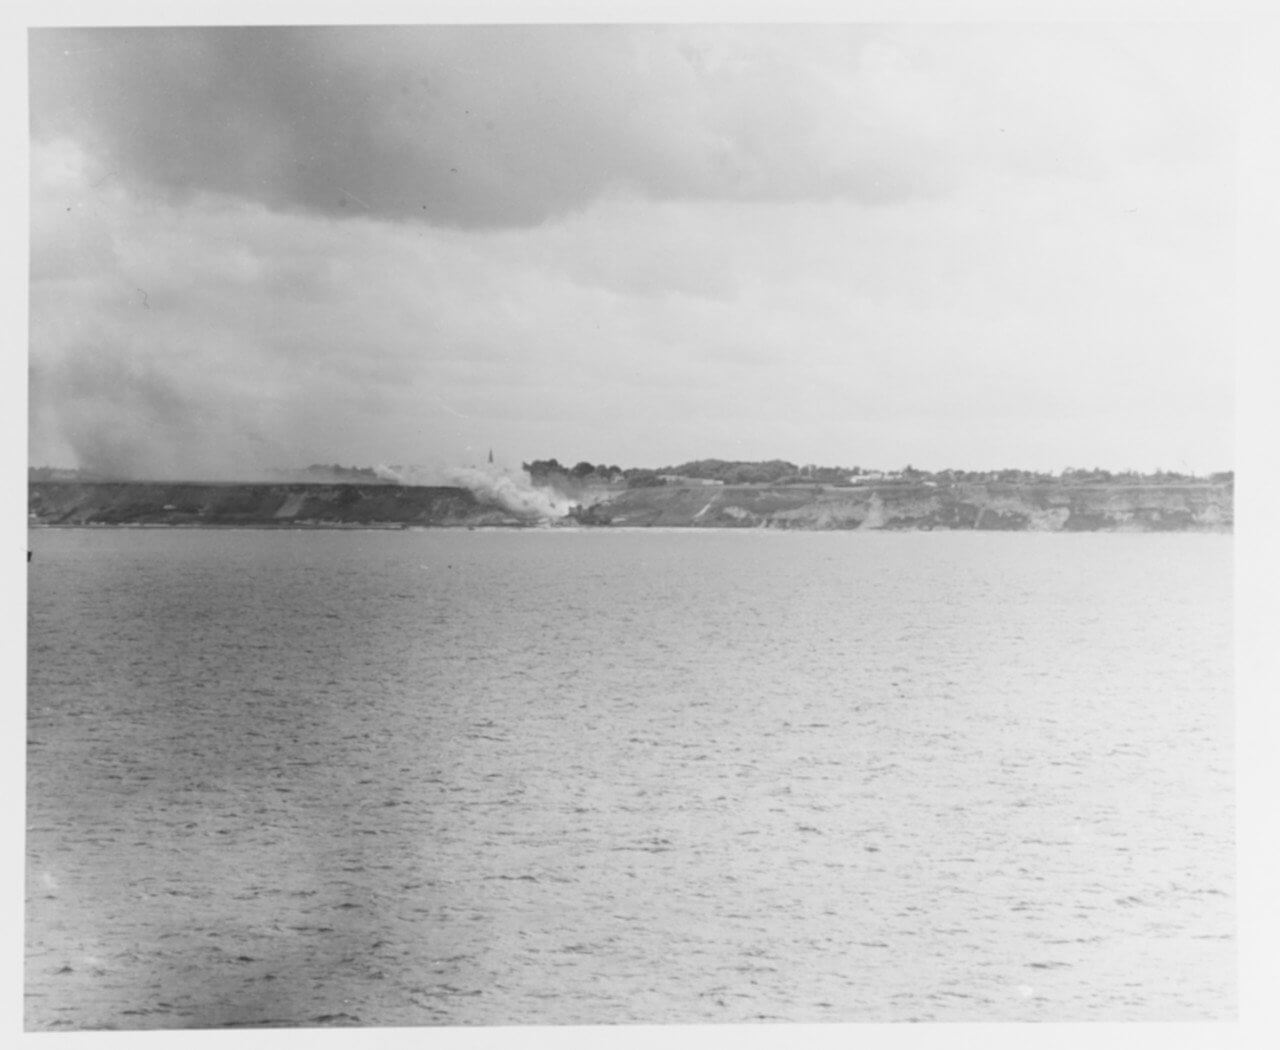
Eight kilometres east of Pointe de la Percée, a second line of cliffs begins. It stretches toward Port-en-Bessin. Between these two cliff lines lies a gently curved section of lower shoreline. It measures almost eight kilometres in length. This stretch is chosen for the landing and designated Omaha Beach. Behind the beach, the ground rises sharply. At both ends, it becomes a true cliff. The landing sector covers 6.4 kilometres and is defended by a chain of fortified German positions. These include Widerstandsnester 60 through 74. They are arranged to provide overlapping fields of fire. They cover the beach and its inland exits.
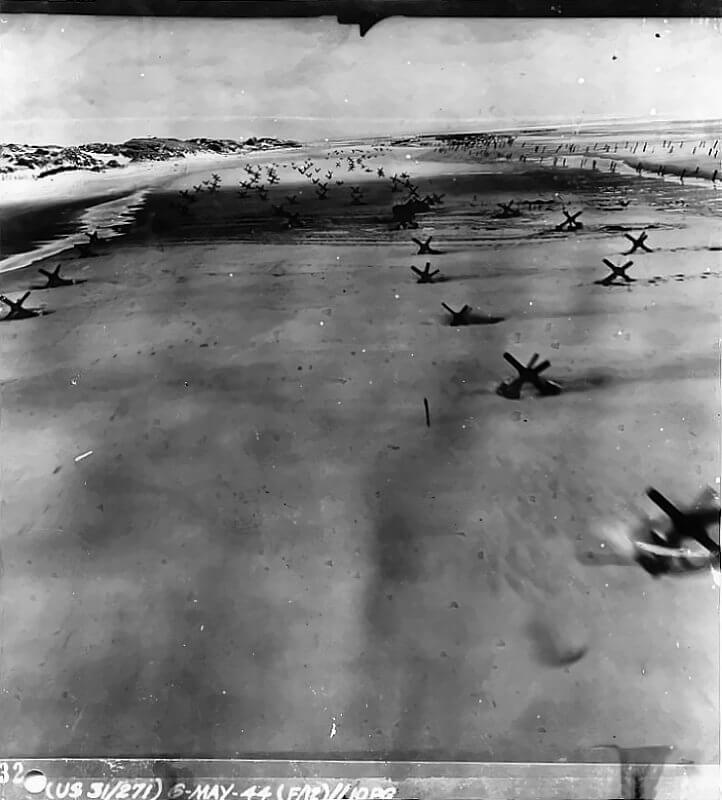
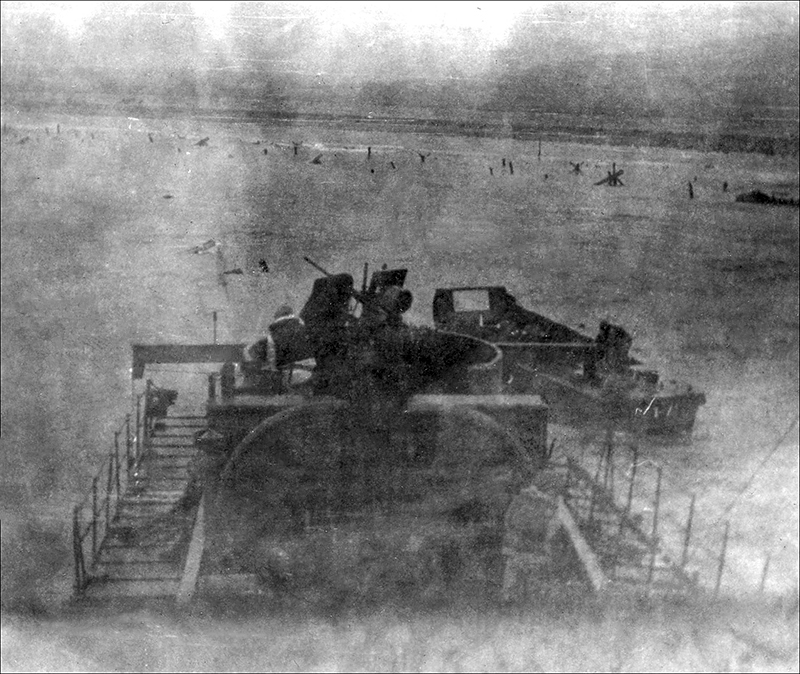
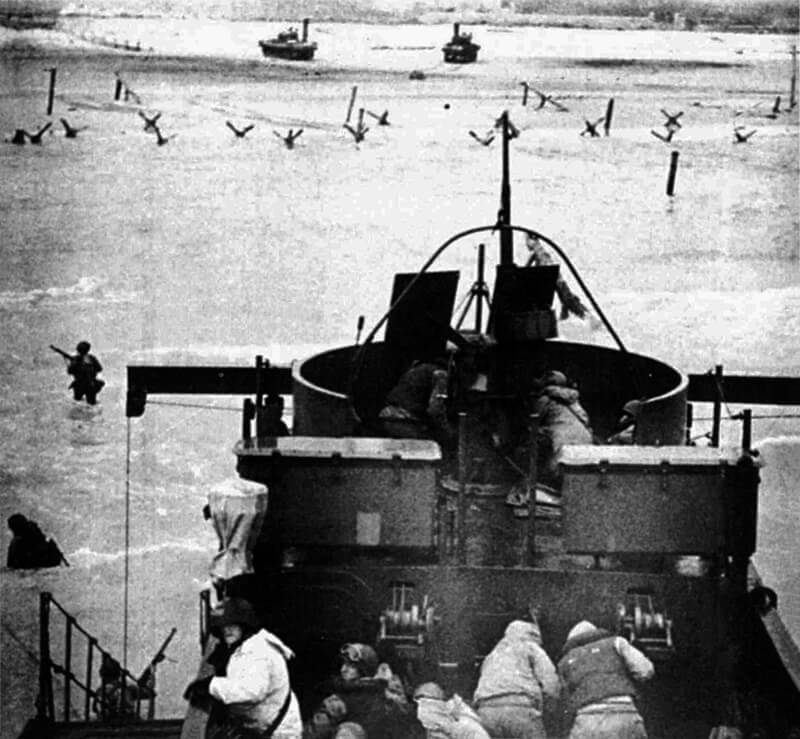
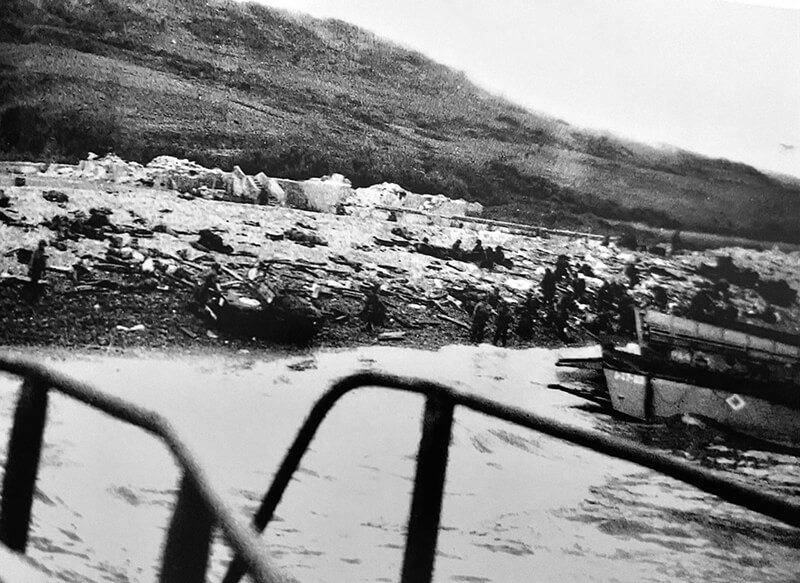
The beach itself slopes gently towards the sea. At low tide, 270 metres of firm sand are exposed. The tidal range reaches 5.5 metres. German engineers have placed obstacles along the tidal flat. These include mined ramps, steel structures, and Belgian gates. They are set in rows to damage landing craft before they reach the shore. Widerstandsnest 72 commands this stretch from a position above the Vierville draw.
Just beyond the waterline, the Germans dig anti-tank ditches. These are shallow, no more than 1.2 metres deep. They obstruct vehicles during high tide. At the high-water mark, a shingle bank forms a barrier. It reaches a height of 2.5 metres and a width of up to 14 metres. On the eastern end, it merges with a sand dune. This area is overlooked by Widerstandsnest 60 above the F-1 draw. On the western side, the shingle meets a stone sea wall near Vierville-sur-Mer. This point is watched by Widerstandsnester 72 and 71. Further east, the wall becomes timber. Behind it lies a concrete promenade. This road turns into a dirt track after Exit D-3. It is covered by fire from Widerstandsnester 66 and 65.
The beach flat lies inland from the shingle. It narrows at both ends and widens near the centre. The area once held summer houses and the hamlet of Les Moulins. These were demolished before the invasion. Widerstandsnest 66 commands this zone.
The ground rises steeply from the beach. The bluffs vary between 30 and 52 metres in height. They are steepest near Exits D-1 and D-3. Here, Widerstandsnester 72, 71, and 66 hold dominant positions. Further east, the slope softens but still reaches 50 metres. It rises past Widerstandsnester 65, 64, 63, 62, and 61. These lie above the draws at Saint-Laurent and Colleville. The bluffs are not smooth. They are broken and contain brush and undergrowth. They offer intermittent cover.
Four major draws cut through the bluffs. Each provides a route inland. Exit D-1 at Vierville is the most important. It is a paved road and lies under direct fire from Widerstandsnest 72. Exit D-3 at Les Moulins is a dirt track. It is covered by Widerstandsnester 66 and 67. Exit E-3 at Saint-Laurent and Exit E-1 at Colleville are protected by Widerstandsnester 64 through 61. Exit F-1 lies at the far eastern end and is watched by Widerstandsnest 60.
Beyond the bluffs lies a rolling plateau. It reaches a height of 75 metres near Colleville. Hedgerows, orchards, and small farms limit observation. Vierville, Saint-Laurent, and Colleville sit near the main exits. They must be taken early. Each is supported by inland Stützpunkte under the 352nd Infantry Division.
The Aure River valley lies south of the plateau. It flows east to west. It is three kilometres inland from Port-en-Bessin and eight kilometres from Pointe de la Percée. The Germans flood the valley west of Trévières. On its northern bank stand two hills: Trévières and Mount Cauvin. Each rises to 60 metres. They overlook the rear of the beach. They are likely linked to Widerstandsnester 62 and 63.
Further inland, the land rises to the Cerisy Forest. It is 19 kilometres from the sea and 120 metres high. The woods give cover to enemy artillery. Securing this high ground is essential.
To the west and southwest, a peninsula lies between the Vire Estuary and Aure River. It measures 15 kilometres across. It holds German defences, artillery, and command posts. The main east-west highway from Caen to Cherbourg crosses through Isigny-sur-Mer. Its capture links V Corps with VII Corps.
The Caen-Cherbourg railway runs just south of the Aure River. Its seizure is vital for the British Second Army.
Normandy’s fields are enclosed by hedgerows. These are earthen banks up to three metres high. Many carry trees or stone walls. They form a natural defence. Fields measure between four and thirty hectares. Most are pasture or orchards.
Hedgerows reduce visibility. They make movement slow and dangerous. They conceal enemy fire and break unit cohesion. Paths are often unmapped. Tanks cannot easily cross. Platoons become isolated.
Fighting here demands initiative. It is shaped by the terrain. The hedgerows begin just behind the beach. They dominate all movement inland.
In 1944, the settlements of Calvados retain a distinctly Norman architectural character. Many buildings are constructed from creamy-coloured limestone quarried locally. The style is a regional adaptation of Romanesque architecture. Older houses often feature deep cellars, which can serve as improvised shelters or fortified strongpoints. These structures are integrated into the terrain and become useful in both defence and concealment.
A dense lattice of narrow roads and unpaved tracks connects the villages and hamlets of the region. In the months leading up to D-Day, the Germans impose movement restrictions on a wide swathe of land between the shoreline and the interior. This restricted zone varies from 8 to 24 kilometres in depth. However, exceptions are granted to local fishermen and farmers, who continue to work under surveillance.
The Overlord lodgement area is poorly suited to sustained heavy military movement. At Omaha Beach, the escarpment is pierced by only four narrow draws. These natural exits rise steeply and are the only usable routes inland for vehicles and equipment. Each leads to a small village: Vierville-sur-Mer, Saint-Laurent-sur-Mer, and Colleville-sur-Mer. The road network in this area is limited in capacity and designed for light, local traffic. Bridges are small and numerous, and many roads pass through narrow defiles that can be easily obstructed or destroyed.
Of the four draws at Omaha, only the Vierville exit includes a paved road capable of handling sustained traffic. The remaining routes require urgent improvement before they can support logistical operations. Once inland, the best lateral communications actually favour the British and Canadian sectors. From Caen, road and rail lines extend east and southeast into France’s interior, offering better prospects for breakout and exploitation.
By contrast, the U.S. V Corps must fight its way into the heart of the Norman bocage. This region consists of small fields, thick hedgerows, and sunken lanes. While beautiful and tranquil in peacetime, the bocage proves ideal for defensive warfare. Every field boundary is a potential strongpoint. Visibility is limited, manoeuvre is constrained, and artillery and armour are difficult to employ effectively.
The Department of Calvados generally experiences a temperate maritime climate. Conditions are mild year-round. However, immediately to the west, in the Department of Manche, rainfall is more severe. This area is the wettest in northern France. Normandy receives its heaviest rainfall in October, though a secondary peak often occurs in early summer, particularly in June and July.
Persistent rains have serious implications for military operations. In poorly drained areas, water quickly saturates the soil, turning fields into mud and reducing off-road vehicle mobility. This is especially problematic in the low-lying Aure valley and the hinterland behind Utah Beach. Here, the high-water table lies just beneath the surface. Even moderate precipitation can render the ground impassable.
Normandy’s weather poses consistent challenges to air operations throughout the year. Low cloud cover and fog frequently reduce visibility, particularly in winter. Even during summer months, cloud ceilings may drop to as low as 600 metres, significantly restricting flight operations.
However, May, June, and July typically provide the most favourable flying conditions. During this period, Normandy often experiences sequences of up to five consecutive clear days. These windows offer Allied air forces ideal conditions for bombing, reconnaissance, and air support missions in preparation for and during the invasion.
The summer also brings long daylight hours. In June 1944, twilight begins before 04:00 and full darkness does not fall until nearly 23:00. These extended hours of light provide Allied air units with the maximum time to operate each day. Conversely, they restrict the movement of German forces, who rely on darkness to conceal their redeployments and resupply efforts. The short nights in summer 1944 allow the Allies to dominate the skies while denying the enemy the freedom to manoeuvre unseen.
| Multimedia |
| Pre-Invasion Bombardment Plans |
By early 1944, the Allies have forged an effective joint force structure, integrating land, sea, and air operations under unified strategic control. As General Eisenhower assumes command and tasks his deputy, Air Chief Marshal Sir Arthur Tedder, with unifying Allied air strategy. Tedder, working with Air Chief Marshal Sir Trafford Leigh-Mallory, develops a coordinated air plan to secure air superiority, disrupt German movements, and support land and naval forces during Operation Neptune and the wider Overlord campaign.
The plan unfolds in four phases:
- Interdiction and Reconnaissance, targeting German air and naval forces in the Channel.
- Preparation (from March 1944), bombing fortresses, bases, transport networks, and radar sites, with two-thirds of raids outside Normandy to maintain deception.
3–4. Invasion and Battle of Normandy, massive air coverage of beaches, fleet protection, bomber escorts, and direct support for ground forces, with over 5,000 Allied fighters deployed.
The Transportation Plan cripples the French rail system, cutting traffic to 30% of 1943 levels and destroying key bridges and routes into Normandy. This delays German reinforcements and, combined with diversionary bombing, confuses enemy intelligence.
Despite resistance from senior strategic bombing advocates, Tedder secures agreement to integrate strategic and tactical air operations. His policy of drawing the Luftwaffe into battle before D-Day results in heavy German pilot losses, 2,262 killed from January to June 1944, and forces remaining aircraft inland, far from the beaches. By D-Day, German air presence over the invasion area is minimal.
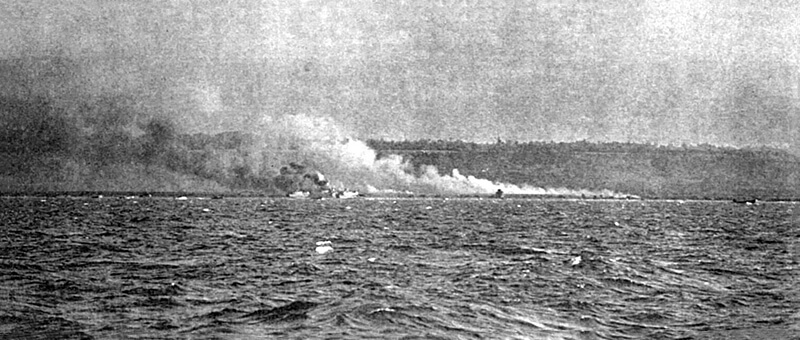
The pre-invasional bombardments on Omaha Beach are meant to neutralise enemy gun positions and demoralise defenders. In the lead-up to D-Day, air attacks target coastal batteries across the Neptune area, with the main focus north of the Seine. One of the priority targets, the battery at Pointe du Hoc, is planned to be bombed by bombers on April 15th, 1944, May 22nd, 1944, and June 4th, 1944.
| Multimedia |
| Air and Naval Pre-Assault Bombardment Plans |
The Royal Air Force concludes this pre-invasion phase on Pointe du Hoc with a concentrated strike between midnight and dawn on D-Day. A total of 1,333 heavy bombers drop 5,316 tonnes of bombs from the Seine to Cherbourg.
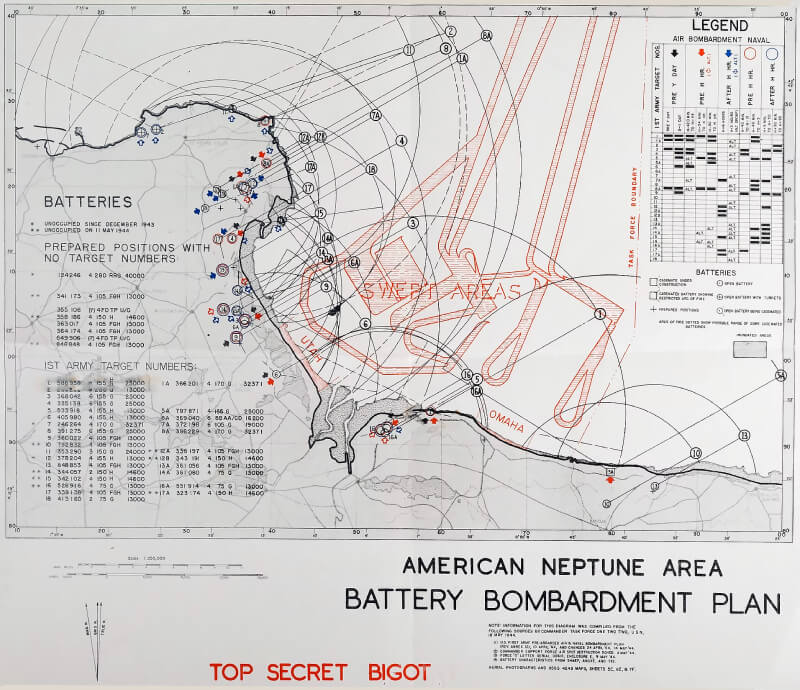
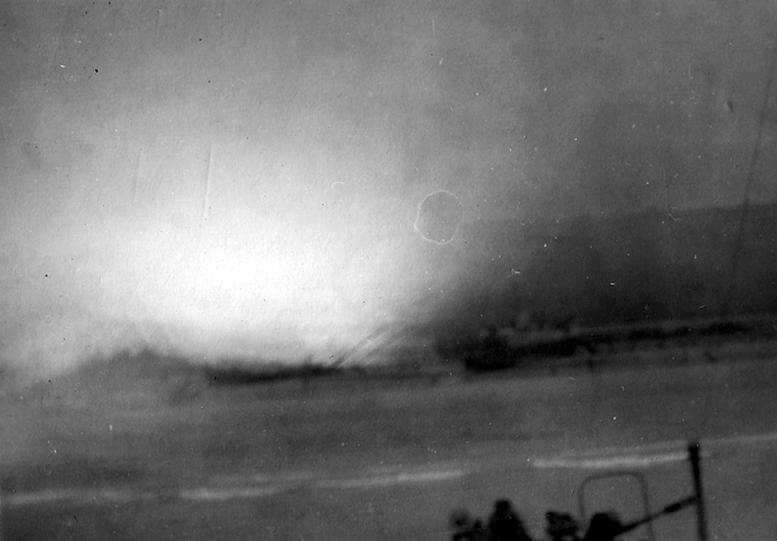
From H-30 to H-5 minutes, heavy bombers of the Eighth Air Force strike enemy beach defences between the Vire and the Orne. In the V Corps zone, 480 B-24 bombers drop 1,285 tonnes of ordnance on thirteen target areas. Eleven of these targets lie between Pointe de la Percée and the eastern edge of the Omaha sector. These include all major strongpoints. The bomb load mainly consists of 45-kilogram fragmentation and high-explosive bombs. Some 225-kilogram bombs are used on specific targets. All are fitted with instantaneous fuzes to avoid deep cratering of the beach.
At Pointe du Hoc, eighteen medium bombers from the Ninth Air Force conduct a final strike between H-20 and H-5 minutes. Simultaneously, medium bombers attack Maisy, while fighter-bombers strike targets at Maisy and Gefosse-Fontenay.
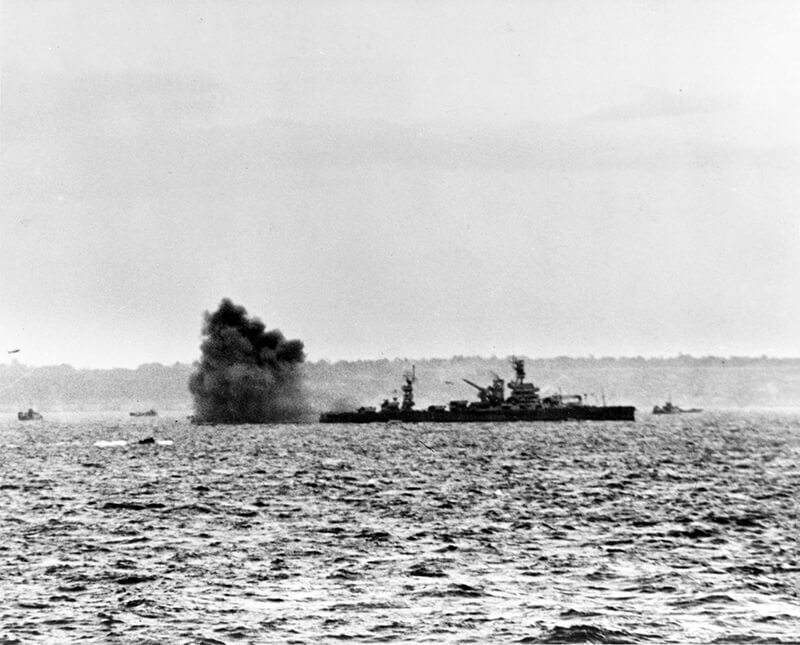
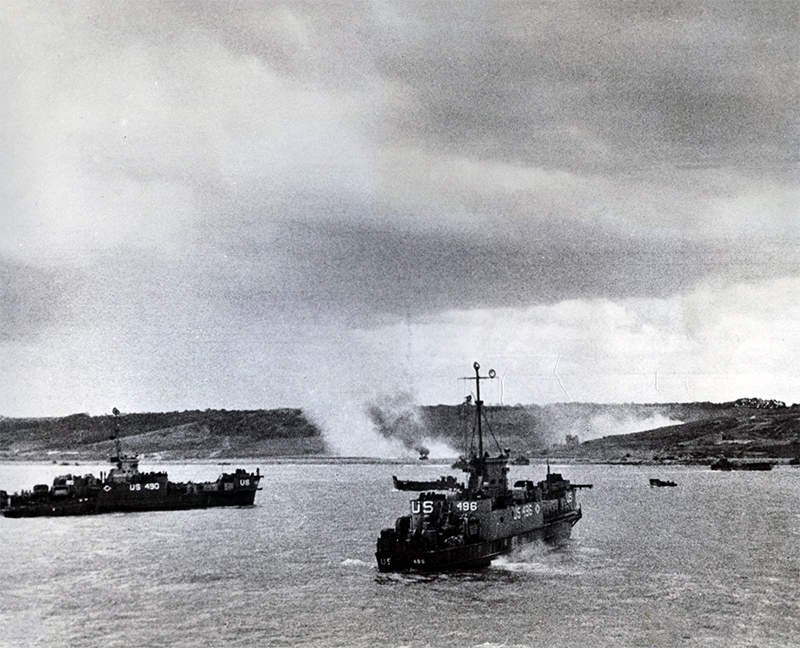
Naval bombardment begins at H-40 minutes and continues until H-3 minutes. The battleships U.S.S. Texas and U.S.S. Arkansas, with 356-millimetre and 127-millimetre guns, fire from 16.5 kilometres offshore. They target Pointe du Hoc and the strongpoints guarding Exit D-3, firing approximately 600 heavy shells. Three cruisers with 152-millimetre guns fire 950 rounds at Port-en-Bessin and the defences at draws D-3 and E-1. Eight destroyers fire 2,000 rounds from 1,650 metres off each flank of the landing area.
Additional fire-support craft contribute to the bombardment. Five Landing Craft Gun (Large), each armed with two 47-millimetre guns, begin firing at H-20 minutes. They aim 630 rounds at selected strongpoints. Sixteen Landing Craft Tank (Armoured and High Explosive) carry tanks configured to fire over their ramps. Each tank fires from 2,750 metres starting at H-15 minutes, with an allowance of 150 rounds per gun.
Ten Landing Craft Tank (5) carry 105-millimetre self-propelled howitzers of the 58th and 62nd Armoured Field Artillery Battalions. These guns begin firing from 7,300 metres at H-30 minutes, closing to 3,400 metres by H-5 minutes. Each gun is allocated 100 rounds. Nine rocket-equipped Landing Craft Tanks, stationed 2,750 metres offshore, each fire 1,000 high-explosive rockets when the first assault wave reaches 275 metres from shore.
This combined plan directs intense fire against all major German strongpoints in the Omaha sector, including those providing flanking fire. The Pointe du Hoc battery receives bombardment from both air and sea.
At H Hour, naval fire shifts inland to strike suspected assembly areas. Further targeting awaits direction from naval shore fire control parties. Twenty-four such parties are assigned, one per battalion in the two assault divisions, excluding the reserve regiment. High-performance spotting aircraft remain available until H+5 hours. Fire Support Group I, with a battleship, cruiser, and four destroyers, supports the 29th Infantry Division. Fire Support Group II, including a battleship, two cruisers, and four destroyers, supports the 1st Infantry Division.
| Multimedia |
| Assault Phase Plans |
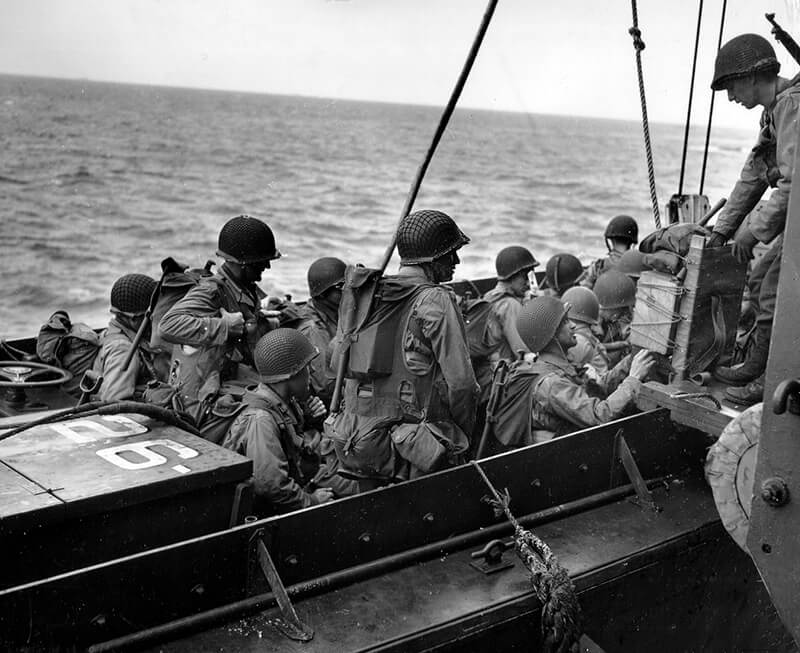
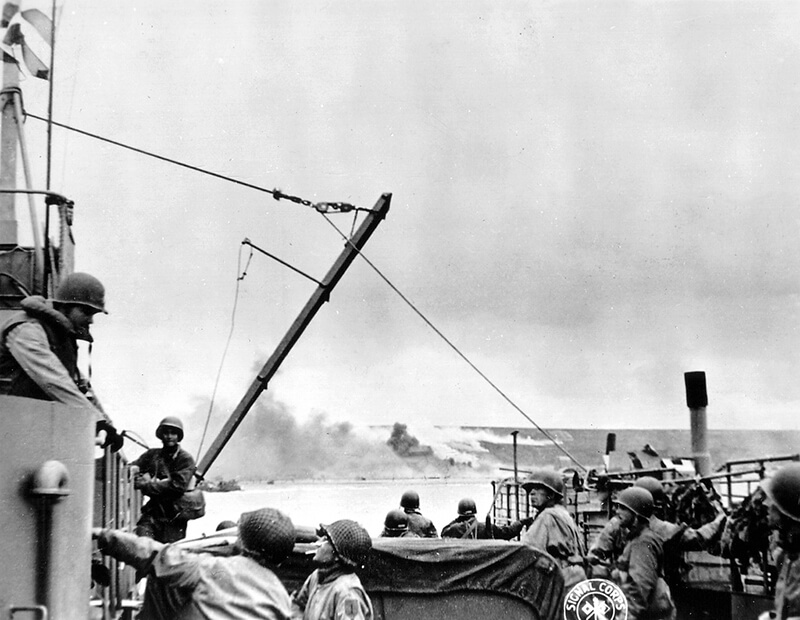
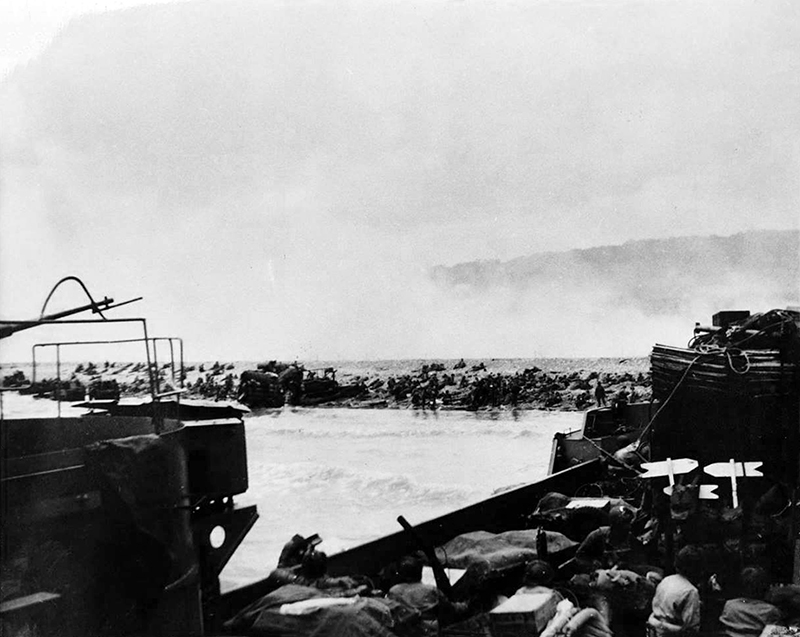
The Air and naval bombardment are intended to weaken the beach defences. The main effort to break through inland must come from the assault landing teams. These teams include specialists and weapons trained for combat on the beach. Every unit, down to the smallest, has a precise mission within a designated sector.
The Omaha area is divided into beach sectors and sub-sectors. Six sub-sectors fall within the main landing area. The 1st Infantry Division plans to attack with two regiments abreast. On the eastern sub-sectors (Easy Red and Fox Green), totalling about 2,700 metres, the 16th Regimental Combat Team lands with two battalion landing teams abreast. The support battalion touches down on Easy Red at H+70 minutes. On the four western sub-sectors (Dog Green, Dog White, Dog Red, and Easy Green), also totalling about 2,700 metres, the 116th Regimental Combat Team assaults with two battalion landing teams abreast. Its support battalion lands on the three eastern sub-sectors. The 116th Regimental Combat Team is part of the 29th Infantry Division but during the assault phase it is attached to the 1st Infantry Division.
The Provisional Ranger Force, comprising two battalions of six companies each and attached to the 116th Regimental Combat Team, has special missions on the right flank. Three companies of the 2nd Ranger Battalion, Force A, scale the cliffs at Pointe du Hoc, 5 kilometres west of the main landings, to neutralise the battery there. One company, Force B, lands just west of the 116th Regimental Combat Team near Exit D-1 and attacks German positions at Pointe de la Percée. If the Pointe du Hoc assault succeeds by H+30 minutes, the 5th Ranger Battalion and remaining 2nd Ranger Battalion companies, Force C, follow. If not, they land on Dog Green at H+70 and proceed overland to Pointe du Hoc.
The landing schedule reflects a tactical pattern designed to meet battlefield needs. The plan for the 116th Regimental Combat Team is representative.
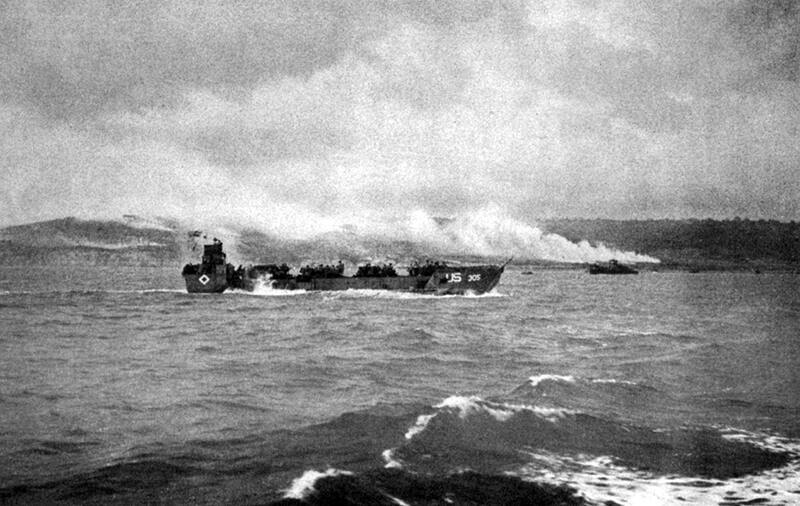
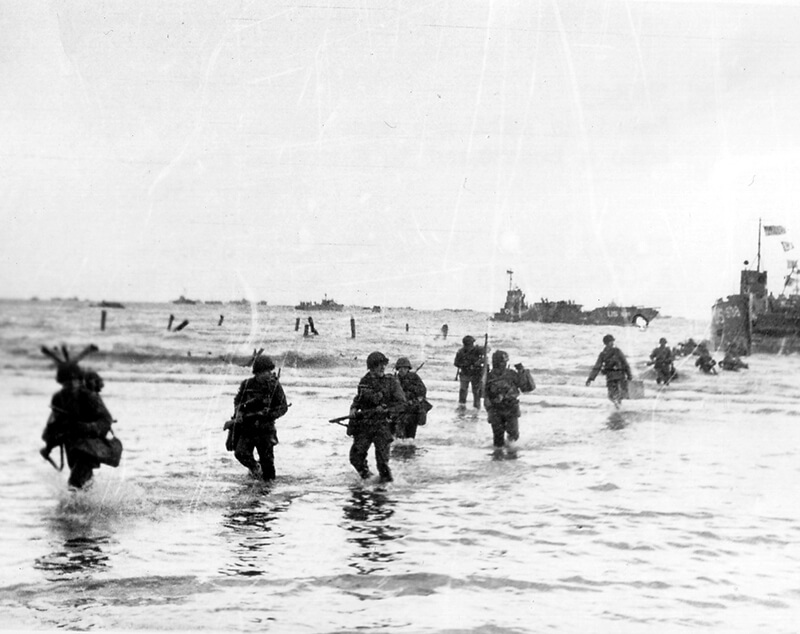
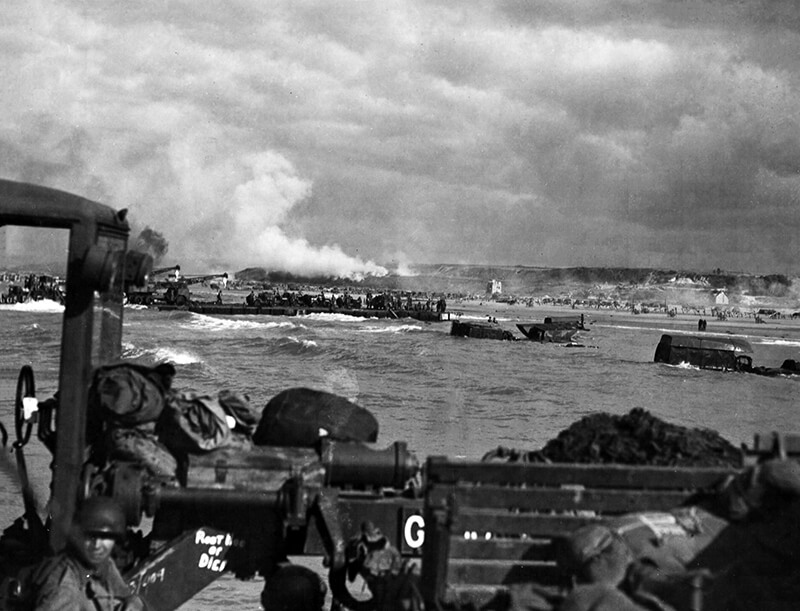
H-Hour is timed to allow the first waves to land just after dawn, when the tide is low enough to expose the underwater obstacles. Though troops must cross hundreds of metres of open tidal flat, this timing permits engineers to clear obstacle lanes before high tide.
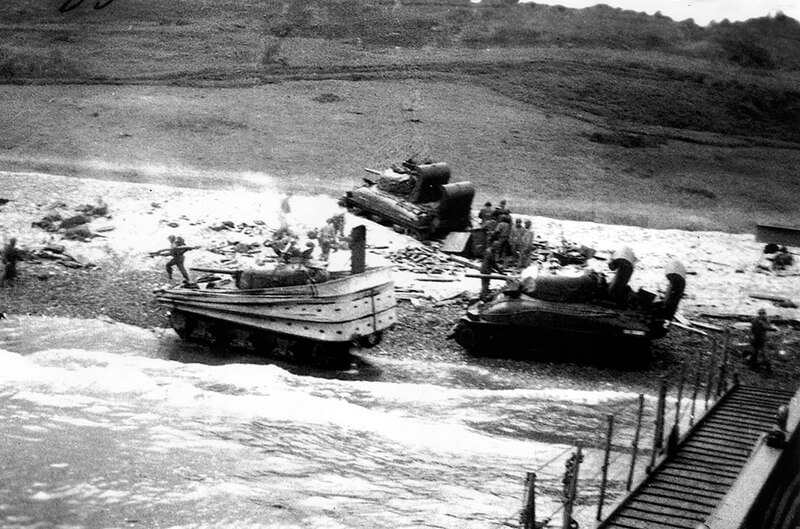
At H-5 minutes, Companies B and C (DD tanks) of the 743rd Tank Battalion land on Dog White and Dog Green. These amphibious tanks are launched 5.5 kilometres offshore and fire on German fortifications, especially those west of Exit D-1. As the tide rises, they move through obstacles to support the infantry and clear Exit D-3. At H-Hour, eight Landing Craft Tank land Company A of the 743rd Tank Battalion on Easy Green and Dog Red. This unit has a similar mission. With Company A are eight tank dozers towing explosive trailers for use in obstacle demolition.
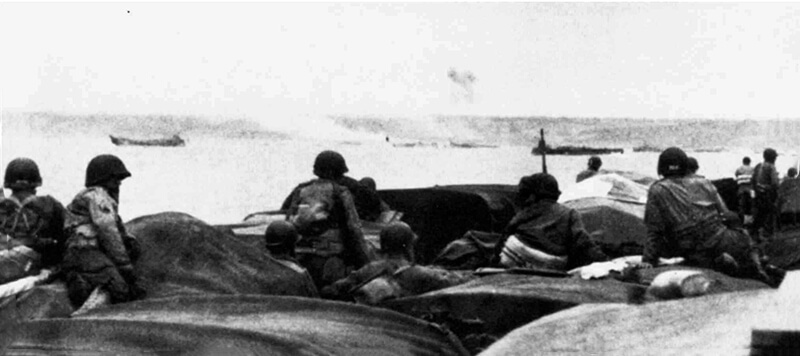
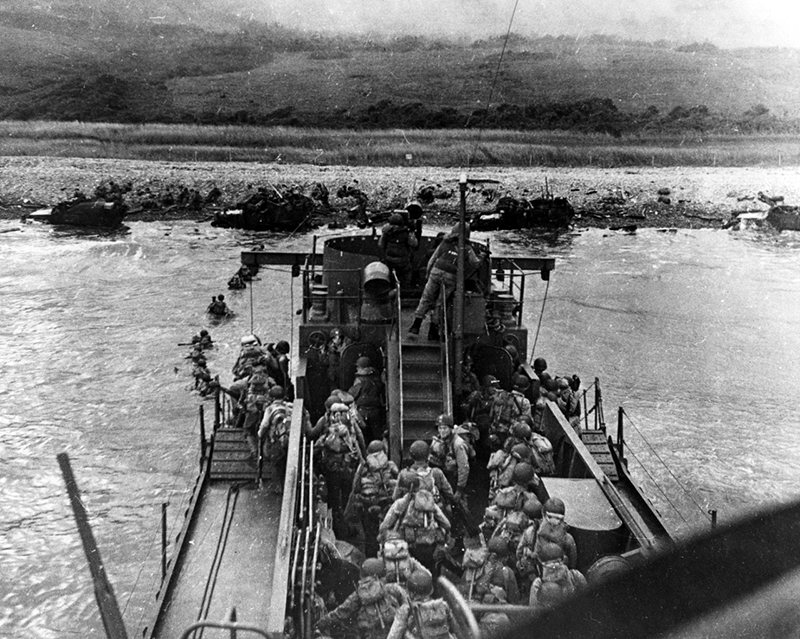
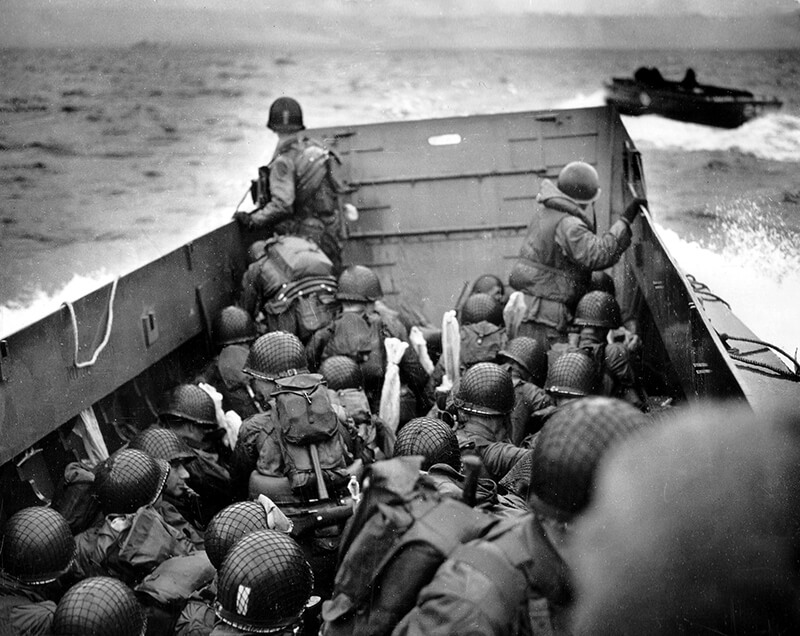
At H+1 minute, the first infantry wave lands: four companies, each in six Landing Craft, Vehicle, Personnel, organised into boat sections. Company A lands on Dog Green to lead the 1st Battalion’s attack on Exit D-1. Companies E, F, and G land further east. Each boat section executes a precise assault task within its zone. These small groups reduce beach defences with tank support, allowing the engineers to begin clearing obstacles.
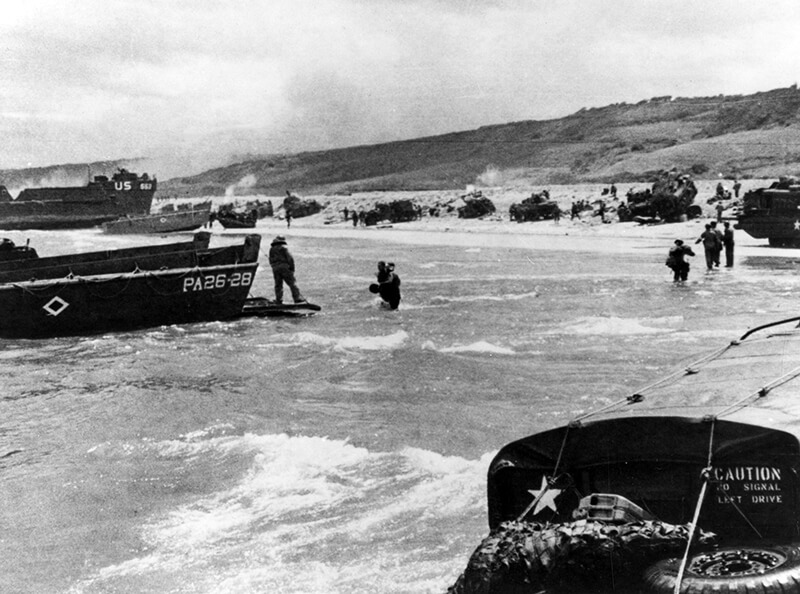
The Special Engineer Task Force arrives between H+3 and H+8 minutes in 13 Landing Craft Medium. For the 116th Regimental Combat Team sector, the 146th Engineer Combat Battalion provides eight assault and four support teams, plus a control section. Eleven teams include Naval Combat Demolition Units (one officer and twelve men each). Their mission is to clear and mark eight 45-metre-wide gaps through obstacles, two per sub-sector. Tank dozers push or tow obstacles at the lower beach. Other obstacles are demolished, and mines are cleared.
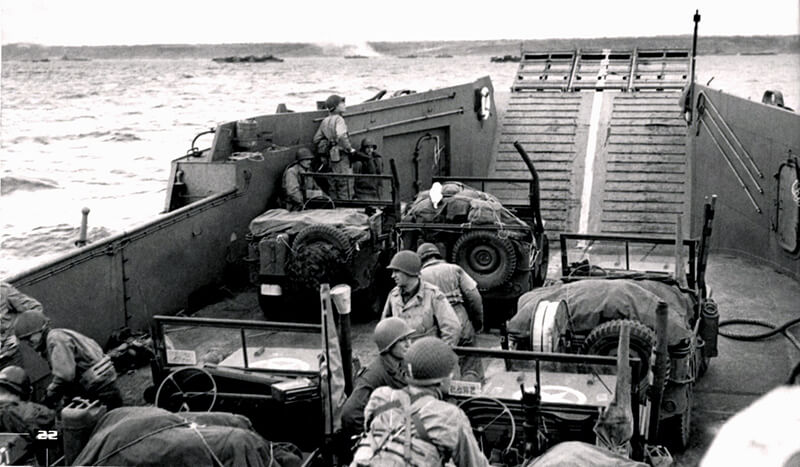
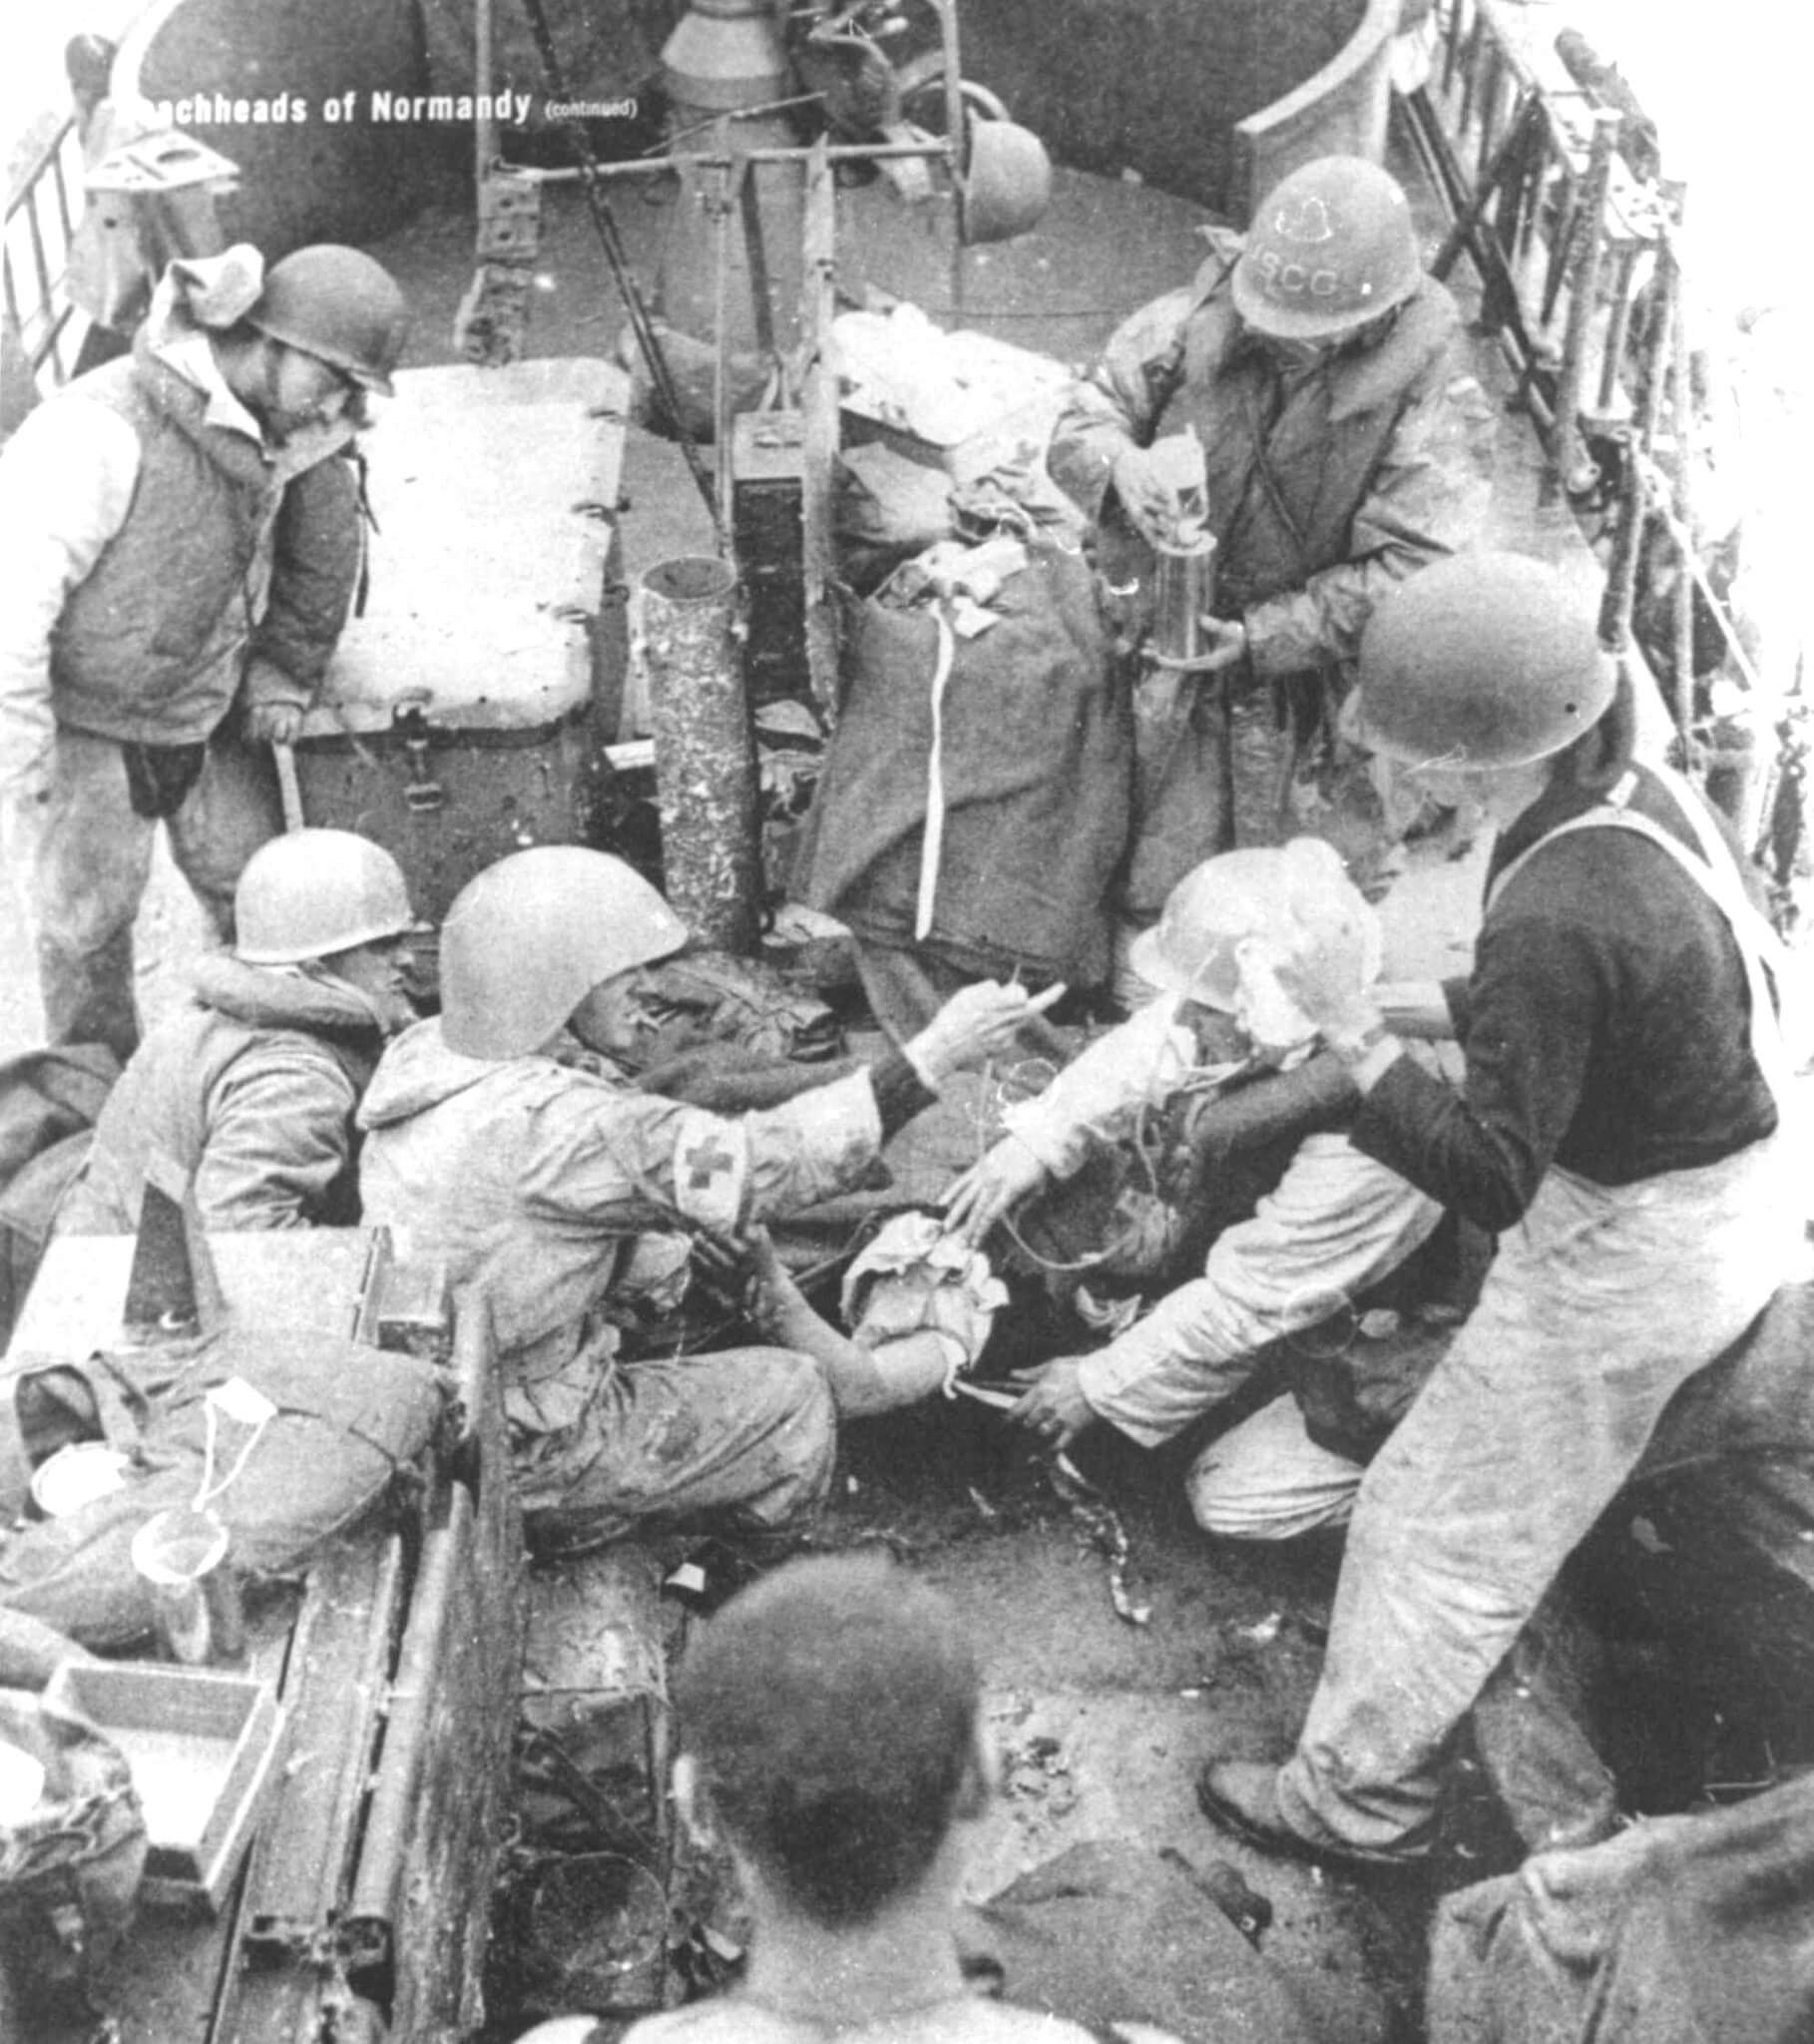
A 30-minute window is given for engineer clearance. From H+30 minutes, five successive waves bring the rest of the assault battalions and supporting units over the next 30 minutes. This includes battalion and regimental Headquarters, two companies of the 81st Chemical Weapons Battalion, and elements of the 112th and 121st Engineer Combat Battalions. These engineers help infantry clear minefields and obstacles and open exits for vehicles by H+3 hours. They then move inland with the 116th Regimental Combat Team, starting with the transit vehicle areas.
Advance elements of the Provisional Engineer Special Brigade Group also land with this second wave. Commanded by Brigadier General William M. Hoge, it consists of two brigades with three battalions each. Once the engineers attached to the 116th Regimental Combat Teammove inland, this group takes over beach operations and logistics.
Between H+90 and H+120 minutes, artillery arrives. The 58th Armoured Field Artillery Battalion comes ashore after participating in the preparatory bombardment. Dukws bring in the 111th Field Artillery Battalion, the 467th AAA AW Battalion, and the 116th Regimental Combat Team’s antitank and cannon companies. Some vehicles land in earlier waves, but the bulk arrives from H+180 minutes, increasing steadily. By H+240, cranes, tank-recovery vehicles, half-tracks, and trucks are ashore. Rhino-ferries and Dukws play a major role in logistics.
The 16th Regimental Combat Team lands on Easy Red and Fox Green under a similar plan. Differences in infantry landings are shown in maps. Of the 741st Tank Battalion’s three companies, B and C land on Easy Red and Fox Green. Company A straddles the boundary between sectors. Engineer deployment is similar to that on the 116th Regimental Combat Team’s front. Artillery and supply elements follow a similar rhythm.
The larger support forces start landing at H+195 minutes, when the 18th Regimental Combat Team reaches Easy Red. The 115th Regimental Combat Team lands behind the 116th Regimental Combat Team on orders from V Corps command and initially operates under the 1st Infantry Division.
The two assault Regimental Combat Teams are expected to breach the beach defences within the first two hours after landing. Strongpoints guarding the exit draws must be neutralised in time to allow traffic to move inland by H+3 hours. After reducing the defences, companies from each battalion assemble about 900 metres inland. From there, they continue to their assigned objectives.
In the 16th Regimental Combat Team zone, the 2nd Battalion seizes Colleville and holds the high ground to the south to block counterattacks from Trévières or Bayeux. The 3rd Battalion advances east to clear enemy positions along the bluff to Sainte-Honorine-des-Pertes and then occupies Mount Cauvin to cover the eastern flank. The 1st Battalion, initially in support, pushes through to capture Formigny, then seizes the high ground near Trévières and secures the river crossings.
The 18th Regimental Combat Team moves southeast of Colleville, crosses the Aure, and secures the heights east of Trévières, patrolling forward to the D-Day phase line. The 26th Regimental Combat Team, landing on corps order, reverts to 1st Infantry Division control. Its task is to occupy and defend the area south-east of Tour-en-Bessin and link with the British 50th Infantry Division.
On the western flank, 29th Infantry Division units secure the ground between the Aure and the sea. After capturing Vierville, the 1st Battalion clears the coastal strip westwards with the Rangers, aiming for the Vire Estuary. It must be ready to take Isigny and link with VII Corps. The 2nd Battalion takes Saint-Laurent and the high ground beyond. The 3rd Battalion, landing in support, advances through Longueville to the high ground 2,300 metres west and prepares for an advance on Isigny.
The 115th Regimental Combat Team helps mop up beach defences if needed, then advances through Longueville to la Cambe. It establishes outposts south of the Aure and patrols further beyond. The 175th Regimental Combat Team, held as corps reserve in Force B, lands on D+1.
Artillery support includes five battalions of 105-millimetre howitzers attached to the assault regiments, advancing with the infantry. Naval fire support is directed by fire control teams assigned to infantry battalions.
If successful, V Corps pushes south of the Aure toward the Cerisy Forest and west to Isigny to link with VII Corps. No large-scale movement beyond the Vire is planned, as the objective is to force the enemy to retreat from Carentan by advancing southward.
| Multimedia |
| March 23rd, 1944 |
V Corps receives its warning order. Allied planners finalise their preparations for the largest amphibious invasion in history. The selection of D-Day has been governed by several factors. Allied commanders must satisfy the operational needs of five separate landing zones. Each presents different navigational and tactical challenges. Long daylight hours are required for air operations. A full moon is needed to assist naval manoeuvres and guide airborne troops at night. Strong tidal movement is also essential. This exposes beach obstacles at low tide and allows landing craft to reach higher up the beaches at high tide for unloading.
There are further requirements for H Hour. One hour of daylight must precede the landing to aid bombardment accuracy and allow landing craft to form up. The tide should be at mid-flood so obstacles remain visible, but rock ledges in the British sector are not a hazard. The tide must be rising to provide two high tides during daylight, helping to unload supplies.
Only a few date ranges meet all criteria: May 21st–23rd, 1944, June 5th–7th, 1944, and June 19th–21st. The target date is June 1st, 1944.
| May 7th, 1944 – May 11th, 1944 |
British intelligence intercepts a signal from the Japanese naval attaché in Berlin to Tokyo. The message confirms that Generalfeldmarschall Rommel intends to destroy any Allied invasion near the coast, especially on the beaches. Meanwhile, movement to marshalling areas begins on May 7th, 1944, and is completed by May 11th, 1944. The XVIII and XIX Districts of the Southern Base Section handle 65,000 troops and 7,600 vehicles. Troops are sealed in camps, issued final equipment, and briefed thoroughly. In late May, they move to embarkation points at Portland, Weymouth, and Poole. Units scheduled to follow landings begin replacing them.
| May 8th, 1944 |
General Eisenhower selects June 5th, 1944, as D-Day.
| May 27th, 1944 |
During the night, German aircraft mine the Weymouth area. Some small vessels are lost, but overall, German reconnaissance remains routine.
| June 3rd, 1944 |
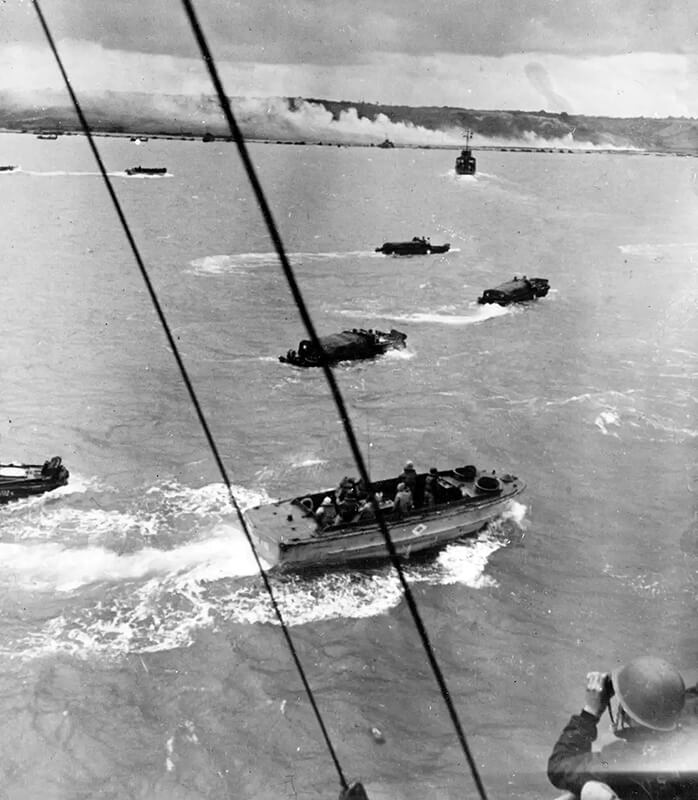
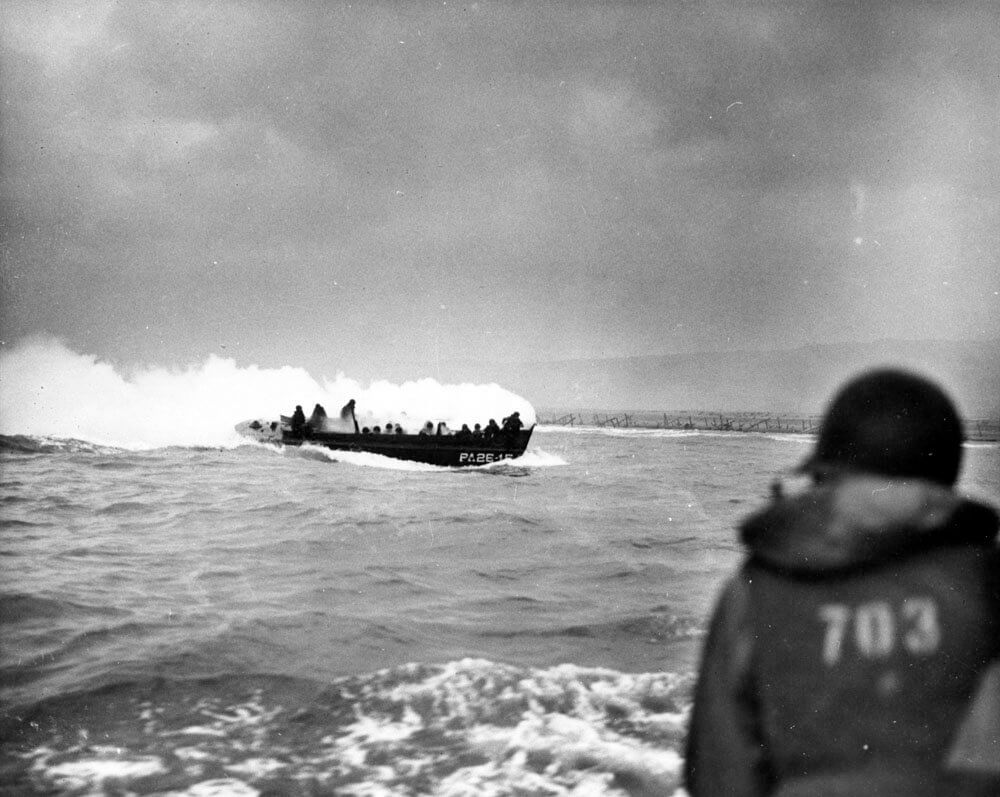
All elements of Force O have been loaded onto ships. Some units remain aboard for several days. Enemy air activity remains low. Rear Admiral Alan Kirk commands the Western Naval Task Force. Rear Admiral John Hall leads Force O, responsible for Omaha Beach. The scale of the movement is vast. To land the first wave of 34,000 men and 3,300 vehicles requires 7 transports, 8 Landing Ship Infantry, 24 Landing Ship Tank, 33 Landing Craft Infantry, 36 Landing Craft Medium, 147 Landing Craft Tank, and 33 additional landing craft. Gunfire support includes 2 battleships, 3 cruisers, 12 destroyers, and over 100 other vessels. Mine-sweeping and service work involves 33 sweepers and 585 auxiliary craft.
The 16th Regimental Combat Team numbers 9,828 men, including 3,502 attached for landing purposes. The unit has 919 vehicles and 48 tanks. Its embarkation alone requires 2 transports, 6 Landing Ship Tank, 53 Landing Craft Tank, and 5 Landing Craft Infantry. From these vessels, 81 Landing Craft Vehicle, Personnel, 18 British Landing Craft, Assault, 13 other craft, and 64 DUKW’s are to be launched.
By this time, weather becomes the critical variable. General Eisenhower receives a poor forecast: overcast skies and strong winds.
| June 4th, 1944 |
At 04:15, General Eisenhower postpones D Day by 24 hours. One convoy division is already at sea and must be recalled.
Southern ports are congested. Landing Ship Tank and other craft are packed with vehicles and equipment. In many cases, M-29 Weasels haul trailers across ramps and piers. Enemy aircraft remain unable to disrupt the operation.
| June 5th, 1944 |
A new forecast offers a narrow window of better conditions. Cloud ceilings may reach 900 metres. The sea is expected to moderate slightly. After this short period, conditions may worsen. Delaying to June 7th, 1944, risks further deterioration. Fuel shortages threaten vessels already in the Channel. A further delay means waiting until June 19th, 1944, when tides and moon align once more.
At 04:15, Eisenhower makes his decision. The invasion will proceed on June 6th, 1944. H Hour for Omaha is set for 06:30. Low tide is at 05:25, with high tide at 11:00. Sunrise is at 05:58 and sunset at 22:07.
The main convoy of Force O departs Portland in the afternoon. The Channel crossing of 160 kilometres is calm and unopposed. Enemy naval and air forces remain inactive. Spitfires provide low cover over the shipping lane. P-47 Thunderbolts from the Eighth and Ninth Air Forces patrol overhead at all times.
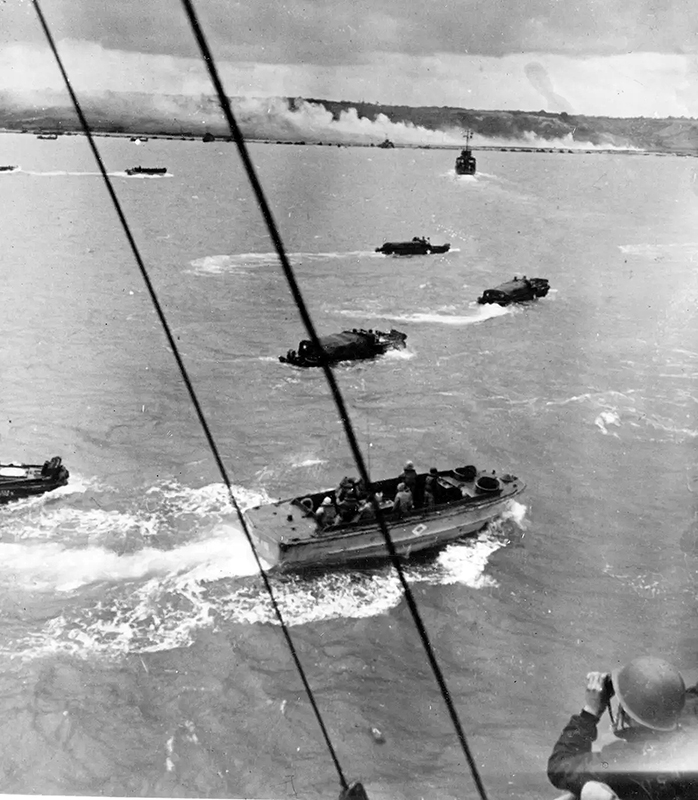
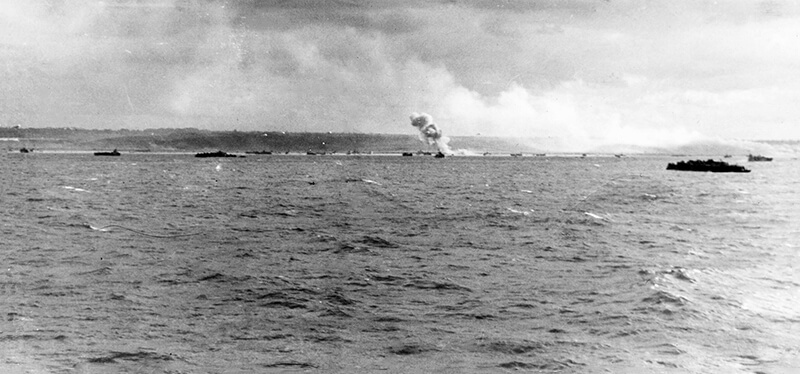
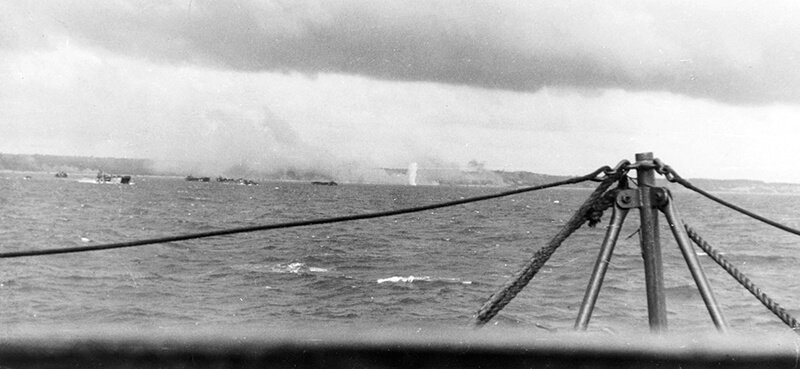
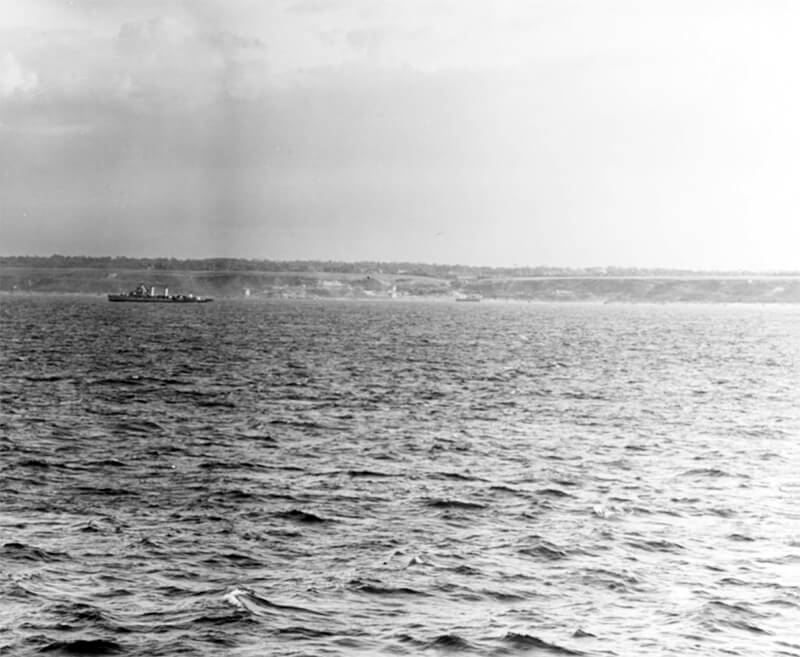
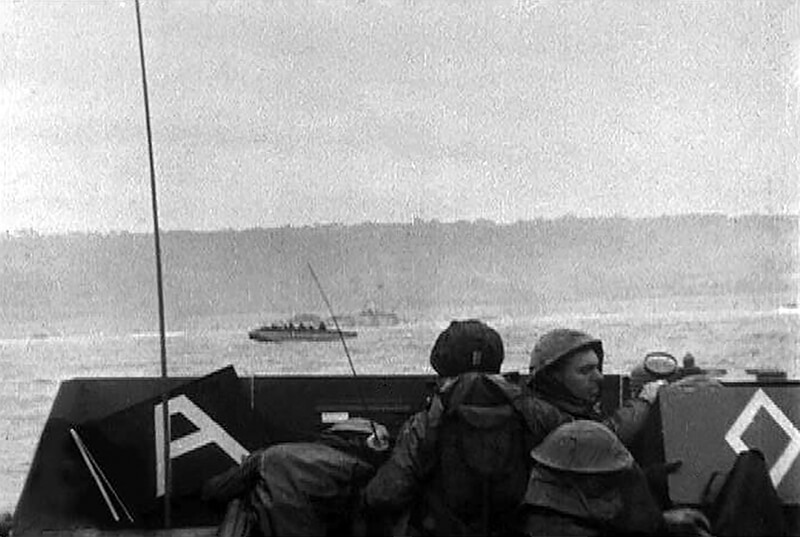
| Normandy, June 6th, 1944 |
As dawn breaks, the assault beaches come under continuous Allied air cover. The Ninth Air Force assigns five groups of fighters to maintain a presence over the beaches. The Royal Air Force provides low cover. A major contribution comes from the mine-sweepers of the Western Naval Task Force. Their work ensures that no ships are lost to mines during the approach.
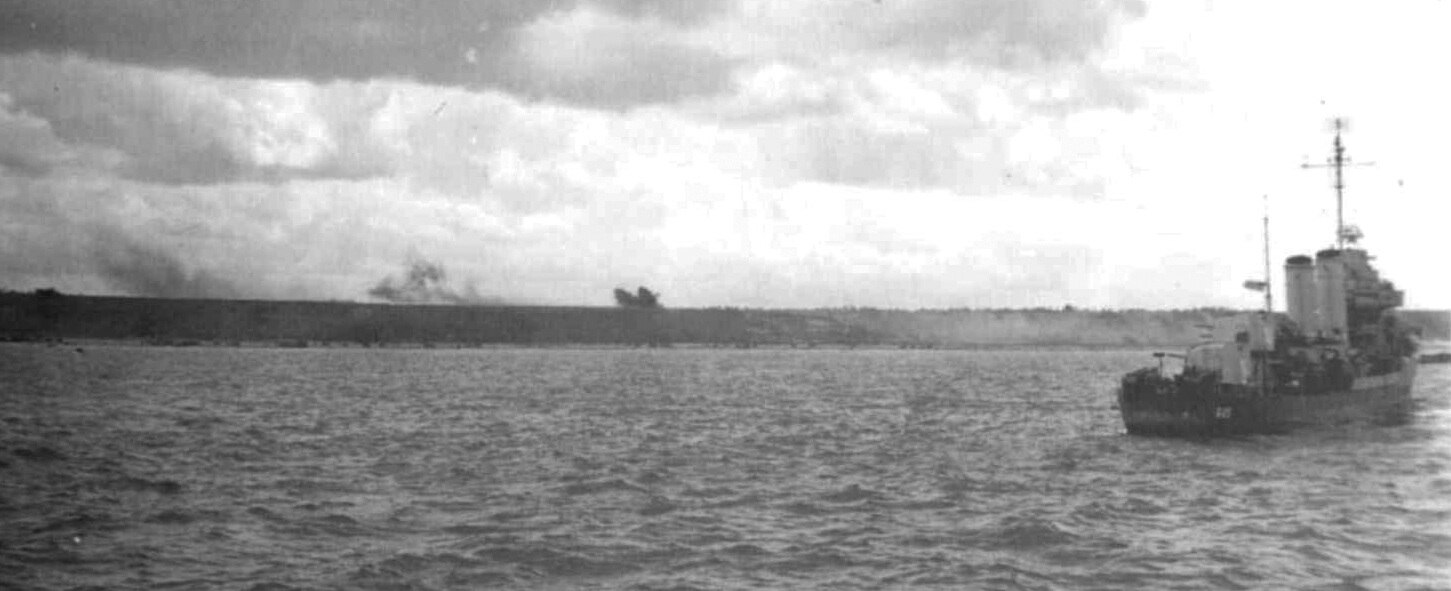
At 02:51, Admiral Hall’s flagship U.S.S. Ancon, also serving as General Gerow’s command ship, anchors 21 kilometres off Omaha Beach. Sea conditions, though improved, are still poor. Visibility reaches 16 kilometres. A partial overcast remains, which hampers bombing accuracy.
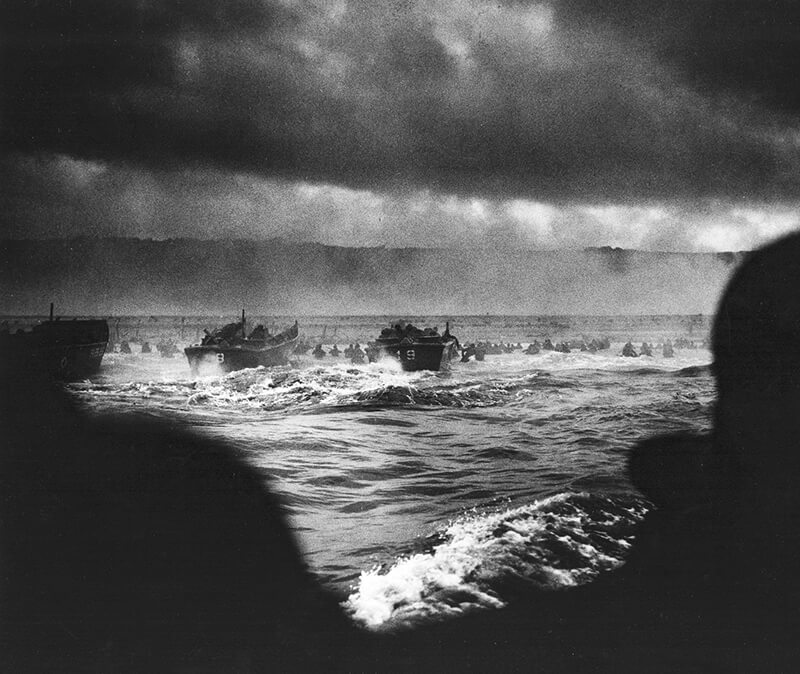
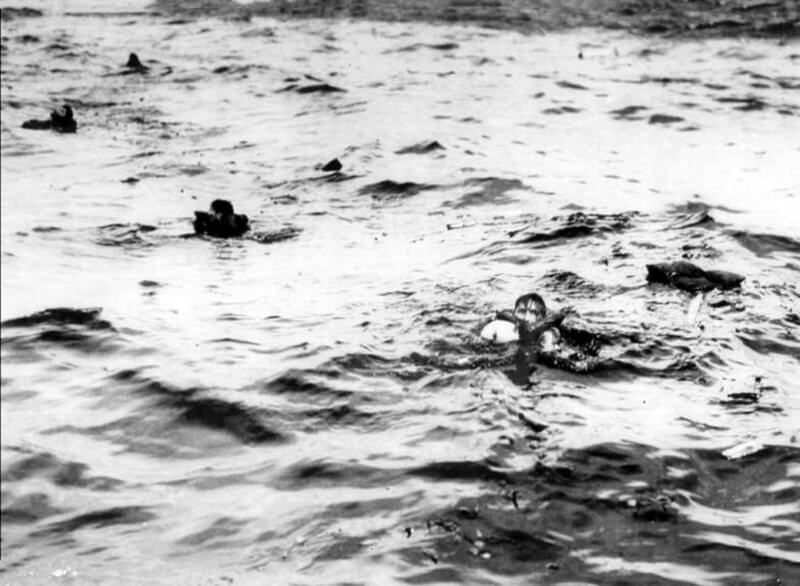
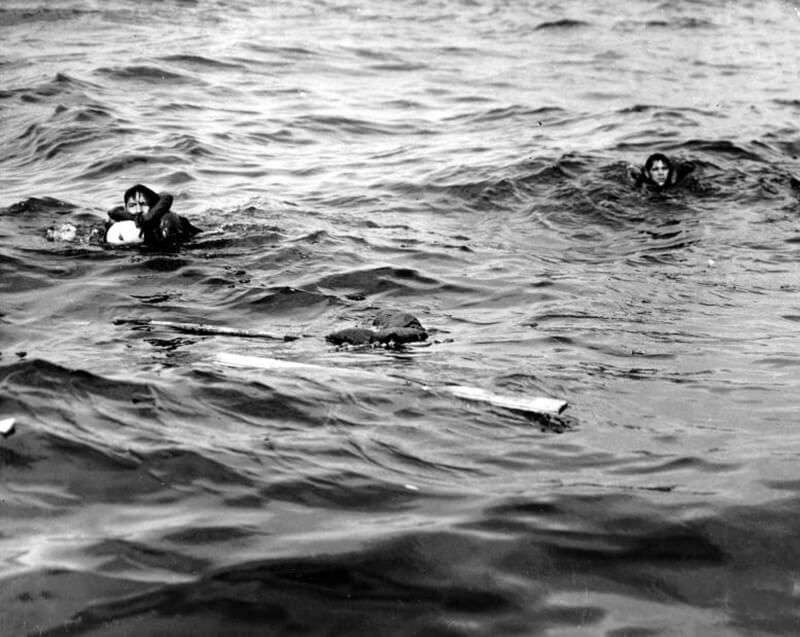
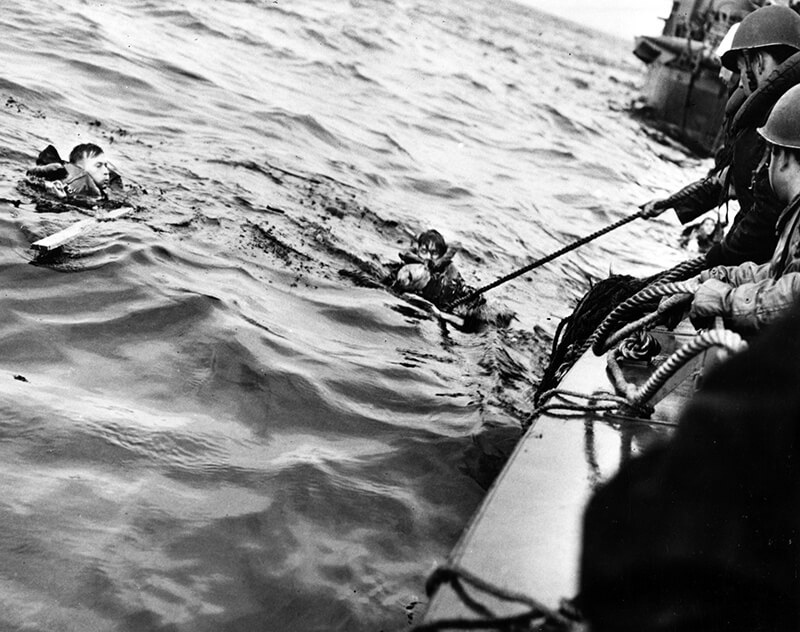
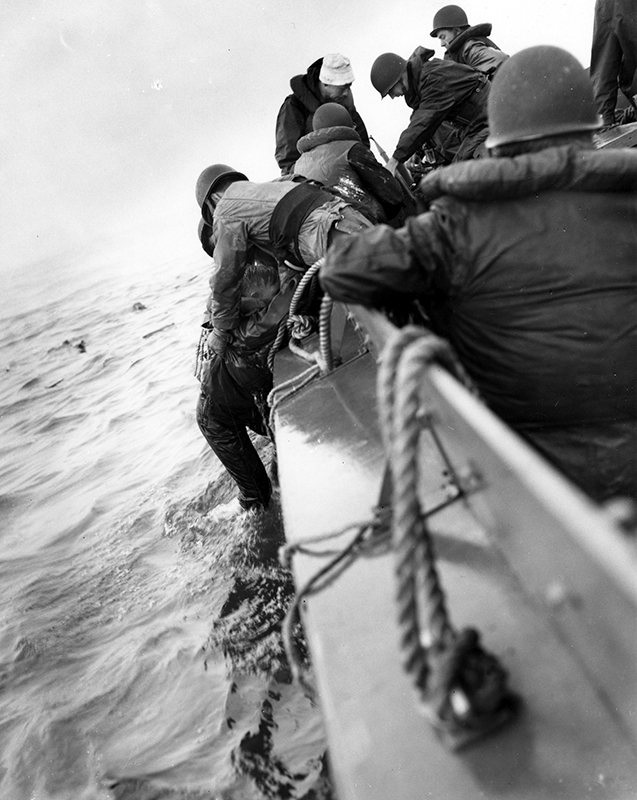
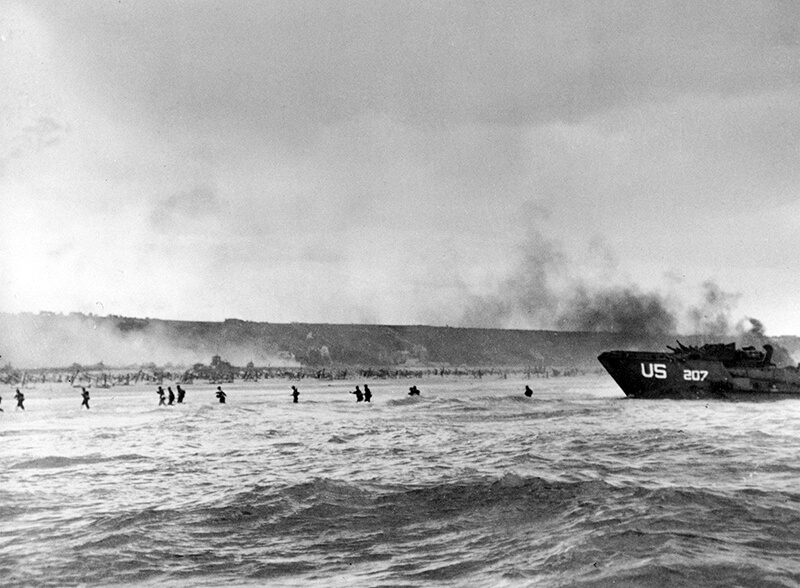
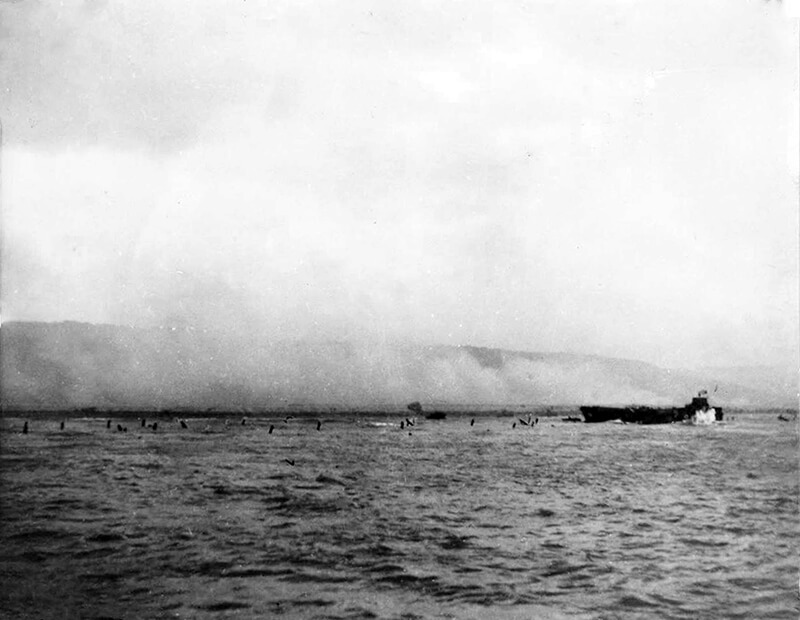
Winds from the northwest blow steadily at 10 to 18 knots. In the transport area, waves average 1 to 1.2 metres, with occasional peaks up to 1.8 metres. Breakers on the beach reach 1.2 metres. These conditions persist throughout the day and into June 7th, 1944. The rough sea hinders landing operations. Craft struggle to stay on course. Many troops are delayed or scattered. The effects of the weather are felt at every level of the operation.
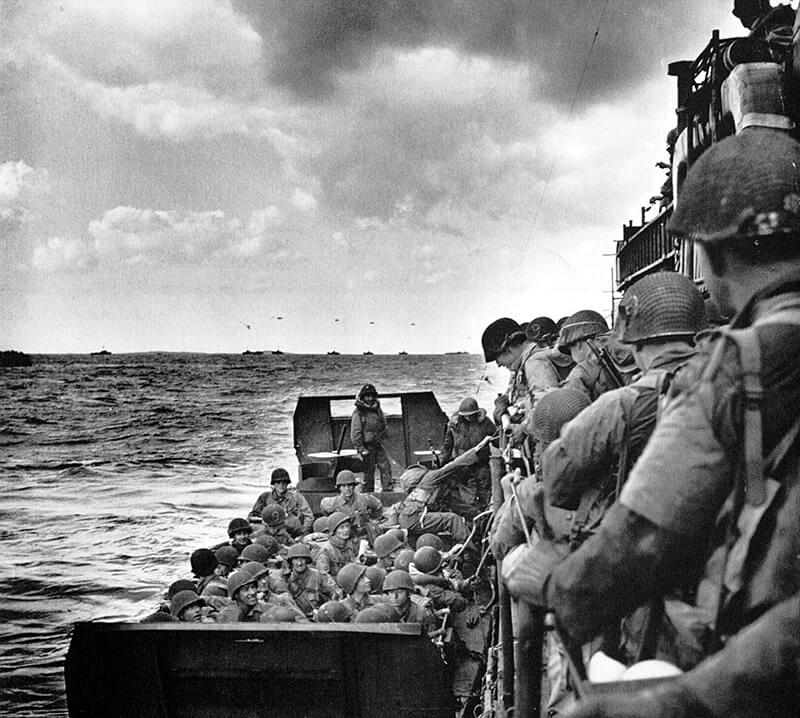
The movement from the transport area to the beaches follows a detailed and complex schedule. Hundreds of landing craft must operate in synchrony to deliver troops in the correct sequence. Timing is critical. The process begins three to four hours before H Hour. Assault infantry embark from larger transports into smaller landing craft, mainly Landing Craft Vehicle, Personnel and British Landing Craft, Assault, launched from their mother ships. The rough sea makes this operation difficult, causing minor delays.
| Multimedia |
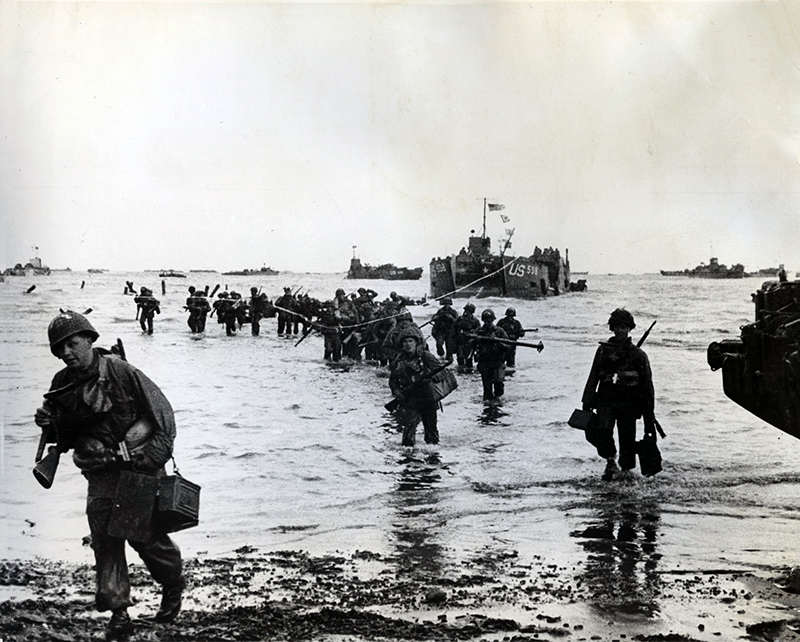
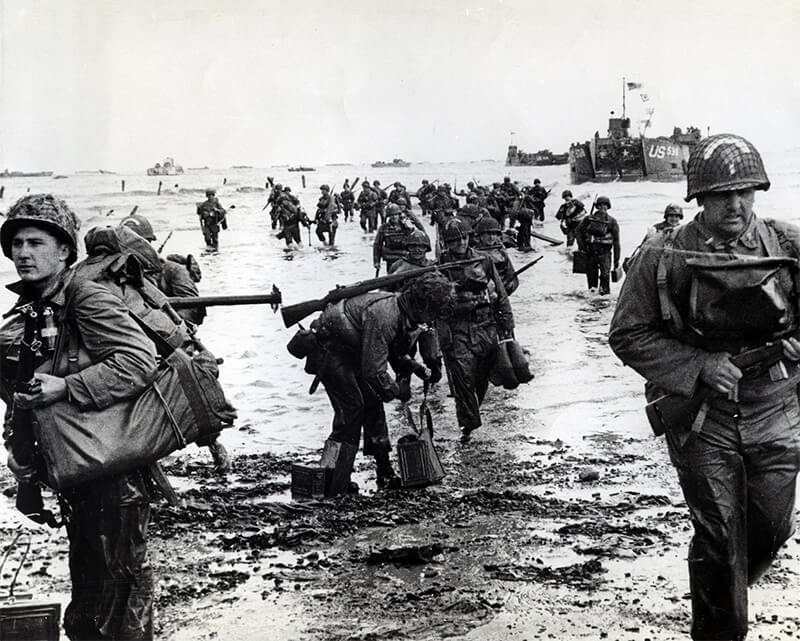
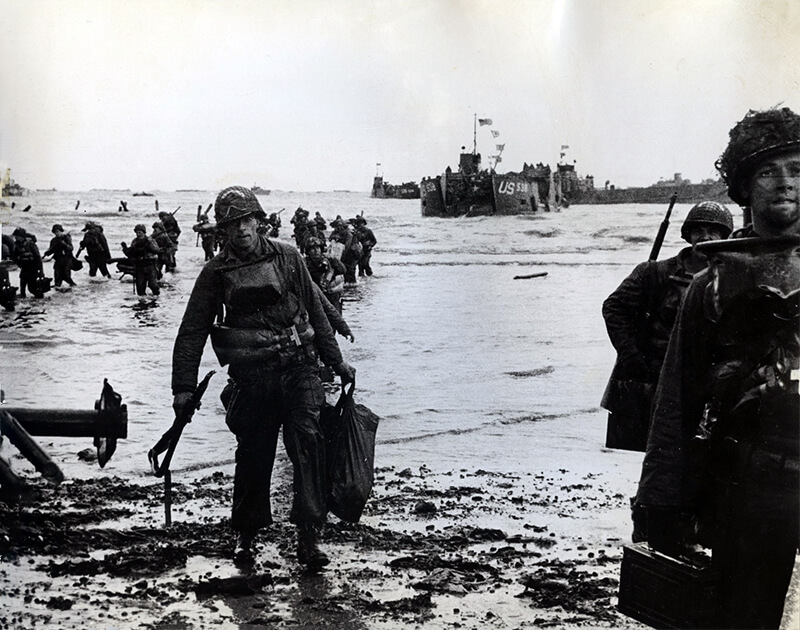
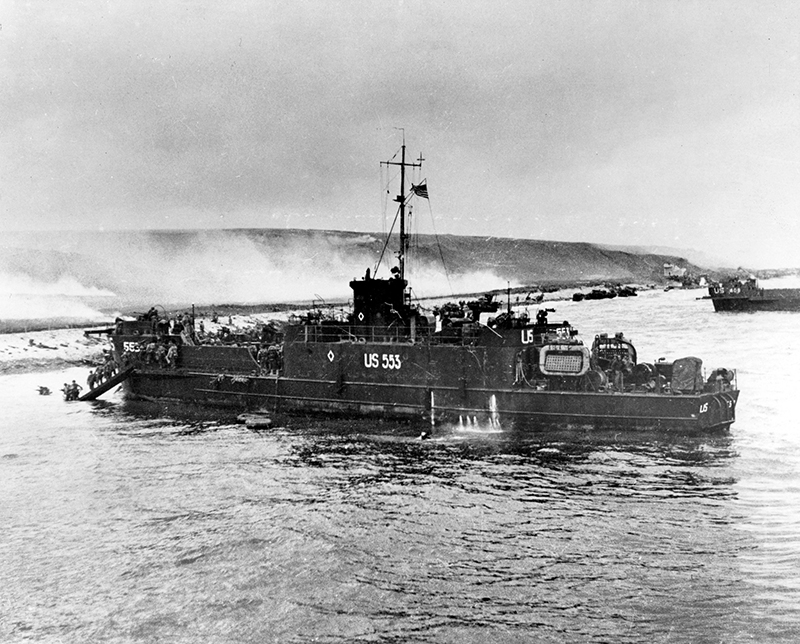
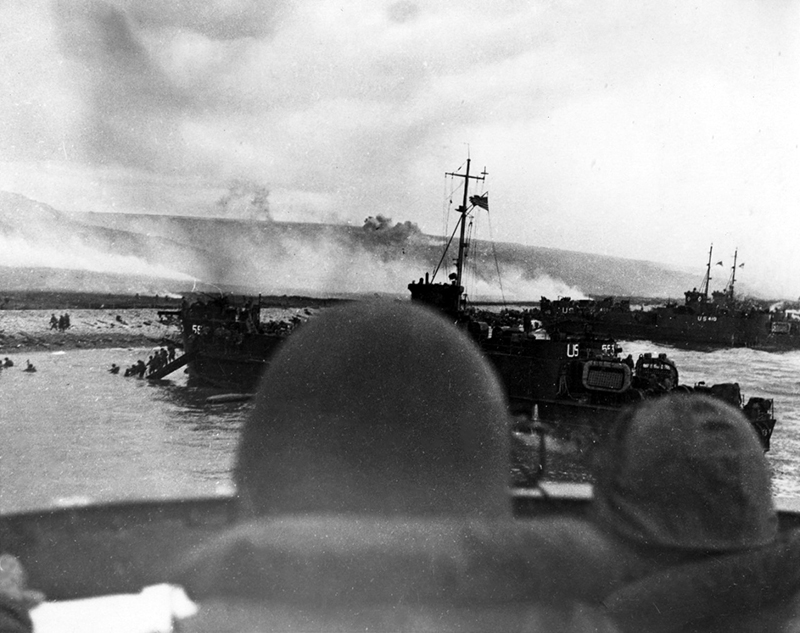
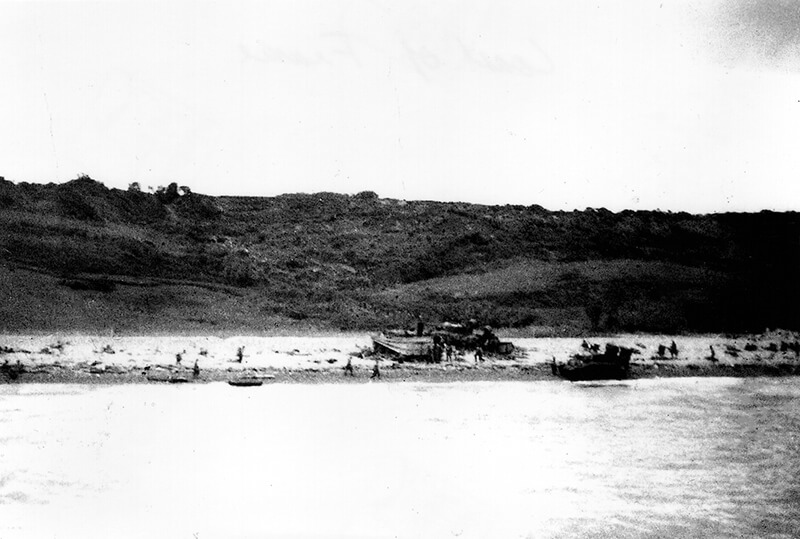
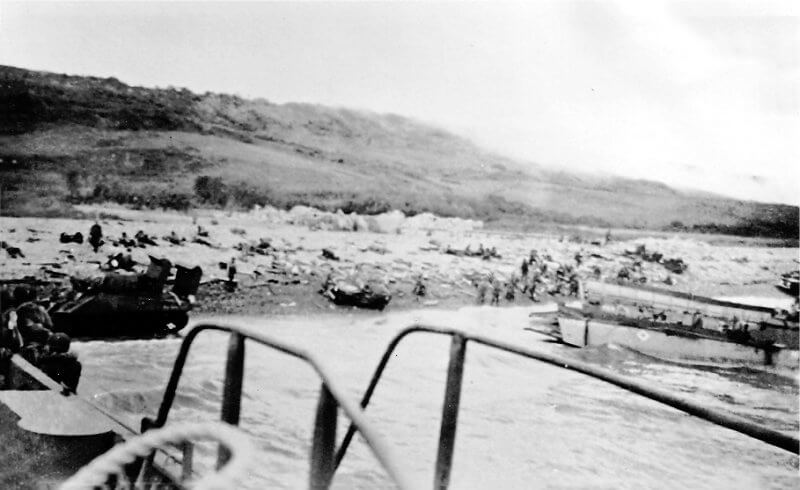
| Landing |


| Sources |