
| Page Created |
| December 4th, 2025 |
| Last Updated |
| December 26th, 2025 |
| Great Britain |
 |
| Origin and Need |
Crab Flailing Tanks emerge during the early years of the war. Allied forces advance across regions filled with dense minefields. The German defences in North Africa, often called the Devil’s Gardens, contain millions of mines. Conventional clearance methods are too slow and too dangerous under fire. Manual prodding cannot keep pace with combined-arms assaults. A mechanical solution becomes essential if armour and infantry are to maintain momentum.
The idea of a mine-flail tank begins in 1941 with Abraham S. J. du Toit. He is an automotive engineer in civilian life and a sergeant in the South African Artillery. Du Toit designs a device that detonates mines by striking the ground with heavy chains or steel cables fixed to a rotating drum. His team builds a test rig on a truck chassis and conducts a demonstration in Pretoria. A short film of the trial is produced and sent to General Claude Auchinleck. After General Auchinleck views the film, he judges the idea to be highly promising. He orders Sergeant du Toit to travel to England to continue the work. Du Toit must refine the concept and produce a stronger prototype mounted on a tank chassis for operational use.
He soon receives promotion to Major.
Before Sergeant du Toit leaves for England, he shares his idea with Captain Norman Berry, the South African Chief Mechanical Engineer of the Eighth Army. Captain Berry waits impatiently for official news from Britain. Bureaucracy slows communication, so he begins his own experiments while the Eighth Army remains entrenched along the Gazala Line in the spring of 1942.
Remarkably, the same idea emerges independently a few months later in another sector. During the summer of 1942, Lieutenant Colonel Mill Colman of the South African Engineer Corps observes a tracked vehicle passing by with barbed wire tangled in its sprocket. Each revolution of the sprocket whips the wire against the ground with great force. This gives him the inspiration for a mine-clearing device. He realises that controlled blows on the ground might detonate mines safely.
Major L. A. Girling, commanding the 21st South African Corps Field Park Company, receives the task of building the first experimental unit. The team refers to it as a mine destruction device. Captain Berry hears of Colman’s new initiative and immediately informs Major Girling of the earlier work done under strict secrecy. He explains that General Auchinleck has already sent du Toit to Great Britain to continue development. The secrecy is so tight that Allied Command in the Middle East has almost forgotten the project exists. Berry retrieves his earlier reports with enthusiasm and delivers them to Girling’s engineering team. The team consists of himself, Captain G. J. Barry, Lieutenant Hofmann, and Lieutenant C. D. B. Cramb. They begin work at once.
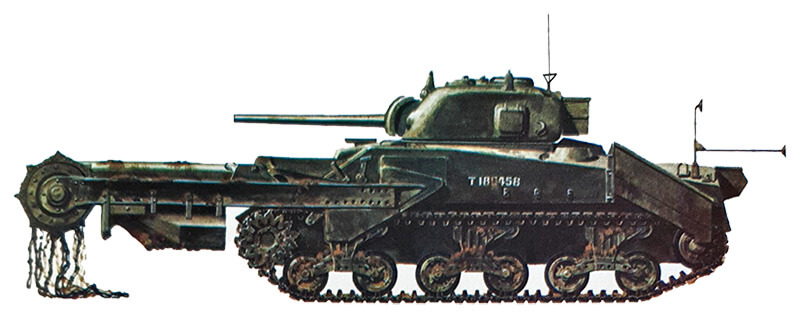
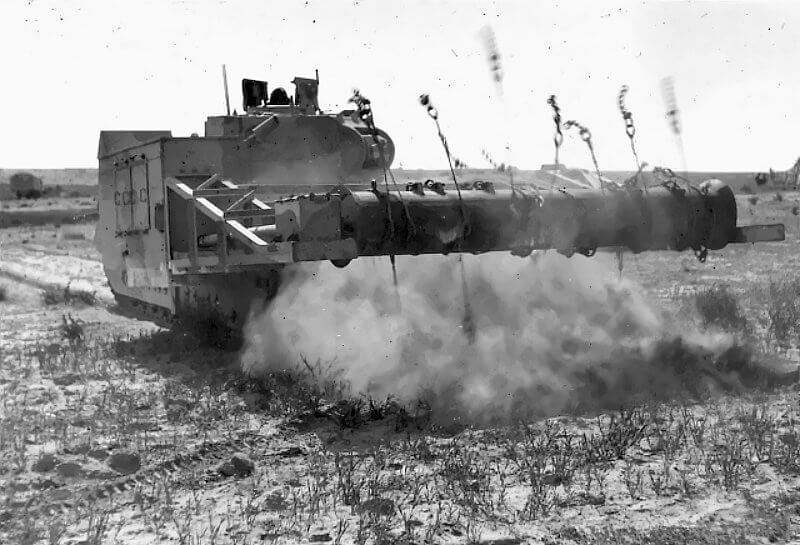
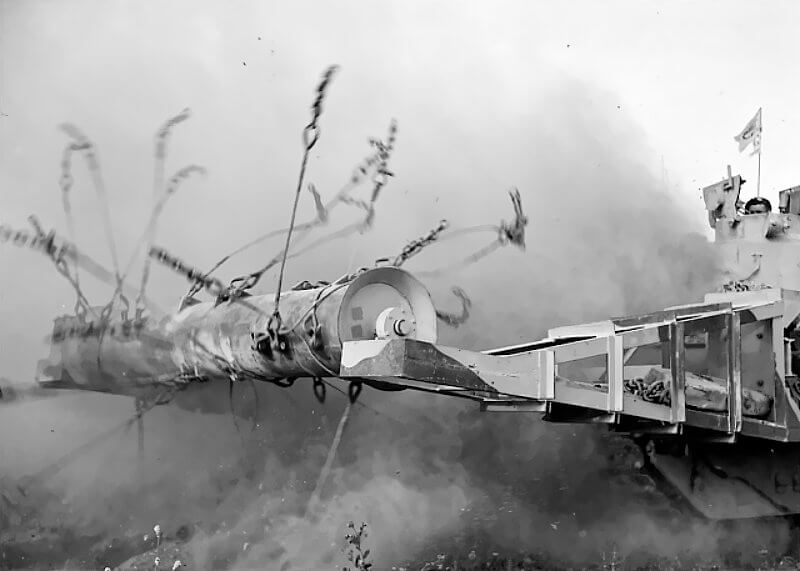
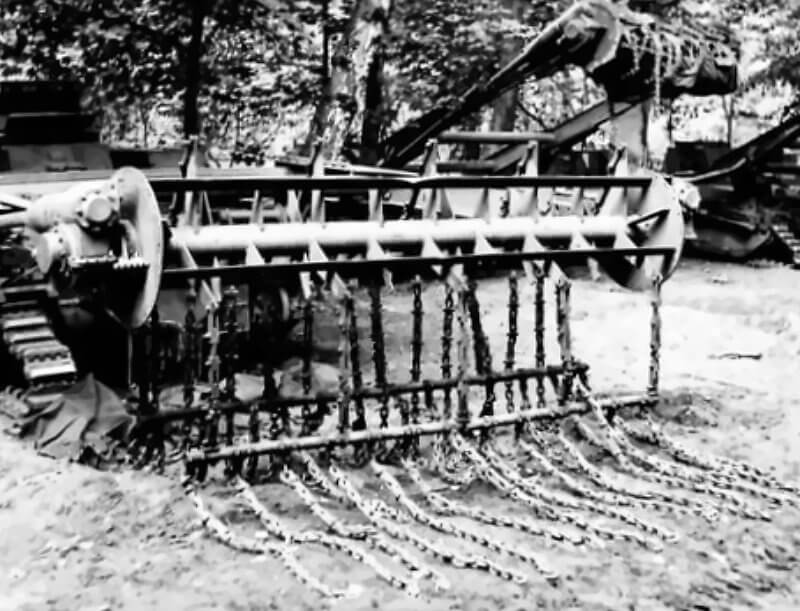
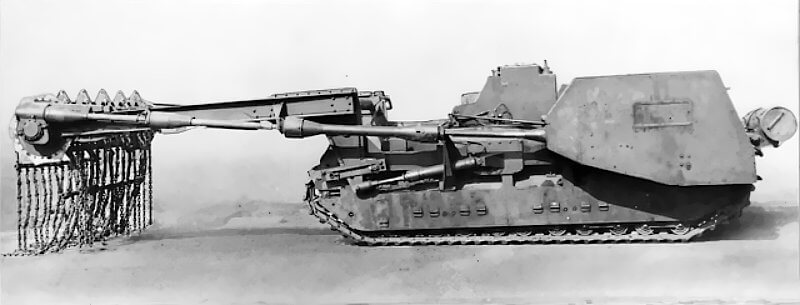
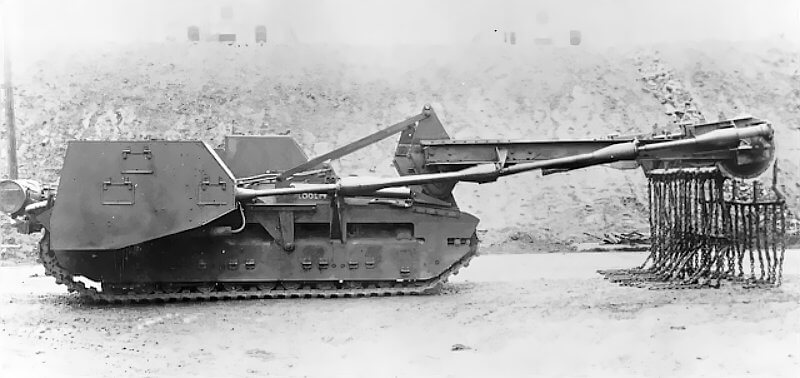
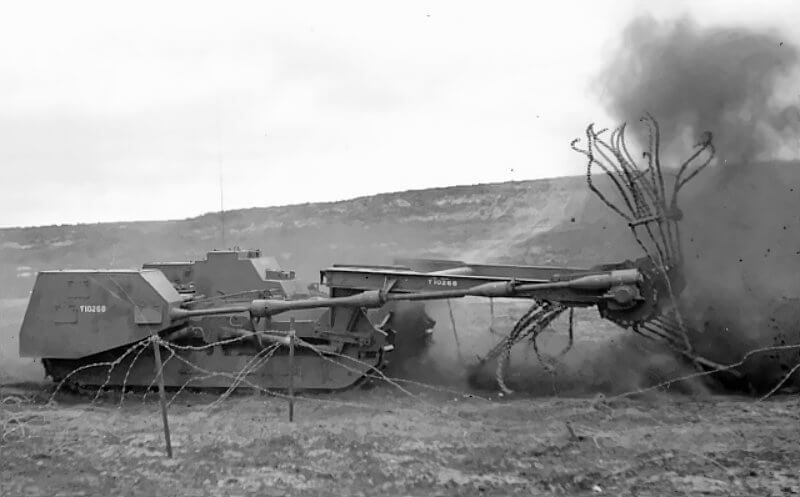
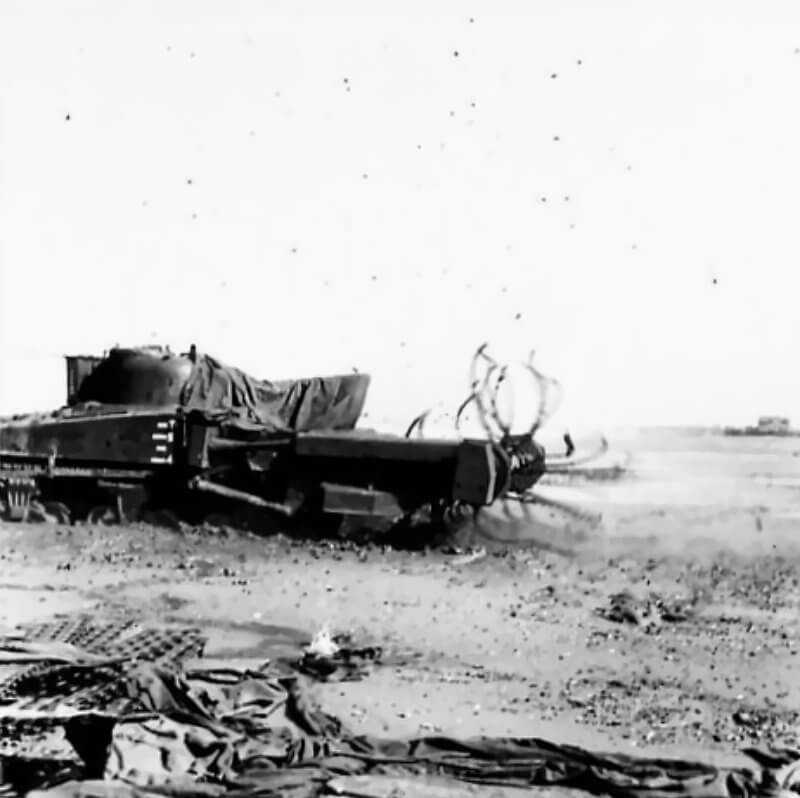
By August 6th, 1942 the first mock-up is complete. The new prototype receives the name Durban Mark I, after Lieutenant Colonel Colman’s birthplace in South Africa. The Durban Mark I, later known as the Matilda Scorpion, incorporates many of Berry’s ideas. It uses an auxiliary Ford V8 engine mounted in a sponson on the right side of the Matilda II’s hull. The engine sits within an armoured box and drives a horizontal flail rotor suspended above the ground. The box also houses controls so the operator can manage the rotor and restart the engine when required.
The flail arms use simple lattice-beam construction and are fixed and non-articulated, much like those of the Matilda Baron. The left arm, which is not motorised, appears in two forms. One version is rectangular and includes four vertical trusses on the front of each arm. The other is triangular and includes two vertical trusses on the right arm and one on the left. No previous conflict has seen front-line personnel design and build equipment of such tactical value and complexity under field conditions.
The Middle East Scorpion programme begins trials in mid-1942. Engineers test early prototypes in the Egyptian desert. The Matilda Scorpion demonstrates that it can detonate almost every mine it passes over in ideal conditions. Crews quickly discover serious drawbacks. Flailing in sand creates blinding dust. Commanders cannot see ahead. Drivers must wear gas masks to breathe. During these trials the auxiliary engines also tend to overheat after ten to fifteen minutes due to dust and desert heat. Engines seize without warning. Lieutenant-Colonel Kerswell of Eighth Army workshops solves this by cutting extra air inlets in the armour around the flail engine. Cooling improves immediately. With these modifications three Scorpions are prepared for battle.
After the field trials, Major Girling’s team continues to refine the machine. On September 12th, 1942, the Durban Mark I is demonstrated to the Eighth Army’s corps commanders and their chief engineers. General Harold Alexander, the Commander-in-Chief Middle East, attends the trial. General Bernard Law Montgomery, commanding the Eighth Army, and General Leslie James Morshead of the Ninth Australian Division also witness the demonstration. They are impressed by the machine’s performance, especially given the short development time.
Montgomery reacts immediately. He states that he wants twelve machines for the forthcoming offensive. Brigadier Kisch explains that such production requires approval from General Headquarters and would place other manufacturing tasks on hold. Montgomery replies, “Don’t belly-ache, order two dozen.” The next day Brigadier Kisch orders the fabrication of twenty-four more devices. Together with the prototype, this gives the Eighth Army a total of twenty-five Scorpions for Operation Lightfoot during the Second Battle of El Alamein. These Matilda Scorpions are built in North Africa and issued to the 42nd and 44th Royal Tank Regiments.
During the Second Battle of El Alamein in October 1942, the Scorpions help open lanes, but also experience serious problems. Dust blocks the auxiliary engines. Heat causes persistent overheating in the desert. Mechanical failures stop many vehicles during operations. Their clearance speed is slow, which exposes them to fire. At El Alamein one Scorpion flails roughly 410 metres of minefield before mechanical failure. Another is destroyed by German 88-millimetre fire. A third suffers a breakdown. Their overall tactical effect is limited, yet the principle is proven. A Scorpion can trigger around forty mines in a single advance without damage to the tank itself, apart from the expected loss of flail chains.
However, their performance at El Alamein is good enough for Middle East Command to request permission to equip five hundred tanks with the Scorpion device. Approval is later granted for three hundred conversions, though the exact number completed remains uncertain. It is also unclear how many of these are Matilda-based Scorpions.
Hand-clearing parties still carry out most of the work at Alamein. However, the psychological effect of the flail tanks proves remarkable. The sight and noise of a tank thrashing through a minefield demoralise some Axis troops. Several surrender simply due to fear of the machine’s violent motion.
New versions appear after the battle. The Scorpion Mark II removes the Matilda turret because the gun is not essential for flail work. The operator now sits under armour, replacing the gunner. Improved air filtration reduces dust problems. Weak mechanical parts are strengthened. Later Scorpion Mark III and Mark IV models are mounted on the American M3 Grant. The Grant becomes available in quantity as front-line units re-equip with Shermans. A small number of Grant Scorpions serve in later African fighting and during the 1943 invasion of Sicily. The Matilda Scorpion is withdrawn from service in 1943.
The desert trials teach vital lessons. Designers learn about engine strain, dust control, crew protection, and the limits of auxiliary power. These experiences shape every later generation of flail tanks.
| Multimedia |

| Parallel Development in Britain |
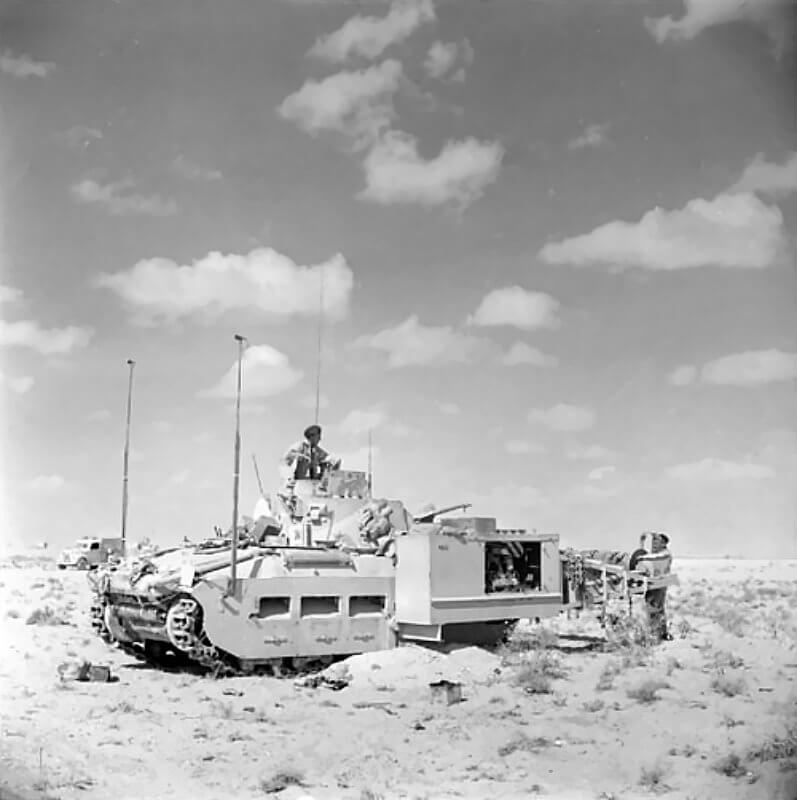
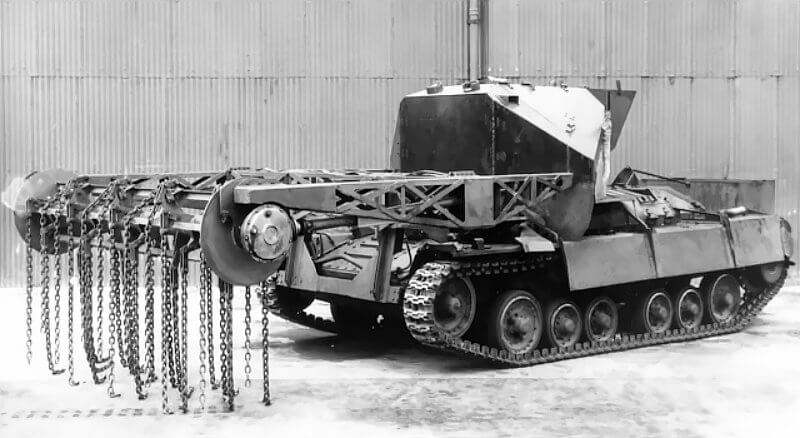
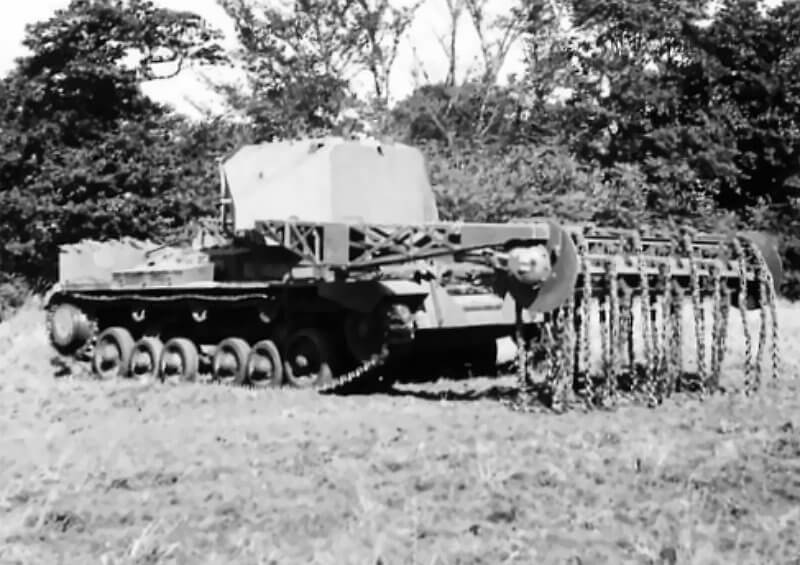
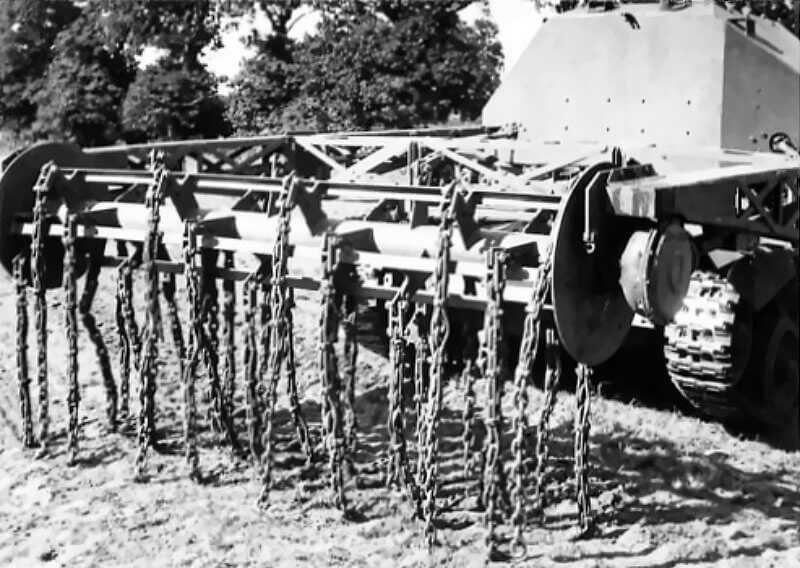
While the Middle East team builds Scorpions, du Toit begins separate work in Britain. He collaborates with Associated Equipment Company Ltd to produce a Matilda-based flail named the Baron. The Baron uses flails mounted on a rotor at the end of arms roughly three metres long. These arms whip the ground and detonate buried mines before the tank reaches them. Linkages and hydraulic pistons allow the crew to raise or lower the arms as required. By late 1942 the Baron is ready for production. It uses two Bedford engines to drive the flail mechanism. The normal turret is removed, and a purpose-built operator’s cabin is fitted in its place.
Around sixty Matilda Barons are built by Curran Brothers in Cardiff. In December 1942, as the Baron Mark IIIA undergoes trials, the Scorpion design is submitted to the War Office. Its simplicity proves decisive. Field production is authorised. They see further use in trials, demonstrations, and training but never go into combat. The vehicle comes with some disadvantages. The vehicle is too wide for many Bailey bridges and for easy rail travel. Crews often remove the flail engine pods when the vehicle is moved by rail. By late 1942 and early 1943, planners recognise that future large operations require a more reliable and efficient flail tank.
Major-General Percy Hobart, responsible for developing specialist armour for the planned invasion of Northwest Europe, takes direct interest in flail technology. Under his control, the 79th Armoured Division tests several experimental systems. Engineers mount flails on Valentine tanks. They also test flails on Sherman tanks, including designs labelled Scorpion Mark IV and Mark V, along with a machine known informally as the Sherman Lobster.
Hobart demands a standardised and effective design. Trials show that the Sherman platform offers better automotive performance and greater mechanical reliability. The Sherman-based flail receives the name Crab and enters full development. The design draws heavily on lessons from Scorpion experience. Its layout is stronger and simpler. Its chain pattern and rotor arrangement improve clearance efficiency.
During this period du Toit promotes a different idea. He proposes a remote-controlled or push-type flail named the Perambulator. Any tank could push the unit ahead and avoid damage to its own hull. British authorities favour integral flail tanks with crews, so the Perambulator concept is set aside. Du Toit returns to South Africa in 1943.
| Multimedia |
| Continuation Development |
British work continues after the North African battles. By early 1943 the Ministry of Supply adapts a flail system to the Valentine tank. Prototypes appear in April 1943. Trials show important gains. A revised chain pattern reduces furrows, since earlier Scorpions sometimes plough ruts that leave mines untouched. Cooling problems persist in the first prototype. The second prototype resolves this and introduces a taller periscope to improve the driver’s visibility above the dust cloud. Crews complain that the flail rotor height must be adjusted manually. The vehicle must halt, and men must dismount to alter the setting. The issue is noted for later improvement.
By mid-1943 attention turns to the M4 Sherman. Major Allan M. Beck leads the team that adapts the flail to the Sherman. The M4’s strong engine and mobility make it a better basis for a future flail. Engineers assemble an experimental Sherman flail by September 1943 using a Sherman I. Tests take place at the British Fighting Vehicles Proving Establishment. The machine uses the Sherman’s main engine to power both movement and flail.
Performance proves impressive. The Sherman flail works at about 2.7 kilometres per hour and detonates roughly ninety-one percent of mines in its path. On inclines, performance falls by only ten percent due to the Sherman’s high torque. Repeated mine blasts break chains but do not harm the vehicle. The damage pattern matches experience with earlier Scorpions.
Engineers quickly produce a new prototype on the Sherman V by late October 1943. During this period another prototype appears. It is called Octopus at first and later renamed Marquis. It is essentially an improved Valentine Scorpion with an auxiliary engine and hydraulic arms to lift or lower the flail drum. The Marquis trials show clear advantages. Hydraulic lifting allows the crew to raise the flail to pass obstacles or lower it for transport inside a landing craft.
Once the Sherman flail proves successful the Marquis project ends in October 1943. Its hydraulic system is reused for the second Sherman prototype, giving the Crab a hydraulic flail lift. This refinement shapes the final production standard of the Sherman Crab, and by the time Allied forces prepare for large-scale operations in 1944 the flail tank has become a mature and proven design. Its success encourages both British and Canadian armoured units to commit fully to the vehicle, and it attracts interest from the United States Army, which seeks additional mine-clearing capability for the campaign in Northwest Europe.
In July 1944 American forces receive nine Crabs for use with First US Army. The Americans classify the Crab Mark I as the Mine Exploder T3 and the Crab Mark II as the T4. These vehicles see limited service in France. U.S. units employ them mainly during the breakout from Normandy and in the push towards the German frontier. German forces lay minefields in depth during this phase, and the Crabs prove valuable in opening safe routes for armour and infantry.
Canadian forces, operating under the British 21st Army Group, continue to use Crabs throughout the campaign. A Crab of the Fort Garry Horse, attached to the 3rd Canadian Division, becomes well known for its work in clearing the mined approaches to Calais. The same regiment later employs Crabs during the assault on Walcheren Island in late 1944. These actions underline the continued importance of flail tanks well after the initial landings in Normandy.
| Multimedia |


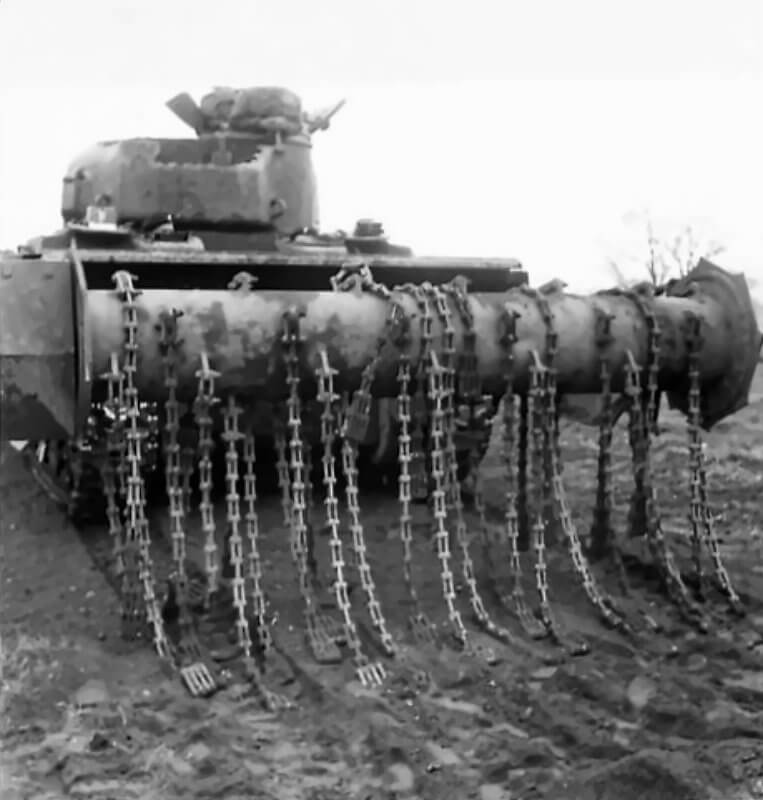
| Technical Characteristics of the Sherman Crab |
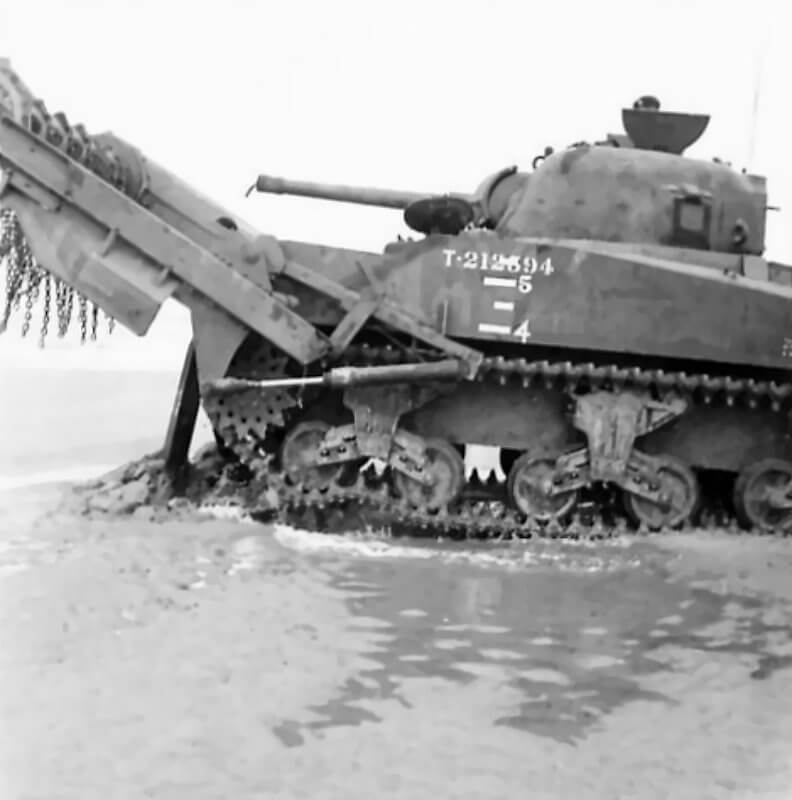
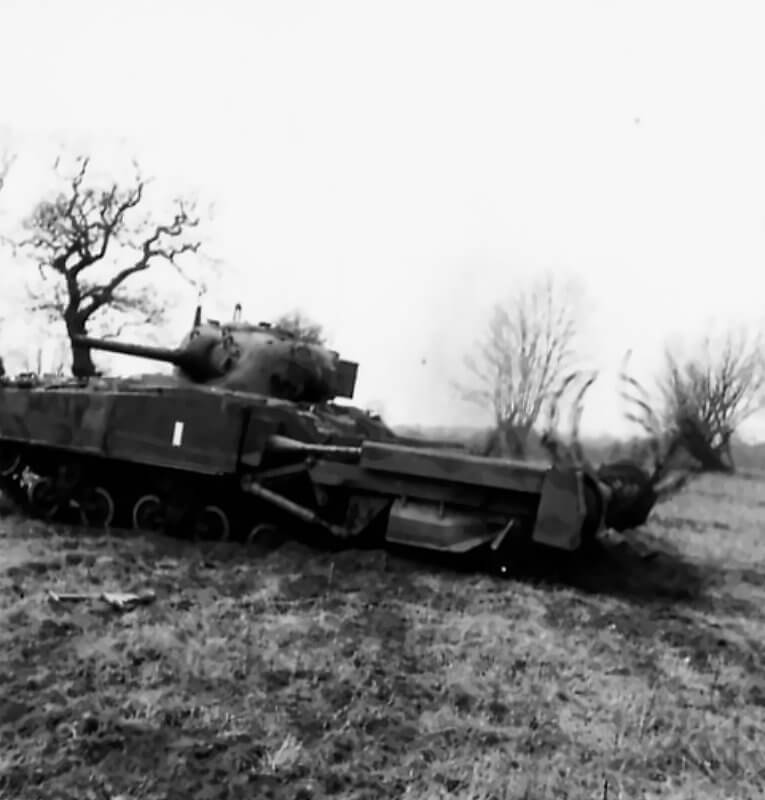
The Sherman Crab begins life as a standard M4-series medium tank. Most conversions use the Sherman V, the British designation for the M4A4. This variant is selected for its long hull, which improves stability, and for its Chrysler A57 multibank engine. The multibank provides enough power to drive both the tracks and the flail drum through a power take-off. Unlike earlier flail designs, the Crab keeps its turret and 75-millimetre gun. It can therefore fight as a normal tank when not flailing.
The 75-millimetre gun allows the Crab to act as a gun tank once the flail stops. A coaxial 0.30-inch machine gun sits beside the main armament. Many Crabs carry a 12.7-millimetre machine gun on the turret roof. This offers limited anti-air defence and close-range suppressive fire.
The base vehicle remains a Sherman at heart. The turret rotates fully when the flail arms are raised. The hull machine gun is usually removed because the forward blast shield covers its position. The crew remains five men. The commander, gunner, and loader sit in the turret. The driver and co-driver occupy the hull. The co-driver handles the flail controls in the early version. All controls sit inside the armour, unlike several improvised Scorpion layouts.
The tank’s hull measures about 6.06 metres. With the flail boom lowered, the overall length reaches roughly 8.4 metres. The hull width is near 2.62 metres. The height is roughly 2.74 metres. The flail arms extend the vehicle’s front considerably. They restrict manoeuvring in confined ground. The tank weighs about 31,600 kilograms in combat trim. This is around two tonnes more than a standard Sherman. The extra mass lies mainly over the forward bogies. These bogies sit lower under the strain.
Armour protection follows the standard pattern for the Sherman. The hull front carries about 50 millimetres of armour. The sides and rear carry about 38 millimetres. The turret front reaches roughly 75 millimetres with 50 millimetres on the sides and rear. The Crab receives a reinforced blast shield across the bow to protect the crew from mine detonations. This shield also masks the bow machine gun aperture.
The Chrysler A57 multibank engine delivers around 425 horsepower at roughly 2,850 rpm. It drives both tracks and flail through a special power take-off linked to the transmission. A gearbox manages the flail speed so the drum rotates at the correct rate even when the driver changes throttle on slopes. The five-speed transmission remains unchanged apart from this added drive system.
The Crab reaches almost 40 kilometres per hour on roads when driving normally. Flailing speed is much lower. The optimum speed is between one and two kilometres per hour. The tank uses standard Sherman VVSS suspension. The heavier nose affects handling and reduces ditch-crossing capacity. The operational range on roads is close to 160 kilometres. Ground clearance is roughly 41 centimetres. The tank can ford about 1.7 metres of water without waterproofing.
The Sherman Crab introduces several important innovations to increase its effectiveness. The power take-off drive is central to the design. It draws power directly from the Sherman’s engine. This eliminates the bulky external motors used on earlier flails. The change reduces the vehicle’s width and profile. It also simplifies maintenance and improves reliability. Earlier Scorpion tanks struggle with rail loading and bridge crossings because their side engines make them too wide for Bailey bridges. The Crab has no such issues. Its compact layout allows it to deploy easily across the battlefield.
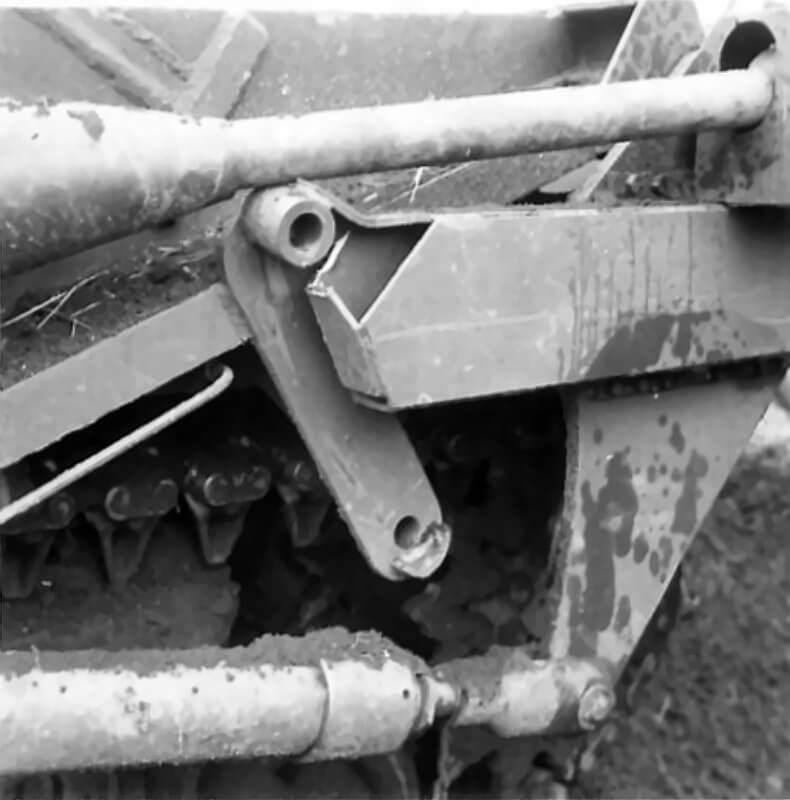
Hydraulic lifting arms appear on the Crab Mark I. They enable the crew to raise the flail for travel or lower it for clearance. This removes the dangerous task of dismounting to adjust the mechanism in a minefield. The later Mark II introduces a self-adjusting contouring jib. A counterweight balances the jib so the flail maintains ground contact as the tank moves over dips or uneven ground. The system reduces the risk of skipping mines in undulating terrain. Crews value this feature because it increases confidence that the flails strike every part of the intended path.
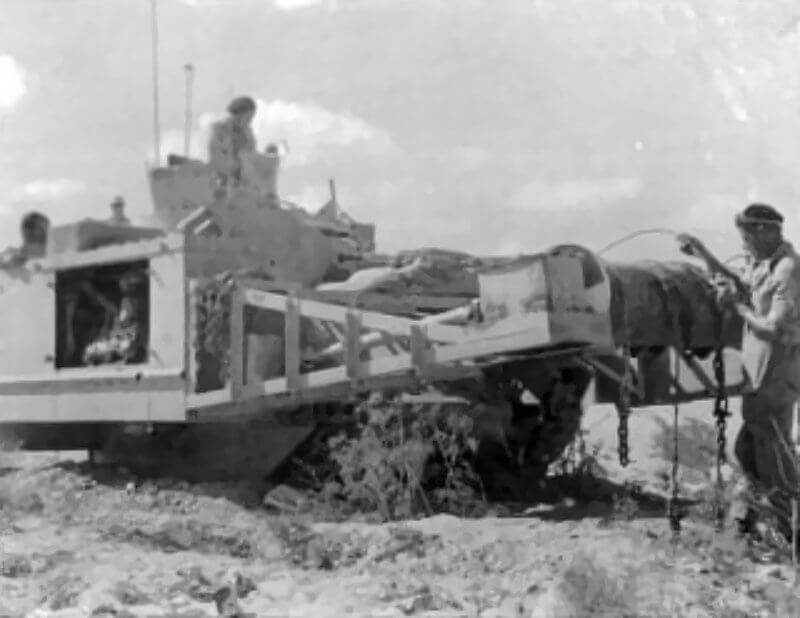
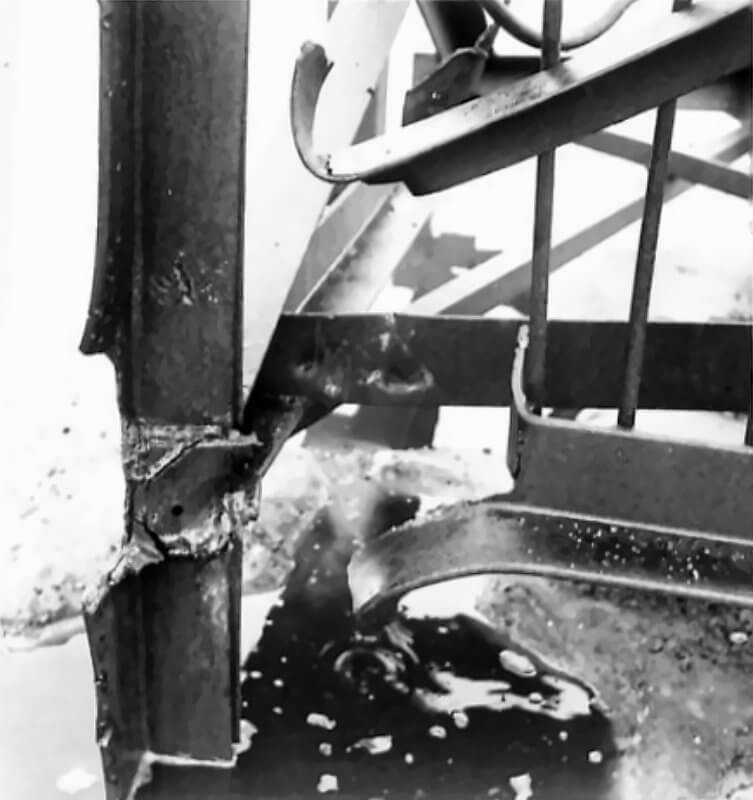
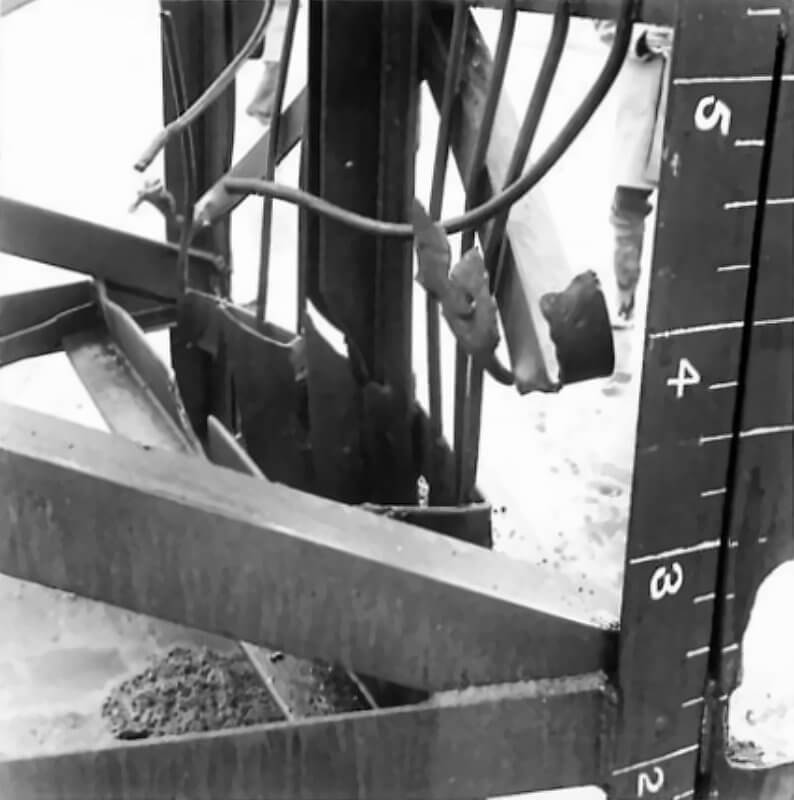
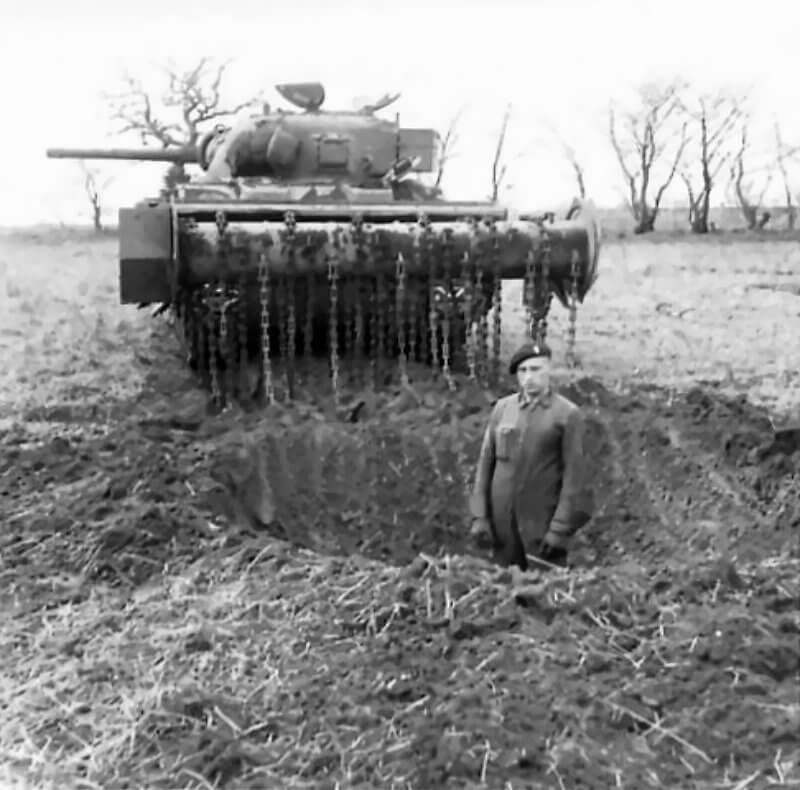
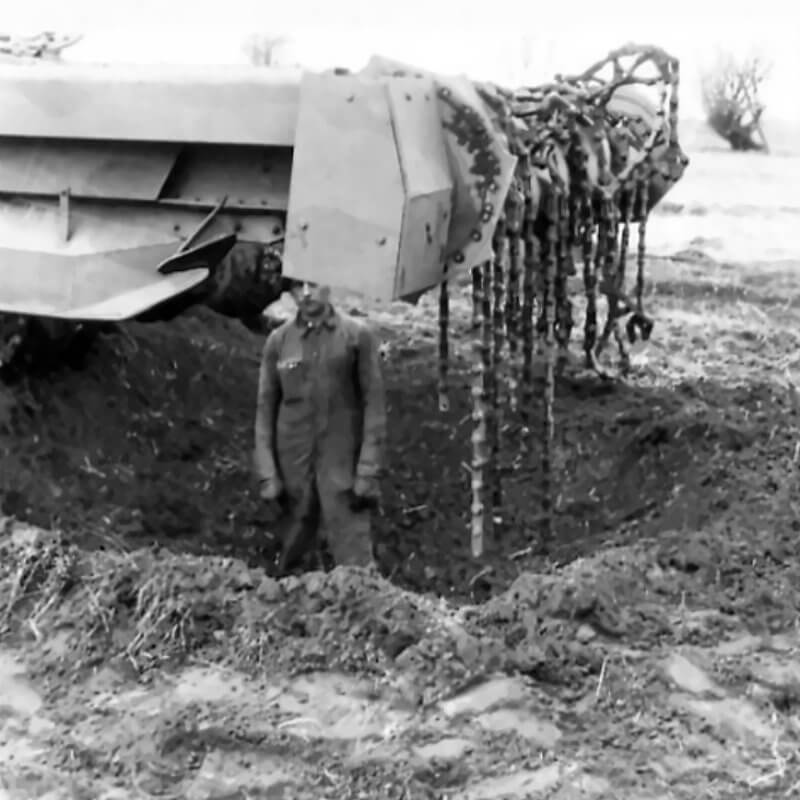
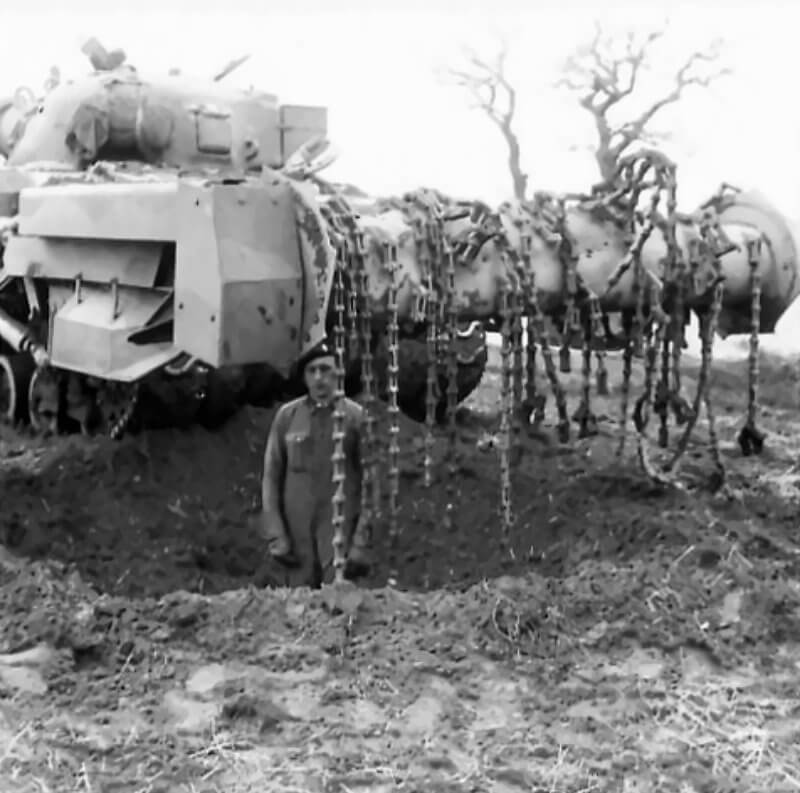
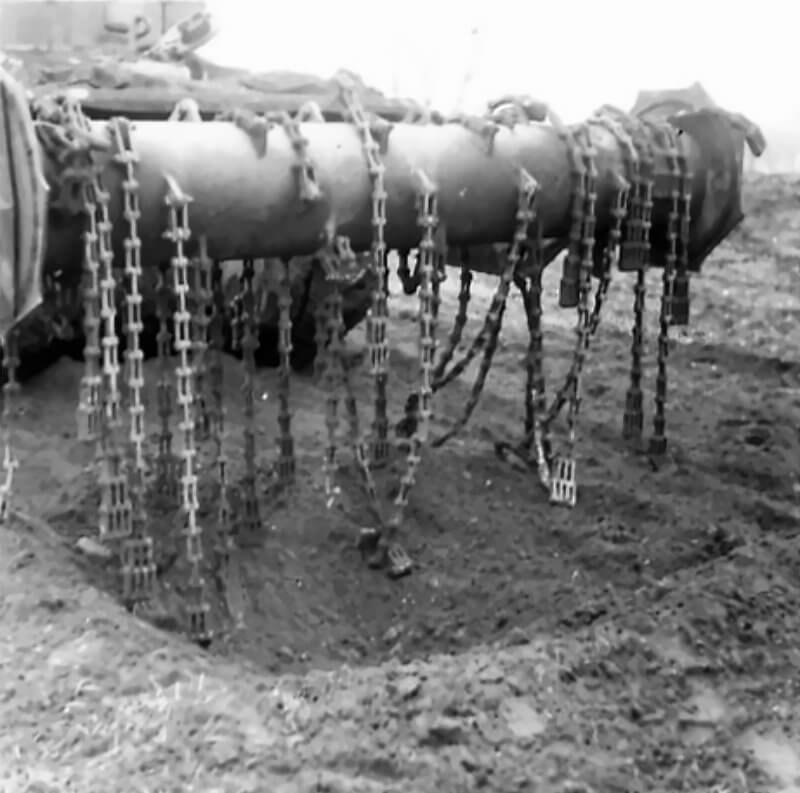
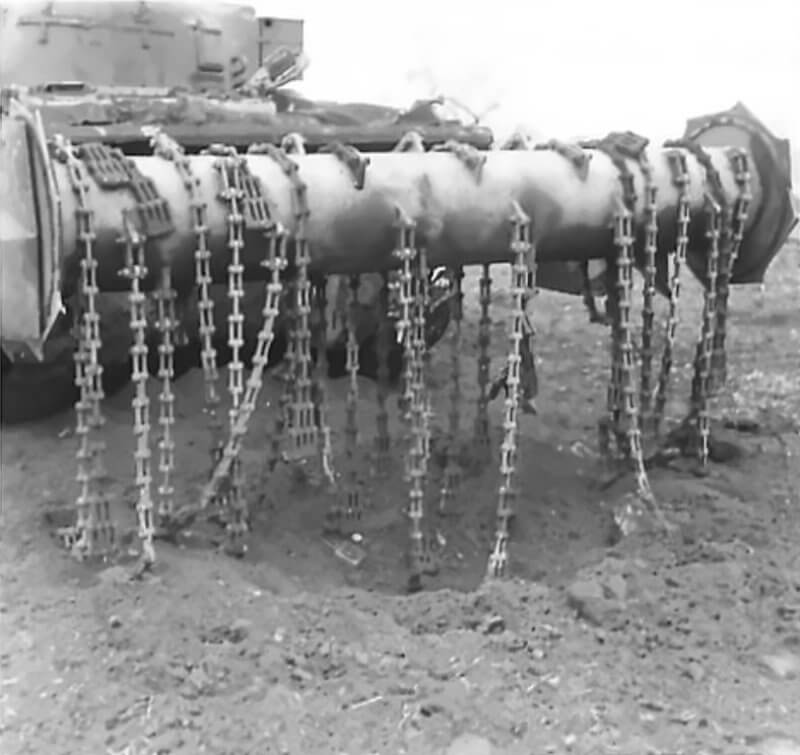
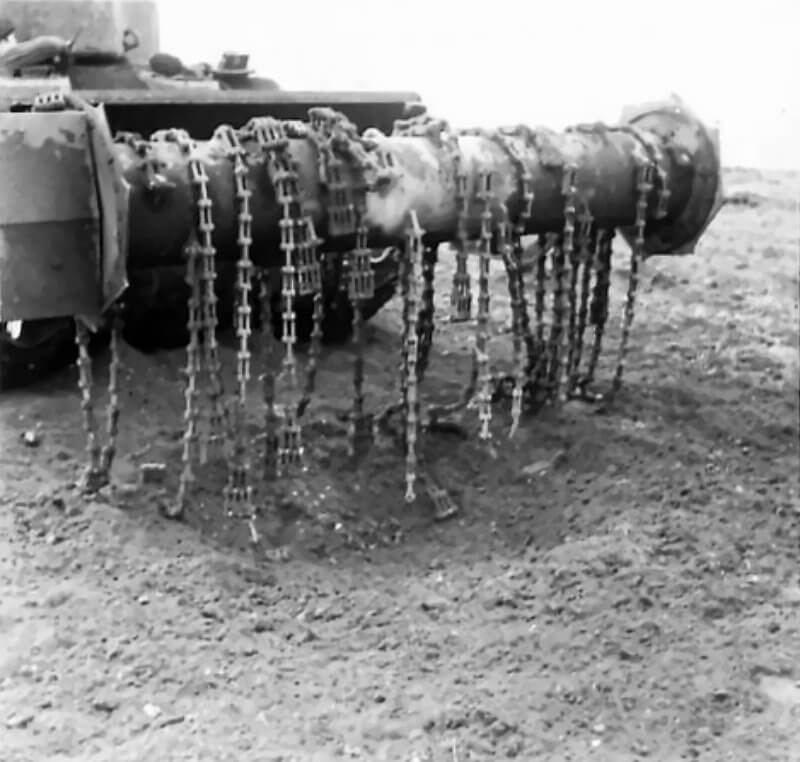
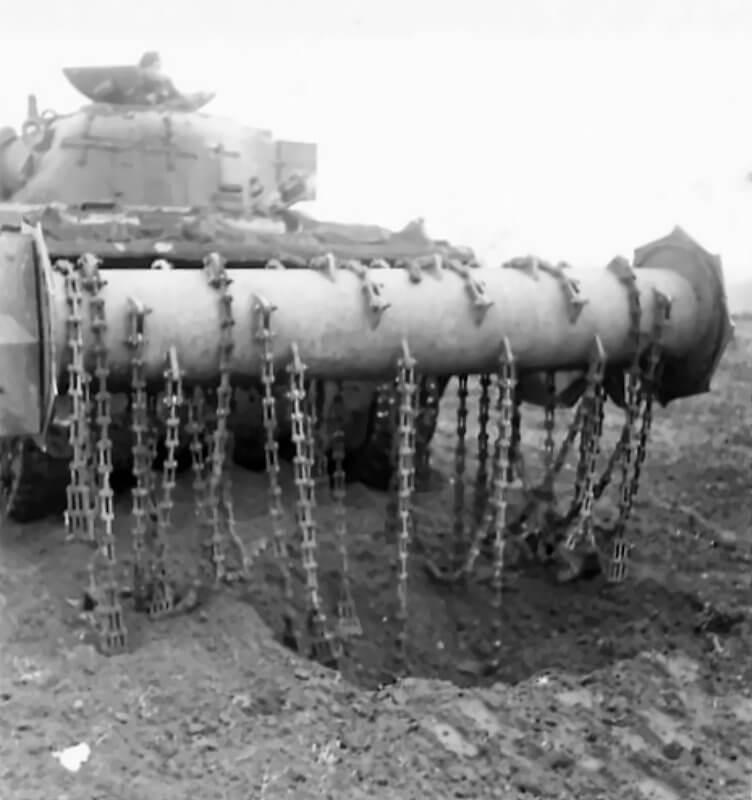
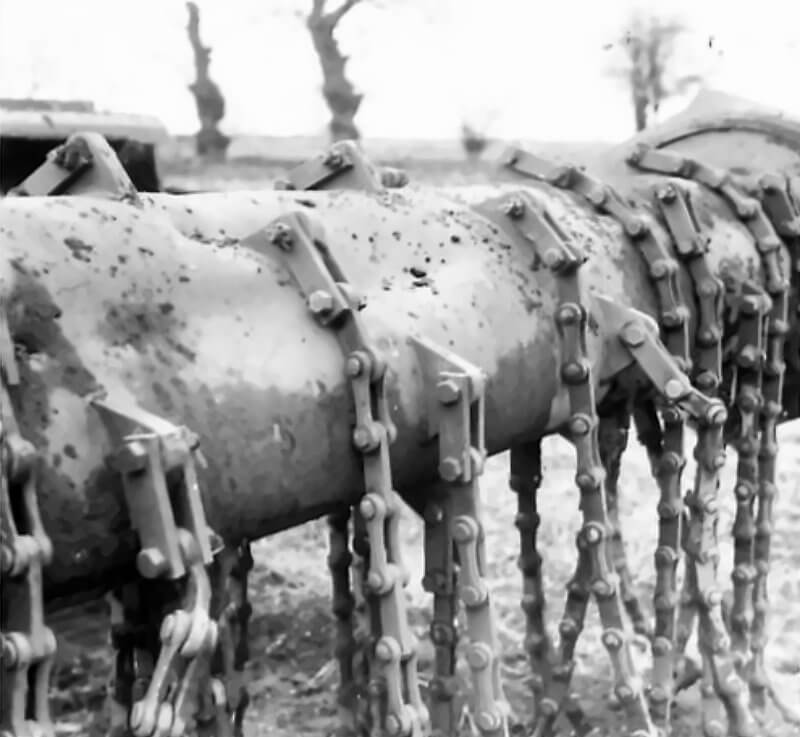
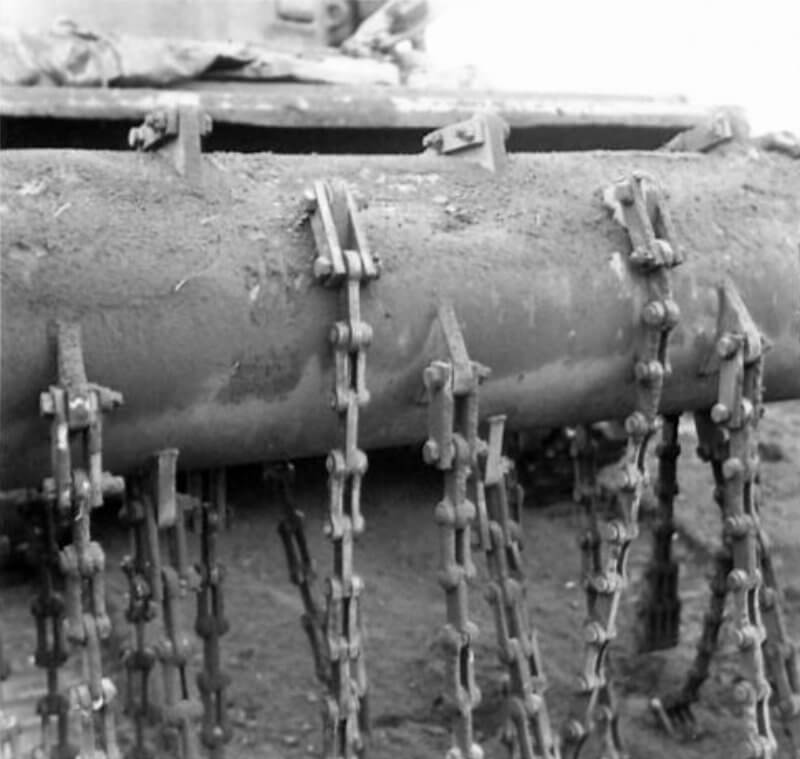
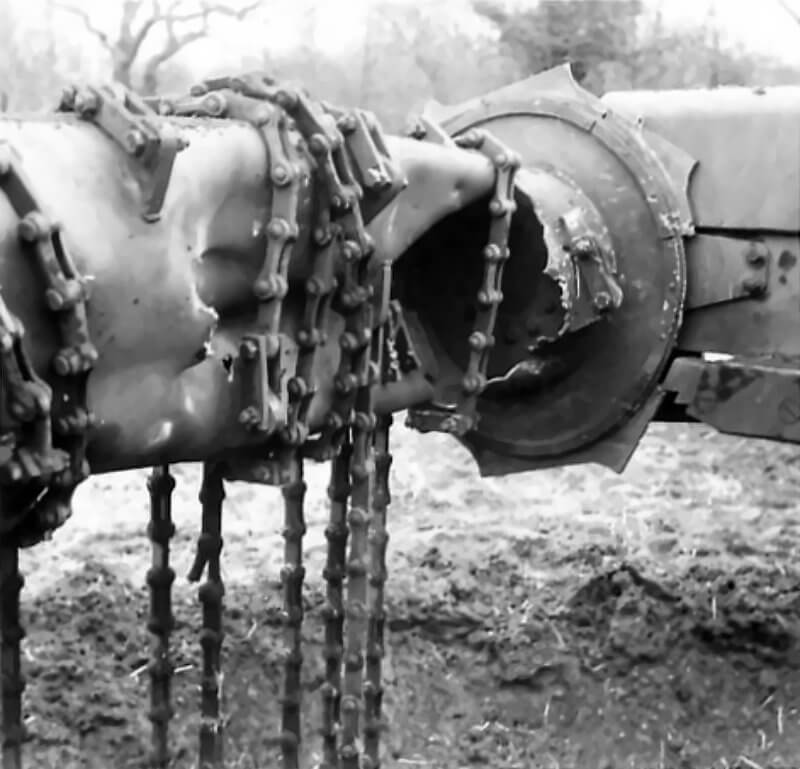
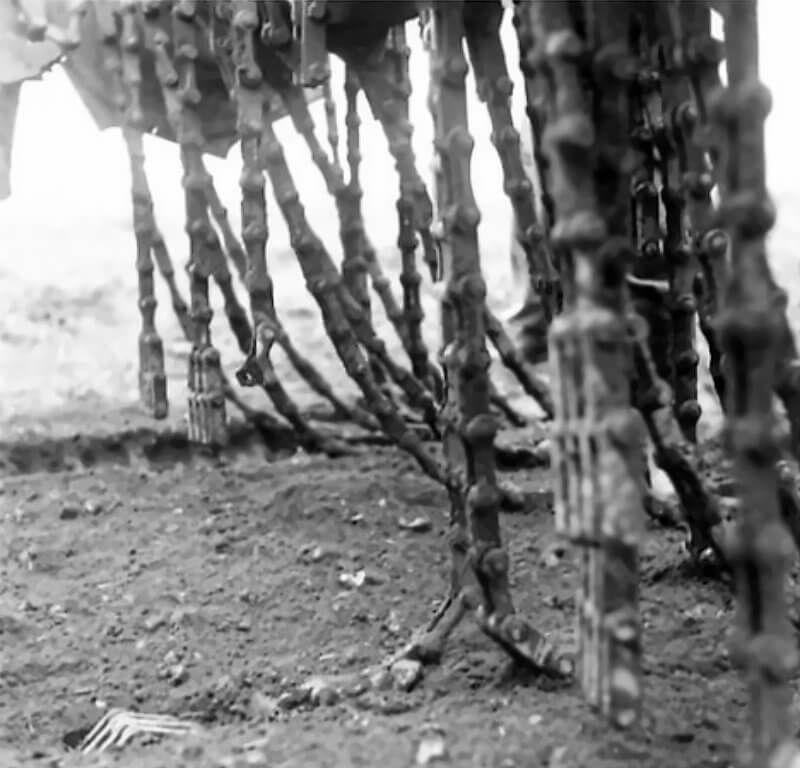
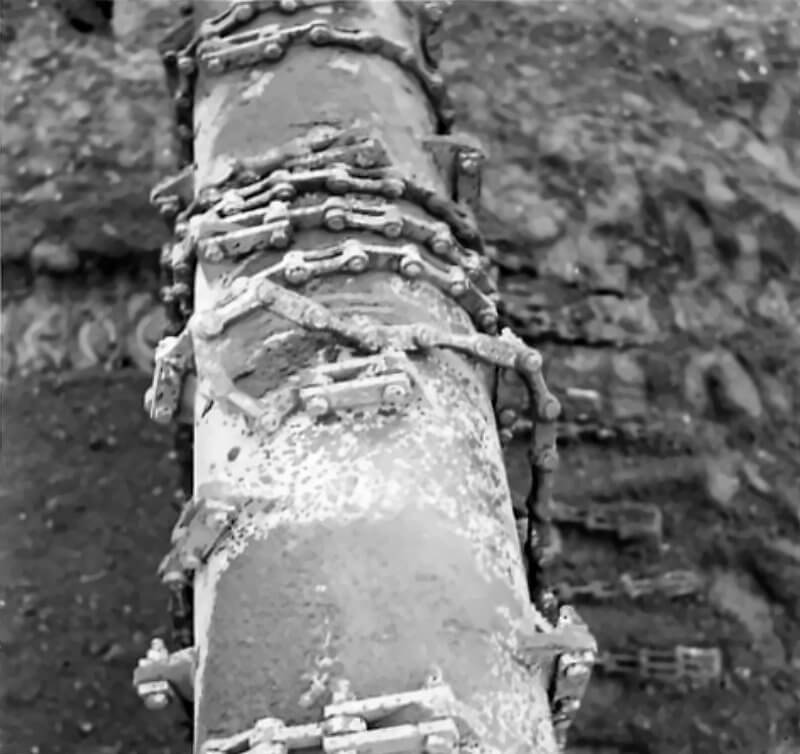
The flail mechanism mounts on two stout arms at the front. A rotating drum spans the width of the tank’s path. Early Crabs carry forty-three chains with weighted tips. These tips strike the ground at about 140 to 150 revolutions per minute. The chain length is chosen so the ends hit just ahead of the tank’s tracks. Hydraulic rams raise or lower the arms in the first production model. Later Crabs, known as the Contouring Crab or Mark II, use a counterweighted jib. This keeps the flail at the correct height automatically by balancing the forces on the drum. The feature helps the flail follow uneven terrain or dips.
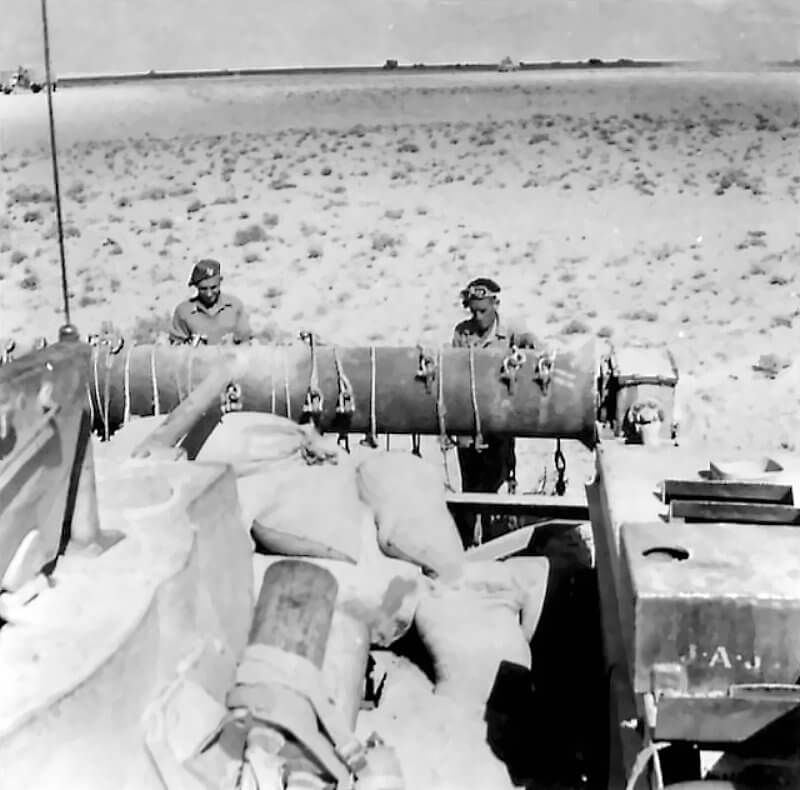
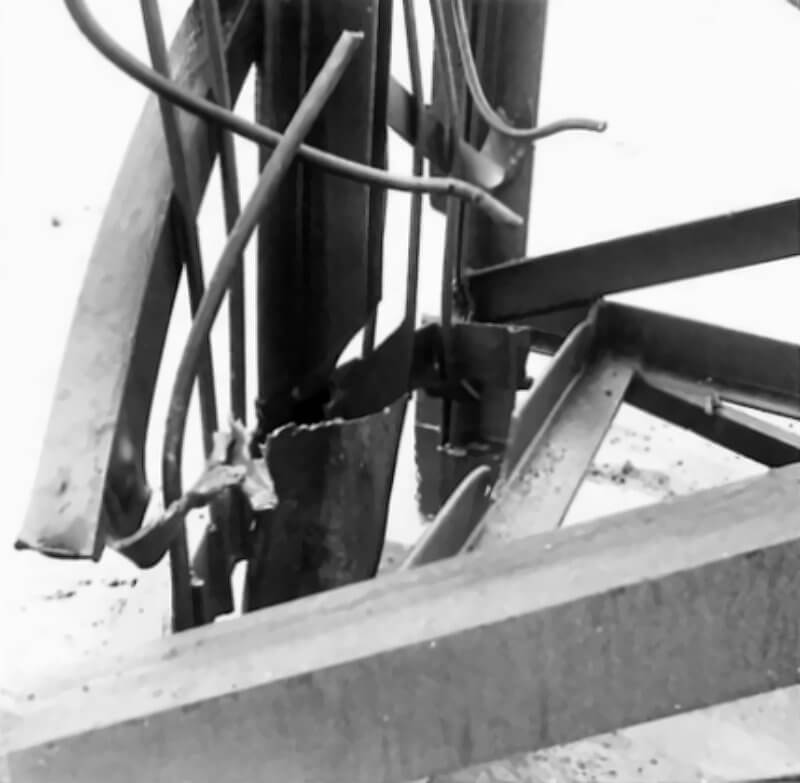
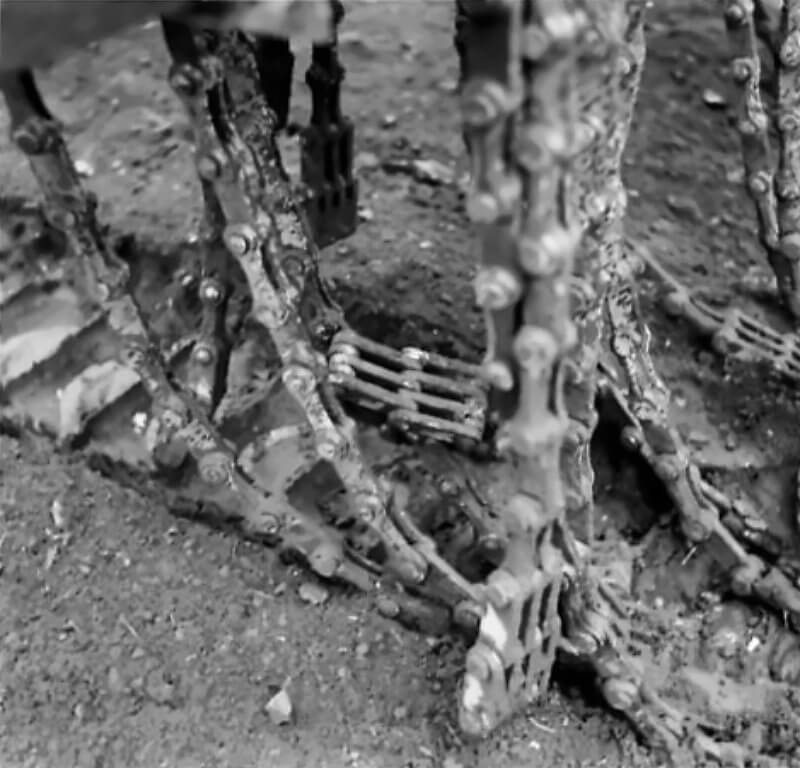
Chain types change as development progresses. Initial Crabs use link-type chains. The preferred product is the Wiggins K-type chain because it resists breakage better than other makes. Later Crabs adopt plate-link flails. These use flat steel plates rather than conventional links. They last longer under blast pressure. Both types rely on expendable ends. Teller mine blasts often snap individual links. Crews carry spare segments so they can repair or extend chains after each run.
The crew works under difficult conditions. Visibility drops severely during flailing. Dust and debris form a thick cloud in front of the tank. The driver uses an auxiliary periscope to see over the dust. Communication inside the tank is essential because the crew cannot rely on external cues. Emergency controls allow either driver or co-driver to halt the drum instantly.
Several auxiliary features support the Crab’s engineering role. Wire cutters sit on the rotor drum. These allow the tank to break through barbed wire without fouling the flails. Many vehicles carry lane-marking devices. These drop chalk powder or release smoke so following troops can see the safe route. Some Crabs also fire short marker poles to outline cleared paths. The main gun is always traversed to the rear while flailing. This protects the barrel and prevents the weapon from pointing into the dust cloud.
The design has limits. The flail clears slowly, and the tank is vulnerable while moving at such low speed. Dust can still blind the crew despite improved optics. Mine blasts regularly destroy flail links. Deeply buried mines may escape contact entirely. The mechanism requires steady maintenance. The forward weight strains the suspension. Even so, the Crab remains compact and reliable compared with earlier flails. The main engine drives all systems, eliminating the external auxiliary motors that caused many Scorpion failures. Retaining the turret gives the Crab defensive power once a lane is cleared.
The technical evolution of the Sherman Crab creates a durable and effective combat engineer vehicle. Its design influences all post-war flail tanks and remains a benchmark in mine-clearing technology.
Lane-marking devices improve the Crab’s battlefield value. Chalk dispensers, smoke markers, and small illuminated poles help following troops identify the safe path. Dust and confusion often obscure mine-free lanes. The Crab’s marking gear ensures that cleared routes remain visible to the units that depend on them. This prevents accidental entry into uncleared ground.
Crew accounts describe the experience of operating a Crab as both frightening and fulfilling. Flailing produces overwhelming noise. The engine roars. Chains slam the ground. Mines explode in rapid succession. The combination creates an almost continuous deafening din. Visibility collapses to almost nothing. Dust and smoke pour across the periscopes. Drivers often navigate by counting seconds or following a compass bearing rather than by sight. Many crews state that they feel a mine detonate only as a slight jolt. The racket usually drowns the sound entirely.
Inside the hull the armour protects the crew. Yet they know that a mechanical failure in a minefield can be fatal. Enemy gunners target flail tanks aggressively because they understand the threat they pose. Despite this, morale in flail units remains high. Crews see their work as lifesaving. They believe that clearing a safe route for others justifies the danger. Some develop a strong sense of elite identity. When officers later suggest removing the flail equipment and reverting the vehicles to standard gun tanks, many Crab crews oppose the idea. They take pride in their specialised role and wish to continue with it.
| Multimedia |
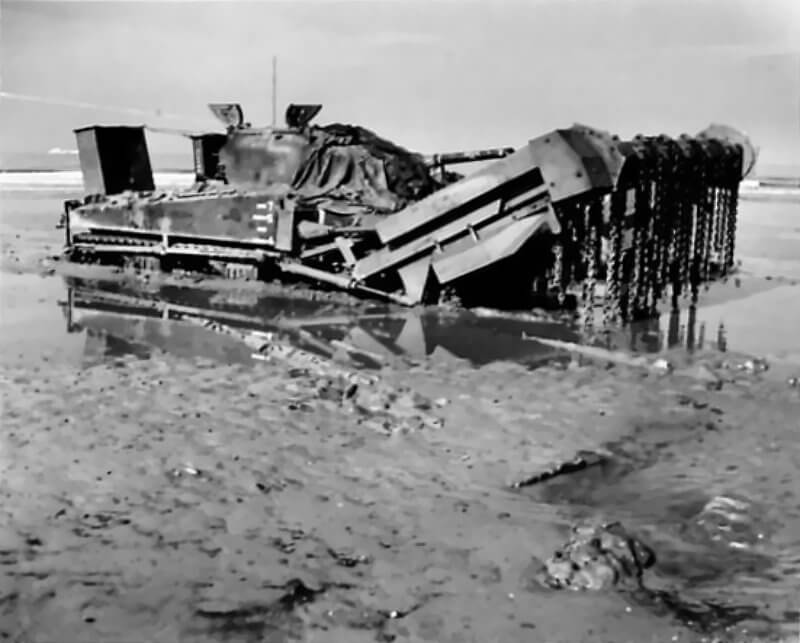
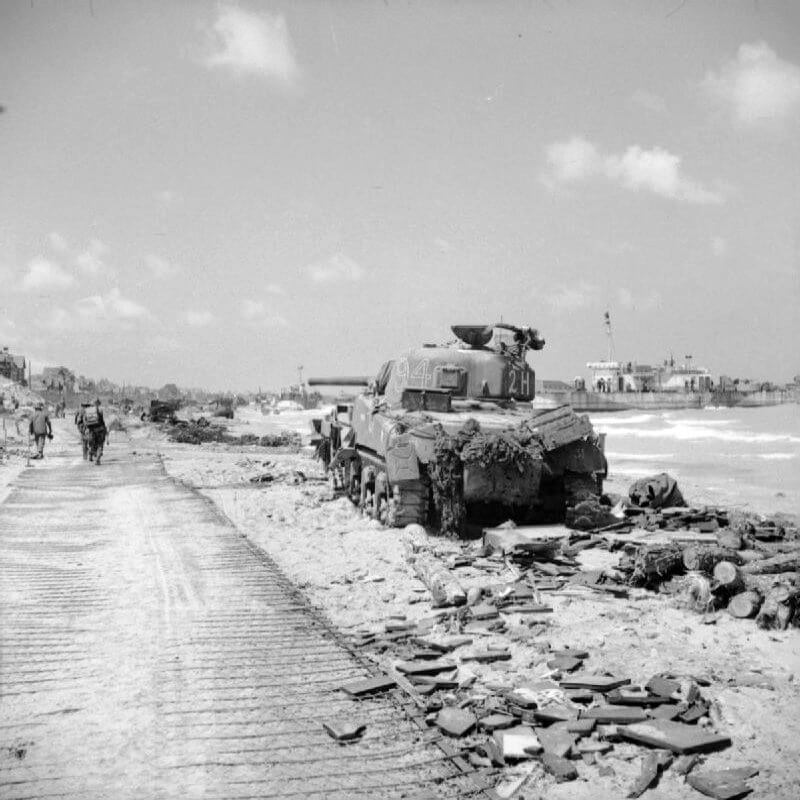
FLAIL TANKS (H 37410) Original wartime caption: Sherman bogged Copyright: ý IWM. Original Source: http://www.iwm.org.uk/collections/item/object/205509204
FLAIL TANKS (H 37416) Original wartime caption: Churchill tank charges on Tetrahedra Defence Post. Copyright: ý IWM. Original Source: http://www.iwm.org.uk/collections/item/object/205509208
FLAIL TANKS (H 37408) Original wartime caption: Sherman tank fitted at Flails at work. Copyright: ý IWM. Original Source: http://www.iwm.org.uk/collections/item/object/205509202
FLAIL TANKS (H 37406) Original wartime caption: Sherman tank fitted at Flails at work. Copyright: ý IWM. Original Source: http://www.iwm.org.uk/collections/item/object/205509200
FLAIL TANKS (H 37407) Original wartime caption: Sherman tank fitted at Flails at work. Copyright: ý IWM. Original Source: http://www.iwm.org.uk/collections/item/object/205509201

FLAIL TANKS (H 37460) Original wartime caption: Flail in operation Copyright: ý IWM. Original Source: http://www.iwm.org.uk/collections/item/object/205509250
FLAIL TANKS (H 37459) Original wartime caption: Flail sunk. Copyright: ý IWM. Original Source: http://www.iwm.org.uk/collections/item/object/205509249
FLAIL TANKS (H 37445) Original wartime caption: Re-rolling mat and the placing of the unrolling ropes. Copyright: ý IWM. Original Source: http://www.iwm.org.uk/collections/item/object/205509235
FLAIL TANKS (H 37450) Original wartime caption: Second mine Copyright: ý IWM. Original Source: http://www.iwm.org.uk/collections/item/object/205509240
FLAIL TANKS (H 37457) Original wartime caption: Double tele mine crater. Copyright: ý IWM. Original Source: http://www.iwm.org.uk/collections/item/object/205509247
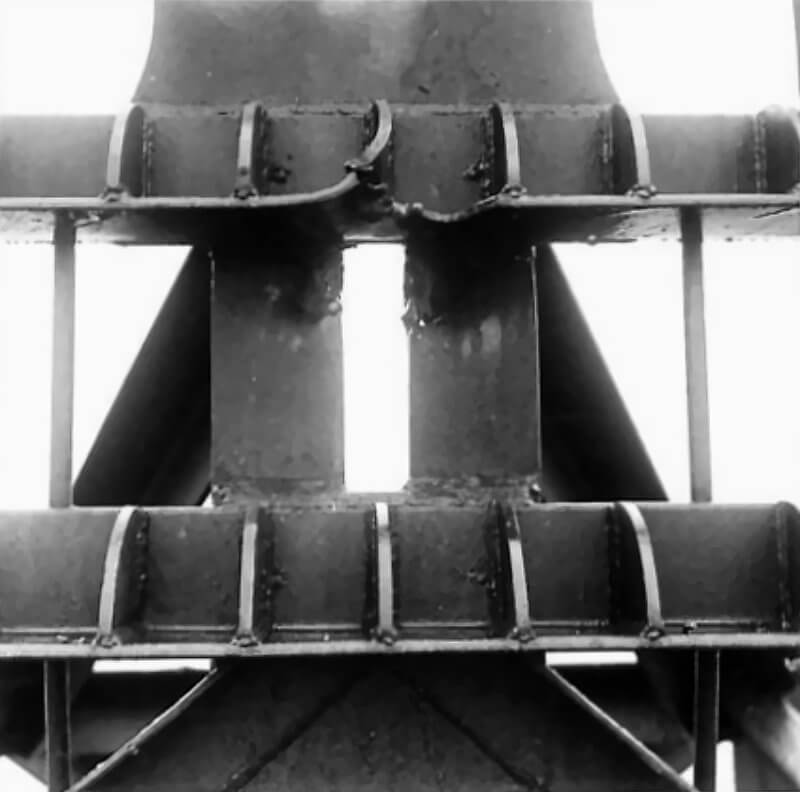
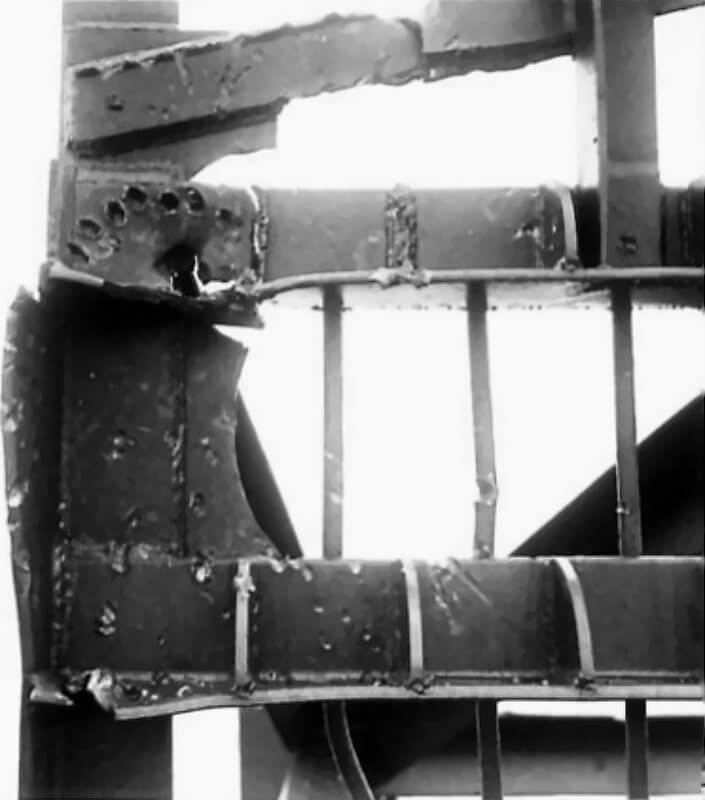
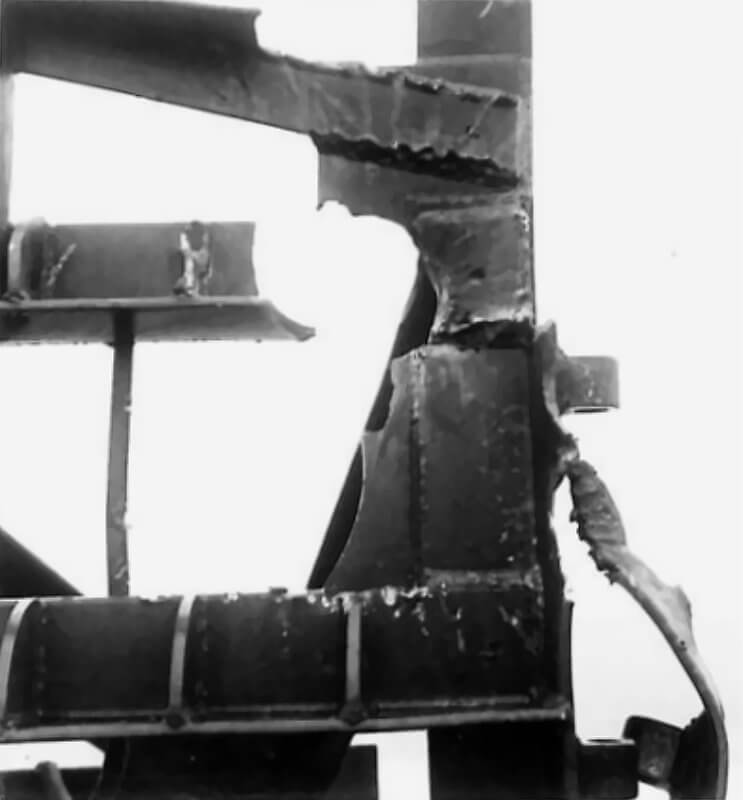
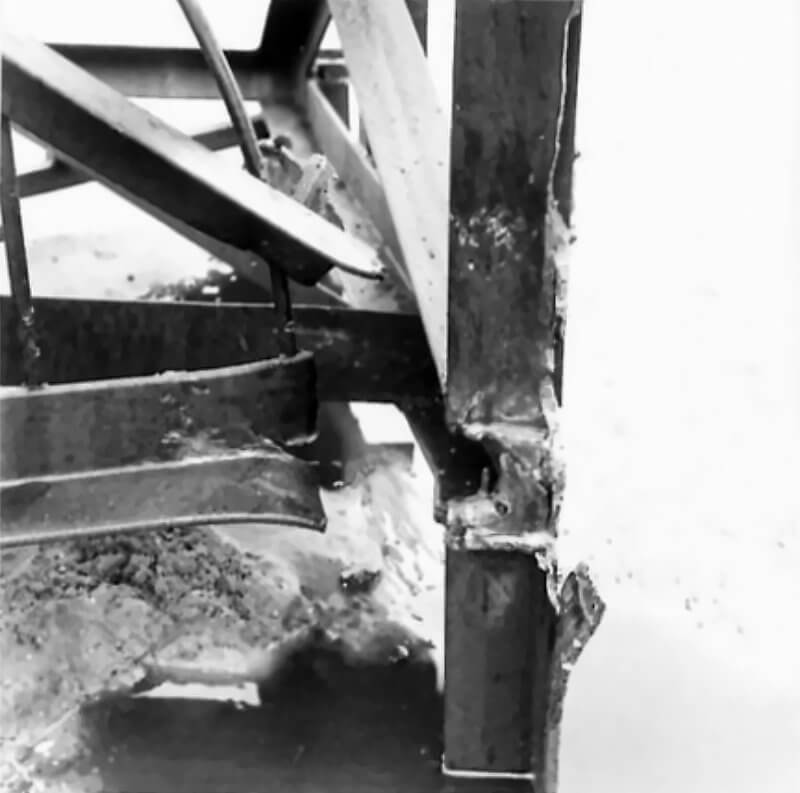
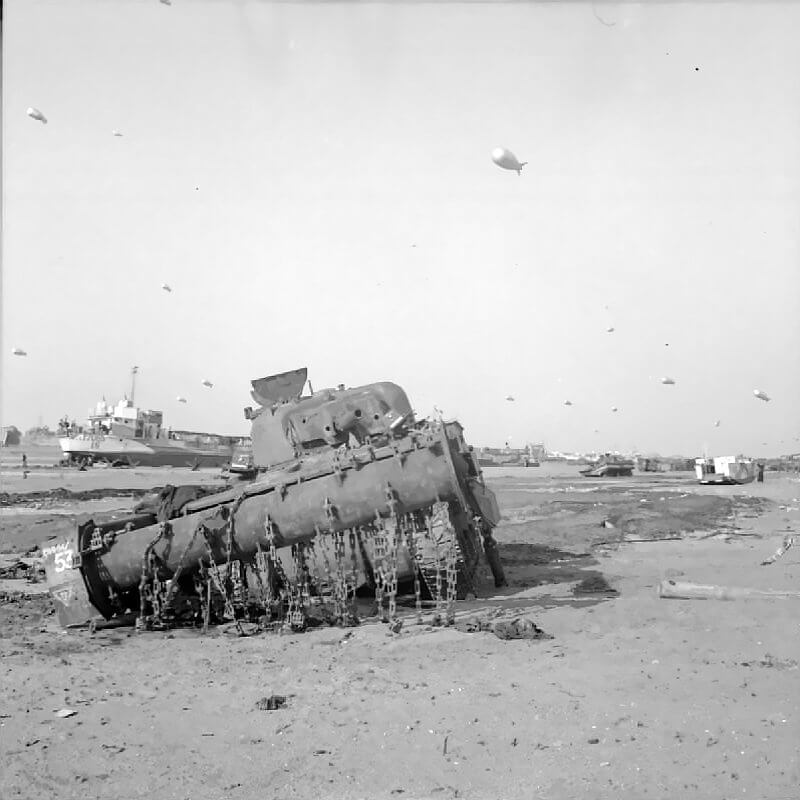
FLAIL TANKS (H 37463) Original wartime caption: Damaged flail after operation Copyright: ý IWM. Original Source: http://www.iwm.org.uk/collections/item/object/205509253
FLAIL TANKS (H 37462) Original wartime caption: Damaged flail after operation Copyright: ý IWM. Original Source: http://www.iwm.org.uk/collections/item/object/205509252
FLAIL TANKS (H 37454) Original wartime caption: 5th mine and flail Copyright: ý IWM. Original Source: http://www.iwm.org.uk/collections/item/object/205509244
FLAIL TANKS (H 37464) Original wartime caption: The ‘Boss’ Copyright: ý IWM. Original Source: http://www.iwm.org.uk/collections/item/object/205509254
FLAIL TANKS (H 37451) Original wartime caption: Flail Copyright: ý IWM. Original Source: http://www.iwm.org.uk/collections/item/object/205509241

FLAIL TANKS (H 37454) Original wartime caption: 5th mine and flail Copyright: ý IWM. Original Source: http://www.iwm.org.uk/collections/item/object/205509244
FLAIL TANKS (H 37452) Original wartime caption: 3rd mine and flail Copyright: ý IWM. Original Source: http://www.iwm.org.uk/collections/item/object/205509242
FLAIL TANKS (H 37453) Original wartime caption: 4th mine and flail Copyright: ý IWM. Original Source: http://www.iwm.org.uk/collections/item/object/205509243

FLAIL TANKS (H 37456) Original wartime caption: Dent from tele mine cleaned Copyright: ý IWM. Original Source: http://www.iwm.org.uk/collections/item/object/205509246
FLAIL TANKS (H 37458) Original wartime caption: Dented Rotor Copyright: ý IWM. Original Source: http://www.iwm.org.uk/collections/item/object/205509248
FLAIL TANKS (H 37455) Original wartime caption: Dent from tele mine. Copyright: ý IWM. Original Source: http://www.iwm.org.uk/collections/item/object/205509245
FLAIL TANKS (H 37461) Original wartime caption: Damaged flail after operation Copyright: ý IWM. Original Source: http://www.iwm.org.uk/collections/item/object/205509251
FLAIL TANKS (H 37449) Original wartime caption: Twisted flail Copyright: ý IWM. Original Source: http://www.iwm.org.uk/collections/item/object/205509239
FLAIL TANKS (H 37448) Original wartime caption: Broken flail Copyright: ý IWM. Original Source: http://www.iwm.org.uk/collections/item/object/205509238
FLAIL TANKS (H 37447) Original wartime caption: Twisted and knotting on flail Copyright: ý IWM. Original Source: http://www.iwm.org.uk/collections/item/object/205509237
FLAIL TANKS (H 37446) Original wartime caption: Explosion of mine Copyright: ý IWM. Original Source: http://www.iwm.org.uk/collections/item/object/205509236
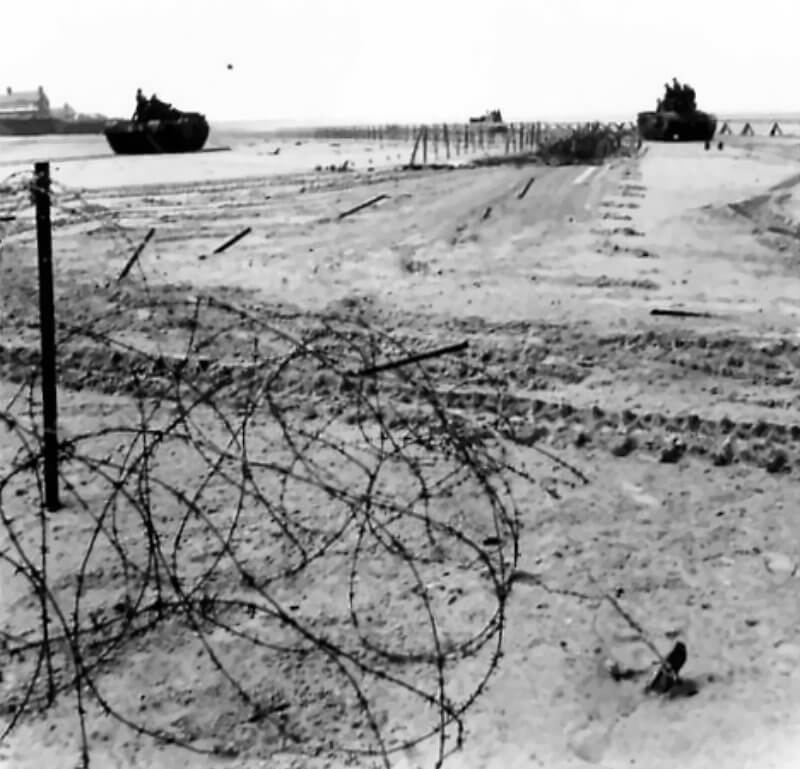
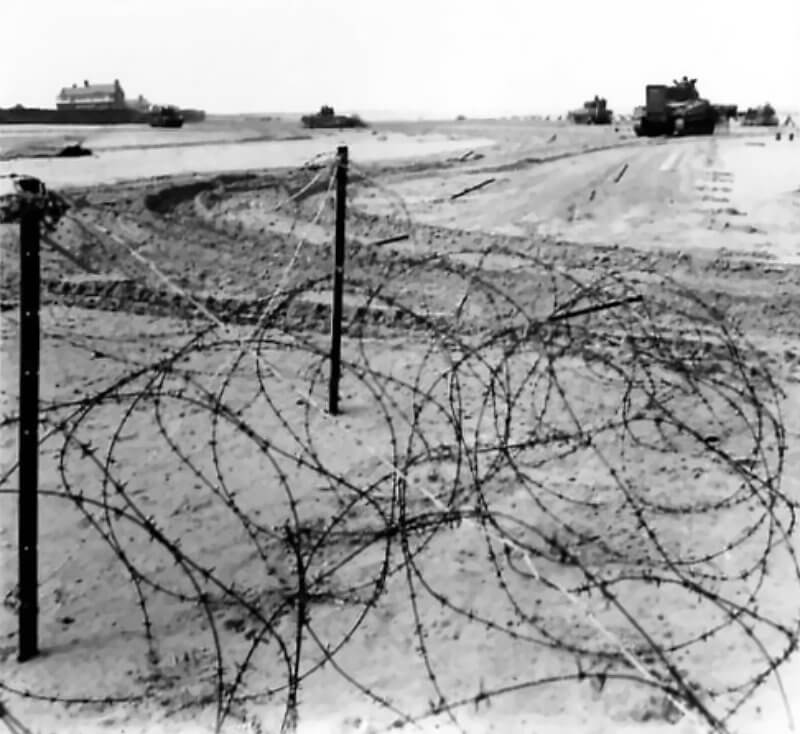
| Crab clearing Beach Obstacles |
FLAIL TANKS (H 37425) Original wartime caption: Loading L.C.T. Copyright: ý IWM. Original Source: http://www.iwm.org.uk/collections/item/object/205509217
FLAIL TANKS (H 37426) Original wartime caption: Assault of L.C.T. and heavy tanks. Copyright: ý IWM. Original Source: http://www.iwm.org.uk/collections/item/object/205509218
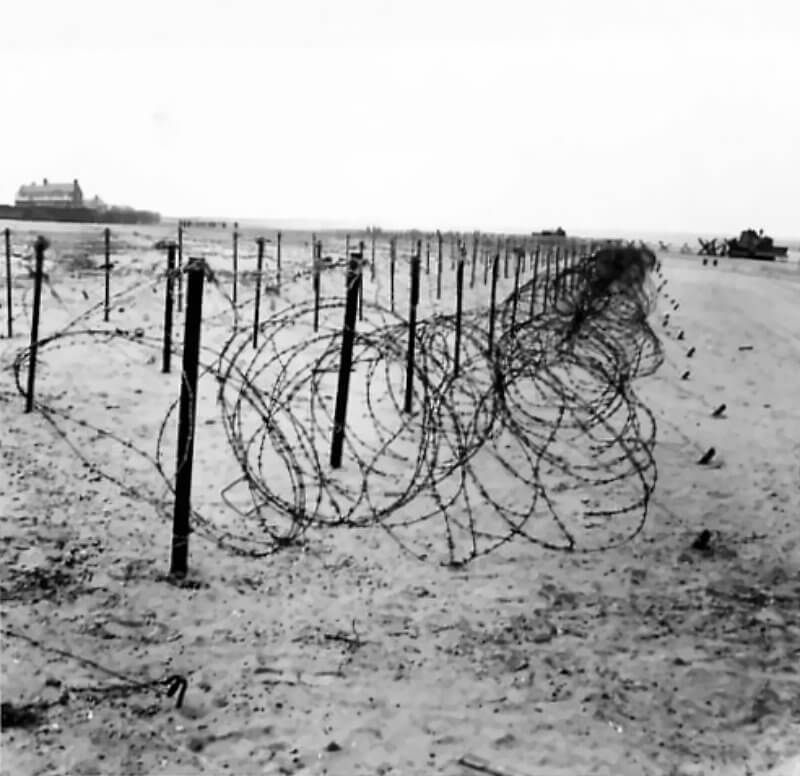
FLAIL TANKS (H 37430) Original wartime caption: Wire entanglement fence Copyright: ý IWM. Original Source: http://www.iwm.org.uk/collections/item/object/205509220
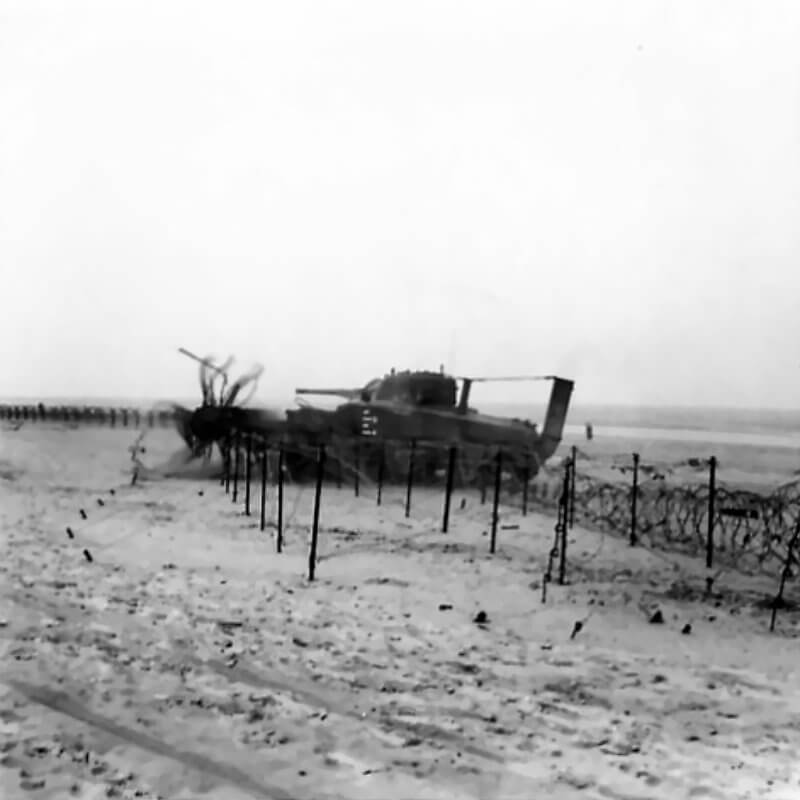
FLAIL TANKS (H 37431) Original wartime caption: Sherman clears road through wire entanglements fence. Copyright: ý IWM. Original Source: http://www.iwm.org.uk/collections/item/object/205509221
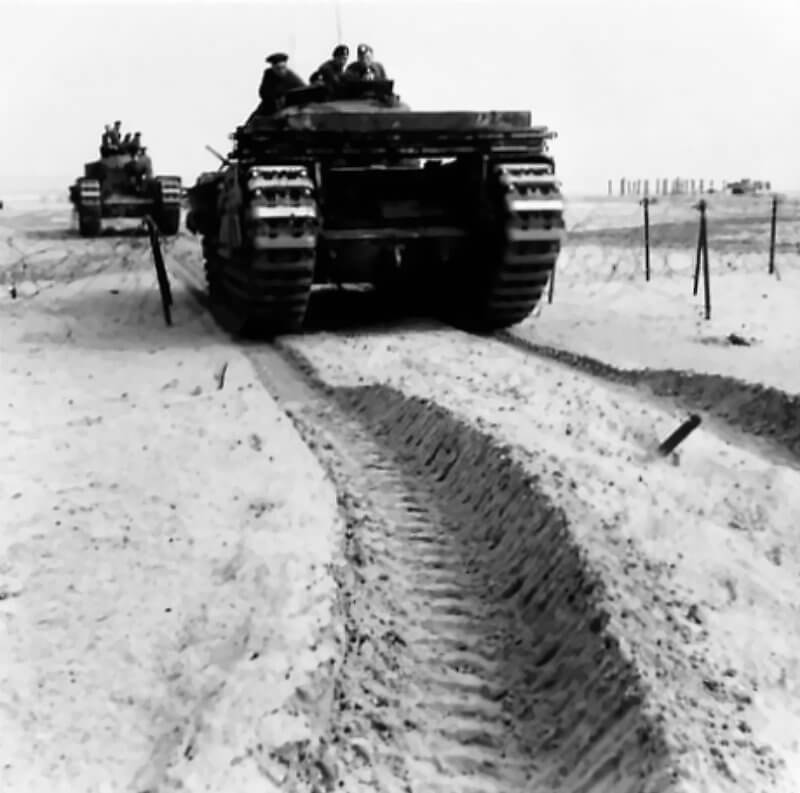
FLAIL TANKS (H 37432) Original wartime caption: Grapels pulled by two Churchills tear down fence. Copyright: ý IWM. Original Source: http://www.iwm.org.uk/collections/item/object/205509222

FLAIL TANKS (H 37434) Original wartime caption: Close up of fence being pulled by grapels. Copyright: ý IWM. Original Source: http://www.iwm.org.uk/collections/item/object/205509224
FLAIL TANKS (H 37433) Original wartime caption: Fence being destroyed. Copyright: ý IWM. Original Source: http://www.iwm.org.uk/collections/item/object/205509223
FLAIL TANKS (H 37435) Original wartime caption: Location of fence. Copyright: ý IWM. Original Source: http://www.iwm.org.uk/collections/item/object/205509225
| The Mine-Flailing Technique in Action |
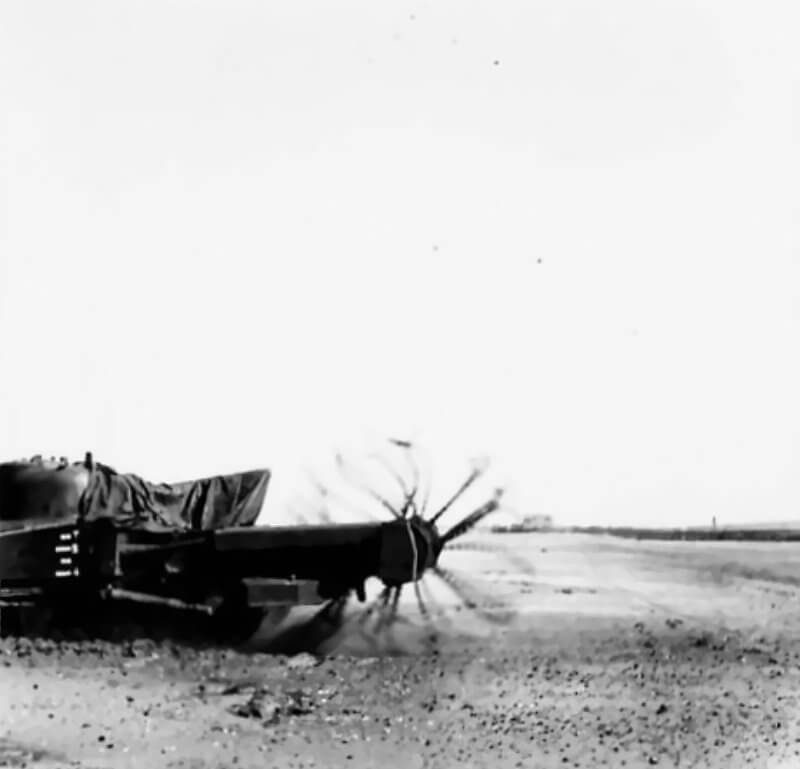
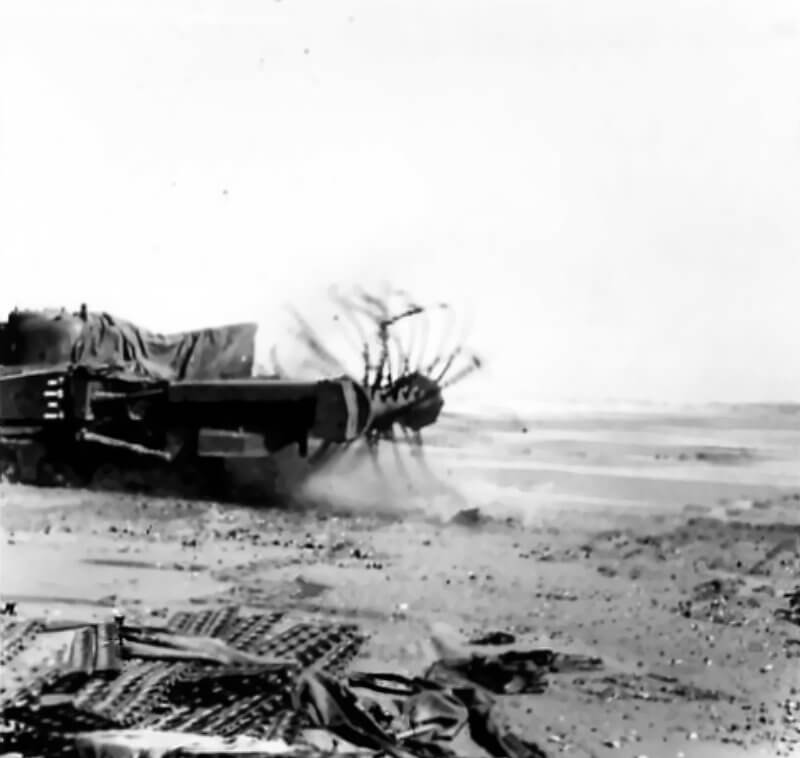
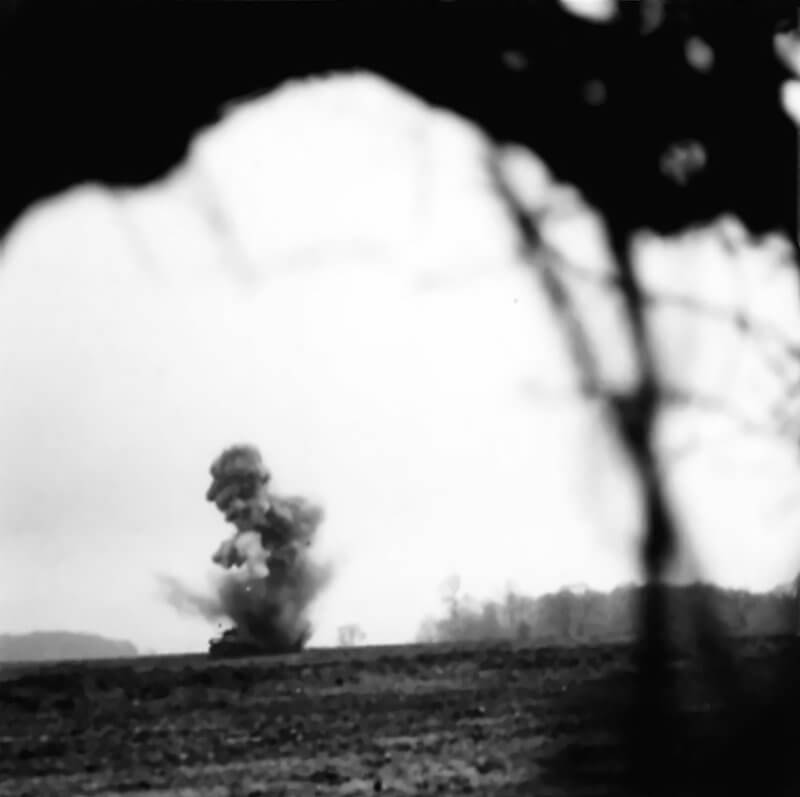
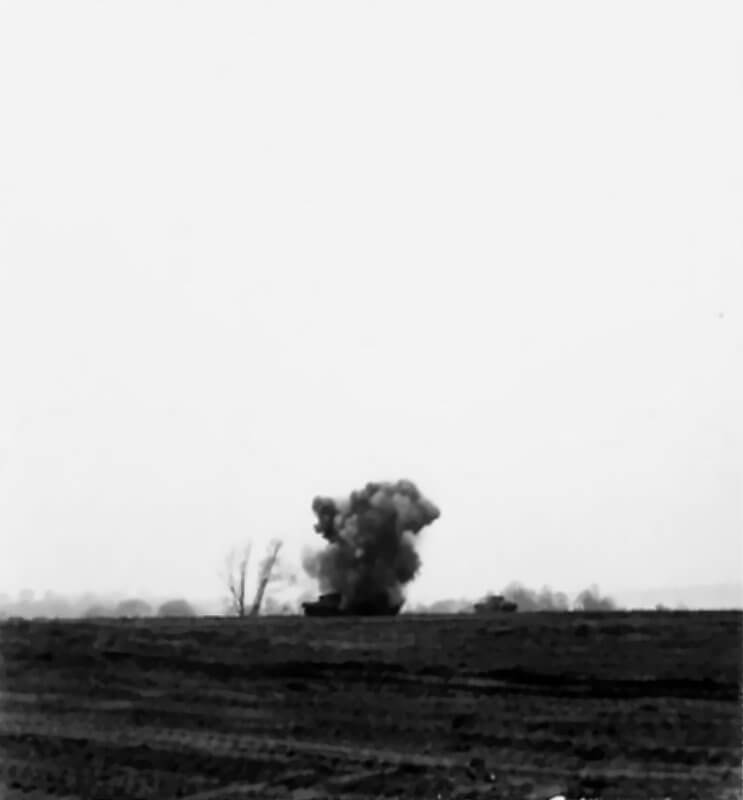
The Crab uses its flail to strike the ground with violent regularity. As the tank moves forward, the rotor spins at high speed. The chains hammer the soil in a rapid rhythm, reaching nearly two hundred strikes each minute. Each weighted chain end hits the earth with force comparable to a footstep or vehicle wheel. Pressure-fused mines respond to this impact and detonate before the tank reaches them.
When a buried anti-tank mine or anti-personnel mine encounters a flail strike, it usually explodes at once. The blast occurs several metres in front of the Crab and close to the surface. The explosion directs most of its force outward or upward. The effect on the tank is slight. Flail links may shear off, but such losses are expected. The armoured drum protects the mechanism, and the blast shield across the bow shields the crew from fragments. The result is a controlled series of explosions that clear a safe route while allowing the tank to continue its advance.
Crabs operate most effectively in groups. By 1944 a typical flail squadron includes three troops of Crabs and one troop of standard Shermans for protection. Each troop begins with four flails, though many later deploy five. A command element coordinates movement, timing, and the marking of cleared lanes.
In action, groups of five Crabs often work together. Three Crabs drive forward in an echelon line and flail parallel lanes. Two more Crabs follow slightly behind on either side. These trailing vehicles provide covering fire and stand ready to replace a disabled lead tank. The formation creates a broad safe corridor and maintains progress even if one vehicle is lost.
Lead vehicles have their turrets traversed to the rear. They cannot fire through the dust cloud, and the gun barrel must be kept clear of the flails. Supporting Shermans or infantry protect the flails from enemy anti-tank teams. The Crabs concentrate solely on their clearing task.
Each Crab marks the lane as it advances. Chalk dispensers, flags, and small lamps show the exact line of safe ground. Following vehicles rely on these markers to avoid drifting into uncleared areas. At night the Crabs use illuminated poles and rear lights for alignment. This prevents gaps between adjacent lanes and ensures continuous coverage across the minefield.
These coordinated methods allow entire minefields to be breached quickly under combat conditions. The system relies on disciplined teamwork, precise positioning, and constant communication. When used correctly, flail teams create safe routes for infantry and armour even under heavy fire.
| Operational Use and Service History |
| Operation Overlord |
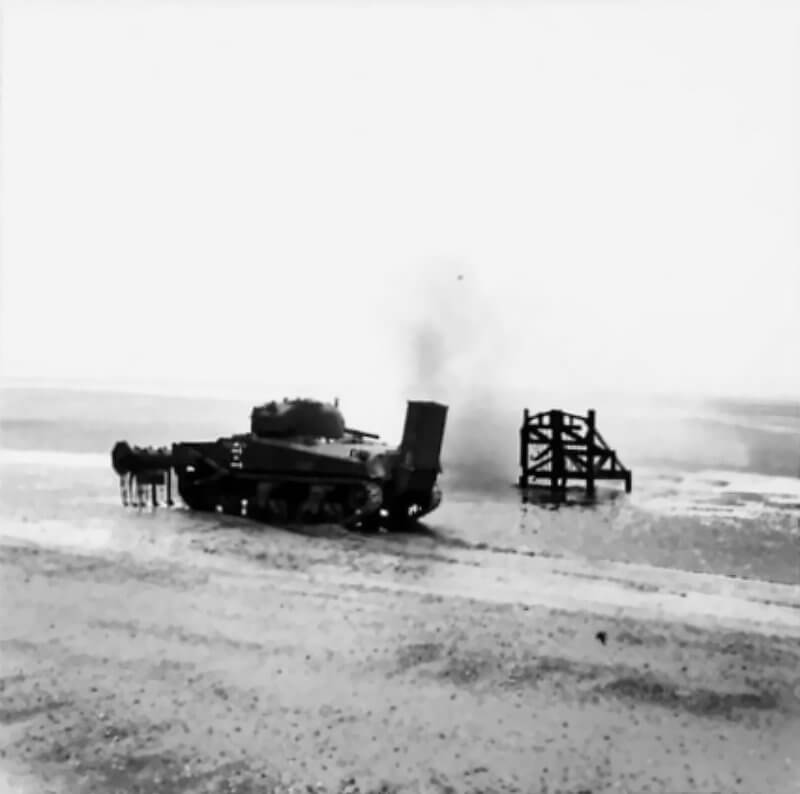
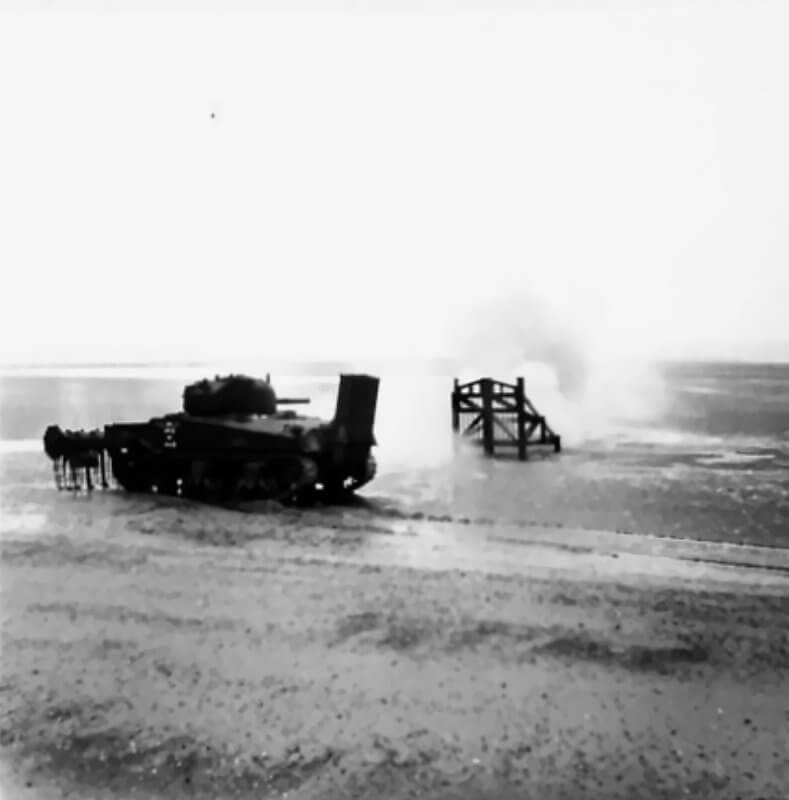
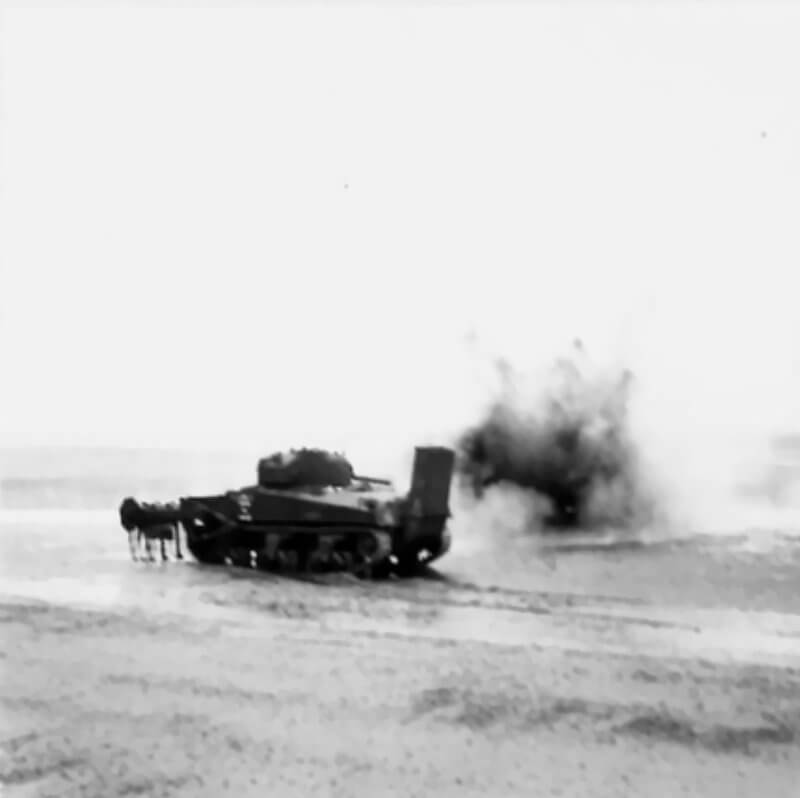
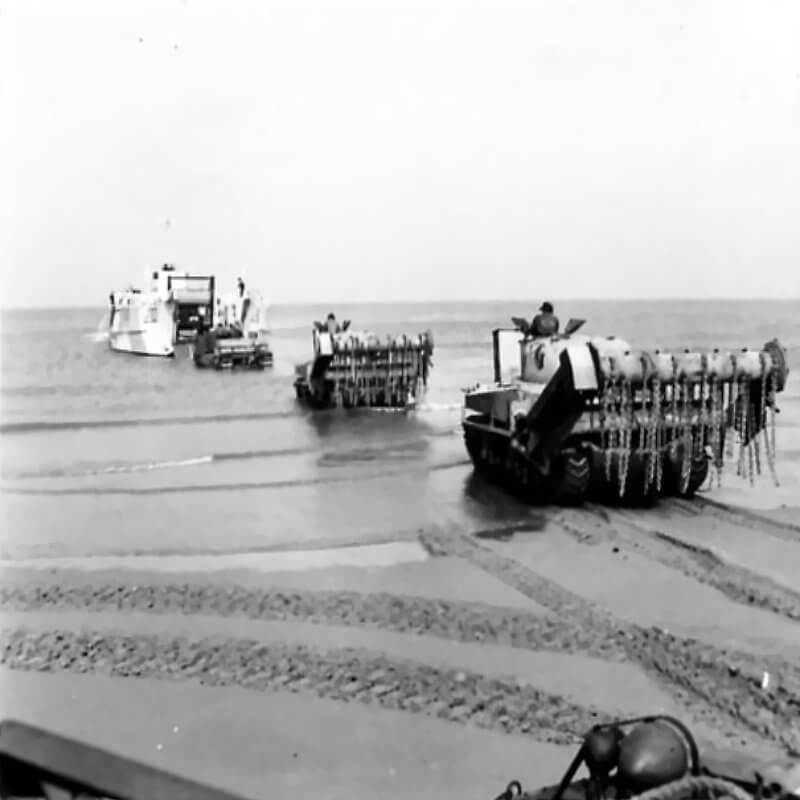
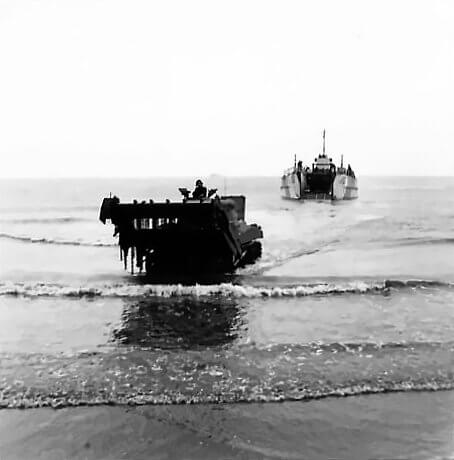
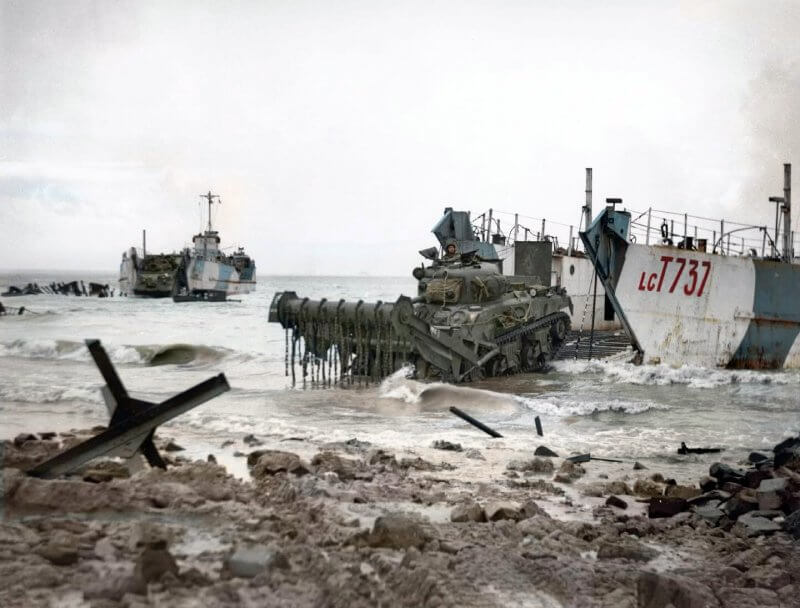
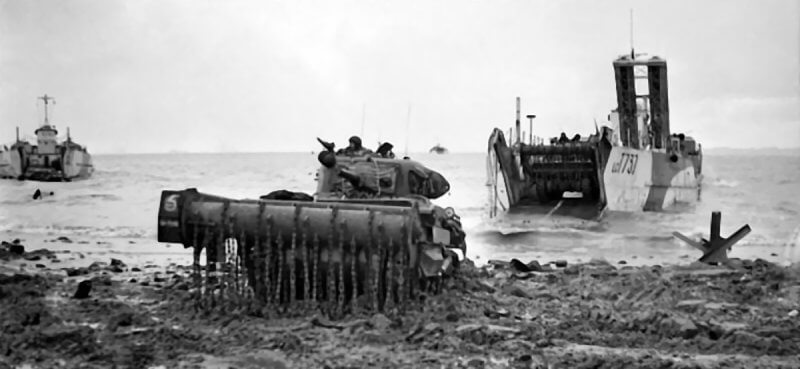
The Sherman Crab enters combat for the first time during Operation Overlord on June 6th, 1944. The flail regiments of the 79th Armoured Division support the British and Canadian landings on Gold, Juno, and Sword Beaches. Between fifty and seventy Crabs are assigned to the first assault waves. These vehicles belong to the 30th Armoured Brigade. The Westminster Dragoons land on the King sector of Gold. The 22nd Dragoons land on Sword. The 1st Lothians and Border Horse land on Juno. Each regiment must clear several lanes through beach obstacles and mined dunes so infantry and vehicles can leave the sand.
Conditions on D-Day make their task extremely difficult. Heavy seas, strong wind, and accurate German fire affect the landings. Some Crabs arrive by landing craft and begin flailing at once in waterlogged sand. On Sword Beach several Crabs open narrow paths through wire and mine belts under fire. On Juno Beach deep flooding delays the flails, forcing crews to wait until the water recedes enough to operate safely.
Gold Beach presents the hardest challenge. German positions are strong and cover every approach. The Westminster Dragoons begin clearing lanes for the 50th Infantry Division soon after landing. By the afternoon they have opened several routes despite casualties and mechanical losses.
Crews also discover that flailing loose sand creates deep craters. These holes hinder following vehicles. Engineers therefore use explosive charges to breach parts of the beach where possible during the early tide. Once the beachhead stabilises the Crabs move inland with the infantry and armour. They continue flailing along hedgerows, tracks, and fields that the Germans have mined heavily. On D-Day plus one and plus two they open vital routes into the hinterland and support the expanding foothold, proving that the flail concept works beyond the beaches as well as upon them.
| Multimedia |
| Northwest Europe Campaign |
After Normandy the Sherman Crab becomes a constant presence in British and Canadian operations. Whenever minefields threaten progress, the 30th Armoured Brigade provides flail support. Its three flail regiments move between corps as required. Their Crabs accompany infantry and armour during every major advance from the summer of 1944 to the final battles of 1945.
In July 1944 the fight for Caen intensifies. Flails take part in Operations Charnwood and Goodwood. At the start of Goodwood on 18 July, lines of Sherman Crabs advance ahead of British armour east of the city. A well-known photograph shows infantry riding on the tanks as they move towards the attack. The Crabs break through the mine belts rapidly. Their work prevents delays that could stall the momentum of VIII Corps.
Later in the autumn, Canadian units rely on flails during the Battle of the Scheldt. The landscape consists of flooded polders with only narrow strips of dry ground. German forces seed these routes with mines. The Crabs clear safe paths for the infantry and engineers, allowing the advance to continue despite the waterlogged terrain.
In early 1945 the Crabs see heavy service in Operation Veritable. The fighting in the Reichswald forest is slow and muddy. The Siegfried Line defences include minefields, wire, and obstacles along forest tracks. Flails open lanes for the assault units and work in deep mud under constant threat from German fire.
Flails even operate in built-up areas. During the battle for Overloon in October 1944, Crabs from the 22nd Dragoons clear a mined anti-tank ditch under fire. Their work allows Allied armour to enter the town. One Crab, commanded by Lieutenant Bill Hall, flails across a narrow causeway while under continuous German fire. Its chains cut through mines and wire as Hall’s troop presses forward. His troop then silences enemy positions and plays a decisive role in securing the objective. Hall receives the Military Cross for his actions.
These operations show the extreme demands placed on flail crews. They must advance slowly, exposed to observation, while detonating mines only metres ahead of the vehicle. The work requires nerve, precision, and determination. Flail tank crews meet these demands repeatedly across Northwest Europe and help ensure that Allied advances continue despite the German reliance on mines.
By early 1945 German forces rely less on prepared minefields. Their ability to construct large defensive belts diminishes as the war turns against them. The role of the Sherman Crab therefore begins to change. Instead of breaching enemy positions, many Crabs now clear mines in newly captured areas. Their work makes ground safe for supply routes, headquarters, and occupation forces.
There is discussion within the British Army about removing the flail equipment from some Crabs and restoring them to standard gun-tank configuration. The idea never progresses before the end of the war. All British Crabs remain with the 79th Armoured Division until Germany surrenders. After victory in Europe the division is broken up, but its influence remains clear. Its specialised vehicles shape the future of British armoured engineering.
The flail concept does not fade after 1945. In 1948 the Royal Commission on Awards to Inventors recognises Captain Abraham S. J. du Toit pioneering contribution. He receives an award of £13,000. The British develop the Churchill Toad in the 1950’s, a flail tank directly inspired by the Crab. Other nations also pursue similar designs. The Soviet Army experiments with its own flail systems. In Japan engineers build a prototype called the Type 97 Chi-Yu, using a modified Chi-Ha tank and adopting principles from the Crab. The wartime success of the Sherman Crab therefore spreads well beyond the conflict that created it and establishes the pattern for post-war mine-clearing vehicles worldwide.
| Multimedia |
| Sources |
Hobart’s funnies always triggered my late husband’s interests. Nice to read about it. Thank you.