| Page Created |
| February 6th, 2025 |
| Last Updated |
| February 10th, 2025 |
| Italy |
 |
| Related Pages |
| Avviso Veloce Diana Motoscafi Armati Siluranti Motoscafo Turismo Silurante Motoscafo Turismo Modificato Motoscafo Turismo Lento Siluro a Lenta Corsa |
| July 26th, 1941 – July 27th, 1941 |
| Operazione Malta 2 |
| Objectives |
- attack against Valletta’s naval base to destroy British naval and submarine assets within the harbour.
| Operational Area |
| Allied Forces |
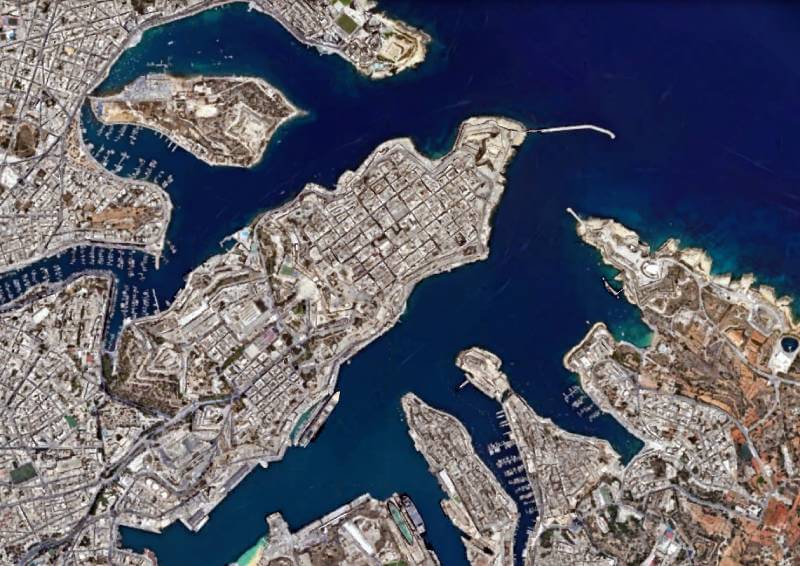
- Valleta Harbour, Malta
- GM 1 Convoy
- Sydney Star
- Durham
- Port Chalmers
- Melbourne Star
- City of Pretoria
- Deucalion
- Marsa Muscetto submarine base
- GM 1 Convoy
| Axis Forces |
- Xa Flottiglia MAS
- Avviso Veloce Diana, commanded by Capitano di Corvetta Mario Di Muro, carrying nine MT’s and towing an Motoscafo Turismo Lento with two Siluro a Lenta Corsa.
- The crew for MTS is:
- Capitano di Corvetta Giorgio Giobbe
- Scalatore Leonildo Zocchi
- Scalatore Luigi Costantini, responsible for MT guidance
- The crew for the nine MT’s are:
- Sottotenente di Vascello Carlo Bosio
- Sottotenente di Vascello Roberto Frassetto
- Sottotenente Armi Navali Aristide Carabelli
- Capo di 1ª Classe Motorista Navale Fiorenzo Capriotti
- Capo di 2ª Classe Motorista Navale Alessandro Follieri
- Capo di 2ª Classe Incursore Enrico Pedrini
- Nocchiere di 3ª Classe Pietro Zaniboni
- Sergente Vittorio Marchisio
- Capo di 2ª Classe Motorista Vincenzo Montanari
- Motoscafo Turismo No. 1: Sottotenente di Vascello Carlo Bosio, charge set to detonate at 5 metres depth.
- Motoscafo Turismo No. 2: Sottotenente di Vascello Roberto Frassetto, charge set to detonate at 1.5 metres depth.
- Motoscafo Turismo No. 3: Sottotenente di Anno Aristide Carabelli, charge set to detonate at the surface.
- Motoscafo Turismo No. 4: Vittorio Marchisio,charge set to detonate at 5 metres depth.
- Motoscafo Turismo No. 5: Capo 2a Classe Vincenzo Montanari
- Motoscafo Turismo No. 6: Capo 2a Classe Alessandro Follieri
- Motoscafo Turismo No. 7: Capo 2a Classe Enrico Pedrini
- Motoscafo Turismo No. 8: Capo 3a Classe Pietro Zaniboni
- Motoscafo Turismo No. 9: Capo 3a Classe Fiorenzo Capriotti
- MAS 452, commanded by Tenente di Vascello Giobatta Parodi, tasked with MTS recovery, carrying Mission commander Capitano di Fregatta Moccagatta and Tenente di Vascello Bruno Falcomatà.
- MAS 451, commanded by Sottotenente di Vascello Giorgio Sciolette, assigned to the second phase of MTL towing.
- Motoscafo Turismo Lento, commanded by Scalatore Tindaro Paratore, carrying two Siluro a Lenta Corsa’s.
- SLC No. 1: Maggiore del Genio Navale Teseo Tesei and 2° Capo Alcide Pedretti, tasked with breaching the wire mesh obstruction under Saint Elmo Bridge.
- SLC No. 2: Tenente di Vascello Franco Costa and Sergente Luigi Barla, assigned to attack the Marsa Muscetto submarine base.
- Capitano di Corvetta Vincenzo Martellotta (Reserve)
- Capitano di Corvetta Gastone Bertozzi (Reserve)
- Tenente di Vascello Pietro Miniat (Reserve)
- Guardiamarina Vittorio Pinto (Reserve)
- Capo 3a Classe Mario Marino (Reserve)
- Capo 3a Classe Francesco Malfa (Reserve)
- Corrado Gianni (Reserve)
| Operation |
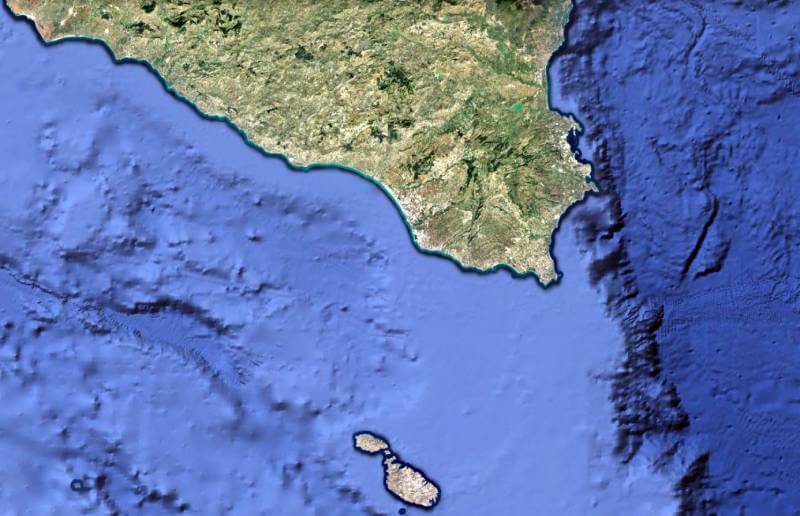
By 1941, Malta serves as a key Allied stronghold in the Mediterranean, disrupting Axis supply lines to North Africa. The island endures relentless aerial bombardment from the Regia Aeronautica and the Luftwaffe. Its supply situation grows increasingly dire. Britain must keep Malta operational to continue threatening Axis convoys to Libya, supporting the wider war effort in North Africa. Valetta Harbour is the major harbour in Malta. Valletta Harbour is divided by a peninsula on which the city of Valletta is situated. To the north lies Marsamxett Harbour, which serves as the location of the submarine base, while to the south, Grand Harbour accommodates both the primary naval base and the commercial docks. In 1941, the entrance to Grand Harbour is heavily fortified, with Fort Saint Elmo positioned at the tip of the Valletta peninsula and Fort Ricasoli standing on the eastern side of the entrance. The harbour is further protected by breakwaters extending from both forts. The distance between St Elmo and Ricasoli is approximately five hundred metres.
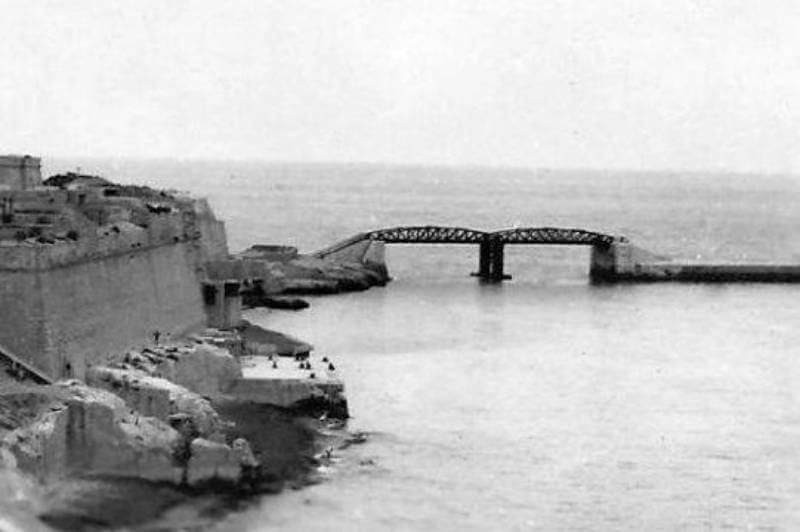
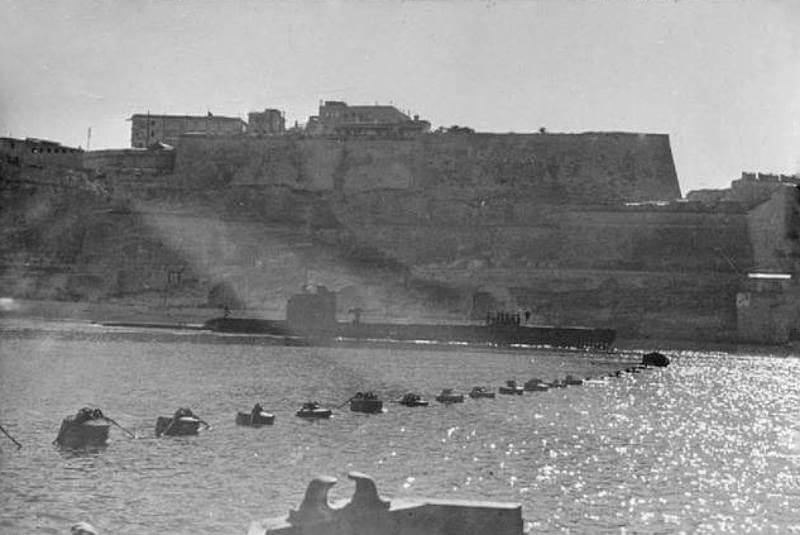
The eastern breakwater, shorter in length, terminates at the rocks beneath Fort Ricasoli. In contrast, the longer western breakwater features a 70-metre gap near the shore beneath Fort St Elmo, allowing passage for small vessels. A bridge spans this gap, supported by a central pylon. Suspended from this bridge is a steel torpedo net, extending from the structure down to the seabed, acting as a defensive barrier against enemy craft. The primary entrance to Grand Harbour, located between the breakwaters, is further obstructed by a boom that stretches from the inner side of St Elmo to the extremity of the breakwater on the Ricasoli side.
The entrance to the harbour is defended by two artillery positions equipped with 56-millimetre guns. Fort Saint Elmo is armed with five of these guns, while Fort Ricasoli has three. Each gun position is designated by a letter, with those at Fort Ricasoli marked as A, B, and C, while the positions at Fort Saint Elmo are labelled D, E, F, G, and H. These defensive emplacements are strategically arranged to provide comprehensive coverage of the harbour’s entrance, ensuring no blind spots remain.
The Fort Saint Elmo’s guns, are operated by the 3rd Coastal Battery of the Royal Malta Artillery under the command of Colonel Henry Ferro. Meanwhile, Fort Ricasoli’s guns, are manned by the 1st Coastal Battery of the same regiment. The artillery emplacements are positioned along the bastion walls, approximately 18 metres above sea level, providing a commanding vantage point over the harbour entrance. In addition to these defences, numerous searchlights are stationed throughout the area, ensuring visibility of approaching threats during night-time operations. In addition to the artillery, machine-gun emplacements are established on the rocky outcrops, and searchlights are positioned on the forts to illuminate targets. The machine-gun posts are operated by soldiers from the 1st Battalion, The Cheshire Regiment.
Six-pounders guns are added to the defences and are initially intended to be equipped with a fire control director. However, the vessel transporting this vital equipment is lost, leaving the guns under local control. To enhance their effectiveness during nocturnal engagements, the 6-pounders are supplied with specialised anti-flash ammunition, designed to reduce muzzle flare and prevent the gunners from being temporarily blinded. However, this measure also results in significant clouds of smoke, which can obscure visibility for the defenders. The defensive strategy at the harbour entrance assigns specific zones to each 6-pounder gun, ensuring that no area is left undefended. Gun crews are instructed to fire only within their designated zone, unless their assigned sector is clear, preventing overlapping fire and ensuring an efficient response to any incursion.
Capitano di Fregatta Vittorio Moccagatta, commanding the Xa Flottiglia MAS, recognises the potential of slow-moving torpedoes and explosive motorboats (MTM) in an attack on Malta’s harbour. To assess their viability, he compiles a detailed report for Admiral de Courten and initiates a series of reconnaissance missions in the waters surrounding Valletta.
In April 1941, following the success of the motorboats at Suda Bay in March, the Xa Flottiglia MAS receives orders to plan an attack on Malta, initially scheduled for March 26th, 1941. Based on this plan, the deployment of a group of assault aircraft and vessels begins in May at Augusta, Sicily, first operating on the surface and later incorporating underwater assets.
The initial plan, known as Operazione Malta 1, relies solely on surface vessels. However, due to limited available resources, with eight vessels already deployed in the Aegean, six of which were used at Suda Bay and never returned to Mainland Italy, underwater vehicles are added to the mission. The decision to include these assets aims to clear obstacles without sacrificing one or two motorboats for this purpose.
| May 26th, 1944 |
The first reconnaissance mission takes place on the night. On his return, Capitano di Fregatta Moccagatta submits his findings to Admiral de Courten, outlining his observations. He notes that approaching the island using auxiliary engines does not trigger an alarm. Additionally, he remarks that the westerly swell diminishes significantly near the island due to natural shelter, and wind conditions remain entirely calm.
| June 26th, 1944 |
A month later, on the night of, a second reconnaissance mission is carried out using MAS 451 and 452. This time, MT pilots accompany the mission along with a German war correspondent. The objective is to assess potential approach routes and defensive positions before the full-scale attack. The approach is repeatedly interrupted by Malta’s defensive measures, including searchlights, bomb detonations, and anti-aircraft fire. Despite this, the MAS vessels advance to within three thousand metres of the coast, getting close enough to make out the bastions in the dim light. By 07:35 the following morning, the vessels successfully return to Augusta.
Upon returning, Moccagatta prepares another report and sends it to Admiral de Courten. His analysis includes several key points. He asserts that no hydrophone listening devices are deployed in the waters off Valletta. Likewise, he sees no evidence of a structured offshore patrol service, as no enemy units have been sighted in three consecutive reconnaissance operations. He also identifies a continuous chain of over thirty searchlights positioned from Saint Paul’s Bay to the southeast of Valletta. Furthermore, he believes that these searchlights are linked to aerophones, given that their beams synchronise on a single point and move with a uniform bearing variation during scanning rotations.
One critical insight emerges from these observations: an attack using explosive motorboats cannot be timed according to the phases of the moon. Since the entrance to Valletta is narrow and positioned between steep cliffs, navigating it in complete darkness is nearly impossible. As a result, the assault must take place at first light. Despite these tactical challenges, Moccagatta remains confident in his ability to penetrate the British harbour defences.
| June 28th, 1941 |
Capitano di Fregatta Moccagatta launches the first direct assault on Valletta harbour. Supported by MAS 509, MAS 556, and MAS 562, he leads a strike force consisting of eight MT explosive boats and an MTS motor torpedo boat under the command of Giorgio Giobbe. However, the mission does not proceed as planned. One of the MT boats accidentally sinks, and further mechanical failures force Moccagatta to abandon the operation, returning to Augusta without engaging the enemy.
| June 30th, 1941 |
Determined to complete the mission, Capitano di Fregatta Moccagatta orders another departure from Augusta, Sicily on at 15:00. The flotilla sets out in rough seas with a strong wind. Shortly after departure, one of the MT boats begins to take on water, prompting the commander to order its return under tow by a MAS. Believing the sea conditions will improve, he decides to proceed. However, soon after, the engine of the designated explosive boat targeting the surface defences fails. Still unwilling to call off the mission, the fleet continues its advance until an engine failure on one of the MAS torpedo boats forces a reassessment. With the hour growing late and several vessels compromised, Moccagatta ultimately orders a retreat to base, marking another failed attempt to breach Valletta’s defences.
| July 20th, 1941 |
Following the Operazione Malta 1, the plan is revised as Operazione Malta 2, incorporating a transport vessel similar to the one used at Suda Bay to transport and deploy the assault craft. The fleet consists of two MAS boats, nine MT’s, one MTS designated as the command vessel during the final approach, and one Motoscafo Turismo Lento with electric propulsion, tasked with transporting two Siluro a Lenta Corsa. Initially towed by the transport vessel, this Motoscafo Turismo Lento is later handed over to a MAS for the final approach. Additionally, two motor torpedo boats are assigned to support the operation and recover personnel if necessary, one of which serves as the command ship.
The transport vessel, the Avviso Veloce Diana, is a former yacht built in 1939 at the Quarnaro shipyard in Fiume for the Italian head of government. Delivered in 1940, it is immediately converted into a military vessel for wartime operations. The objective of the attack is to strike both the Grand Harbour, the primary hub of naval activity in Valletta, where significant enemy vessels could be sunk, and the adjacent military harbour at Marsa Muscetto, home to a Royal Navy submarine base.
The mission is scheduled for a moonless night. The fleet departs Augusta in the late afternoon, proceeding to an initial waypoint fifteen miles from Malta, where the transport ship Diana begins the deployment of assault craft. The operation continues without Diana, which takes shelter south of Capo Passero, awaiting repatriation after the attack. At this stage, one of the two MAS tows the Motoscafo Turismo Lento while the MT’s advance in formation under their own power.
At a position near the Dragut Shoals, eight hundred metres from the secondary entrance to the Grand Harbour, the two Siluro a Lenta Corsa’s are launched first. One is tasked with breaching the defensive barriers at the harbour entrance, while the other is assigned to place a charge in the adjacent submarine base. Once the opening in the obstacle is created, the explosive motorboats initiate their attack, advancing at maximum speed through the breach and navigating the narrow channel leading to the Grand Harbour before targeting their designated objectives.
Meanwhile, the MTS and the Motoscafo Turismo Lento remain at the Dragut Shoals to recover the human torpedo operators before returning to the MAS for extraction to Augusta, Sicily. As final preparations are completed, Supermarina, the Headquarters of the Regio Marina, requests aerial support and diversionary attacks from Superaereo. The operation’s air component includes a nuisance bombing raid over Valletta at 01:45 on day X, followed by a second, heavier bombardment at 02:30. A third wave is planned to strike internal strategic targets. Additionally, from 05:30 on day X, fighter aircraft are to be deployed to cover the retreat of the MAS and Diana.
Superaereo, through its Liaison Officer with Supermarina, confirms that the requested air support will be provided as planned.
| Operation Substance and Convoy GM 1 |
Another opportunity to attack Valetta Harbour, Malta arises when the British organise a major convoy to resupply Malta. Operation Substance is conceived as a heavily escorted convoy designed to reinforce the island’s defences and sustain its ability to resist Axis attacks. A formidable Royal Navy force is assembled to counter anticipated assaults by the Italian fleet and the Regia Aeronautica. Given that previous attempts to deliver supplies to Malta have met fierce opposition, the British consider the protection of this convoy to be of utmost importance.
The convoy, designated GM 1, consists of six merchant ships transporting essential supplies, including fuel, ammunition, and food. The merchant ships are Sydney Star, Durham, Port Chalmers, Melbourne Star, City of Pretoria, and Deucalion. These vessels are escorted by a substantial Royal Navy force. Force H, departing from Gibraltar, includes the aircraft carrier H.M.S. Ark Royal, the battleship H.M.S. Nelson, the cruisers H.M.S. Manchester, H.M.S. Arethusa, and H.M.S. Edinburgh, and the destroyers H.M.S. Lightning, H.M.S. Firedrake, H.M.S. Cossack, H.M.S. Forester, H.M.S. Foxhound, H.M.S. Fearless, and H.M.S. Foresight. Force X, sailing from Malta to rendezvous with the convoy, consists of the light cruisers HMS Hermione and H.M.S. Cairo, along with the destroyers H.M.S. Nestor, H.M.S. Maori, H.M.S. Sikh, H.M.S. Eridge, and H.M.S. Avon Vale. The convoy’s escort is structured to counter threats from Axis aircraft, submarines, and surface vessels, ensuring the merchant ships reach their destination despite the dangers ahead.
The convoy encounters resistance from Italian submarines, the Regia Aeronautica, and German aircraft based in Sicily. The Regia Marina poses an additional threat but does not directly engage. Axis forces employ multiple tactics to intercept and damage the convoy, launching sustained bombing raids against the merchant vessels and their escort. Italian submarines attempt to break through the defensive perimeter but are countered by the escort force. The Italian fleet, including the battleships Littorio and Vittorio Veneto, sorties from its bases but does not engage, as the Royal Navy escort maintains defensive readiness.
| July 22nd, 1941 |
Convoy GM 1 departs Gibraltar under the protection of Force H. Enemy reconnaissance aircraft detect and shadow the fleet, alerting Axis forces to its movements.
| July 23rd, 1941 |
Heavy air attacks commence as bombers target the convoy. Anti-aircraft fire and fighters launched from H.M.S. Ark Royal engage the attackers, repelling multiple waves of bombers.
On that very same day the Operational order on the attack of the convoy once moooored in Valletta Harbour, Malta is given.
Operational Order No. 5/A – Augusta, 23rd July 1941
Date of Order: 23rd July 1941 (XIX)
Date of execution of order: Day X (depending on weather conditions)
Commander in Chief at Sea: CF Vittorio Moccagatta (MAS 452)
Authority issuing order: Xa Flottiglia MAS
Units Participating in the Operation
- R.N. Diana
- MAS 452 and MAS 451
- 1 MTL
- 1 MTS
- 9 MT
- 2 SLC
Purpose: offensive action against the naval base at Valletta (Malta)
Arrangements: At 18:15 on Day X, MAS 452 and MAS 451, along with the R.N. Diana, will depart from the Augusta roadstead, carrying nine MT boats and one MTS, while towing one MTL. By 18:45, they must reach Point “C” near Augusta.
From this location, they will travel at 22 knots along the coastal routes heading south, reaching Pozzallo before proceeding towards Point “K”. Upon arrival, the formation will halt. The Diana will release the MTL from tow and rapidly deploy all MT boats and the MTS into the water. MAS 451 will then take the MTL in tow and proceed towards Point “Y” upon command.
- R.N. Diana
After deploying the MT boats and the MTS, and releasing the MTL from tow, the Diana will turn starboard and head towards Point “Z” before continuing towards Point “A” off Capo Passero. Once at Point “A”, the ship will patrol along a meridional axis between this point and a position three miles south of Capo Passero, maintaining an optimal speed to provide maritime support to the MAS boats. The Diana will remain in this area until receiving orders from MAS 452 to return. If no orders are received by 10:00 on Day X+1, the ship will follow coastal routes to return to Augusta. - MAS 452 and MAS 451
Upon reaching Point “K”, they will proceed using auxiliary engines towards Point “Y” (3.5 miles at 44° from Punta Sant’Elmo), followed by the MTS, the nine MT boats, and the MTL towed by MAS 451.Once at Point “Y”, the formation will cut engines and release the MTL from tow. The MTL will then proceed to a location at the edge of the Dragut Shoals, approximately 800 metres north of the bridge arch connecting the pier to Punta Sant’Elmo. Upon arrival, the MTL will deploy the two SLC (human torpedoes), which will carry out their specific attack objectives.
- Major Tesei will attack the obstruction beneath the bridge, with the explosive charge set to detonate at 04:30.
- Lieutenant Costa will target submarines moored at Marsa Muscetto. Simultaneously, the MTS and the nine MT boats will advance at minimum speed, considering sea conditions, towards the same point as the MTL (800 metres north of the bridge arch), where they will hold position and wait.
Once the SLC charge detonates against the bridge obstruction (or no later than 04:40), the nine MT boats, upon receiving Commander Giorgio Giobbe’s order from the MTSM, will proceed under the left arch of the bridge. If necessary, they will force their way through the obstruction should the explosion fail to create an adequate opening.Inside the harbour, the MT boats will attack their pre-assigned targets, designated according to the latest photographic reconnaissance.
Signed,
Commander Vittorio Moccagatta
Captain of Frigate
| July 24th, 1941 |
While trying to protect Convoy GM 1, Cruiser H.M.S. Manchester sustains damage from an Italian torpedo bomber, forcing the cruiser to return to Gibraltar, reducing the convoy’s escort strength. The British Destroyer H.M.S. Fearless is struck by bombs and sinks, marking the first major loss of the operation. The merchant ship Sydney Star is damaged by air attacks but continues towards Malta. Other merchant vessels experience near misses, while escorting warships maintain defensive formations to shield the convoy.
Just before noon, convoy G.M.1 reaches Malta and the process of guiding the merchant ships into the harbour begins at 11:30 and concludes by 16:30 that same day. They will remained stationed there until the end of September. With its duty completed, the Royal Navy escort fleet departs at 18:15, setting sail back towards Gibraltar. The supplies are unloaded, reinforcing the island’s ability to resist the Axis siege and continue its strategic role in disrupting Axis operations in the Mediterranean.
Italian aerial reconnaissance missions confirm that six supply ships have reached Malta and Valleta Harbour.
| July 25th, 1941 |
Italian aerial reconnaissance missions confirm that the six British supply ships from convoy GM 1 are securely moored in the harbour.
Meanwhile, the Xa Flottiglia MAS organises an assault on the Valetta Harbour. The Italian attack force comprises a carefully selected group of vessels. The Diana carries specialised craft, including MTSM No. 1, nine MT’s, and a Motoscafo Turismo Lento carrying two Siluro di Lenta Corsa. Accompanying them are MAS 451 and MAS 452, the latter serving as the flagship under the command of Frigate Captain Vittorio Moccagatta, the leader of the Italian Xa Flottiglia MAS.
The attack on the Grand Harbour involves two distinct objectives. The first phase, executed with nine explosive motorboats and one Siluro a Lenta Corsa, aims to breach the entrance of the metal harbour defences. The second phase, carried out with a second Siluro a Lenta Corsa, targets the adjacent military port at Marsa Muscetto, where the submarine base is located.
To enter the Grand Harbour, the decision is made to force the secondary entrance rather than the main gateway. This choice stems from the assessment that the primary entrance is more heavily defended, with obstacles that would prove more difficult to overcome. The defences consist of three rows of steel nets secured to buoys with a diameter of approximately two metres and spaced about one and a half metres apart. These barriers, which protrude from the water, are designed to hinder entry but can theoretically be bypassed by the explosive motorboats, as their stern propulsion systems allow them to be lifted laterally.
The first defensive line extends between the pier at Fort Ricasoli and the pier at Fort Saint Elmo. The second, positioned almost perpendicular to the first, runs from the pier of Fort Ricasoli to the shoreline near Fort Saint Elmo. A two-metre opening along this second barrier allows the passage of small boats through the secondary entrance. The third defence line stretches from Fort Saint Elmo towards the inner harbour, terminating at the breakwater of Fort Ricasoli, forming a thirty-degree angle with the second obstacle.
In practice, these defences enclose an initial body of water shaped like a square, with an adjoining triangular section that shares one of its sides with the second barrier. The secondary entrance is further protected by a metal net attached to the viaduct beams, extending down to the seabed. Entering through this passage requires an explosive charge to breach the obstruction.
The responsibility for breaching the net falls to a Siluro a Lenta Corsa, with a backup plan in place should it fail. In such a case, a second, or potentially a third, explosive motorboat is designated to complete the breach. Three of the motorboats are equipped with charges designed to detonate at shallow depths, close to the water’s surface. Once the barrier is cleared, the remaining motorboats must enter the main harbour at maximum speed and engage their assigned targets. The plan requires them to navigate along the shoreline near Fort Saint Elmo, using the two-metre-wide passage that has been identified for small craft. The junction of the second and third defensive obstacles lies just two metres from the shoreline at Saint Elmo. Whether the main entrance is actually more heavily guarded than the secondary entrance remains uncertain, as no documentary evidence exists to justify this choice.
Capitano di Corvetta Giorgio Giobbe assumes responsibility for coordinating the attackers, while Maggiore del Genio Navale Teseo Tesei and 2° Capo Alcide Pedretti are entrusted with executing the most perilous aspect of the mission, clearing an entry point in the defensive barrier by breaching the wire mesh obstruction under Saint Elmo Bridge. This will allow the MT’s to penetrate Valleta Harbour.
Sottotenente di Vascello Carlo Bosio, commanding MT No. 1, is assigned to execute an attack with his explosive charge set to detonate at 5 metres depth. Sottotenente di Vascello Roberto Frassetto, in charge of MT No. 2, is tasked with being launched against the bridge obstruction in the event that Maggiore Tesei’s SLC attack failed. His objective is to create the first breach in the defensive barrier. Sottotenente Armi Navali Aristide Carabelli, assigned to MT No. 3, is designated as a backup. If Frassetto’s attack fails, he is to be launched against the obstruction to ensure a breach. His charge is set to detonate at 1.5 metres depth. Capo di 1ª Classe Motorista Navale Fiorenzo Capriotti, commanding MT No. 4, is ordered to break into the harbour through the openings created in the obstruction and attack vessels or installations inside the port. Capo di 2ª Classe Motorista Navale Alessandro Follieri, leading MT No. 5, is also tasked with entering the harbour through the breaches. His charge is set to explode at 5 metres depth. Capo di 2ª Classe Incursore Enrico Pedrini, in charge of MT No. 6, receives the same orders as Follieri, with his charge also set to detonate at 5 metres depth. Nocchiere di 3ª Classe Pietro Zaniboni, commanding MT No. 7, is assigned to penetrate the harbour through the created breaches. His charge is set to detonate at 5 metres depth. Sergente Vittorio Marchisio, operating MT No. 8, is given an identical mission. He is to enter through the breaches and detonate his charge at 5 metres altitude. Capo di 2ª Classe Motorista Vincenzo Montanari, commanding MT No. 9, is ordered to break into the port through the created breaches and detonate his charge at 5 metres depth.
Siluro a Lenta Corsa No. 2 with Tenente di Vascello Franco Costa and Sergente Luigi Barla are assigned to attack the Marsa Muscetto submarine base.
At 18:15, the three assault ships depart from Augusta, Sicily, consisting of Avviso Veloce Diana, commanded by Capitano di Corvetta Mario Di Muro. The Diana is acompanied by MAS 452, commanded by Tenente di Vascello Giobatta Parodi. The MAS is carrying Mission commander Capitano di Fregatta Moccagatta and Tenente di Vascello Bruno Falcomatà. The third ship of the little convoy MAS 451, commanded by Sottotenente di Vascello Giorgio Sciolette.
By 18:45, the fleet regroups at a designated point outside the harbour, maintaining a tight formation. Their course follows the coastal routes at a steady 22 knots, proceeding towards the Pozzallo sector.
Around 22:00, radar station No. 502 at Fort Madliena detects a strong signal approximately kilometres North of Malta, later confirmed to be the fast aviso Diana. The British quickly raise the alarm, maintaining an alert status even after radar contact is lost at 23:00. Gunners and searchlight crews remain at their posts, anticipating an imminent attack. The timing of this detection aligns with Diana reaching point K, near Pozzallo, at approximately 21:00 while following a course of 200°5′.
The radar signal disappears at 23:00, only to reappear at midnight when Diana moves towards Sicily. The signal is lost permanently shortly thereafter as the ship, having deployed its vessels, departs from point K, changes course towards point Z, and then heads to its designated refuge at Capo Passero.
At 23:55, a Swordfish aircraft takes off from Malta to investigate the radar contact, but the reconnaissance mission yields no results.
At 22:43, Diana reaches point K (36°09’N, 14°35’E) and halts its engines, approximately 32 kilometres North off the coast of Valletta Harbour, Malta. Between 23:00 and 00:00, the ship Diana unloads its attack craft before retreating northward to await the raiders’ return near Capo Passero. One MT is damaged during deployment. This is MT No. 9 piloted by Capo di 2ª Classe Motorista Vincenzo Montanari. MAS 451 takes over towing the Motoscafo Turismo Lento, but almost immediately, one of its propellers becomes entangled in the tow line, leading to a collision.
| July 26th, 1941 |
As the attack force progresses from point K to point Y, unforeseen challenges arise. One of the Siluro a Lenta Corsa’s, assigned to Tenente di Vascello Franco Costa, is unknowingly damaged, rendering it difficult to control. After an hour of failed attempts to free the propeller, the tow is transferred to MAS 452, and MAS 451 is sent back to Augusta, Sicily. The remaining boats increase speed to compensate for lost time, but the damaged MT falls behind and is later scuttled. Shortly after, MAS 451 rejoins the group after finally clearing the propeller.
By 02:00, the fleet finally reaches point Y, 6 kilometres from Fort Saint Elmo. The British searchlights from Malta briefly sweep across the waters, exposing the advancing flotilla for a moment. At Point Y, the final separation takes place, now running 26 minutes behind schedule. The MAS boats remain in place while the Motoscafo Turismo Lento and MT’s proceed at maximum speed towards the Dragut Shoals.
The planned air raids fail to aid navigation, the first attack scheduled for 01:45 does not take place. At 02:45, an Italian BR.20 bomber passes over Malta along a northwest-to-southwest trajectory, releasing its payload more than 5 kilometres away from Valletta. This is going unnoticed by the Italian forces. By 03:00, the MT’s reach a position 1 kilometre off Fort Saint Elmo near the Dragut Shoals, waiting for the signal explosion at the bridge to commence their assault. Around that same time, the Motoscafo Turismo Lento launches the Siluro a Lenta Corsa’s closer to shore, but the operation is delayed. The raiders fail to realise that the westerly current is pushing the Siluro a Lenta Corsa’s and MT’s eastward, away from their intended target.
Tenente di Vascello Franco Costa’s Siluro a Lenta Corsa malfunctions due to a faulty transfer pump, leaving it floating stern-down. Maggiore del Genio Navale Teseo Tesei orders Tenente di Vascello Franco Costa to return to the Motoscafo Turismo Lento and scuttle the torpedo. Disregarding this order, Tenente di Vascello Franco Costa attempts to continue the attack at 03:45, already an hour behind schedule. He fails and both Costa and Barla, his fellow operator, are forced to swim to shore, where they were captured by the British.
The third Italian bombing run occurs at 04:15 when two additional BR.20’s arrive over Malta. However, the intended precision strike, meant to guide the attacking force, is misplaced; bombs intended for Luqa, southwest of Valletta, instead fall over Naxxar, northwest of Valletta. The failure of this air support is compounded by the fact that only two of the four planned bombers reach the target area, mechanical issues prevent the other two from taking off. The defence of Valletta remains undistracted, and by the time the explosive charges detonate and the viaduct is destroyed, the British gunners are already prepared to fire.
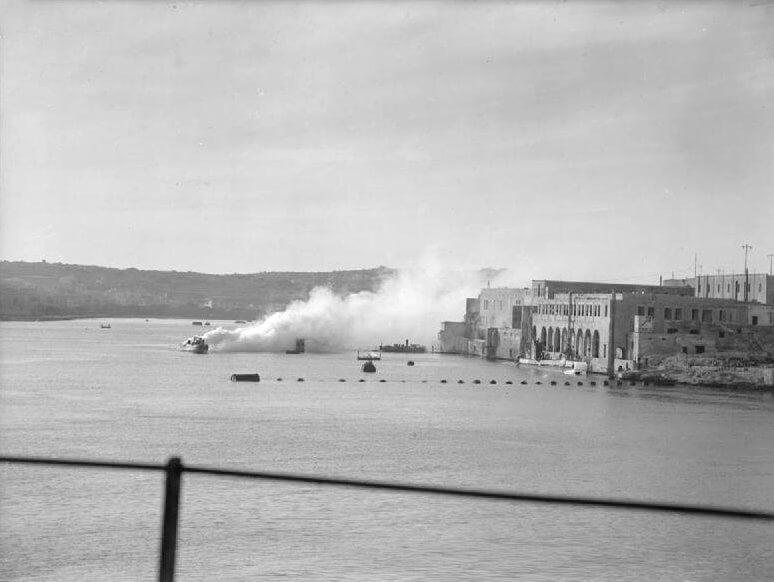
At 04:25, a powerful explosion disrupts the early morning calm near the Valletta bridge. Initially believed to be Tesei’s charge, it is later determined to be the result of an Italian aerial bombardment, mistimed and misaligned with the attack.
By 04:30, Maggiore del Genio Navale Tesei is unable to reach the bridge or destroy the net with his torpedo’s warhead, and he prepares to use an instantaneous fuse. Tesei is fully aware that the boats will proceed without relying on his contribution. The plan dictates that the net should have been breached by 04:30, and if it has not yet exploded, he must make a rapid assessment of the situation. Given his low position on the water, he is in an ideal position to scan the area to the east, where everything appears calm. Aware that he may still achieve something of value, he decides to proceed with the operation, disregarding the constraints of time. Regardless of the existence of this alternative plan, Tesei presses on with his mission, knowing that under the official operational plan, the boats will not proceed before 04:40 if the charge has not detonated at 04:30.
Ten minutes later, at 04:40, Capitano di Corvetta Giorgio orders two MT’s forward to breach the net. Sottotenente di Vascello Frassetto leads the assault. Moving too slow, the vessel becomes entangled without detonating. Frassetto finds himself directly beneath the bridge. While attempting to swim towards the pier of Fort Saint Elmo, he is later caught in the explosion of Folieri’s charge, rendering him unconscious. When he regains consciousness, he is adrift among the wreckage of a small boat, just a few metres from the rocks near the pier. Summoning the last of his strength, he reaches the shore, where he is captured at 05:40.
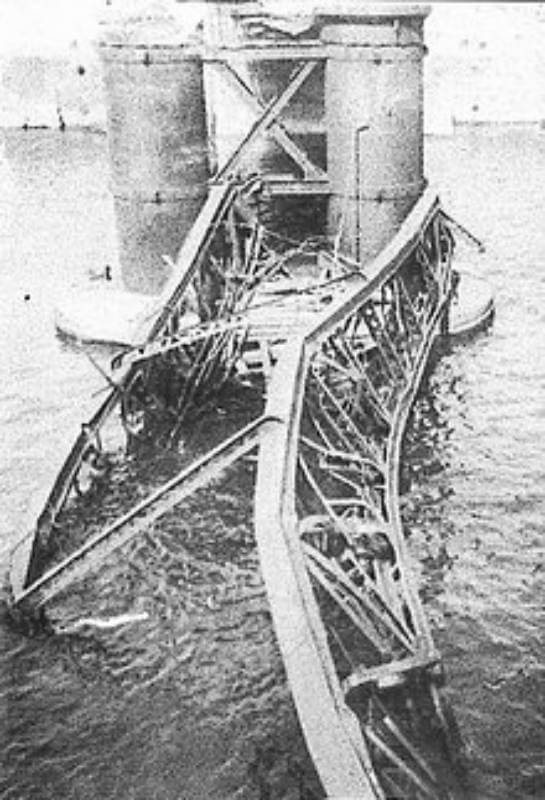
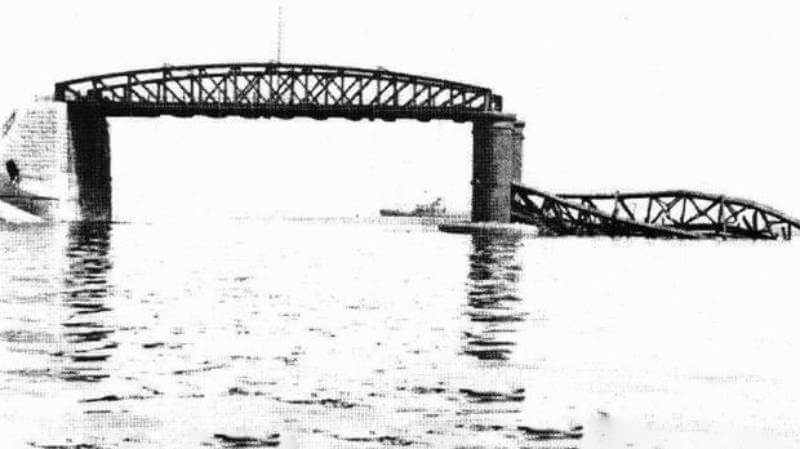
At 04:48, Sottotenente di Anno Aristide Carabelli’s boat reaches the defensive lines. As it makes contact with the net cables, the explosive charge detonates. Carabelli is consumed by the blast while still aboard his boat. He is later recovered by the British near the Saint Elmo bridge. The body had suffered catastrophic injuries, one arm, one leg, half his face torn apart. At 04:49, one of the arches of the Saint Elmo bridge collapses immediately after the explosion of Carabelli’s charge. The simultaneous detonation of two or more charges appears to be the only plausible explanation for the extent of the damage. The passage is now permanently obstructed.
At the time of the viaduct’s destruction, Costa’s Siluro a Lenta Corsa is in the waters off Punta Saint Elmo. At 04:20, Costa’s vessel makes contact with land, striking the port side against the starboard. At 04:48, a loud explosion reverberates through the harbour. A massive fireball and an immense column of water rise near the Valletta Bridge. Within seconds, searchlights sweep across the harbour, immediately illuminating the intruder. Gunfire erupts in response, forcing Costa to dive beneath the surface in an attempt to evade detection.
As daylight breaks, with his vessel severely compromised, Costa attempts to manoeuvre into an ambush position at a depth of ten metres. His intention is to listen for the sound of propellers departing the harbour, hoping for an opportunity to detonate his charge and inflict damage on an enemy vessel.
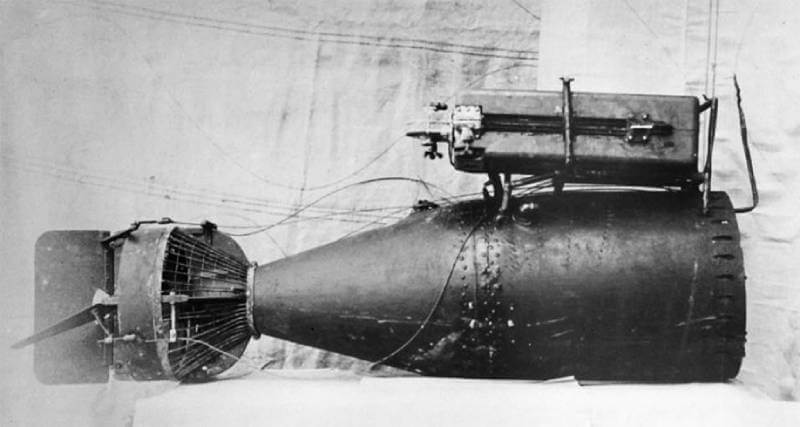
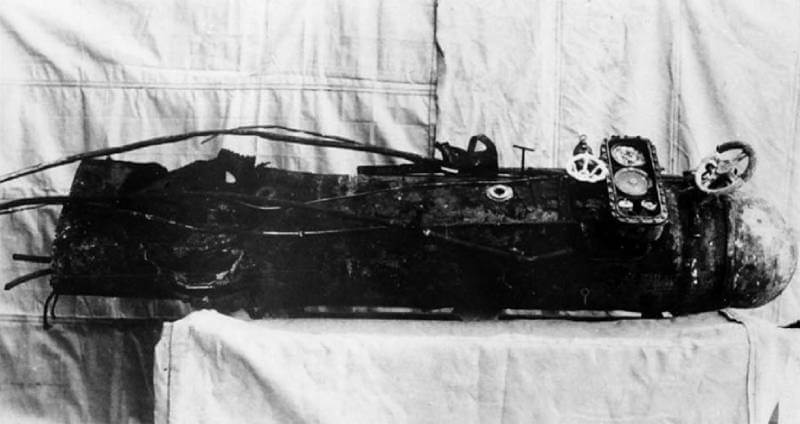
The two men on the Siluro a Lenta Corsa remain in the area until their breathing apparatus reach their operational limit. At approximately 08:40, Costa triggers the self-destruct charges, scuttles the Siluro a Lenta Corsa, and the team begins swimming towards the shore alongside his second-in-command. They reach the coast at around 09:00. At 09:30, British patrol troops capture Francesco Costa and Sergente Luigi Barla. Their Siluro a Lenta Corsa was found later that month.
As said, the batteries at Fort Saint Elmo and Fort Ricasoli, which safeguard the Grand Harbour, are immediately brought to full combat readiness. The gunners, already in a state of high alert, respond rapidly. They open fire on both the harbour entrance and MAS 451 and MAS 452. At the same time, the formation of explosive motorboats, under the command of Sottotenente di Vascello Bosio, accelerates towards the location indicated by Frassetto’s signal. The artillery from Forts Saint Elmo, Ricasoli, and Tigné unleashes intense crossfire, while powerful searchlights illuminate the waters, blinding the Italian operators and preventing them from seeing ahead. Gunfire rains down from every direction, creating a deadly zone of water where it is impossible to remain without being hit. Moments later, a gun at Fort Saint Elmo spots movement in the water and fires, causing an explosion believed to be Maggiore del Genio Navale Teseo Tesei’s warhead, which likely kills him.
Meanwhile, the crews of MT’s remain unaware that the passage is now blocked. They prepare to launch their attack in the direction of the explosion, unaware that the gap in the net has shifted eastward due to a gentle half-knot current. Moving at full speed towards the southwest, the leading boats, Sottotenente di Vascello Carlo No. 1 boat, followed by Sergente Vittorio Marchisio’s No. 8 boat, Capo di 2ª Classe Motorista Navale Alessandro Follieri’s No. 5 boat, Capo di 2ª Classe Incursore Enrico Pedrini’s No. 6 boat, Nocchiere di 3ª Classe Pietro Zaniboni’s No. 7 boat, and Capo di 1ª Classe Motorista Navale Fiorenzo Capriotti’s No. 4 boat target stationary ships. The first five boats move towards moored vessels, while Capriotti is tasked with intercepting any moving naval targets that could disrupt the attack.
As the boats advance in a straight formation towards the viaduct, they enter the fields of fire of three positions at Fort Saint Elmo and three at Fort Ricasoli, exposing themselves to heavy artillery fire. Bosio, leading the formation, is the closest to the bridge when he realises that the passage is blocked. He executes a sharp turn northward in accordance with the operational plan, which calls for a reorganisation and a renewed attack at first light.
During this withdrawal, Follieri is the first to be struck while at the helm of his boat. No longer able to proceed, he jumps into the water and activates the self-destruct mechanism. His boat, still circling, is hit by a bullet in the fuel tank and explodes. His body is later recovered by a British motorboat.
Pedrini, attempting to evade automatic fire, turns his boat 180 degrees. His vessel is struck multiple times, yet he continues the attack at first light, despite the fierce response, which is now reinforced by aerial strafing. Upon reaching within 60 metres of the bridge, it becomes evident that an attack is futile, as the passage remains obstructed. Seeking an alternative, he attempts to reach the main entrance, but this effort also proves unsuccessful. He returns to the viaduct with the intent to scuttle his boat. Activating the self-sinking device, he leaps into the water as the vessel, rudder set, drifts at approximately six knots.
After waiting in the water for about six minutes, it becomes clear that the boat has not sunk as intended. He makes several attempts to swim back towards it, as it continues to drift in a circular motion. On the fourth attempt, he manages to climb aboard but injures his left foot on the propeller. Once aboard, he realises the scuttling mechanism has failed. He then severs the water intake hose and manually forces the boat to sink by striking it with a boat hook. As it finally submerges beneath him, he swims away swiftly to avoid the impending explosion. Shortly after, a detonation throws him violently out of the water. With gunfire continuing until approximately 05:30, he struggles against the wind and currents before being rescued by a tugboat around 07:30.
Bosio and Zaniboni, positioned further away, notice an object in the water, initially mistaking it for a small boat before realising it is a buoy located roughly 3 kilometres from the harbour entrance. Zaniboni and Bosio approach the buoy, British Hurricanes begin circling at low altitude, initially disappearing in the glare of the rising sun before launching a rapid attack. The first aircraft targets Bosio, while the second focuses on Zaniboni. Bosio, already injured, is struck again.
The Hurricanes return for another pass, forcing Zaniboni to accelerate and evade machine-gun fire. The aircraft persist in their attack, and he feels his boat being struck. Water columns rise from nearby explosions, and suddenly, a blast propels him into the air. He lands in the water, momentarily stunned, before forcing himself to swim. His boat also comes to a halt. Struggling against exhaustion, he reaches the wreckage and grips the flotation vest. Managing to climb aboard, he breaks open the engine casing with repeated blows from a paddle. Water has already flooded the battery compartment. He dives back into the sea and attempts to reach another boat. A towering column of water erupts in the spot where he had just been. Moments later, Bosio’s boat explodes.
Bosio is already in the water at the time of the detonation. Despite his severe injuries, he has successfully pulled the activation lever, released the seat-cushion flotation device, and slid into the sea. The pilot’s seat, positioned over the transom, tilted backwards, facilitating his ejection. Both men are rescued by British vessels. Bosio dies two hours later in a Maltese military hospital. However, it is likely that he was still alive upon rescue but succumbed to his injuries before being officially registered.
Marchisio, the last of the patrol, is seen swimming away from his boat, wounded. Capriotti, who is circling around, initially assumes that Marchisio has activated the scuttling charge and is waiting for the explosion. However, after several minutes, the boat remains afloat, indicating that the device has failed.
Capriotti begins moving slowly in a straight line, leaning back in the boat to appear wounded while keeping the engine idling. Observed by British forces, he notes that they refrain from firing, seemingly under the impression that he is incapacitated. Continuing his advance at a slow pace, he reaches the viaduct and sees that the bridge structure has collapsed and is partially submerged, rendering any passage impossible. The only viable option is to turn back and scuttle both his own vessel and Marchisio’s. Executing a half-turn, he accelerates to maximum speed.
The British forces immediately open fire. Accelerating further, he rams his boat into Marchisio’s, launching himself into the sea from twenty-five metres away. The distance is excessive, but a closer jump risks missing the target. The two boats collide, and his continues on its course, veering to the right before exploding approximately fifty metres away. The explosion successfully damages the target, though not to the extent initially intended.
Marchisio’s boat remains intact, drifting aimlessly. To ensure its destruction, Capriotti must reach it, climb aboard, and detonate the charge manually. Before he can attempt this, British artillery fire intervenes. A shell strikes the engine casing, forcibly removing the cover. The impact possibly triggers the scuttling mechanism, accomplishing what Capriotti had planned. The boat sinks and explodes moments later.
Tests conducted prior to the operation establish that submersion beyond seventy metres is fatal. At depths of thirty or forty metres, survival is deemed impossible. Yet, despite enduring two successive shockwaves, Capriotti emerges unharmed. Suffering only muscular pain, he continues swimming towards Marchisio, assisting him in reaching a buoy located one hundred metres from the harbour entrance. Around 08:00, a British motorboat approaches. Capture is now inevitable. At 04:52, British gunners cease fire.
At 05:00, Capitano di Fregatta Moccagatta orders the engines to be started using auxiliary power.
At 05:12, ten Macchi 200 fighters are scrambled from Comiso to provide cover for the withdrawing MAS boats. Their arrival, however, proves to be too late. At 05:20, renewed movement from two stranded MT’s prompts intense fire from the British again, destroying the remaining MT’s. Their pilots reach shore and are captured.
By 05:30, the MTS reaches the MAS boats. MAS 452, recovers Capitano di Corvetta Giobbe and his personnel before restarting its main engines. MAS 451 sets course for Sicily, while MAS 452 tows the MTS southward, possibly in an attempt to rescue survivors. Around that same time, thirty Hurricanes from the No. 126th and No. 185th Squadrons take off from Malta. They quickly engage the Italian Macchi 200 fighters and remaining Xa Flottiglia MAS vessels, leading to a fierce aerial battle.
Twenty-one minutes later, at 06:21, a British air attack begins. Under fire, MAS 451 withdraws towards the northeast, while MAS 452 comes under repeated hits. Among the first casualties is Commander Moccagatta, who falls on deck. Giobbe, Falcomatà, Sottocapo Montanari, and crew members of the MTSM, Costantini and Zocchi, are also killed. Additionally, MAS Commander Parodi and a sailor lose their lives during the attack. The remaining crew board the MTS and return to Sicily, leaving MAS 452 adrift, where it is later destroyed by British aircraft.
As MAS 452 is strafed, eight aircraft attack the remaining MT’s, forcing their pilots to scuttle them. One Italian pilot dies, while another swims to Malta and surrenders. By then the entire fleet of explosive motorboats is lost, with the exception of MT 16, which breaks down and is later seized by British forces. In the aereal battle one Hurricane and two Macchi fighters are shot down, with one Italian pilot is killed and the other rescued by an Italian vessel.
At 06:00, a large explosion occurs within the port, believed to have been caused by Costa’s Siluro a Lento Corsa.
By 06:30, MAS 451 is engulfed in flames from repeated hits, the surviving crew abandon the vessel, only to be captured shortly after.
At 07:00, the MTS sets course for Sicily. Shortly before 09:00, the MTL positions itself beneath the Avviso Veloce Diana, and by 09:05, the Avviso Veloce Diana recovers all remaining personnel from the MTS.
At 11:28, the Avviso Veloce Diana, escorted by the torpedo boat Cigno and MAS 544, enters the port of Augusta, Sicily.
| Aftermath |
The assault on Malta proves disastrous for the Italian Navy. The British defenders, well-prepared and resolute, successfully repel the attack. The Italian forces suffer devastating losses.
The primary cause of failure is the complete loss of surprise. British radar stations and hydrophone networks detect the raiding force long before it reaches its target, allowing the island’s defences ample time to prepare. This early detection ensures that the attack is repelled before achieving its objectives.
The consequences for the Regia Marina are severe. With two MAS boats lost, one MTL scuttled, and the entire explosive boat squadron destroyed without any of the objectives reached. The failure of the operation marks one of the most significant setbacks for Italy’s naval forces in the Mediterranean theatre of war of its most significant setbacks in the Mediterranean theatre.
Vittorio Moccagatta, Bruno Falcomatà, Giorgio Giobbe, Teseo Tesei, Alcide Pedretti, Carlo Bosio, Guido Vincon and Aristide Carabelli were all honoured with the Medaglia d’Oro al Valore Militare and lost their lives in the assault. Roberto Frassetto, who received the same decoration, was taken as a prisoner of war.
Vincenzo Montanari, Mario Di Muro and Giobatta Parodi were awarded the Medaglia d’Argento al Valore Militare and were killed in action. Francesco Costa, Luigi Barla, Vittorio Marchisio, Alessandro Follieri, Enrico Pedrini, Pietro Zaniboni, Fiorenzo Capriotti, and Giorgio Sciolete all received the Medaglia d’Argento al Valore Militare and were taken prisoner. Tindaro Paratore, Vincenzo Martellotta and Gian Gastone Bertozzi, became recipients of the Medaglia d’Argento al Valore Militare, and managed to return.
Leonildo Zocchi and Luigi Costantini were both awarded the Medaglia di Bronzo al Valore Militare andlost their lives in the assault. Pietro Miniati, Vittorio Pinto, Mario Marino, and Francesco Malfa, who also received the Medaglia di Bronzo al Valore Militare, but successfully returned.
Corrado Gianni was honoured with the Croce al Valore Militare and he also made it back safely.
| Multimedia |
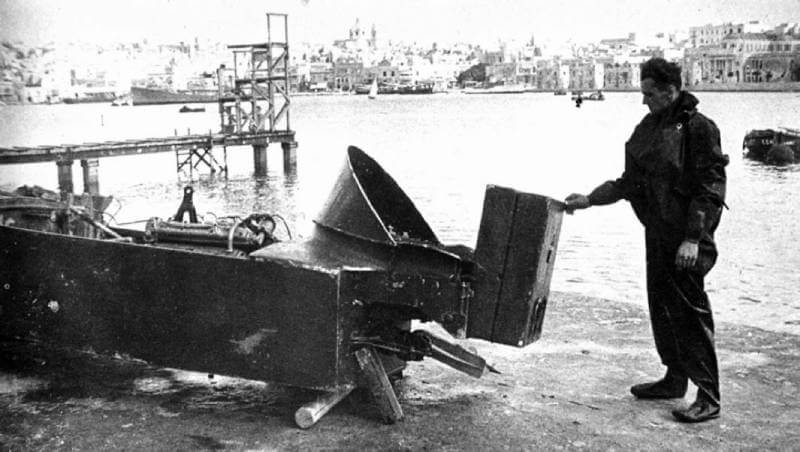
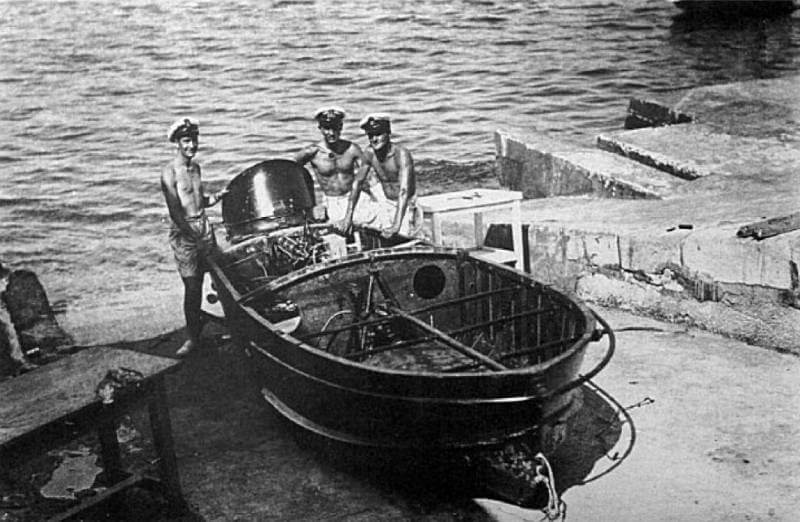
| MT-16 |
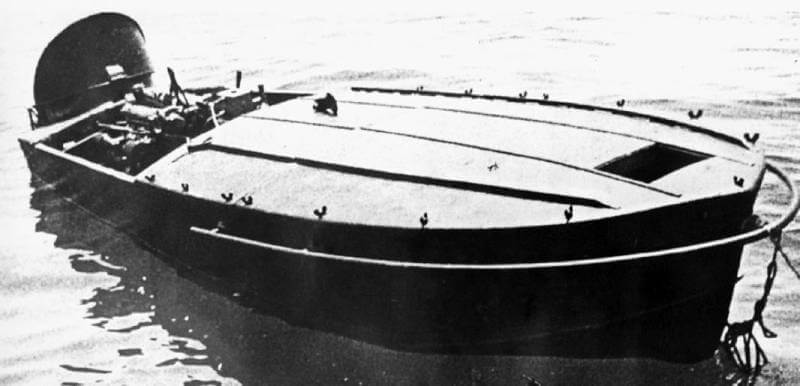
| Recovered SLC |
| Saint Elmo Bridge |
