Page Created |
January 2nd, 2023 |
Last Updated |
March 12th, 2024 |
Great Britain |
![]() |
Additional Information |
Unit Order of Battle Commanders Operations Equipment Multimedia Mulimedia 2 Multimedia 3 Sources Biographies |
Video |
![loading](https://worldwar2-sof.com/wp-content/plugins/youtube-embed-plus-pro/images/gallery-page-loader.gif)
![play](https://worldwar2-sof.com/wp-content/plugins/youtube-embed-plus-pro/images/playhover.png)
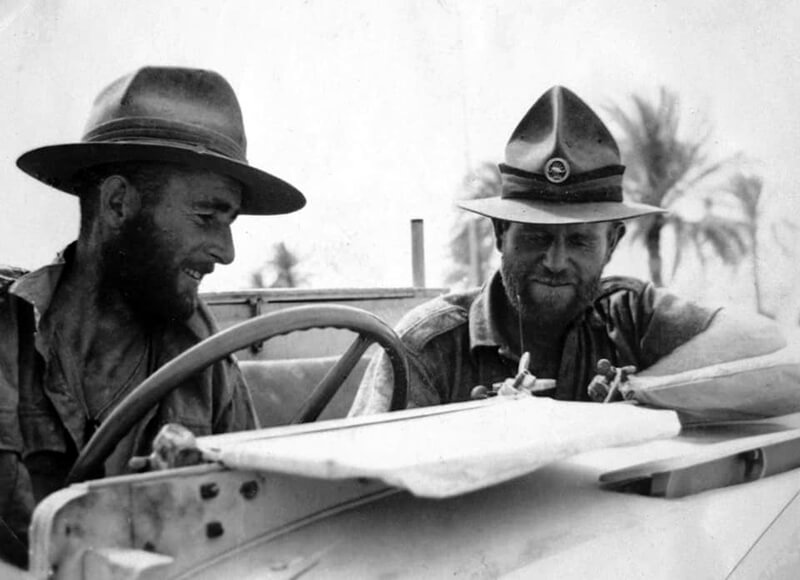
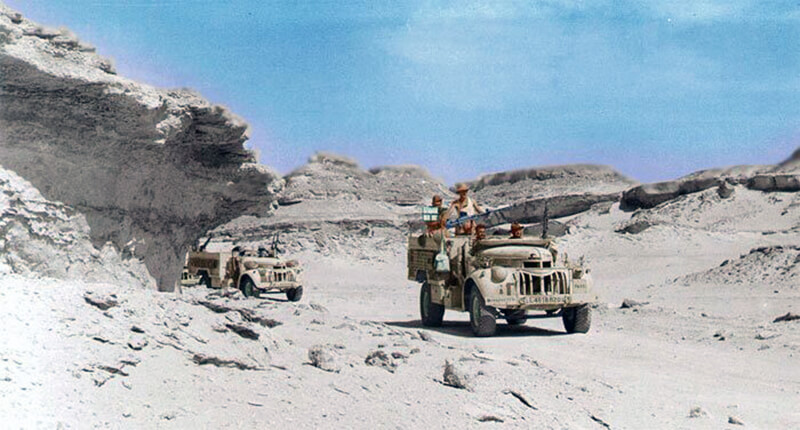
Captain Patrick McCraith, speaking into the camera, of Y Patrol of the Long Range Desert Group
![play](https://worldwar2-sof.com/wp-content/plugins/youtube-embed-plus-pro/images/playhover.png)
Desert Exploration by Major Ralph Bagnold from 1929 to1933.
![loading](https://worldwar2-sof.com/wp-content/plugins/youtube-embed-plus-pro/images/gallery-page-loader.gif)
Photographs |
1940 |
![](https://worldwar2-sof.com/wp-content/uploads/2024/03/lrdg-vehicle-1.jpg)
![The 24 trucks of T & G patrols in December 1940. The truck at the front is Major Pat Clayton’s Ford V8.](https://worldwar2-sof.com/wp-content/uploads/2023/01/t-g-patrol-1940.jpg)
Headquarters |
![Headquarters Chevrolet with Bill Kennedy Shaw & "Shorty" Barrett, the Long Range Desert Group Supply Officer.](https://worldwar2-sof.com/wp-content/uploads/2024/03/headquarters-1.jpg)
![Guy Lennox Prendergast is on the right and Jake Easonsmith on the left.](https://worldwar2-sof.com/wp-content/uploads/2024/03/lrdg-desert-patrol-2.jpg)
![Patrol Leaders, David Lloyd Owen (Y Patrol), Jake Easonsmith (R Patrol) and Gus Holliman (S Patrol). Only Lloyd Owen survived the war.](https://worldwar2-sof.com/wp-content/uploads/2024/03/lrdg-desert-patrol-3.jpg)
![Chevrolet 30 cwt trucks of a Long Range Desert Group patrol moving out into the desert, May 25th, 1942.](https://worldwar2-sof.com/wp-content/uploads/2024/03/lrdg-vehicle-4.jpg)
![Chevrolet 30 cwt trucks of a Long Range Desert Group patrol moving out into the desert, May 25th, 1942.](https://worldwar2-sof.com/wp-content/uploads/2024/03/colour-15.jpg)
G Patrol |
![Members of G Patrol after their formation in late 1940, possibly one their way to attack Murzuk.](https://worldwar2-sof.com/wp-content/uploads/2024/03/g-patrol-2-1.jpg)
![The 24 trucks of T & G patrols in December 1940. The truck at the front is Major Pat Clayton’s Ford V8.](https://worldwar2-sof.com/wp-content/uploads/2023/01/t-g-patrol-1940.jpg)
![](https://worldwar2-sof.com/wp-content/uploads/2024/03/g-patrol-1.jpg)
![](https://worldwar2-sof.com/wp-content/uploads/2023/01/jeep_brendan2.jpg.jpg)
![](https://worldwar2-sof.com/wp-content/uploads/2024/03/g-patrol-sas.jpg)
![Member of the Long Range Desert Group probably from G Patrol, digging out a truck during a reconnaissance tour of the Libyan Desert, June 3rd, 1942.](https://worldwar2-sof.com/wp-content/uploads/2024/03/lrdg-vehicle-6.jpg)
![Truck G 6 from G Patrol.](https://worldwar2-sof.com/wp-content/uploads/2024/03/g-patrol-3.jpg)
R Patrol |
![An early picture of Long Range Desert Group, most likely R Patrol.](https://worldwar2-sof.com/wp-content/uploads/2024/03/r-patrol-7.jpg)
![David Lloyd Owen, Jake Easonsmith and Gus Holliman LRDG officers, only Lloyd Owen survived the war.](https://worldwar2-sof.com/wp-content/uploads/2024/03/r-patrol-3.jpg)
![R Patrol when they stayed with the Free French in Zouar in December 1941. Bill Hammond is wearing the French trousers and on the left from him is Bluey Grimsey. Second on the right Eugene (Tom) Waetford: © IWM. Original Source: http://www.iwm.org.uk/collections/item/object/205234055](https://worldwar2-sof.com/wp-content/uploads/2024/03/lrdg-vehicle-29.jpg)
![](https://worldwar2-sof.com/wp-content/uploads/2024/03/r-patrol-2-1.jpg)
![](https://worldwar2-sof.com/wp-content/uploads/2024/03/colour-1.jpg)
![New Zealanders of R Patrol pause for tea in the Western Desert, March 27th 1941.](https://worldwar2-sof.com/wp-content/uploads/2024/03/r-patrol-1.jpg)
![THE LONG RANGE DESERT GROUP (LRDG) IN NORTH AFRICA DURING THE SECOND WORLD WAR (E 12406) Long Range Desert Group R Patrol at breakfast. Copyright: © IWM. Original Source: http://www.iwm.org.uk/collections/item/object/205196759](https://worldwar2-sof.com/wp-content/uploads/2024/03/r-patrol-4.jpg)
![A R Patrol Chevrolet WA 4x2 30-cwt truck.](https://worldwar2-sof.com/wp-content/uploads/2024/03/A_Long_Range_Desert_Group_Chevrolet_30cwt_1533_truck_negotiates_the_slope_of_a_sand_dune_during_a_patrol_in_the_desert_27_March_1941._E.jpg)
![Heavily loaded 30 cwt 1533x2 Chevrolet vehicles from R1 Patrol departing from Jalo Oasis in Libya. In the foreground is R4 Rotowaro.](https://worldwar2-sof.com/wp-content/uploads/2024/03/r-4.jpg)
![A R Patrol Chevrolet WA 4x2 30-cwt truck.](https://worldwar2-sof.com/wp-content/uploads/2024/03/colour-9.jpg)
![R6 from R 1 Patrol is sunk, fortunately not too deep, in soft sand and is being prepared to be dug free.
The sand mats have been placed in front of the front wheels and a sand channel is being pushed under the right rear wheel.](https://worldwar2-sof.com/wp-content/uploads/2024/03/r-patrol-r-6.jpg)
![THE LONG RANGE DESERT GROUP (E 12392) LRDG trucks stuck in soft sand Copyright: © IWM. Original Source: http://www.iwm.org.uk/collections/item/object/205234056](https://worldwar2-sof.com/wp-content/uploads/2024/03/lrdg-vehicle-28.jpg)
![THE LONG RANGE DESERT GROUP (E 12393) LRDG trucks stuck in soft sand Copyright: © IWM. Original Source: http://www.iwm.org.uk/collections/item/object/205234058](https://worldwar2-sof.com/wp-content/uploads/2024/03/lrdg-vehicle-27.jpg)
![THE BRITISH ARMY IN NORTH AFRICA 1942 (E 12396) Sand mats being used to help the Long Range Desert Group Chevrolet 30 cwt truck R 6 Od R Patrol pass over soft sand, May 25th, 1942. Copyright: © IWM. Original Source: http://www.iwm.org.uk/collections/item/object/205203790](https://worldwar2-sof.com/wp-content/uploads/2024/03/r-patrol-5.jpg)
![THE BRITISH ARMY IN NORTH AFRICA 1942 (E 12408) Long Range Desert Group R Patrol fire a Vickers machine gun from the back of their R6 Chevrolet 30 cwt trucks, May 25th,1942. Copyright: © IWM. Original Source: http://www.iwm.org.uk/collections/item/object/205203791](https://worldwar2-sof.com/wp-content/uploads/2024/03/r-patrol-6.jpg)
![British Captain J. R. ‘Jake’ Easonsmith, and an unidentified trooper clean an M1928 Thompson sub-machinegun somewhere in the Western desert, 25th May, 1942.](https://worldwar2-sof.com/wp-content/uploads/2024/03/The_British_Army_in_North_Africa_1942_E12438.jpg)
![British Captain J. R. ‘Jake’ Easonsmith, and an unidentified trooper clean an M1928 Thompson sub-machinegun somewhere in the Western desert, 25th May, 1942.](https://worldwar2-sof.com/wp-content/uploads/2024/03/colour-4.jpg)
S Patrol |
![Close up view of (Rhodesian) S-Patrol's Pilot Truck. Note camouflage pattern and the mesh covering over the large holes cut in the engine's bonnet. Also of interest is the way the headlights have been painted.](https://worldwar2-sof.com/wp-content/uploads/2024/03/s-patrol-1.jpg)
![An Long Range Desert Group vehicle from S Patrol bogged down in the mud after a desert storm.](https://worldwar2-sof.com/wp-content/uploads/2024/03/s-patrol-5.jpg)
![](https://worldwar2-sof.com/wp-content/uploads/2024/03/s-patrol-2.jpg)
![Simpson of S1 Patrol was wounded in the soldier during an attack on an Italian roadhouse at Tmed Hassan on November 8th, 1941.](https://worldwar2-sof.com/wp-content/uploads/2024/03/s-patrol-6.jpg)
![](https://worldwar2-sof.com/wp-content/uploads/2024/03/s-patrol-3.jpg)
![](https://worldwar2-sof.com/wp-content/uploads/2024/03/colour-3.jpg)
![S Patrol (Rhodesian) Captain Ken Lazarus is standing in the center, on the right Corporal George Howard (Lazaus' driver). The trooper on the left is unidentified, but not altogether dissimilar to a known photo of Bill Johnson. The two on the bonnet are both from 15 Squadron, South African Air Force.](https://worldwar2-sof.com/wp-content/uploads/2024/03/s-patrol.jpg)
![S-13 Jeep from S patrol.](https://worldwar2-sof.com/wp-content/uploads/2024/03/s-patrol-s-13-7.jpg)
![S 6 Gun truck from S Patrol.](https://worldwar2-sof.com/wp-content/uploads/2024/03/s-patrol-s-6-8.jpg)
T Patrol |
![Captain Bruce Ballantyne, Patrol commander of T Patrol, the Long Range Desert Group (LRDG), probably taken in the Western Desert, Libya, 1940-43.](https://worldwar2-sof.com/wp-content/uploads/2024/03/captain-bruce-ballantyne.jpg)
![Captain Bruce Ballantyne, Patrol commander of T Patrol, the Long Range Desert Group (LRDG), probably taken in the Western Desert, Libya, 1940-43.](https://worldwar2-sof.com/wp-content/uploads/2024/03/colour-2.jpg)
![The 24 trucks of T & G patrols in December 1940. The truck at the front is Major Pat Clayton’s Ford V8.](https://worldwar2-sof.com/wp-content/uploads/2023/01/t-g-patrol-1940.jpg)
![Ford 01 V8 15 cwt "TE RANGI" (Maori for "Chief"), T Patrol pilot car. Positioned behind the Vickers machine gun is Vice Corporal Lawrence 'Clarrie' Roderick, noted for his prowess as a professional boxer on January 12th, 1941. Shortly after the photo was taken, Roderick was captured and subsequently sent to a POW camp in Italy. Undeterred, he managed a daring escape and courageously joined the partisans, actively engaging in combat alongside them until his death in 1944.](https://worldwar2-sof.com/wp-content/uploads/2024/03/lrdg-vehicle-10.jpeg)
![The 1533x2 Chevrolet T10 from the T1 Patrol.
Private Euan Hay operates the Lewis machine gun.
Behind the wheel is driver Gerry Gerrard;
Corporal Merlyn H Craw mans a captured
Breda-Safat machine gun.](https://worldwar2-sof.com/wp-content/uploads/2024/03/t-patrol-t-10.jpg)
![The 1533x2 Chevrolet T10 from the T1 Patrol. Private Euan Hay operates the Lewis machine gun. Behind the wheel is driver Gerry Gerrard; Corporal Merlyn H Craw mans a captured Breda-Safat machine gun.](https://worldwar2-sof.com/wp-content/uploads/2024/03/colour-17.jpg)
![THE BRITISH ARMY IN NORTH AFRICA 1942 (E 12384) Long Range Desert Group Chevrolet 30 cwt trucks going through a pass in the Western Desert, May 25th, 1942. Copyright: © IWM. Original Source: http://www.iwm.org.uk/collections/item/object/205203789](https://worldwar2-sof.com/wp-content/uploads/2024/03/lrdg-vehicle-32.jpg)
![The trucks of T Patrol embark on a convoy, with the lead vehicle equipped for defense. Positioned prominently is a Boys Anti-Tank rifle and a Lewis gun, both mounted near the vehicle commander's seat. The crew of the lead vehicle consists of four men. Additionally, a second machine gun, likely a Vickers MG, is observed mounted further back in the truck bed, enhancing the convoy's firepower and defensive capabilities.](https://worldwar2-sof.com/wp-content/uploads/2024/03/colour-16-1.jpg)
![Sergeant George Garven and his driver, Trooper Andy Crawford, of T2 Patrol brings their 30 CWT Chevrolet over a ridge.](https://worldwar2-sof.com/wp-content/uploads/2024/03/colour-22.jpg)
![Sergeant George Garven and his driver, Trooper Andy Crawford, of T2 Patrol in their 30 CWT Chevrolet.](https://worldwar2-sof.com/wp-content/uploads/2024/03/t-patrol-1.jpg)
![T4 Patrol Truck](https://worldwar2-sof.com/wp-content/uploads/2024/03/colour-18.jpg)
![A Breda 20 mm Modello 35 is mounted in the back of a cannon truck belonging to T2 Patrol. The side panels have been modified to allow the cannon to rotate 180 degrees. The individuals in the photograph are: gunner Cyril A Dornbush MM, AG Ferguson (center), and K. Kelly. It's worth noting that LRDG personnel refrained from shaving while on patrol, conserving water. The scene is set in Kufra Oasis, circa 1942.](https://worldwar2-sof.com/wp-content/uploads/2024/03/breda-t-patrol.jpg)
![A F8 Ford 4x2 8 CWT Pilot Car from T Patrol, probably Te Rangi.](https://worldwar2-sof.com/wp-content/uploads/2024/03/t-patrol-2.jpg)
![THE LONG RANGE DESERT GROUP (LRDG) DURING THE SECOND WORLD WAR (HU 16497) A group of Long Range Desert Group men pose for a photograph in front of their vehicles, having become the first 8th Army unit to cross the Tunisian border. At this time, LRDG patrols were being tasked by Montgomery to reconnoitre the 'going' in southern Tunisia, in case the 8th Army had to bypass the strongly held Mareth Line. Copyright: © IWM. Original Source: http://www.iwm.org.uk/collections/item/object/205125575](https://worldwar2-sof.com/wp-content/uploads/2024/03/t-patrol-3.jpg)
![THE BRITISH ARMY IN NORTH AFRICA 1942 (E 12348) The T9 Chevrolet 30 cwt truck from T Patrol ready to leave Cairo, May 25th, 1942. Copyright: © IWM. Original Source: http://www.iwm.org.uk/collections/item/object/205203784](https://worldwar2-sof.com/wp-content/uploads/2024/03/t-patrol-4.jpg)
![THE BRITISH ARMY IN NORTH AFRICA 1942 (E 12353) Two fully loaded Long Range Desert Group Chevrolet 30 cwt trucks from T Patrol. Theone on the right is Te Anau, May 25th, 1942. Copyright: © IWM. Original Source: http://www.iwm.org.uk/collections/item/object/205203785](https://worldwar2-sof.com/wp-content/uploads/2024/03/t-patrol-5.jpg)
![THE BRITISH ARMY IN NORTH AFRICA 1942 (E 12357) A Long Range Desert Group Chevrolet 30 cwt truck from T Patrol is reloaded after a tyre change, May 25th, 1942. Copyright: © IWM. Original Source: http://www.iwm.org.uk/collections/item/object/205203786](https://worldwar2-sof.com/wp-content/uploads/2024/03/t-patrol-6.jpg)
![T2 Patrol in 1942. from left to right. Nutt, unknown, Morris, McCullough, Thompson, Dornbush.](https://worldwar2-sof.com/wp-content/uploads/2024/03/lrdg-men-14.jpg)
![The Te Aute Truck of T Patrol.](https://worldwar2-sof.com/wp-content/uploads/2024/03/t-patrol-8.jpg)
![](https://worldwar2-sof.com/wp-content/uploads/2024/03/breda-t-patrol-1.jpg)
![R-4 truck with two members of R Patrol sitting on top of a Dingo Mk. 1 Scout Car.](https://worldwar2-sof.com/wp-content/uploads/2024/03/r-patrol-9.jpg)
W Patrol |
![Lance Corporal Charles Grieve, affectionately known as 'Curly' Ball, served in R Patrol in 1940. While captured in a photograph posing with W Patrol trucks, it's important to note that his official assignment was within R Patrol. His commendable service and dedication led to his promotion to the rank of sergeant within R Patrol.](https://worldwar2-sof.com/wp-content/uploads/2024/03/lrdg-w-patrol-1.jpg)
Y Patrol |
![](https://worldwar2-sof.com/wp-content/uploads/2023/01/y-patrol.jpg)
![Members of Y Patrol read mail from home at Siwa Oasis in May 1942. Letters from home nearly always provided a boost to morale.](https://worldwar2-sof.com/wp-content/uploads/2024/03/lrdg-men-9.jpg)
![Members of Y Patrol read mail from home at Siwa Oasis in May 1942. Letters from home nearly always provided a boost to morale.](https://worldwar2-sof.com/wp-content/uploads/2024/03/colour-10.jpg)
![Members of Y-Patrol of the Long-Range Desert Group, Siwa Oasis, Western Desert, Egypt, 1942. On left is Trooper Bill Bullock, in the center is Sergeant Frank Johns, Lance Corporal Robert Hall #3529858 is on the right.](https://worldwar2-sof.com/wp-content/uploads/2024/03/black-and-white-11.jpg)
![Members of Y-Patrol of the Long-Range Desert Group, Siwa Oasis, Western Desert, Egypt, 1942 On left is Trooper Bill Bullock, in the center is Sgt Frank Johns , L/Cpl Robert Hall #3529858 is on the right.](https://worldwar2-sof.com/wp-content/uploads/2024/03/colour-11.jpg)
![](https://worldwar2-sof.com/wp-content/uploads/2024/03/y-patrol-5.jpg)
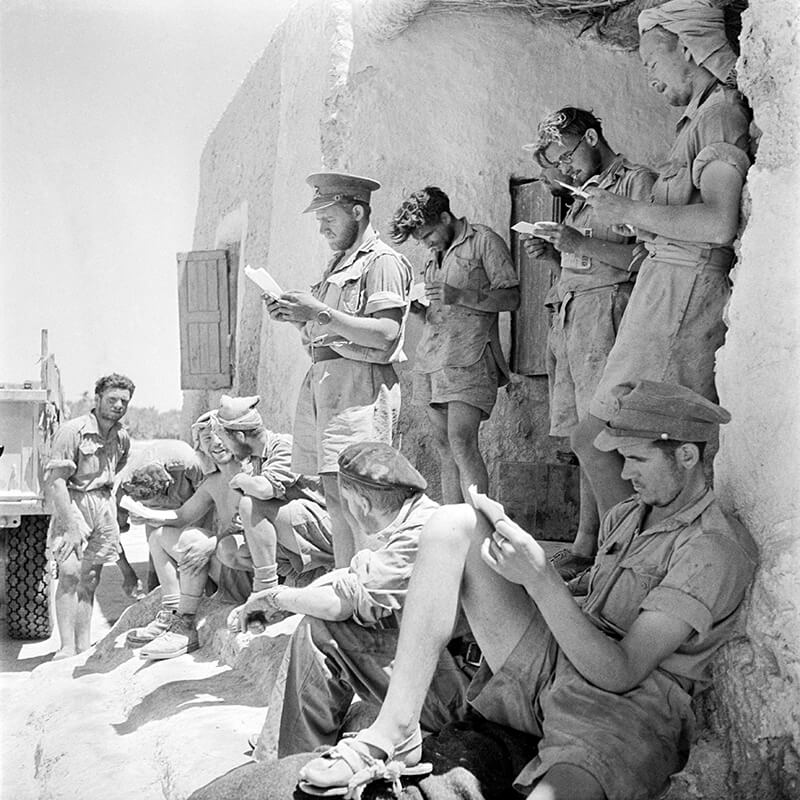
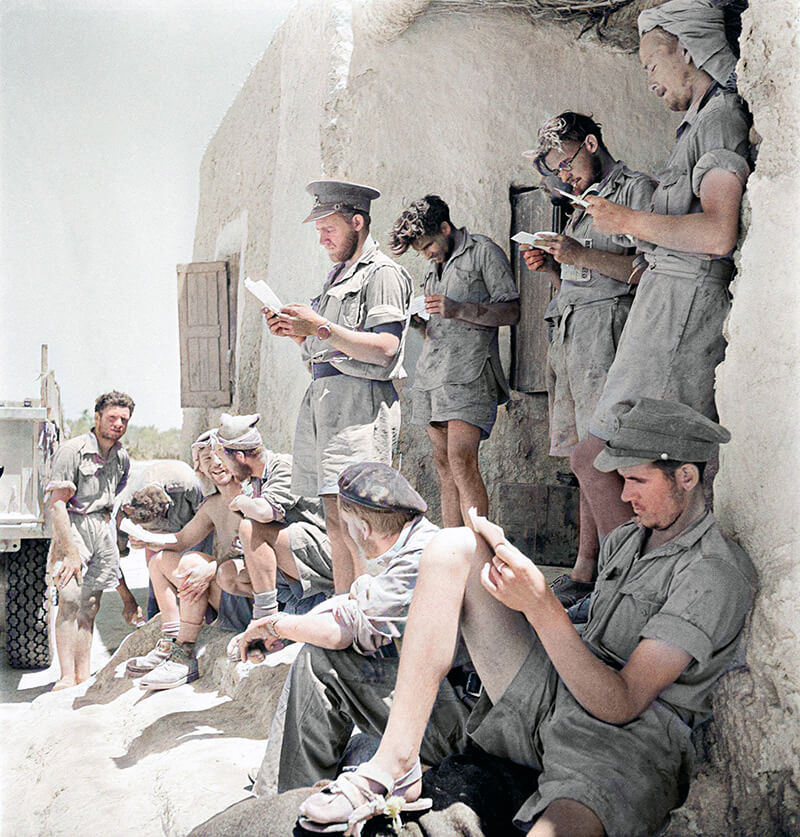
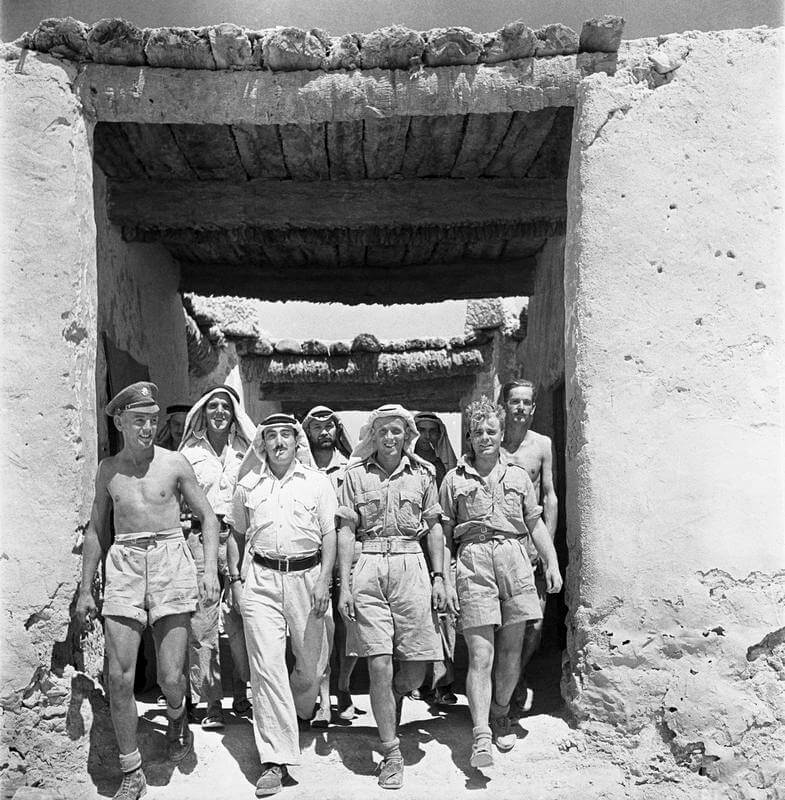
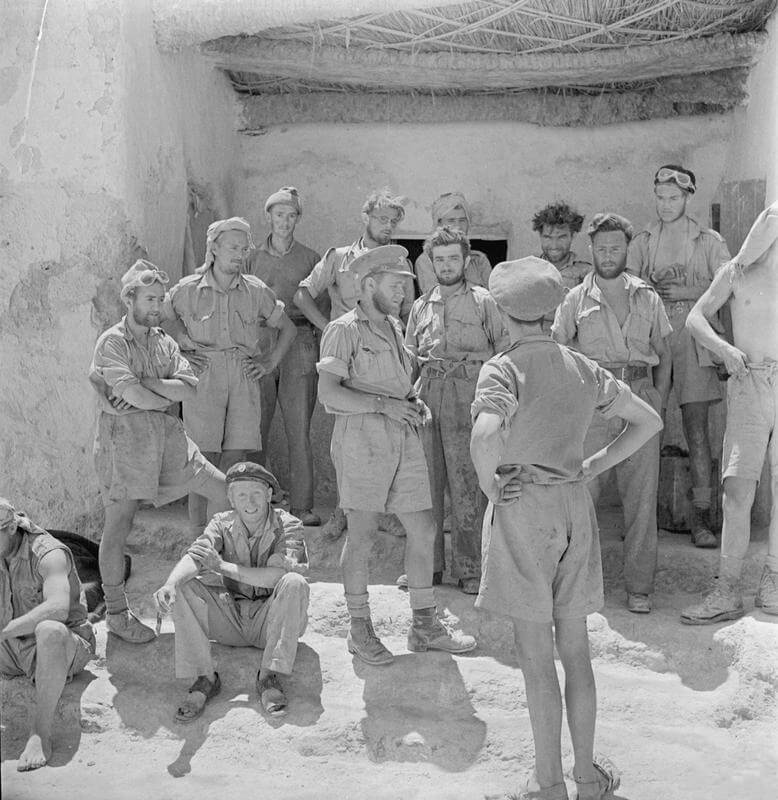
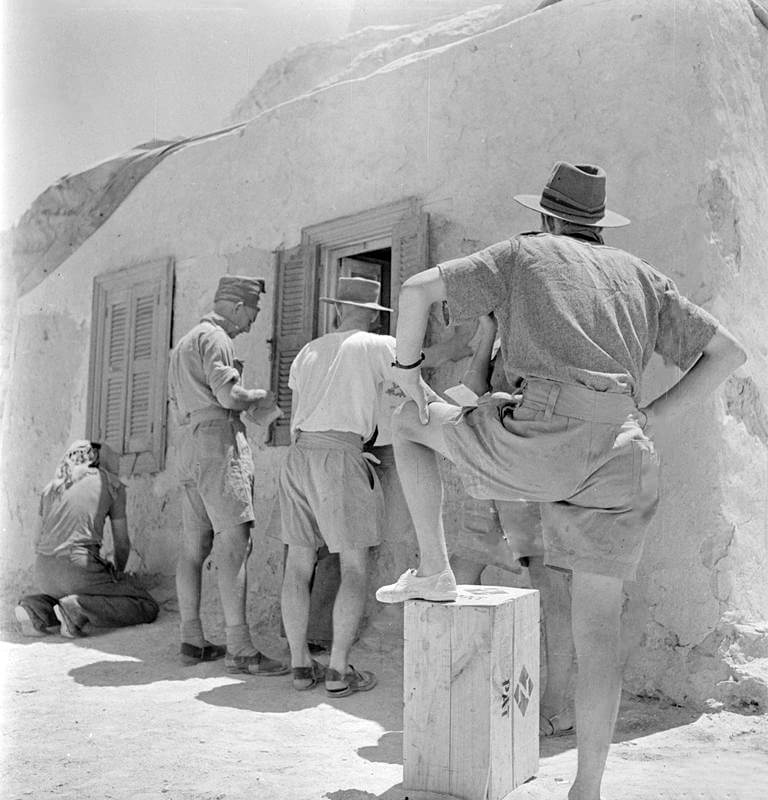
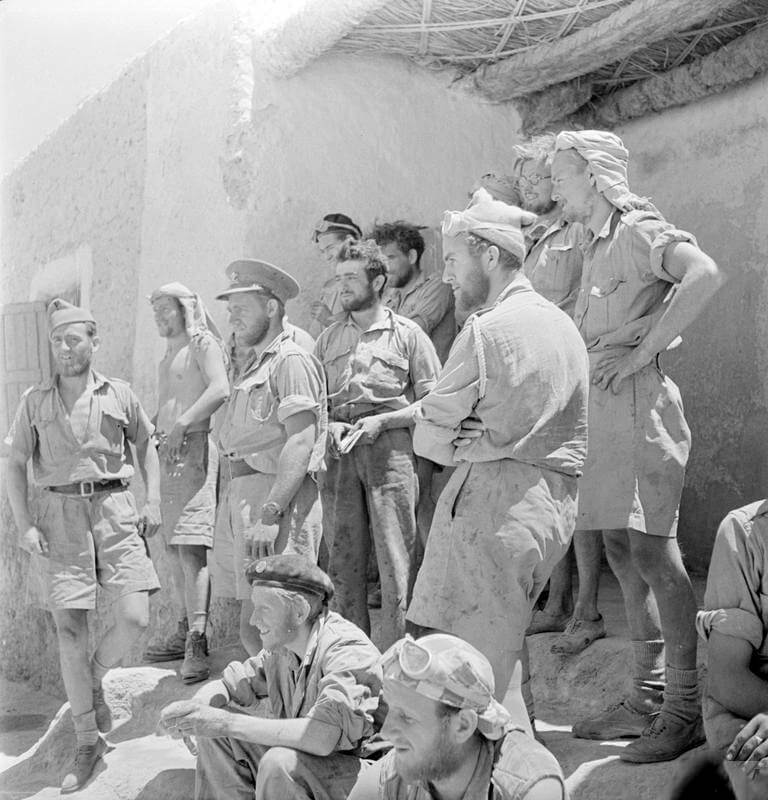
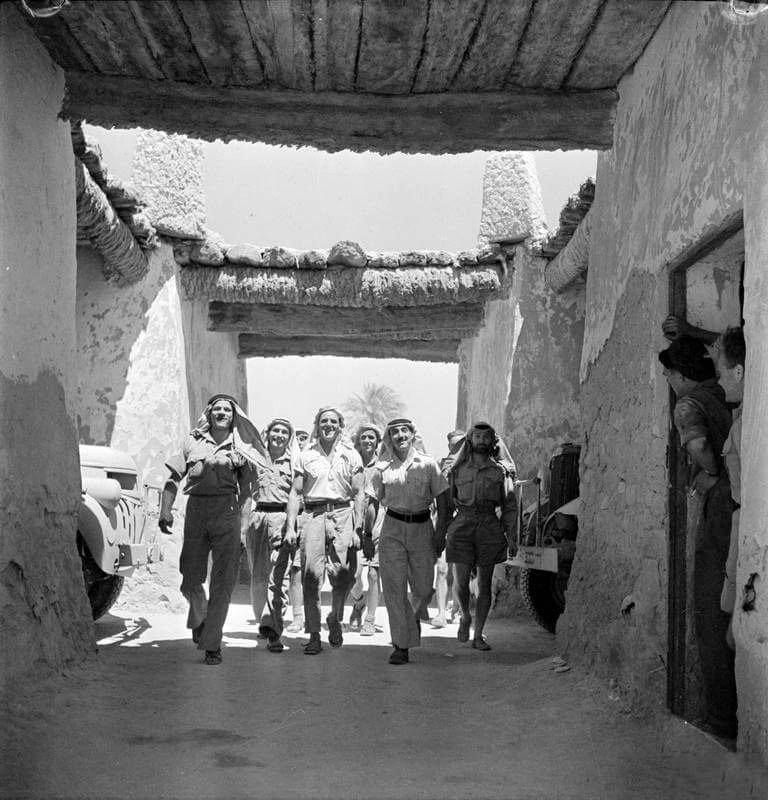
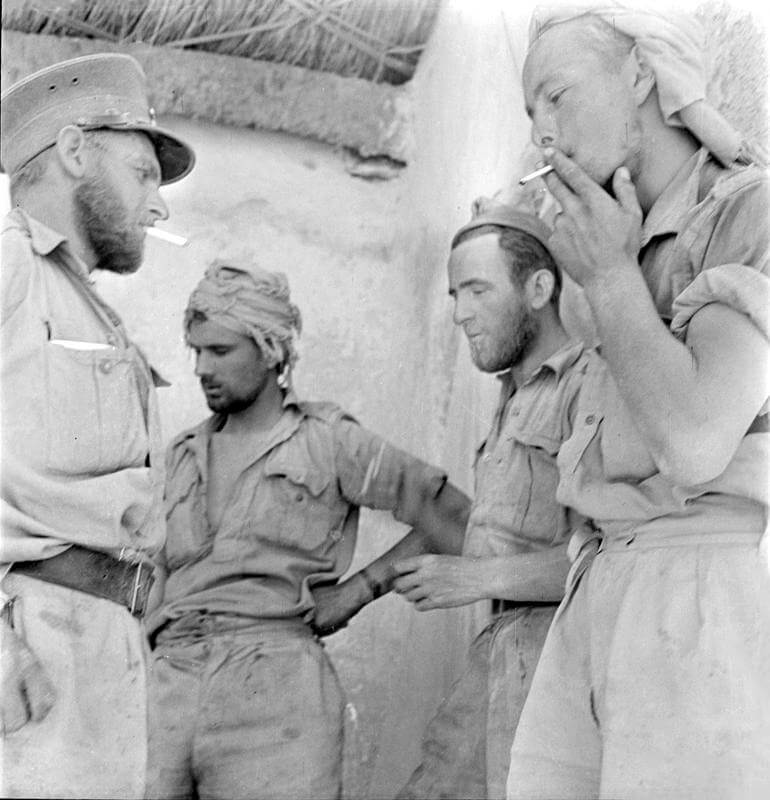
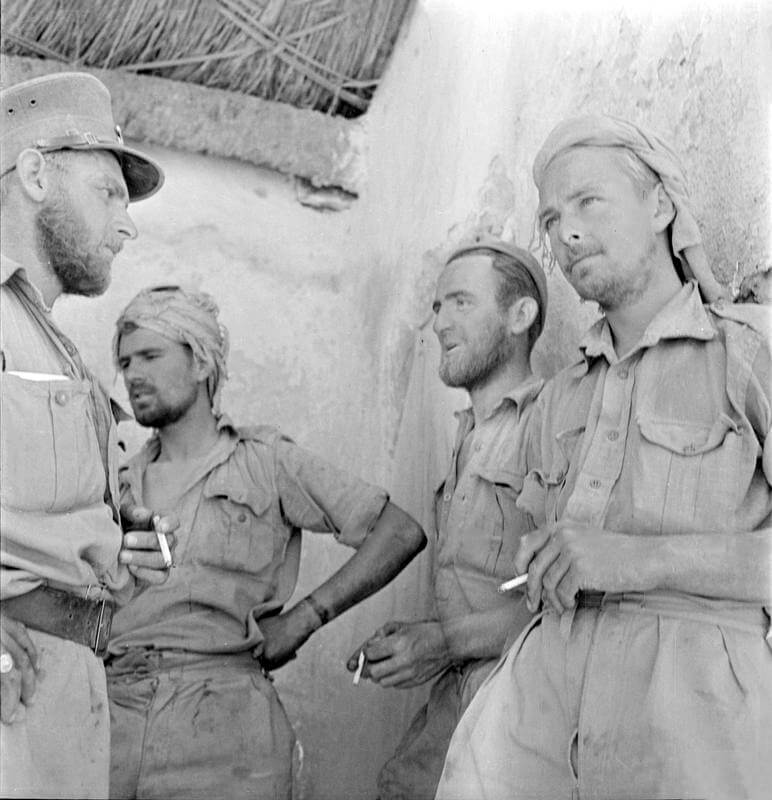
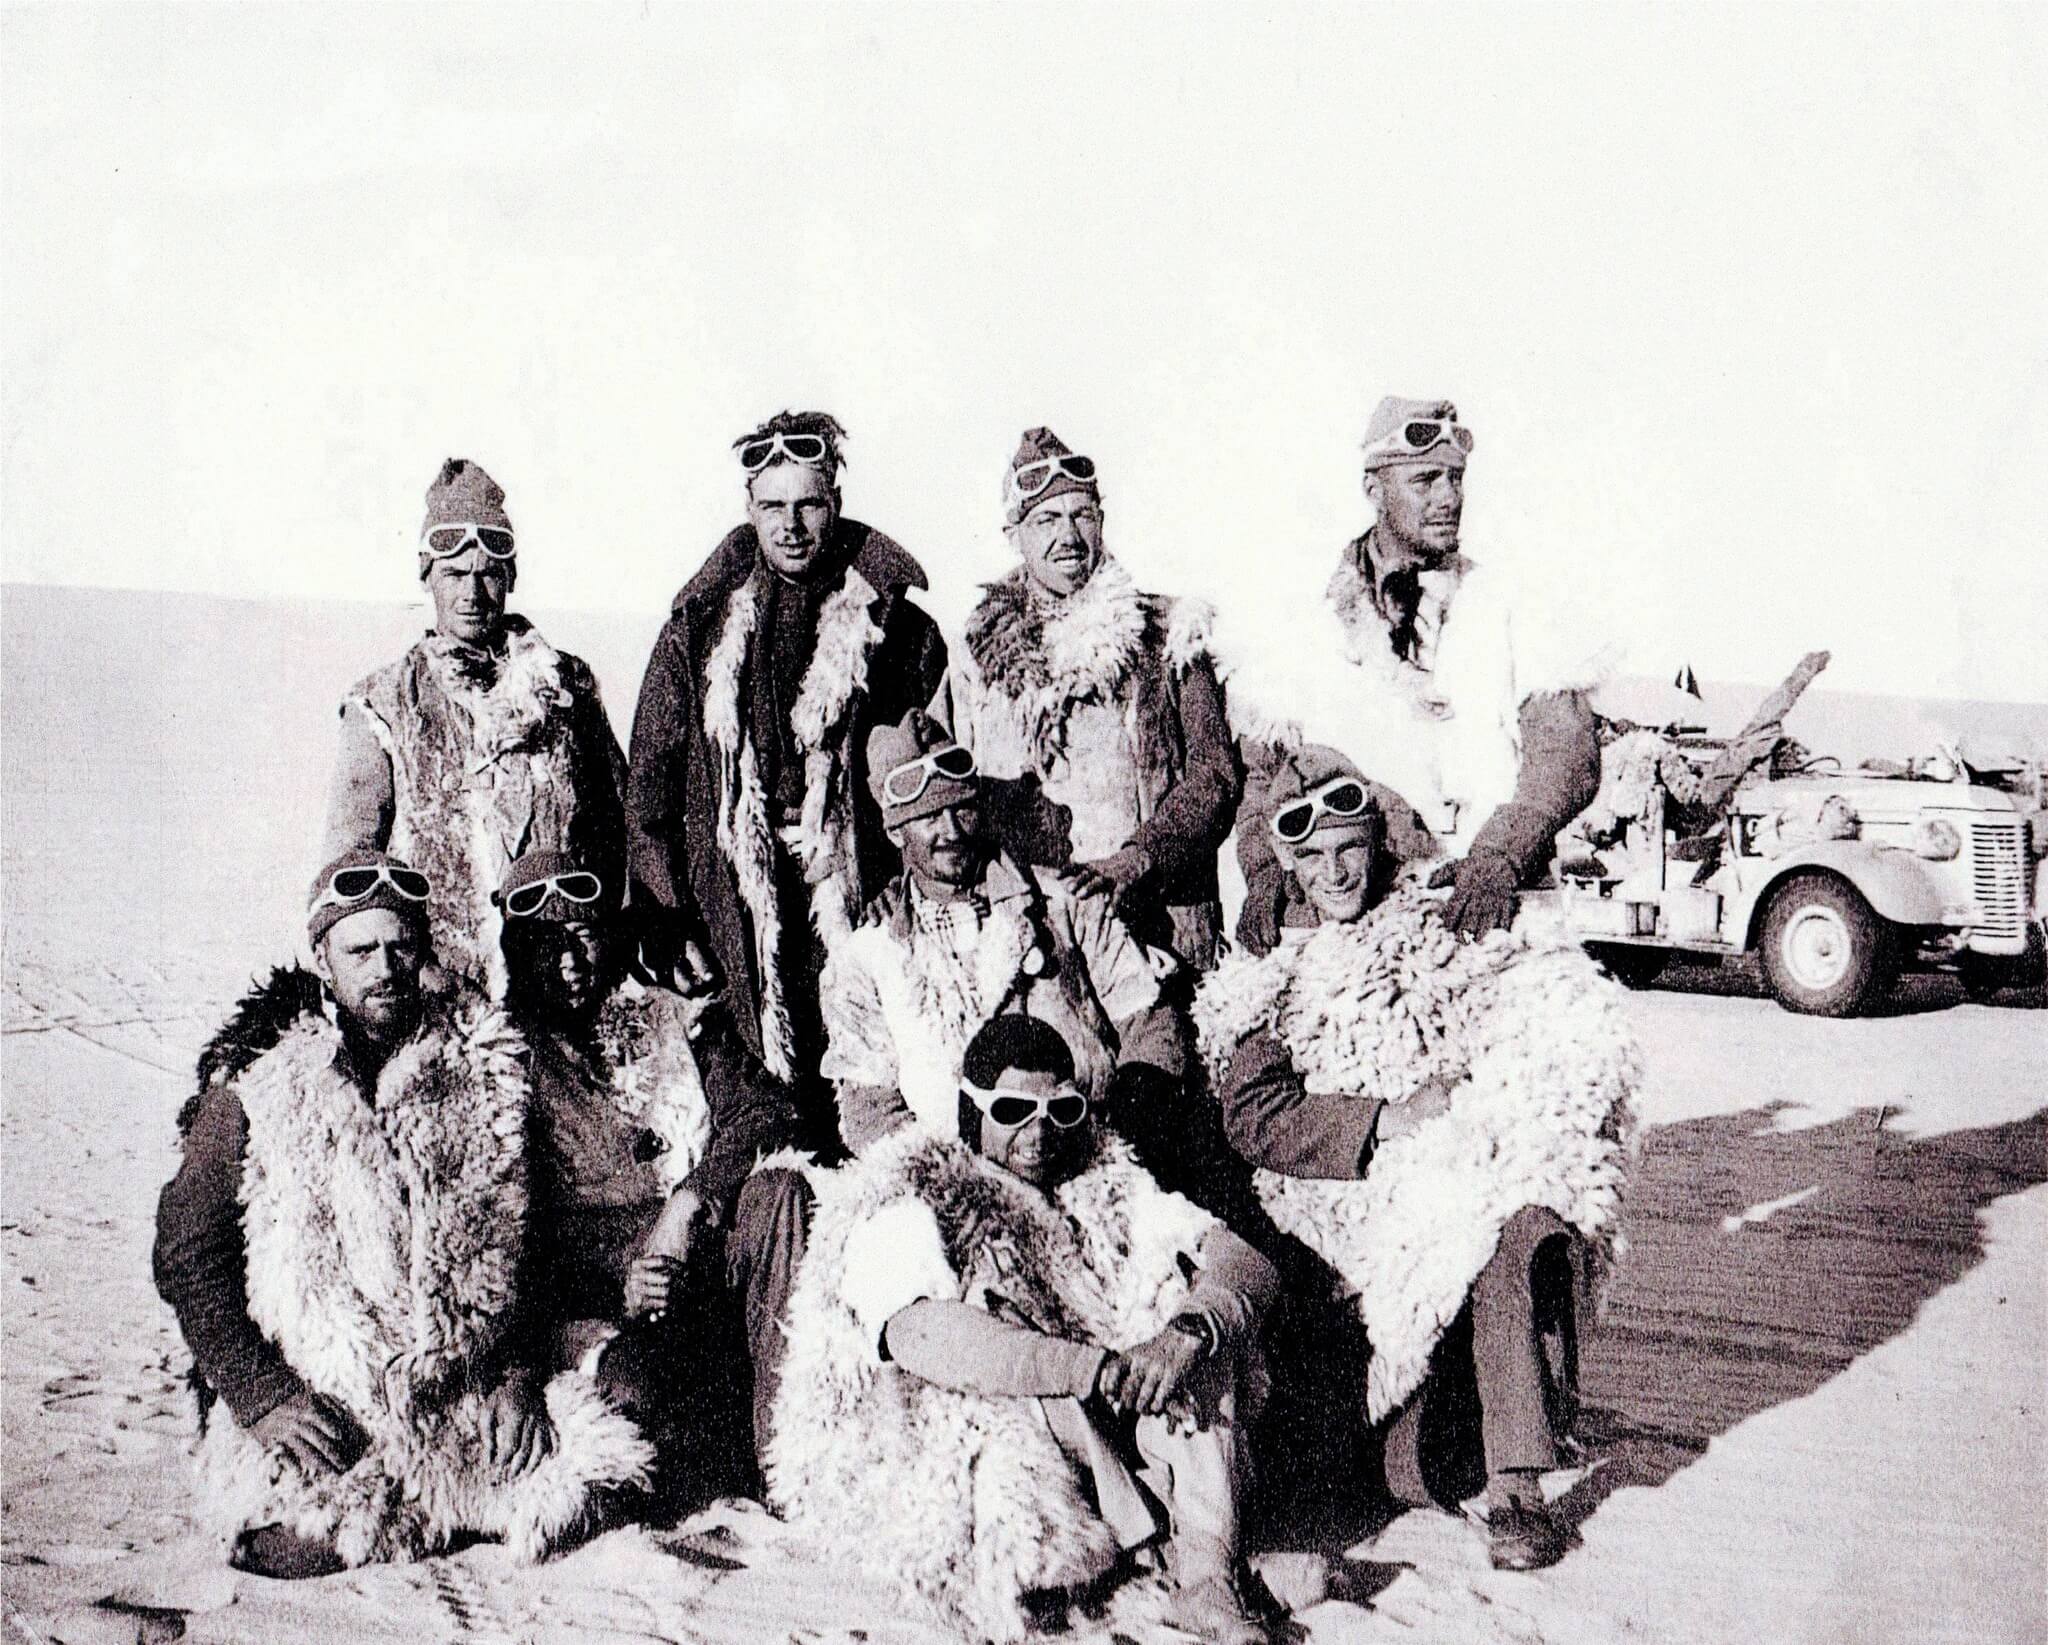
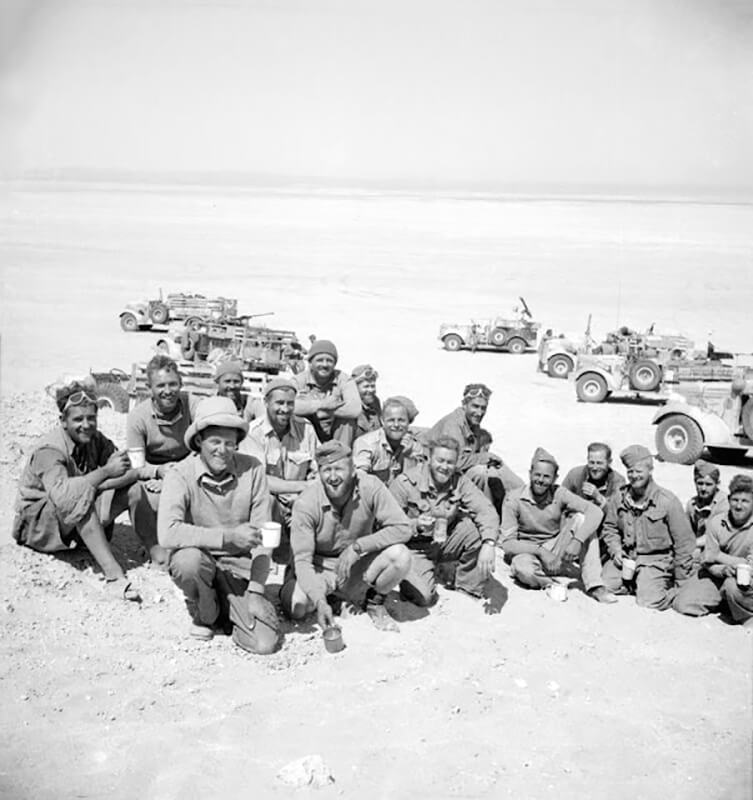
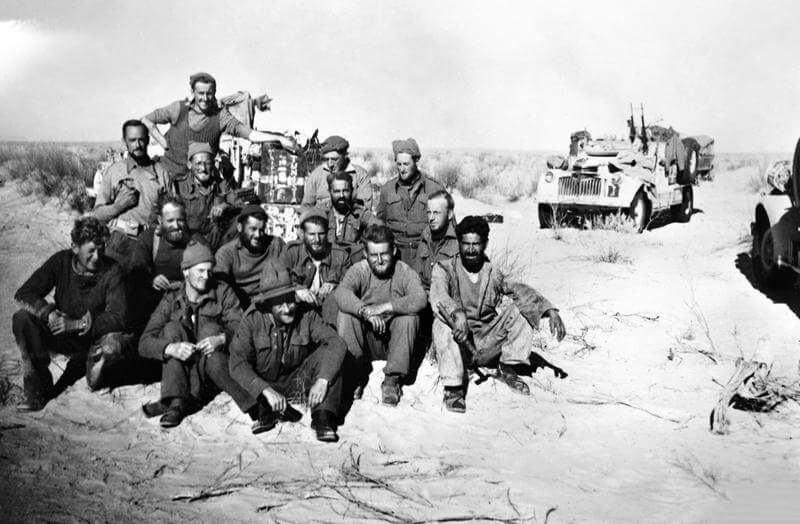
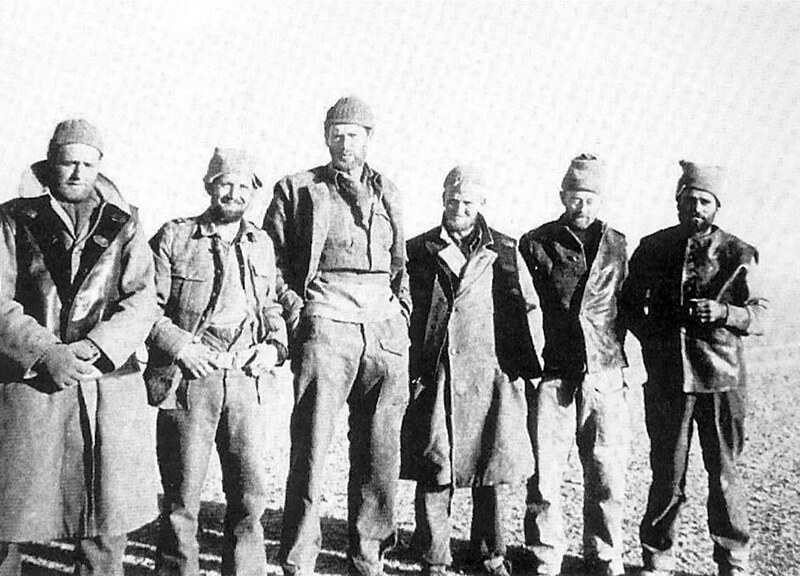
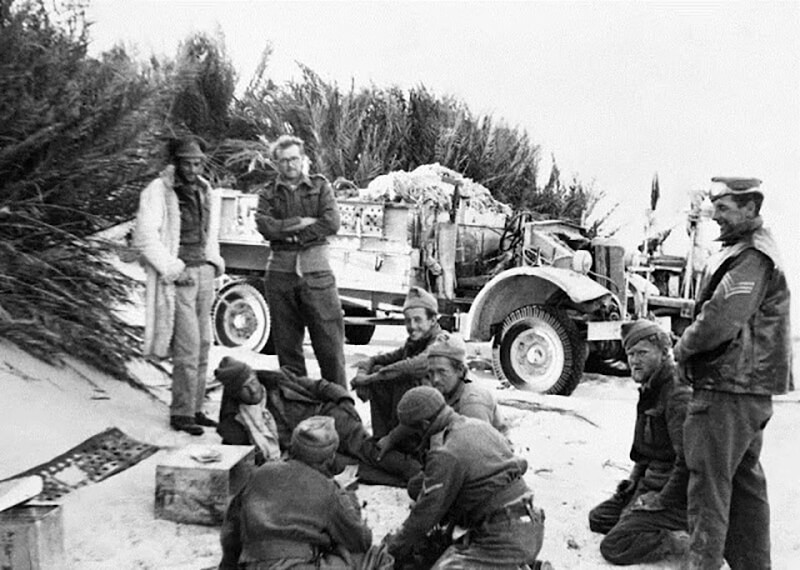
photograph of the Yeomanry
Patrol celebrating at Kufra after
a successful raid deep behind
enemy lines. Back row from left
to right: Trooper ‘Tankie’ Babb
(Tank Corps); Corporal Jack
Harris (Somerset Yeomanry);
Gunner James Patch (Royal
Artillery); Sergeant Derek
Hutchins (Somerset Yeomanry);
Lance Corporal Arthur Cave
MM (Somerset Yeomanry);
Lance Corporal Brian
Springford (Somerset
Yeomanry); Trooper Kenneth
Tinckler (Cheshire Regiment);
Craftsman Alf Tighe MM
(REME); Trooper Armstrong.
Front row (left to right): Private
Devine (Seaforths); Private John
McKay (Seaforths); Trooper F.
Gordon Harrison (Yorkshire
Hussars); Private William Fraser
(Seaforths); Trooper L. D.
Coombs (Somerset Yeomanry);
Trooper Robert Davies
(Yeomanry); Trooper Donald
Cashin (Cheshire Yeomanry).
![](https://worldwar2-sof.com/wp-content/uploads/2024/03/y-patrol-2.jpg)
![David Lloyd Owen with a Y Patrol vehicle named, Aramis.](https://worldwar2-sof.com/wp-content/uploads/2024/03/y-patrol-1.jpg)
![](https://worldwar2-sof.com/wp-content/uploads/2023/01/ILRS.jpg)
![](https://worldwar2-sof.com/wp-content/uploads/2024/04/y-patrol-lysander-1942-1.jpg)
![Members from Y Patrol with their newly painted Jeep Nomad.](https://worldwar2-sof.com/wp-content/uploads/2024/03/y-patrol-9.jpg)
![](https://worldwar2-sof.com/wp-content/uploads/2024/04/y-patrol-lysander-1942-5.jpg)
![](https://worldwar2-sof.com/wp-content/uploads/2024/04/y-patrol-lysander-1942-2.jpg)
![](https://worldwar2-sof.com/wp-content/uploads/2024/04/y-patrol-lysander-1942-4.jpg)
![](https://worldwar2-sof.com/wp-content/uploads/2024/04/y-patrol-lysander-1942-7.jpg)
![](https://worldwar2-sof.com/wp-content/uploads/2024/04/y-patrol-lysander-1942-3.jpg)
![](https://worldwar2-sof.com/wp-content/uploads/2024/04/y-patrol-lysander-1942-6.jpg)
Medical Section |
![The Medical Officers Truck on a converted Chevrolet Chevrolet 1311x3 15-cwt, 4x2 chassis. The two other trucks are both Chevrolet 1533x2, 30-cwt, 4x2 W/T trucks, the base of a windom antenna is barely visible in the background.](https://worldwar2-sof.com/wp-content/uploads/2024/03/lrdg-vehicle-24.jpg)
![The Medical Officers Truck on a converted Chevrolet Chevrolet 1311x3 15-cwt, 4x2 chassis. The two other trucks are both Chevrolet 1533x2, 30-cwt, 4x2 W/T trucks, the base of a windom antenna is barely visible in the background.](https://worldwar2-sof.com/wp-content/uploads/2024/03/lrdg-vehicle-25.jpg)
![Inside of the Medica Officers Truck.](https://worldwar2-sof.com/wp-content/uploads/2024/03/medical-officer.jpg)
Artillery and Royal Artillery Section |
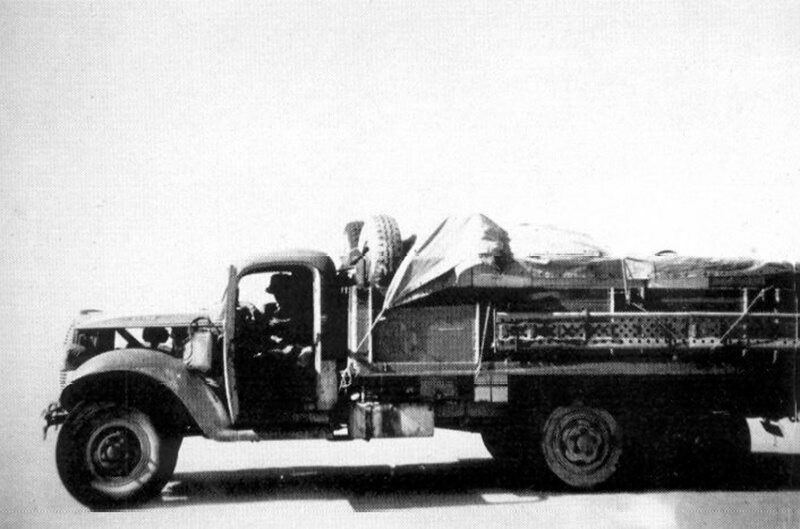
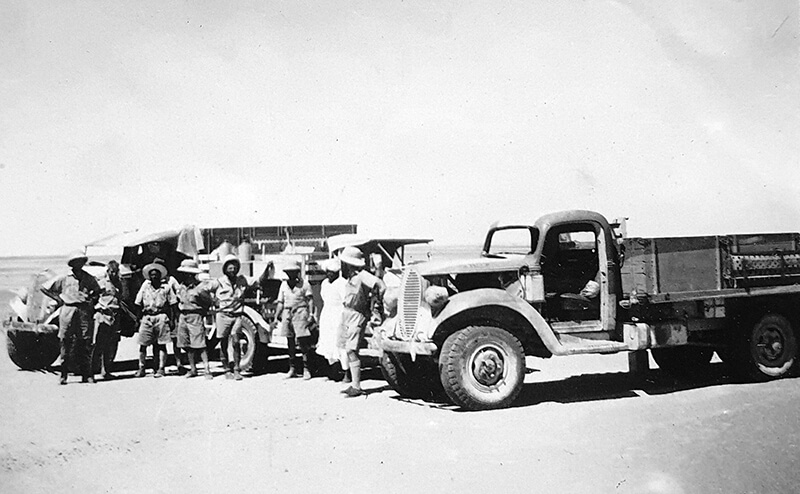
![Italian 20 millimetre Breda M 35 cannon installed on the back of a Long Range Desert Group Chevrolet truck.](https://worldwar2-sof.com/wp-content/uploads/2024/03/lrdg-vehicle-33-1024x822.jpg)
![S 6 Gun truck from S Patrol.](https://worldwar2-sof.com/wp-content/uploads/2024/03/s-patrol-s-6-8.jpg)
![](https://worldwar2-sof.com/wp-content/uploads/2024/03/breda-t-patrol-1.jpg)
![A Chevrolet WB with a 37 mm Bofors anti-tank gun mounted on the rear. The steel helmets were rarely used during action in the LRDG.](https://worldwar2-sof.com/wp-content/uploads/2024/03/colour-19.jpg)
![A Chevrolet WB with a 37 mm Bofors anti-tank gun mounted on the rear. The steel helmets were rarely used during action in the LRDG.](https://worldwar2-sof.com/wp-content/uploads/2024/03/Boforswb.jpg)
![A close up of a Chevrolet WB with a 37 mm Bofors anti-tank gun mounted on the rear.](https://worldwar2-sof.com/wp-content/uploads/2024/03/wd_LRDG_Chevy-WA_05.jpg)
![](https://worldwar2-sof.com/wp-content/uploads/2024/03/v_bofors2.jpg)
Heavy Section |
![](https://worldwar2-sof.com/wp-content/uploads/2023/02/marm-herr.jpg.jpg)
![](https://worldwar2-sof.com/wp-content/uploads/2023/02/Marmon-herrington-1937-heavy-section.jpg)
![](https://worldwar2-sof.com/wp-content/uploads/2023/02/Marmon-herrington-1937-heavy-section-posing.jpg)
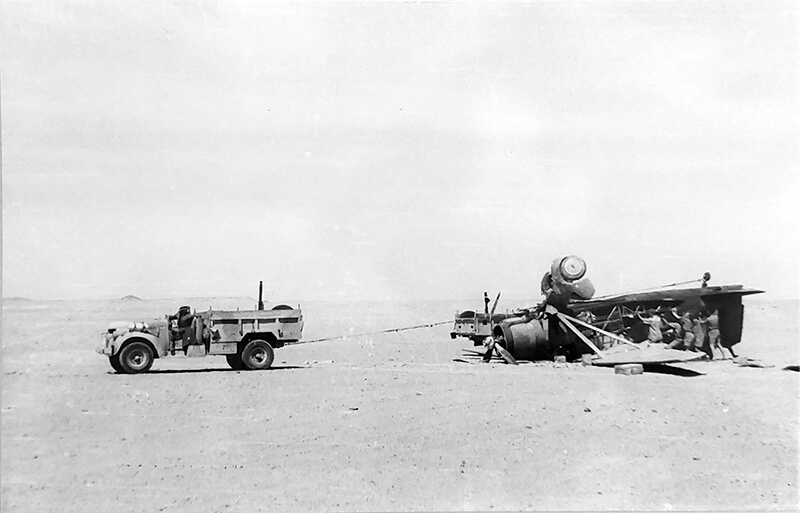
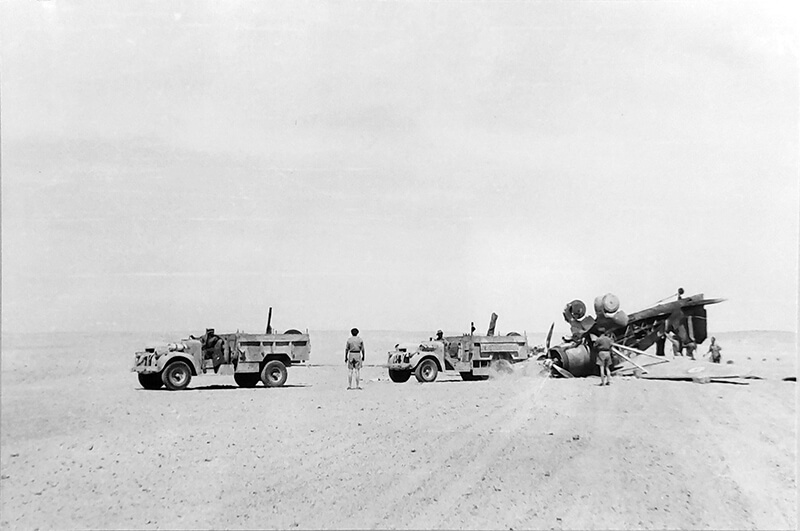
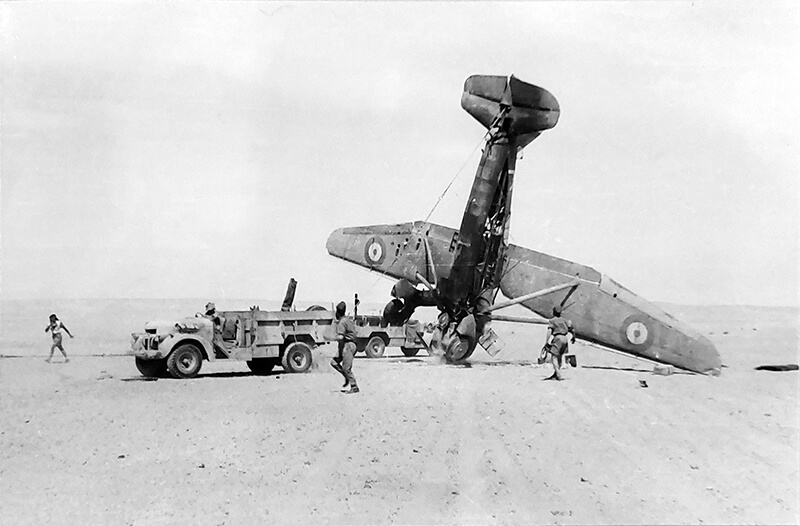
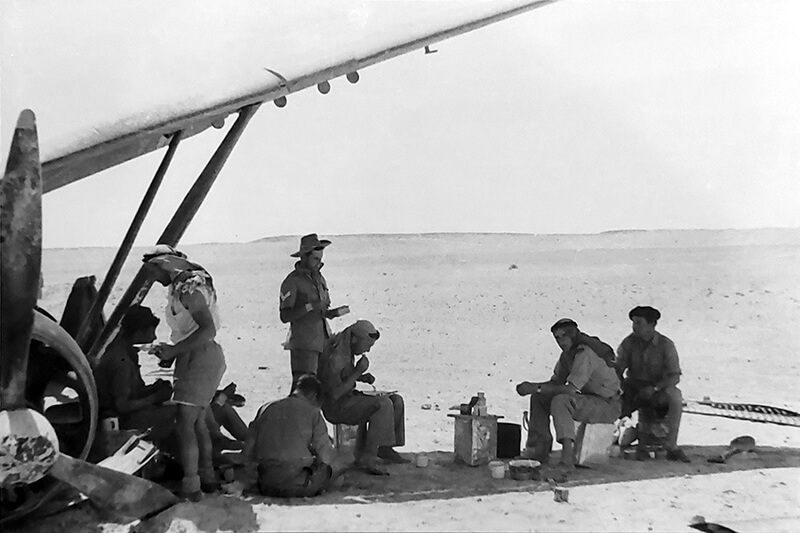
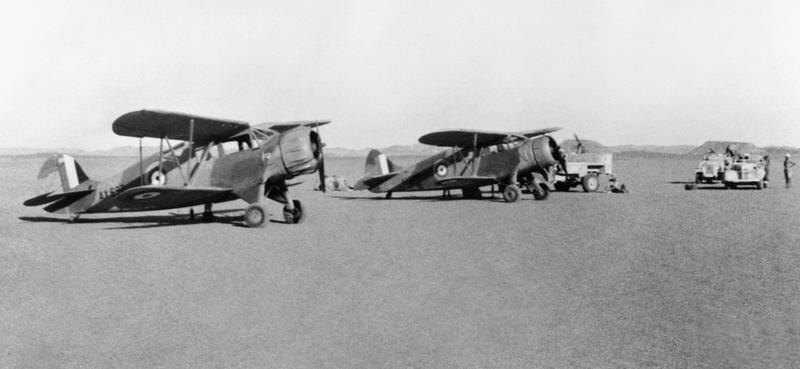
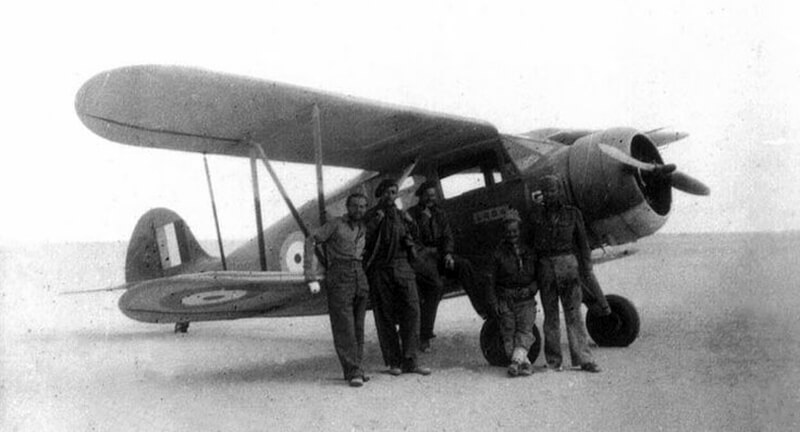
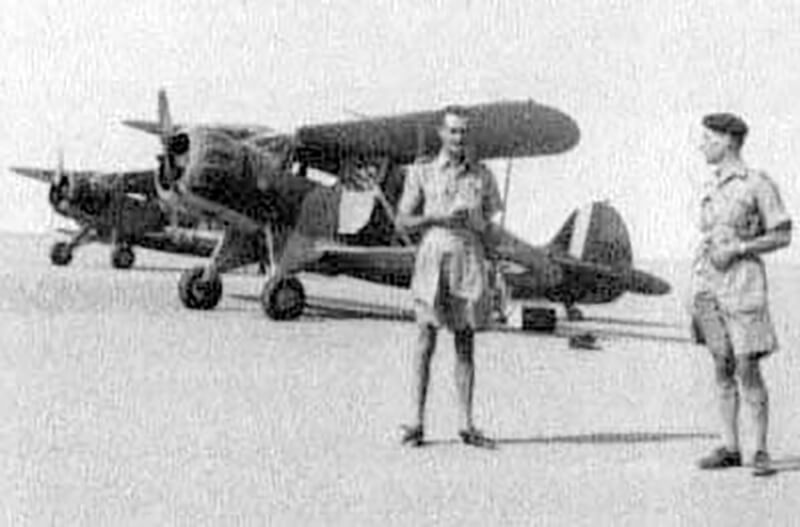
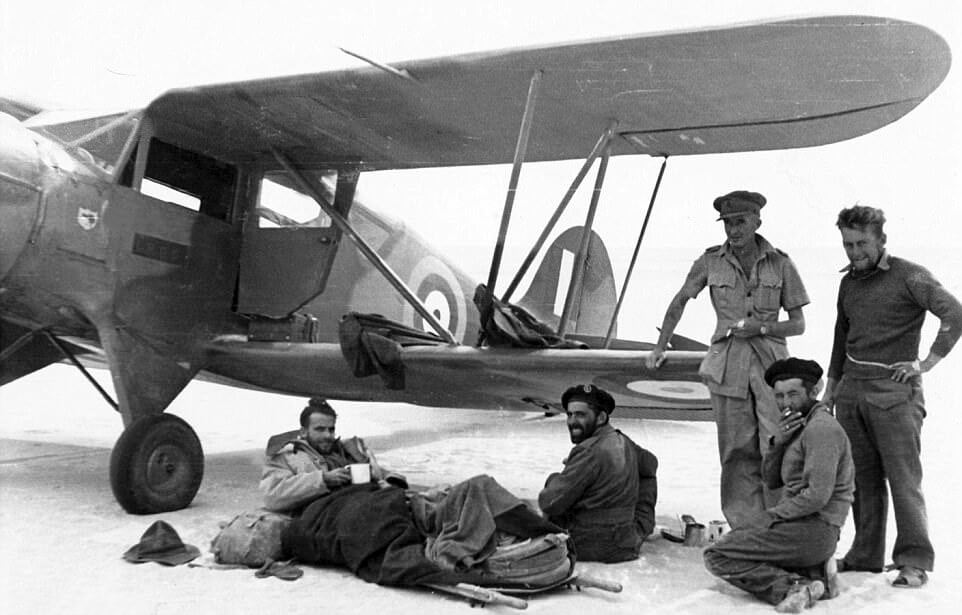
Long Range Desert Group Air Force |
![THE LONG RANGE DESERT GROUP (LRDG) DURING THE SECOND WORLD WAR (HU 25081) Waco YKC, AX697 (left), and Waco ZGC-7, AX695 (right), of the Long Range Desert Group, on the ground in the Western Desert of Egypt between Kufra and Siwa after landing supplies for 'Y' Patrol. The aircraft were 'acquired' by the LRDG's second-in-command, Major G L Prendergast (a pilot himself) to solve the problem of supplying widely scattered outposts. The Wacos shortened the trip from Kufra to ... Copyright: © IWM. Original Source: http://www.iwm.org.uk/collections/item/object/205088545](https://worldwar2-sof.com/wp-content/uploads/2024/03/lrdg-waco-5.jpg)
![](https://worldwar2-sof.com/wp-content/uploads/2024/03/lrdg-waco-2.jpg)
![](https://worldwar2-sof.com/wp-content/uploads/2024/03/lrdg-waco-3.jpg)
![A wounded LRDG soldier enjoys a cup of tea at Kufa as he waits to be flown to a Cairo hospital following Operation Caravan in September 1942.](https://worldwar2-sof.com/wp-content/uploads/2024/03/lrdg-waco-1-1.jpg)
![Guy Prendergast unloading stores. Prendergast had been a Saharan explorer through the 1920s and 1930s before he became an Army officer. He had already worked alongside the Major Ralph Bagnold and built up a great deal of experience and information which became useful to the forces.](https://worldwar2-sof.com/wp-content/uploads/2024/03/lrdg-waco-4.jpg)
Long Range Desert Group Signallers |
![Long Range Desert Group Signallers in Italy at the end of the war, just before the unit is disbanded.](https://worldwar2-sof.com/wp-content/uploads/2024/03/lrdg-signal-1.jpg)
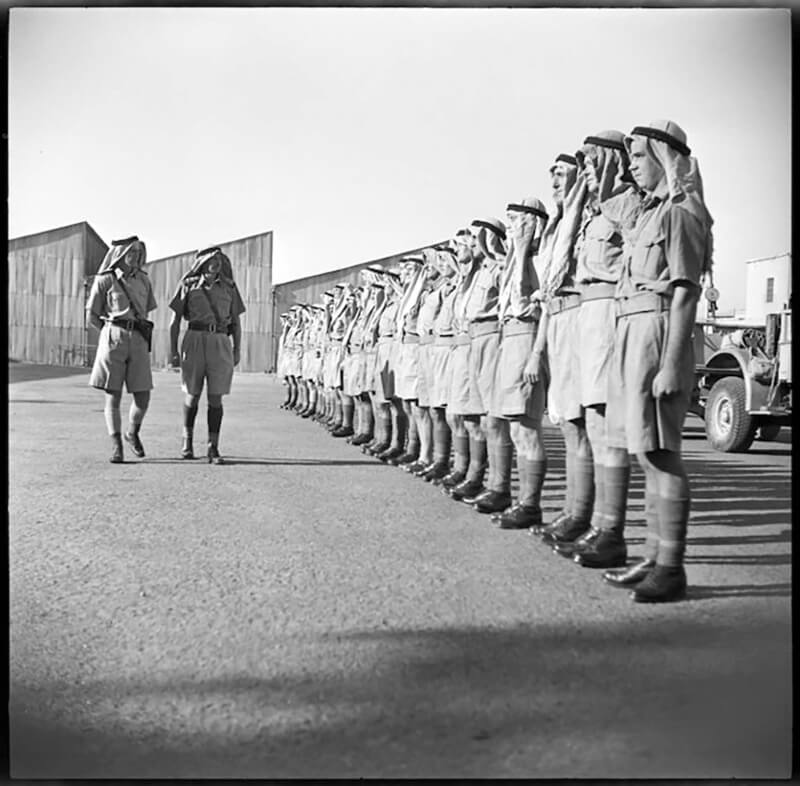
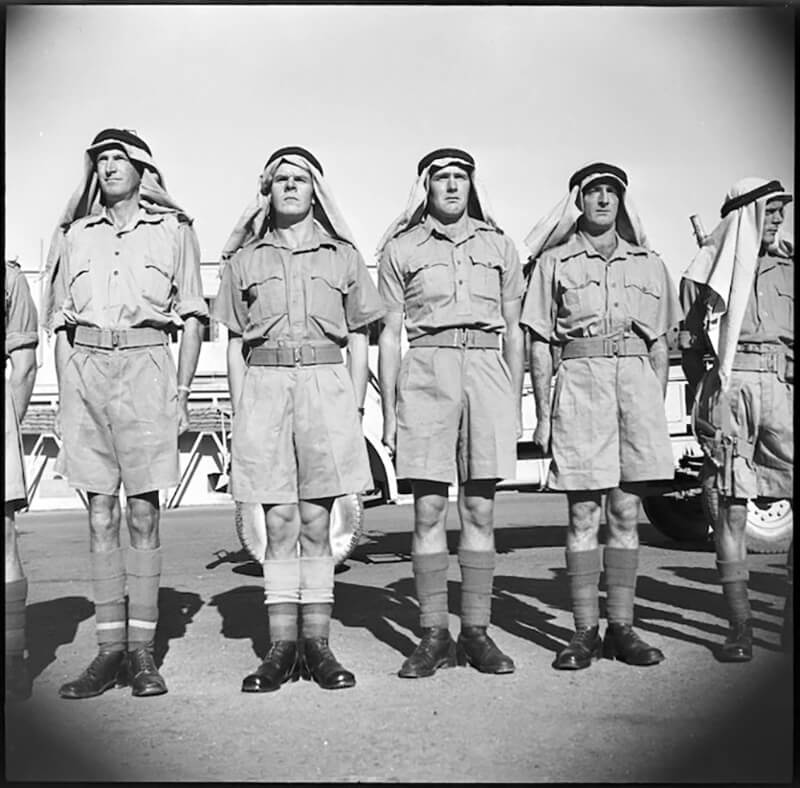
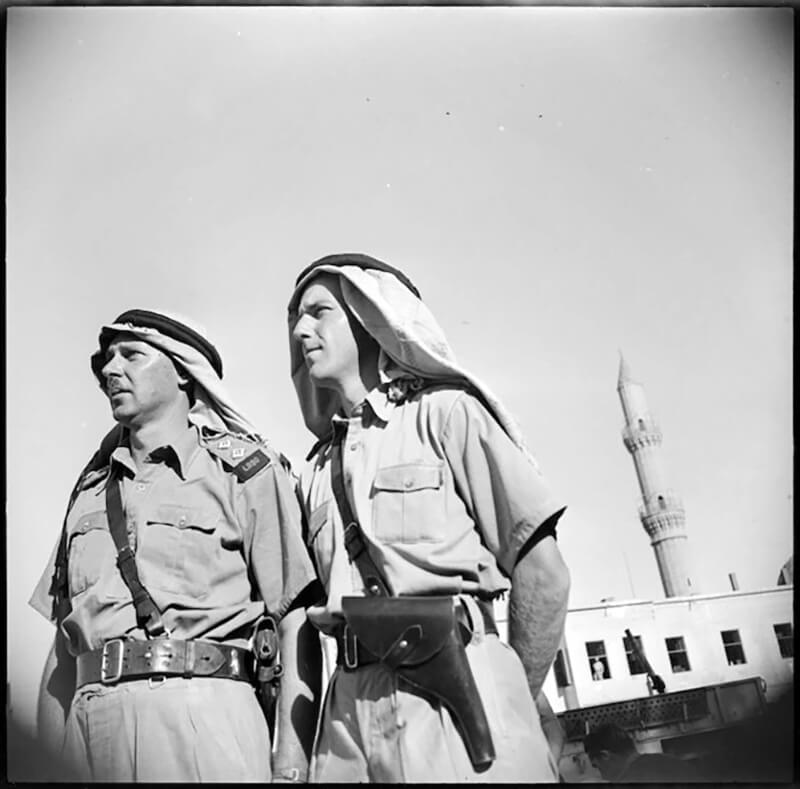
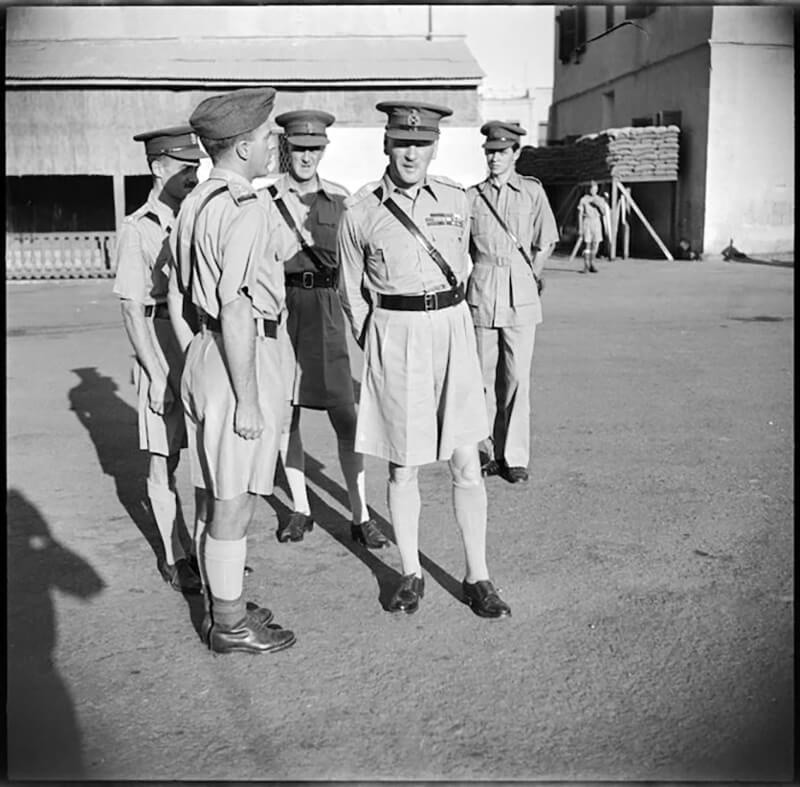
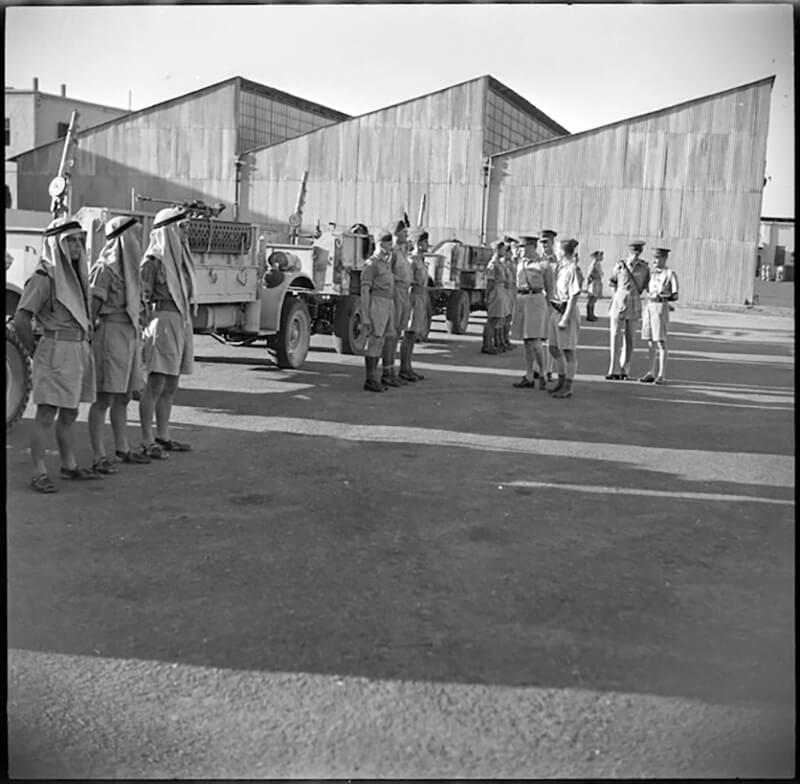
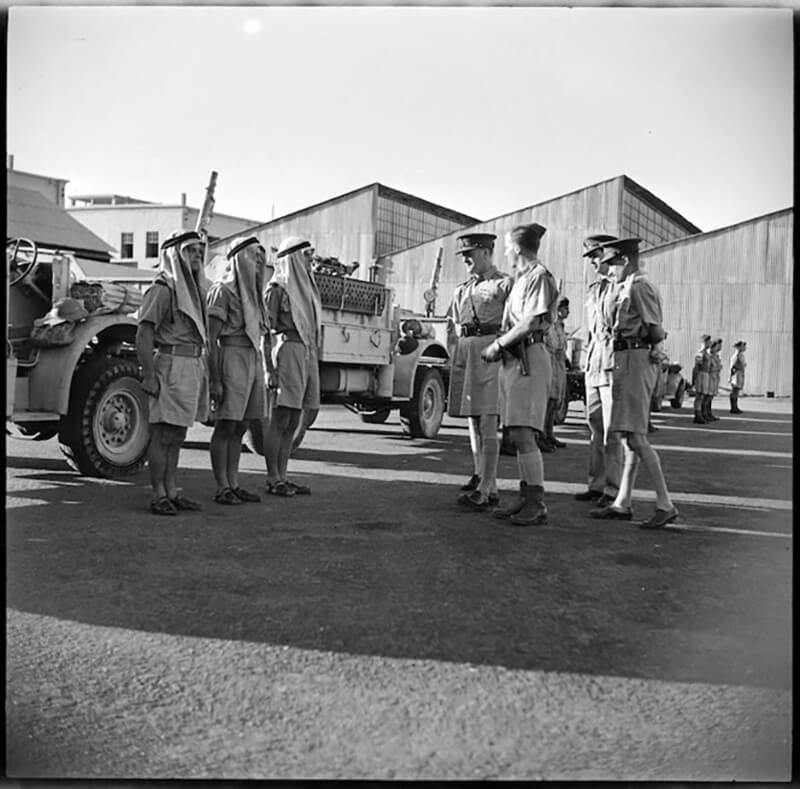
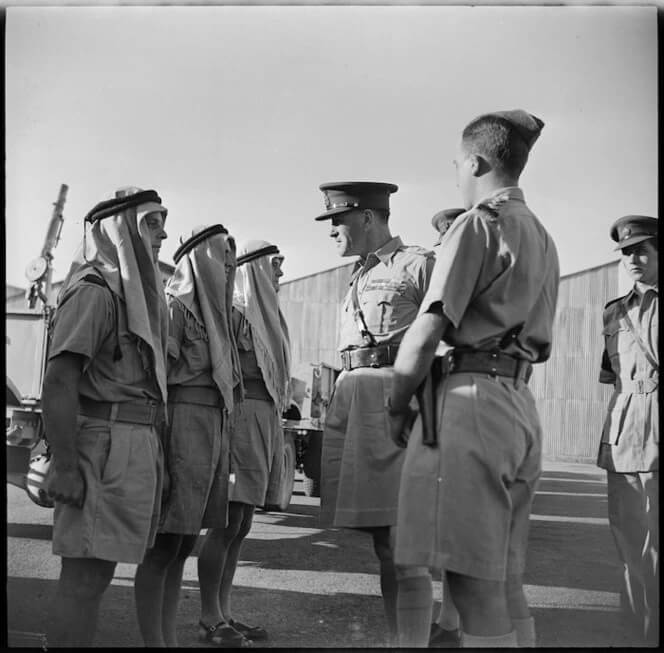
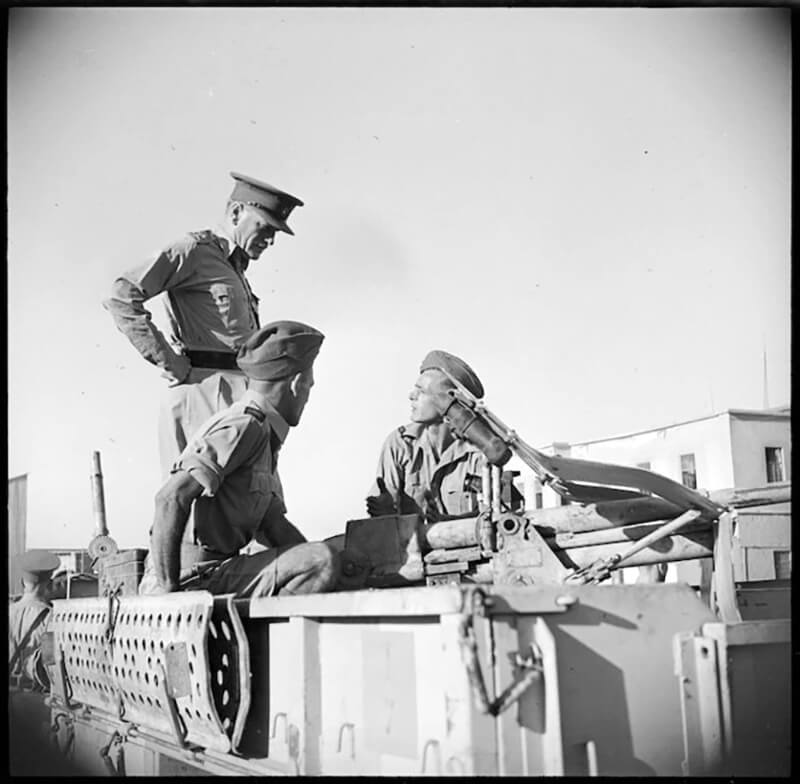
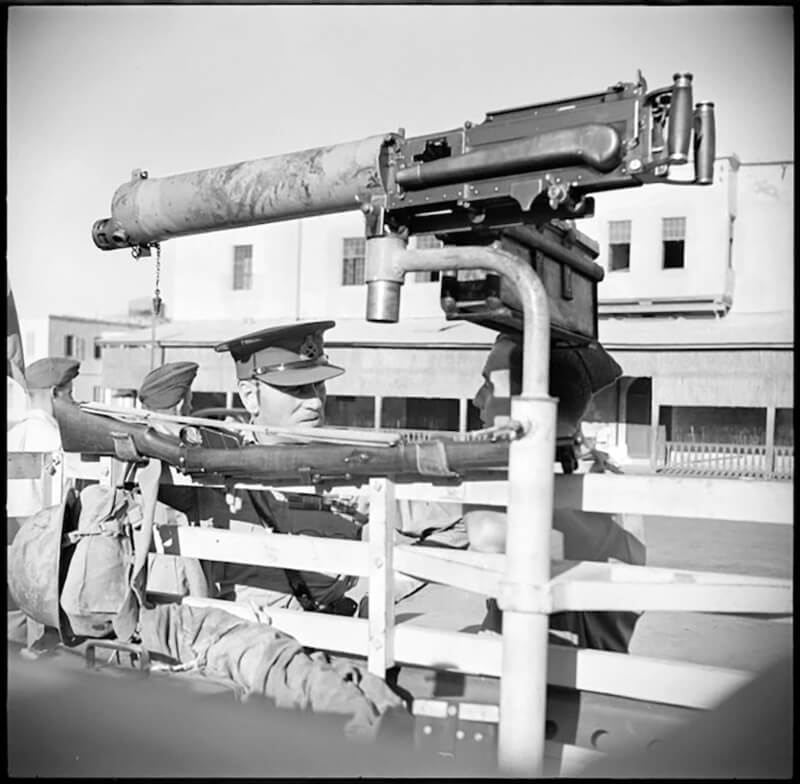
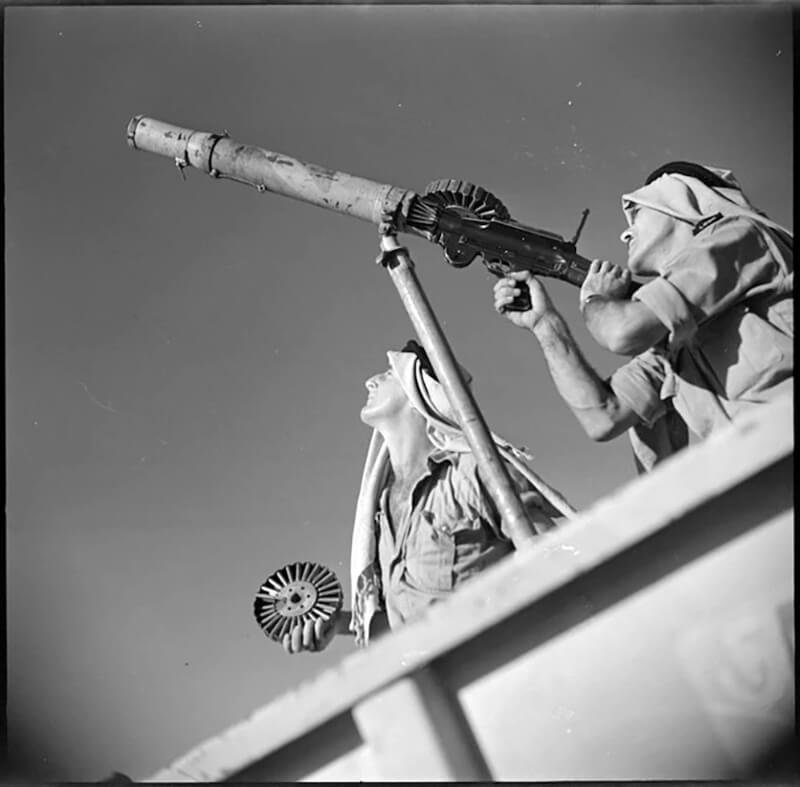
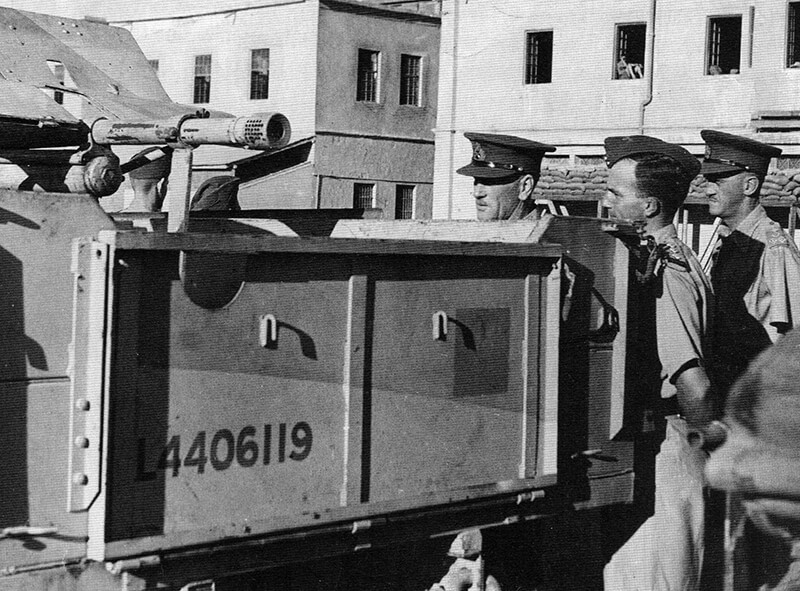
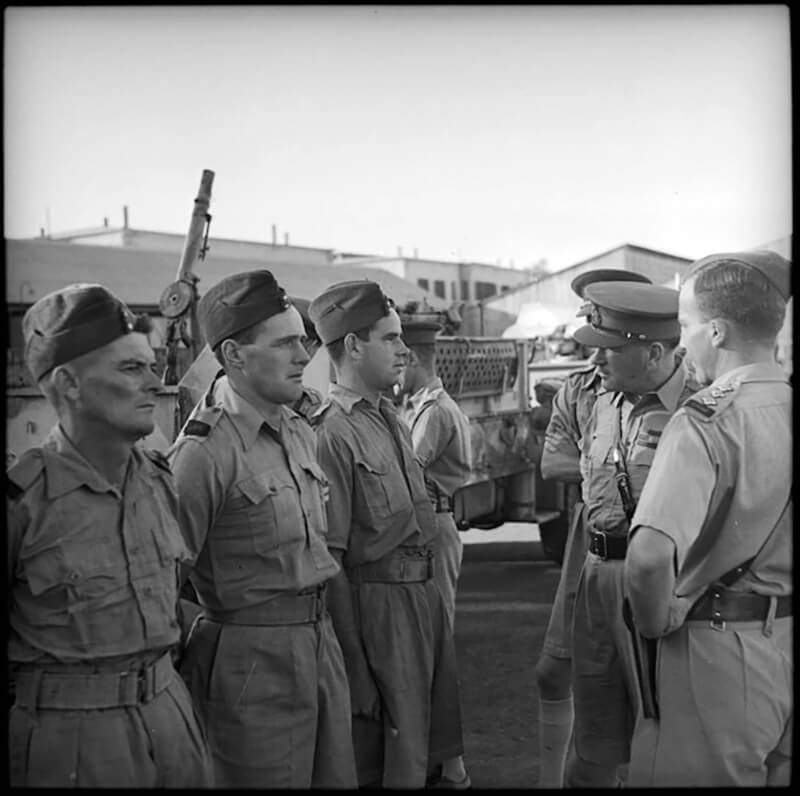
New Zealand LRDG patrol during parade for General Auchinleck in Cairo, October 5th, 1941. |
![Officers of a NZ LRDG patrol overlooking men during parade for General Auchinleck in Cairo. New Zealand. Department of Internal Affairs. War History Branch :Photographs relating to World War 1914-1918, World War 1939-1945, occupation of Japan, Korean War, and Malayan Emergency. Ref: DA-02087-F. Alexander Turnbull Library, Wellington, New Zealand. /records/22757440](https://worldwar2-sof.com/wp-content/uploads/2023/01/nz-lrdg-patrol-on-parade-2.jpg)
![Members of the Long Range Desert Group (LRDG) on parade for General Auchinleck, Commander in Chief of the Middle East Forces. L to R: R J Moore DCM (Taihape), L A McIvor (Wairoa), E C Stuttend (Otorohanga), B T Shepherd (Hamilton). Photograph taken in Cairo on October 5th,1941. New Zealand. Department of Internal Affairs. War History Branch :Photographs relating to World War 1914-1918, World War 1939-1945, occupation of Japan, Korean War, and Malayan Emergency. Ref: DA-02076-F. Alexander Turnbull Library, Wellington, New Zealand. /records/22590967](https://worldwar2-sof.com/wp-content/uploads/2023/01/nz-lrdg-patrol-on-parade-2-1.jpg)
![Trooper R J Moore, DCM, of the Long Range Desert Group (LRDG) at parade for General Auchinleck, Commander in Chief of the Middle East Forces in World War II. Taken in Cairo on October 5th, 1941. New Zealand. Department of Internal Affairs. War History Branch :Photographs relating to World War 1914-1918, World War 1939-1945, occupation of Japan, Korean War, and Malayan Emergency. Ref: DA-02090-F. Alexander Turnbull Library, Wellington, New Zealand. /records/22533747](https://worldwar2-sof.com/wp-content/uploads/2023/01/nz-lrdg-patrol-on-parade-9.jpg)
![Members of a New Zealand patrol of the Long Range Desert Group (LRDG) on parade for General Auchinleck, Commander in Chief of the Middle East Forces, during World War II. Photograph taken in Cairo on October 5th, 1941. New Zealand. Department of Internal Affairs. War History Branch :Photographs relating to World War 1914-1918, World War 1939-1945, occupation of Japan, Korean War, and Malayan Emergency. Ref: DA-02085-F. Alexander Turnbull Library, Wellington, New Zealand. /records/23173481](https://worldwar2-sof.com/wp-content/uploads/2023/01/nz-lrdg-patrol-on-parade-3.jpg)
![Members of the Long Range Desert Group (LRDG) during parade for General Auchinleck, Commander in Chief of the Middle East Forces. L to R: Lieutenant S W Ellingham and Captain Ballantyne. Taken in Cairo on October 5th,1941. New Zealand. Department of Internal Affairs. War History Branch :Photographs relating to World War 1914-1918, World War 1939-1945, occupation of Japan, Korean War, and Malayan Emergency. Ref: DA-02077-F. Alexander Turnbull Library, Wellington, New Zealand. /records/22303633](https://worldwar2-sof.com/wp-content/uploads/2023/01/nz-lrdg-patrol-on-parade-1.jpg)
![General Sir Claude Auchinleck, Commander in Chief of the Middle East Forces, with other officers at an inspection of the Long Range Desert Group (LRDG) held in Cairo, World War II. Taken on October 5th, 1941. New Zealand. Department of Internal Affairs. War History Branch :Photographs relating to World War 1914-1918, World War 1939-1945, occupation of Japan, Korean War, and Malayan Emergency. Ref: DA-02078-F. Alexander Turnbull Library, Wellington, New Zealand. /records/22326254](https://worldwar2-sof.com/wp-content/uploads/2023/01/nz-lrdg-patrol-on-parade-8.jpg)
![General Auchinleck, Commander in Chief of the Middle East Forces, during a visit of inspection to a NZ patrol of the Long Range Desert Group (LRDG) in Egypt during World War II. Photograph taken in Cairo on October 5th, 1941. New Zealand. Department of Internal Affairs. War History Branch :Photographs relating to World War 1914-1918, World War 1939-1945, occupation of Japan, Korean War, and Malayan Emergency. Ref: DA-02084-F. Alexander Turnbull Library, Wellington, New Zealand. /records/22787829](https://worldwar2-sof.com/wp-content/uploads/2023/01/nz-lrdg-patrol-on-parade-12.jpg)
![The New Zealand Patrol of the Long Range Desert Group (LRDG) on parade for General Auchinleck, Commander in Chief of the Middle East Forces, during World War II. Photograph taken in Cairo on October 5th, 1941. New Zealand. Department of Internal Affairs. War History Branch :Photographs relating to World War 1914-1918, World War 1939-1945, occupation of Japan, Korean War, and Malayan Emergency. Ref: DA-06817-F. Alexander Turnbull Library, Wellington, New Zealand. /records/22852018](https://worldwar2-sof.com/wp-content/uploads/2023/01/nz-lrdg-patrol-on-parade-4.jpg)
![General Auchinleck, Commander in Chief of the Middle East Forces, speaking to members of the Long Range Desert Group (LRDG) during World War II. Photograph taken in Cairo on October 5th, 1941. New Zealand. Department of Internal Affairs. War History Branch :Photographs relating to World War 1914-1918, World War 1939-1945, occupation of Japan, Korean War, and Malayan Emergency. Ref: DA-02089-F. Alexander Turnbull Library, Wellington, New Zealand. /records/22900923](https://worldwar2-sof.com/wp-content/uploads/2023/01/nz-lrdg-patrol-on-parade-6.jpg)
![General Auchinleck, Commander in Chief of the Middle East Forces, talking to some of the New Zealanders forming part of one of the Long Range Desert Group (LRDG) patrols. Photograph taken in Cairo on October 5th, 1941. New Zealand. Department of Internal Affairs. War History Branch :Photographs relating to World War 1914-1918, World War 1939-1945, occupation of Japan, Korean War, and Malayan Emergency. Ref: DA-02080-F. Alexander Turnbull Library, Wellington, New Zealand. /records/22326839](https://worldwar2-sof.com/wp-content/uploads/2023/01/nz-lrdg-patrol-on-parade-11.jpg)
![](https://worldwar2-sof.com/wp-content/uploads/2023/01/nz-lrdg-patrol-on-parade-10.jpg)
![General Auchinleck, Commander in Chief of the Middle East Forces, talks with men of New Zealand patrol during inspection of the Long Range Desert Group (LRDG) in Cairo. Photograph taken on October 5th, 1941. New Zealand. Department of Internal Affairs. War History Branch :Photographs relating to World War 1914-1918, World War 1939-1945, occupation of Japan, Korean War, and Malayan Emergency. Ref: DA-02081-F. Alexander Turnbull Library, Wellington, New Zealand. /records/23217698](https://worldwar2-sof.com/wp-content/uploads/2023/01/nz-lrdg-patrol-on-parade-5.jpg)
![](https://worldwar2-sof.com/wp-content/uploads/2023/01/nz-lrdg-patrol-on-parade-15.jpg)
![General Auchinleck, Commander in Chief of the Middle East Forces, inspects a Bofors anti tank gun of the New Zealand Patrol at a Long Range Desert Group (LRDG) parade in Cairo, Egypt, during World War II. Photograph taken on October 5th, 1941. New Zealand. Department of Internal Affairs. War History Branch :Photographs relating to World War 1914-1918, World War 1939-1945, occupation of Japan, Korean War, and Malayan Emergency. Ref: DA-06818-F. Alexander Turnbull Library, Wellington, New Zealand. /records/22690108](https://worldwar2-sof.com/wp-content/uploads/2023/01/nz-lrdg-patrol-on-parade-7.jpg)
![Members of the Long Range Desert Group (LRDG) manning guns during the inspection by General Auchinleck, Commander in Chief of the Middle East Forces in World War II. Photograph taken in Cairo on October 5th, 1941. New Zealand. Department of Internal Affairs. War History Branch :Photographs relating to World War 1914-1918, World War 1939-1945, occupation of Japan, Korean War, and Malayan Emergency. Ref: DA-02088-F. Alexander Turnbull Library, Wellington, New Zealand. /records/23241324](https://worldwar2-sof.com/wp-content/uploads/2023/01/nz-lrdg-patrol-on-parade-13.jpg)
![General Auchinleck, Commander in Chief of the Middle East Forces, during inspection of the Long Range Desert Group (LRDG) in Cairo. Photograph taken on October 5th, 1941.](https://worldwar2-sof.com/wp-content/uploads/2024/03/lrdg-inspection-1.jpg)
![](https://worldwar2-sof.com/wp-content/uploads/2023/01/nz-lrdg-patrol-on-parade-14.jpg)
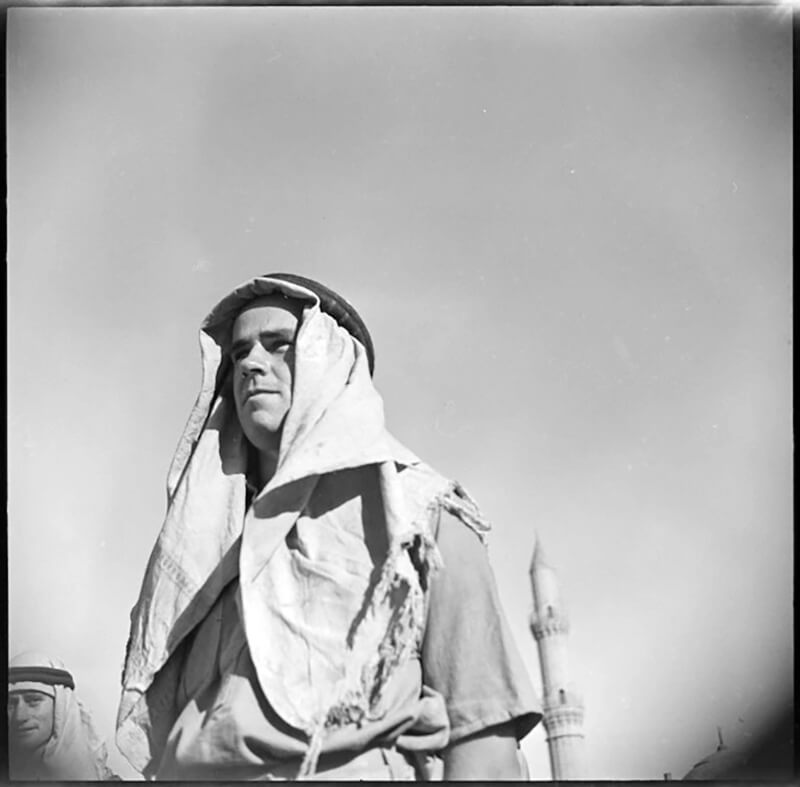
Cecil Beaton Collection |
![CECIL BEATON IN THE MIDDLE EAST FEBRUARY-JULY 1942 (CBM 1399) Photographic negative Copyright: © IWM. Original Source: http://www.iwm.org.uk/collections/item/object/205489325](https://worldwar2-sof.com/wp-content/uploads/2024/03/lrdg-men-5.jpg)
![CECIL BEATON PHOTOGRAPHS: GENERAL (CBM 2220) The Western Desert 1942: A large group of men of the Long Range Desert Group in miscellaneous dress marching through a square archway. Copyright: © IWM. Original Source: http://www.iwm.org.uk/collections/item/object/205193647](https://worldwar2-sof.com/wp-content/uploads/2024/03/lrdg-men-4.jpg)
![CECIL BEATON IN THE MIDDLE EAST FEBRUARY-JULY 1942 (CBM 1396) Photographic negative Copyright: © IWM. Original Source: http://www.iwm.org.uk/collections/item/object/205489322](https://worldwar2-sof.com/wp-content/uploads/2024/03/lrdg-men-3-1.jpg)
![Members of Y-Patrol of the Long-Range Desert Group, Siwa Oasis, Western Desert, Egypt, 1942. On left is Trooper Bill Bullock, in the center is Sergeant Frank Johns, Lance Corporal Robert Hall #3529858 is on the right.](https://worldwar2-sof.com/wp-content/uploads/2024/03/black-and-white-11.jpg)
![Members of Y-Patrol of the Long-Range Desert Group, Siwa Oasis, Western Desert, Egypt, 1942 On left is Trooper Bill Bullock, in the center is Sgt Frank Johns , L/Cpl Robert Hall #3529858 is on the right.](https://worldwar2-sof.com/wp-content/uploads/2024/03/colour-11.jpg)
![Members of Y Patrol read mail from home at Siwa Oasis in May 1942. Letters from home nearly always provided a boost to morale.](https://worldwar2-sof.com/wp-content/uploads/2024/03/colour-10.jpg)
![Members of Y Patrol read mail from home at Siwa Oasis in May 1942. Letters from home nearly always provided a boost to morale.](https://worldwar2-sof.com/wp-content/uploads/2024/03/lrdg-men-9.jpg)
![](https://worldwar2-sof.com/wp-content/uploads/2024/03/lrdg-cbm-001211.jpg)
![](https://worldwar2-sof.com/wp-content/uploads/2024/03/lrdg-cbm-001212.jpg)
![](https://worldwar2-sof.com/wp-content/uploads/2024/03/cecil-beaton-2-1.jpg)
![](https://worldwar2-sof.com/wp-content/uploads/2024/03/lrdg-cbm-001216.jpg)
![](https://worldwar2-sof.com/wp-content/uploads/2024/03/lrdg-cbm-001217.jpg)
![](https://worldwar2-sof.com/wp-content/uploads/2024/03/cecil-beaton-1-1.jpg)
![](https://worldwar2-sof.com/wp-content/uploads/2024/03/lrdg-cbm-001220.jpg)
![](https://worldwar2-sof.com/wp-content/uploads/2024/03/lrdg-cbm-001394.jpg)
![](https://worldwar2-sof.com/wp-content/uploads/2024/03/lrdg-cbm-001395.jpg)
![](https://worldwar2-sof.com/wp-content/uploads/2024/03/lrdg-men-8.jpg)
![CECIL BEATON IN THE MIDDLE EAST FEBRUARY-JULY 1942 (CBM 1397) Photographic negative Copyright: © IWM. Original Source: http://www.iwm.org.uk/collections/item/object/205489323](https://worldwar2-sof.com/wp-content/uploads/2024/03/lrdg-cbm-001397-1.jpg)
![](https://worldwar2-sof.com/wp-content/uploads/2024/03/lrdg-cbm-001398.jpg)
![](https://worldwar2-sof.com/wp-content/uploads/2024/03/lrdg-cbm-001399.jpg)
![](https://worldwar2-sof.com/wp-content/uploads/2024/03/lrdg-cbm-001400.jpg)
![](https://worldwar2-sof.com/wp-content/uploads/2024/03/lrdg-cbm-001496.jpg)
![](https://worldwar2-sof.com/wp-content/uploads/2024/03/lrdg-cbm-001497.jpg)
![](https://worldwar2-sof.com/wp-content/uploads/2024/03/lrdg-cbm-001498.jpg)
![CECIL BEATON IN THE MIDDLE EAST FEBRUARY-JULY 1942 (CBM 1499) Photographic negative Copyright: © IWM. Original Source: http://www.iwm.org.uk/collections/item/object/205489416](https://worldwar2-sof.com/wp-content/uploads/2024/03/lrdg-cbm-001499-1.jpg)
![](https://worldwar2-sof.com/wp-content/uploads/2024/03/lrdg-cbm-001501.jpg)
![CECIL BEATON IN THE MIDDLE EAST FEBRUARY-JULY 1942 (CBM 1502) Photographic negative Copyright: © IWM. Original Source: http://www.iwm.org.uk/collections/item/object/205489418](https://worldwar2-sof.com/wp-content/uploads/2024/03/lrdg-cbm-001502-1.jpg)
![](https://worldwar2-sof.com/wp-content/uploads/2024/03/lrdg-cbm-001503.jpg)
![](https://worldwar2-sof.com/wp-content/uploads/2024/03/lrdg-cbm-001504.jpg)
![CECIL BEATON IN THE MIDDLE EAST FEBRUARY-JULY 1942 (CBM 1505) Photographic negative Copyright: © IWM. Original Source: http://www.iwm.org.uk/collections/item/object/205489421](https://worldwar2-sof.com/wp-content/uploads/2024/03/lrdg-cbm-001505-1.jpg)
![](https://worldwar2-sof.com/wp-content/uploads/2024/03/lrdg-cbm-001507.jpg)
![](https://worldwar2-sof.com/wp-content/uploads/2024/03/lrdg-cbm-001508.jpg)
![](https://worldwar2-sof.com/wp-content/uploads/2024/03/lrdg-cbm-001511.jpg)
![](https://worldwar2-sof.com/wp-content/uploads/2024/03/cecil-beaton-3-1.jpg)
![](https://worldwar2-sof.com/wp-content/uploads/2024/03/lrdg-cbm-001866.jpg)
![](https://worldwar2-sof.com/wp-content/uploads/2024/03/lrdg-cbm-001871.jpg)
![CECIL BEATON IN THE MIDDLE EAST FEBRUARY-JULY 1942 (CBM 2216) Photographic negative Copyright: © IWM. Original Source: http://www.iwm.org.uk/collections/item/object/205490068](https://worldwar2-sof.com/wp-content/uploads/2024/03/lrdg-cbm-002216-1.jpg)
![](https://worldwar2-sof.com/wp-content/uploads/2024/03/lrdg-cbm-001396.jpg)
![](https://worldwar2-sof.com/wp-content/uploads/2024/03/lrdg-cbm-002217.jpg)
![CECIL BEATON IN THE MIDDLE EAST FEBRUARY-JULY 1942 (CBM 2218) Photographic negative Copyright: © IWM. Original Source: http://www.iwm.org.uk/collections/item/object/205490070](https://worldwar2-sof.com/wp-content/uploads/2024/03/lrdg-cbm-002218-1.jpg)
![THE LONG RANGE DESERT GROUP (LRDG) DURING THE SECOND WORLD WAR (CBM 2219) Members of Y Patrol of the Long Range Desert Group reading mail from home at Siwa Oasis in the Western Desert. Copyright: © IWM. Original Source: http://www.iwm.org.uk/collections/item/object/205194963](https://worldwar2-sof.com/wp-content/uploads/2024/03/lrdg-cbm-002219-1.jpg)
![Left, Sergeant Dick Lewis. Pte William Rees, RAOC. Also known as Taffy or Ginger, on the right adjusting the sun compass. Rees was the fitter with Y2 at Siwa when this photo was taken by Cecil Beaton.](https://worldwar2-sof.com/wp-content/uploads/2024/03/lrdg-desert-patrol-9.jpg)